Configure the Network
Retrieve the Certificates from a Microsoft Certificate Authority
Steps for the Trusted CA Certificate
- Launch your browser and go to http://<IP Address>/certsrv
where <IP Address> is the IP address of the computer hosting the CA.
- Click Download a CA certificate, certificate chain or CRL.
- Select Base64 as the encoding method.
- Click Download CA certificate.
- Save the file to a location of your choice.
Steps for the Server Certificate
This certificate is used by the AAA Server to perform the server authentication (TLS handshake).
- Launch your browser and go to http://<IP Address>/certsrv
where <IP Address> is the IP address of the computer hosting the CA.
- Click Request a certificate.
- Select Advanced certificate request.
- Click Create and submit a request to this CA.
- Select Web Server as the certificate template.
- Enter the IP address of the machine hosting the AAA Server in the Name field.
- Select a size for the key.
- Select Mark keys as exportable.
- Submit the request.
Steps for the Certificate Revocation List
This list is used by the AAA Server to when authenticating a user certificate.
- Launch your browser and go to http://<IP Address>/certsrv
where <IP Address> is the IP address of the computer hosting the CA.
- Click Download a CA certificate, certificate chain or CRL.
- Select Base64 as the encoding method.
- Click Download the latest base CRL.
- Save the file to a location of your choice.
Configure the AAA Server for EAP
- From the Windows Start menu, point to Program Files, ActivID, AAA, and then click Server Configurator and enter the AAA Server Administrator credentials.
The AAA Server Configurator opens.
- Click Options, and then select EAP Settings.
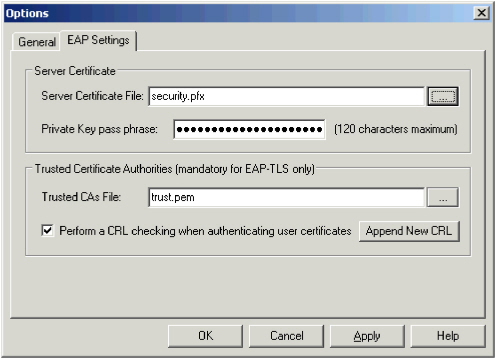
- In the Server Certificate File field, enter the name (including location) of the AAA Server certificate (*.pem, *.pfx or *.p12), or browse to the certificate file.
The following table lists the options for the type of certificate you are using:
If... Then... You are using a .pfx certificate. The Please Enter Certificate Pass Phase dialog box is displayed. Enter the pass phase, and click OK. The passphrase is entered in the Private Key pass phrase field. You are using a .pem or .p12 certificate. Manually enter the certificate’s pass phrase in the Private Key pass phrase field. - In the Trusted CAs file field, enter the name (including location) of the trusted certificate authorities file, or browse to the file.
Configuring the Trusted CAs File is mandatory for EAP TLS (client certificate authentication).
- (Optional) To remove the user’s wireless authentication rights at the certificate level, select Perform a CRL checking, and click Append New CRL to locate the list of revoked certificates.
You can append a Certificate Revocation List (CRL) by updating it manually from the certificate authority.
- In the EAP Settings dialog, click Apply.
- Log on as administrator to the AAA Server Administration Console.
- (Optional.) Create a new RADIUS server for the wireless access solution (see Managing the ActivID AAA Server for further information).
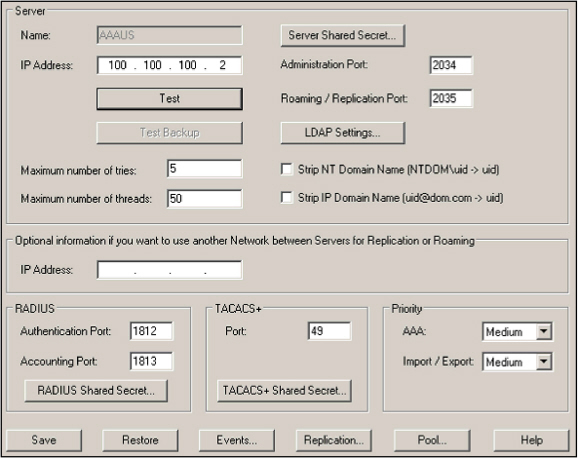
- You must enable the strip domain name options as follows:
- For EAP-TLS, select Strip IP Domain Name....
-
For PEAP-MSCHAP V2, select Strip NT Domain Name....
- Create a new RADIUS gate for the wireless authentication attempts (refer to the Managing the ActivID AAA Server for further information).
- Select EAP Methods for your wireless gate.
The supported methods display.
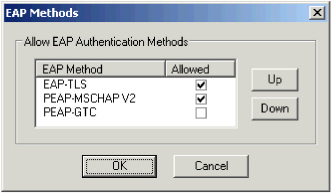
- Select which EAP Authentication Methods to allow and, using Up and Down, define their order on the gate.
The AAA Server starts authentication negotiations using the EAP methods in the order specified.
The selection and order can be modified later, if required.
For EAP-TLS and PEAP-MSCHAP V2, you must enable the strip domain name options in the RADIUS server configuration. Refer to step 9 above.
- Click OK to apply the settings.
- Export the data to the AAA Server.
Configure the Access Point
For illustration purposes, this section uses the Cisco Aironet 1100 as the wireless access point and Microsoft Windows XP on the workstation. Please refer to the documentation provided with your access point for the corresponding steps.
- Open the access point’s configuration window.
- Select Security and then SSID Manager.
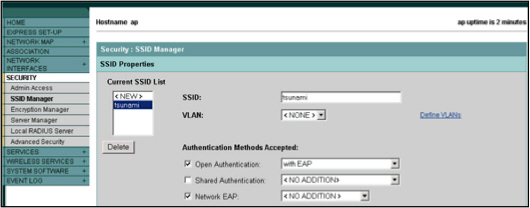
- Select the SSID from the Current SSID List.
- Under Authentication Methods Accepted, select Open Authentication and with EAP from the corresponding drop-down list.
- Select Network EAP (without additional options).
- Under Security, select Server Manager.
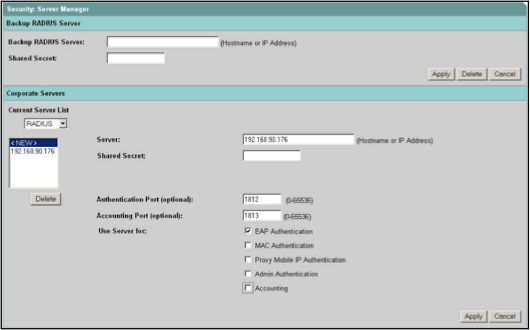
- Select < NEW > to create a new RADIUS server.
- Enter the hostname or IP address of the machine hosting the AAA Authentication Server assigned to handle the wireless authentication attempts in the Server field.
- Enter the Shared Secret for the authentication server.
- Enter the Authentication Port for the authentication server.
- Enter the Accounting Port for the authentication server.
- Select EAP Authentication in the Use Server for: section.
- Click Apply.
The configured authentication server is displayed in the Current Server List.
Steps 10 to 13 are required for encrypting the traffic on the wireless network (between the client and the access point).
It is recommended that these steps are performed to secure the connection. - Under Security, select Encryption Manager.
The Encryption Manager configuration window opens:
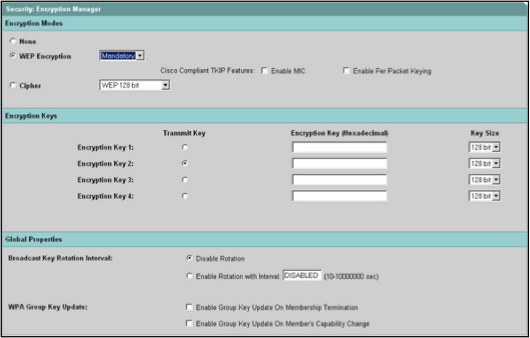
- Select WEP Encryption for the mode.
- Select Mandatory from the WEP drop-down list and click Apply.
- Under Security, select Advanced Security and then the EAP Authentication tab.

- Select Enable Reauthentication with Interval and set the value to a reasonable interval (in seconds).
- Set EAP Client Timeout to 30 seconds which is sufficient for a PKI-based authentication.
- Click Apply and restart the wireless access point.


