Setup Customization Methods
Using a Command Line
This section describes how to use a command line.
| To.... | See..... |
|---|---|
|
Use the basic command line to install a product. |
|
|
Start the ActivClient setup program with a pre-defined list of features to install, to not install, or to hide from the setup-installation option tree. |
|
|
Start ActivClient setup program in blind mode i.e. default features installation without any user interface displayed |
You must be logged on as a local administrator in order to execute these commands.
ActivClient Setup applications are MSI files. For this version, the ActivClient Setup file name is ActivClient-7.4.1.msi.
In all command line examples provided in the following sections, the ActivClient setup file name is referenced as <ActivClient setup>.msi, where <ActivClient setup> is the appropriate name for the ActivClient version in use.
Basic Install Command Line
The basic command line used to install a product (with Microsoft Installer) is:
Msiexec.exe /i "<path>\<ActivClient setup>.msi"
where:
-
<path> is the ActivClient setup path.
-
<ActivClient setup> is the ActivClient setup .msi file name.
This command allows installation of the default ActivClient setup, just as when double-clicking ActivClient setup file.
Remove Features
To remove one or several features from the setup program, use the following command:
msiexec /i "<path>\<ActivClient setup>.msi" Remove=<FeatureName>
where:
-
<path> is the ActivClient setup path.
-
<ActivClient setup> is the ActivClient setup.msi file name.
-
<FeatureName> is the name of the feature to remove. See section Customize the Feature Installation for more information.
For example, to remove the User Console feature, use the following command:
msiexec.exe /i "<path>\<ActivClient setup>.msi" Remove=UserConsole
-
The quotation marks shown in the command line are necessary when there are spaces in the file name.
-
Once ActivClient is installed, you can modify the installed features using the Add or Remove Programs function in the Windows Control Panel.
Features removed during initial installation (that is, the features that are not installed) are displayed in the ActivClient Custom Setup screen as unselected, with a red cross, where you can select them for installation.
Force Features
To force installation of one or several features from the setup program, use the following command:
msiexec.exe /i "<path>\<ActivClient setup>.msi" AddLocal= FeatureName1
where:
-
<path> is the ActivClient setup path.
-
<ActivClient setup> is the ActivClient setup .msi file name.
-
<FeatureName1> is the name of the feature to install. See section Customize the Feature Installation for more information.
When installing ActivClient, you need to list all the features that you want to install. For example:
msiexec.exe /i "<path>\<ActivClient setup>.msi" AddLocal=MiniDriver,OutLook,PKCS,SoftwareAutoUpdate
You can use AddLocal=ALL if you want to install all the ActivClient features.
When modifying an existing installation, you can use AddLocal to add only the features that you want to install.
Using Orca
This section describes how to edit the .msi file in order to hide or display the setup features by changing the appropriate feature values.
This can be done with Orca, a free resource editor program distributed by Microsoft. Orca is part of the Microsoft Windows Installer SDK. The default values can be updated directly in the MSI.
-
Download the Microsoft Windows Install SDK from:
https://developer.microsoft.com/en-us/windows/downloads/windows-10-sdk
-
Install the Microsoft Windows Installer SDK from the web site, and then install Orca by double-clicking the Orca.msi file from the \Program Files\Microsoft SDK\Bin directory.
After the Orca installation completes, a shortcut is available in your Start menu.
-
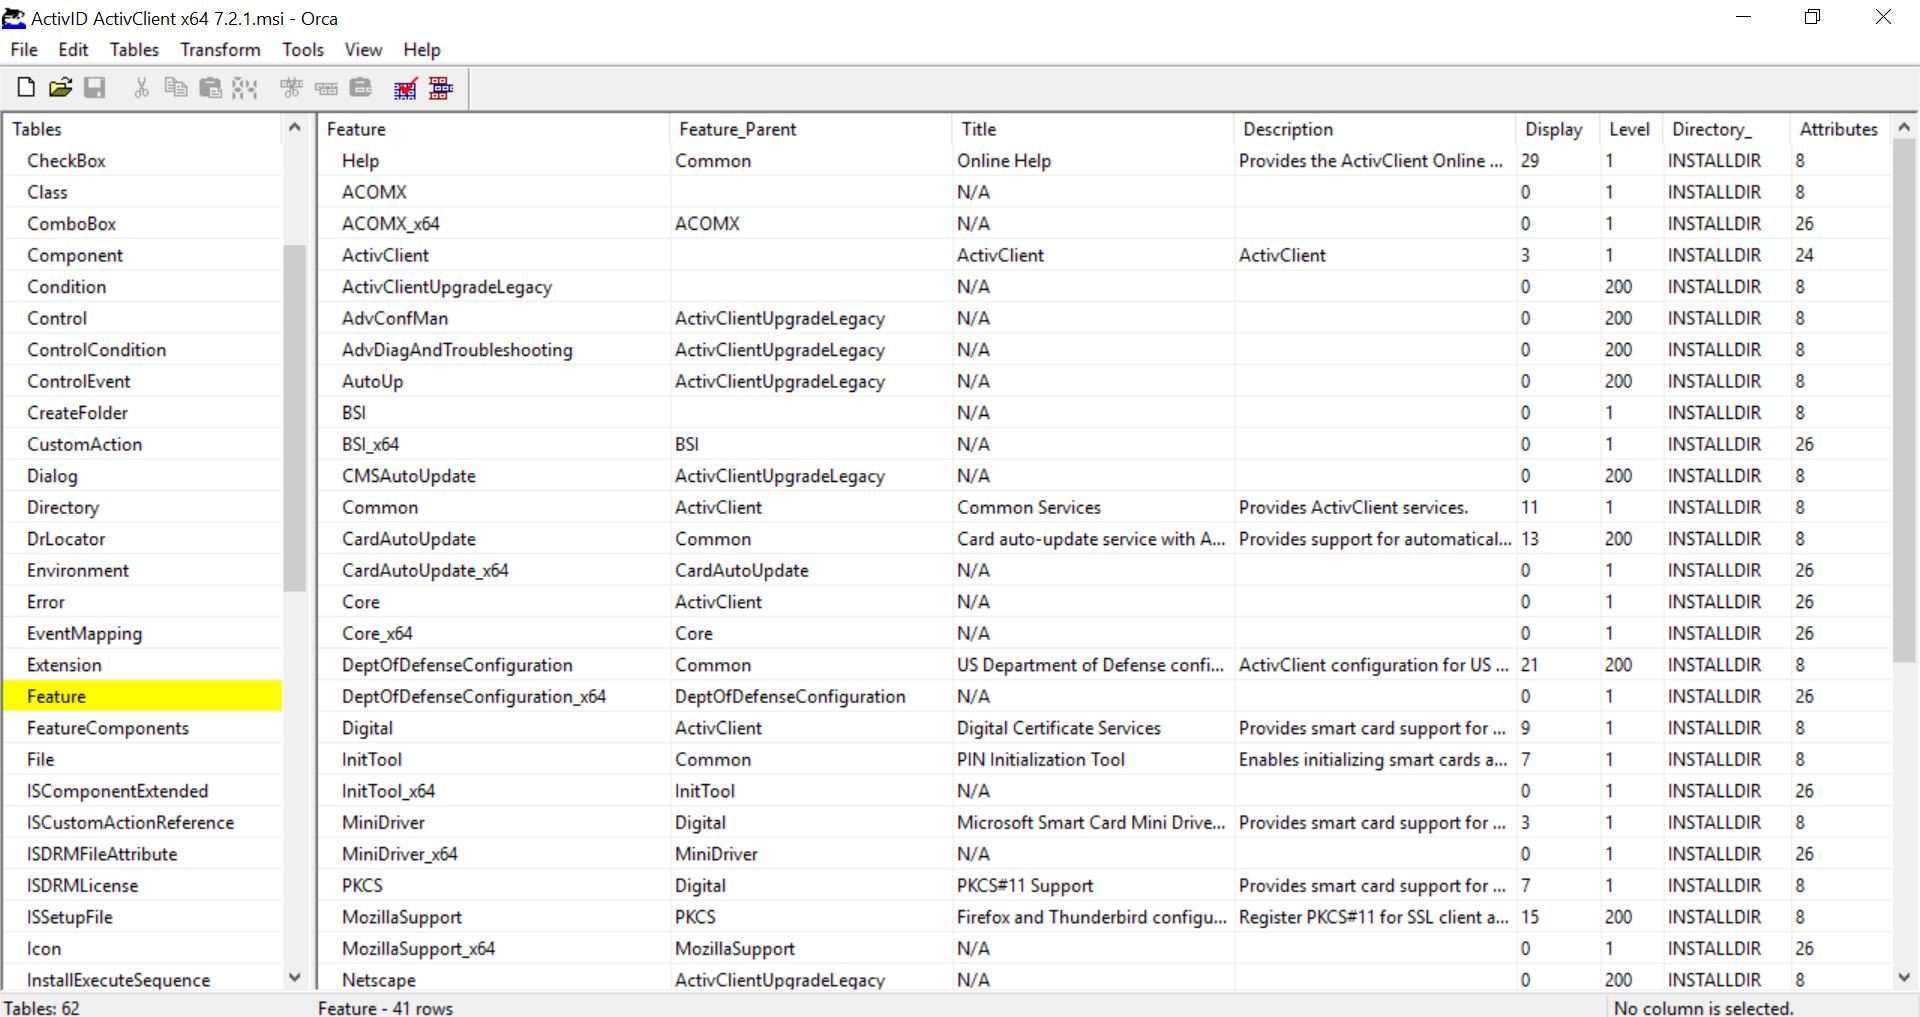
Start the Orca tool and open the ActivID ActivClient x64 7.4.1.msi ActivClient setup file.

-
Select Feature in the Tables column to display all the ActivClient features.
-
Locate and select the feature you want to change.
You can refer to the ActivClient features in section Customize the Feature Installation.
-
Change the feature's Display value to either:
-
0 (to hide it)
-
1 (to force it to display)
-
Repeat the procedure for all other features you want to edit.
-
Save the file.
-
You can then place this setup program on the network for use by all end users.
Using InstallShield Admin Studio (or Wize Package Studio)
Depending of your deployment configuration, the deployment of a customized setup can be done using either:
-
A customized MSI file, see ActivID ActivClient Setup Customization Options.
-
ActivClient MSI file together with an MST file.
You can use either InstallShield Admin Studio or Wize Package Studio to customize the ActivClient msi setup and to generate Transforms files (MST files).
Both programs allow setup customization (MSI and MST management) and packages integrity validation.
Their user interfaces hide typical setup complexity for the following customization operations:
-
Removing or relocating shortcuts
-
Changing policy settings
-
Adding files
For further information, see InstallShield Admin studio and Wize Package Studio documentation.


