Managing User and CA Certificates
Once you have one or more certificates on your smart card, ActivClient allows you to view, import, export and delete them.
ActivClient User Console allows you to access two types of certificates:
 User Certificates contain one (or more) certificate and a pair of keys (public/private keys) allowing you to authenticate. In order to use your certificates, you must first install or trust a CA Certificate on your machine.
 CA Certificates (Certificate Authority (CA) Certificates) might contain certificates identifying the authority that issued your certificates.
View Your Certificate
You can view details of your certificates on your smart card using the ActivClient User Console.
-
Open the ActivClient User Console and either:
-
From the tasks pane under My Certificate Tasks, click View My Certificates.
-
From the right pane, double-click the My Certificates icon
 .
.An icon for each of your certificates is displayed.
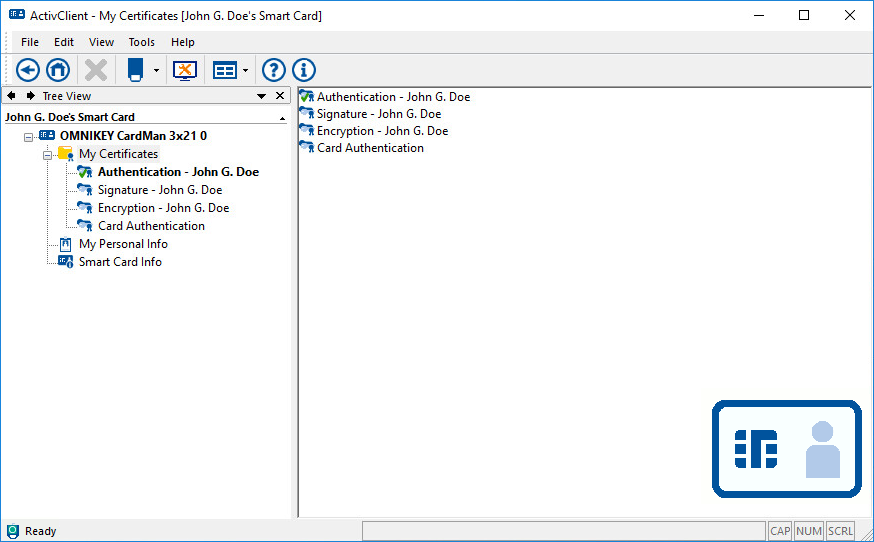
Depending on the card and certificate issuance model, the certificate friendly name can help you identify the certificate purpose.
-
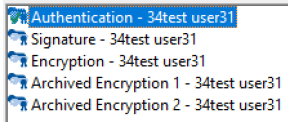
For PIV cards, ActivClient automatically displays the following friendly names:
-
Authentication - <username>
-
Signature - <username>
-
Encryption - <username>
-
Archived Encryption #N - <username>
-
Card Authentication
-
-
For CAC cards, ActivClient automatically displays the following friendly names:
-
ID - <username>
-
Signature - <username>
-
Encryption - <username>
-
-
For cards issued by ActivID CMS, you can customize the friendly names during the issuance process.
-
In other cases, ActivClient will identify certificates by the user's name and a sequence number.
-
Double-click the certificate that you want to view.
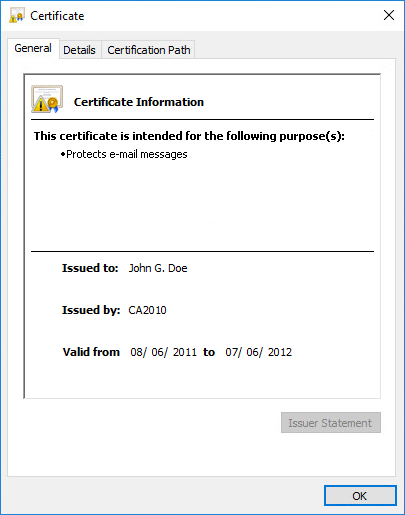
The Certificate dialog is displayed.
-
The General tab displays general information about the certificate such as issuer, issuee and validity dates.
-
The Details tab displays information about all certificate attributes.
-
The Certification Path displays the certificate validation path.
Import a User Certificate
If you are already using your personal PKI key pair and certificates, you can import them to your smart card as .pfx or .p12 file formats. This guarantees that your private credentials are portable and more secure inside your smart card.
-
ActivClient User Console is installed.
-
A certificate is available as a PKCS#12 file on your workstation. To obtain this file, export your certificate by using, for example, the Microsoft Internet Explorer Export function.
To import certificates on Crescendo C2300 Smart Card or Crescendo Key, you must follow the below sequence to avoid incorrect labels in the ActivClient User Console.
-
Authentication certificate
-
Signature certificate
-
Encryption certificate
-
Previous encryption certificates (Archived)
-
Open the ActivClient User Console.
-
From the File menu, select Import and then click Certificate.
-
Select or browse to the certificate that you want to import, and click Open.
If the certificate is password-protected, the Password Request dialog box is displayed prompting you to enter your password.
-
In the Password field, enter the certificate password, and click OK.
-
When the confirmation message is displayed, click OK.
-
To make the certificate available on the computer, remove the card from the reader, and then re-insert it.
Import a CA Certificate
You can store the Certificate Authority's root certificate on your smart card. This guarantees that the certificate chain is portable with your smart card, and that you can use your own certificates from any ActivClient workstation.
-
ActivClient User Console is installed.
-
A certificate is available as a .cer or .crt file on your workstation. To obtain this file, export your CA certificate by using for example the Microsoft Internet Explorer Export function.
-
Smart card must have enough space for a CA certificate.
-
Open the ActivClient User Console
-
From the File menu, select Import and then click Certificate.
-
Select or browse to the certificate that you want to import, and click Open.
Make sure that X.509 Certificate (*.cer;*.crt) is selected as the file type.
If the certificate is password protected, the Password Request dialog box is displayed prompting you to enter your password.
-
In the Password field, enter the certificate password, and click OK.
-
When a confirmation message is displayed, click OK.
-
To make the certificate available on the computer, remove the card from the reader, and then re-insert it.
Export a Certificate
You can send your user certificate or CA certificate to someone by exporting it from your smart card into a file.
-
ActivClient User Console is installed on your workstation.
-
A certificate is available on your smart card.
Note: For security reasons, you cannot export the private key located in your smart card. You can only export certificates from your smart card.
-
Open the ActivClient User Console and either:
-
Select View My Certificates or View CA Certificates in the Tasks pane related section.
-
Double-click the My Certificates or CA Certificates icon in the right pane.
An icon representing each of your certificates or CA certificates is displayed.
-
-
Select the certificate you want to export and either:
-
Select Export this certificate in the left pane.
-
Right-click on the certificate and select Export this certificate from the menu.

-
-
Select the location and the file name for the exported certificate, and click Save.
A confirmation message is displayed.
-
Click OK.
Note:Alternatively, you can export a certificate using native Microsoft Windows functionality:
-
In the ActivClient User Console, double-click on the certificate you want to export.
-
Go to the Details tab, and select Copy to File, and then follow the wizard instructions.
-
Delete a Certificate
If a certificate is obsolete (expired or revoked), you can delete it from your smart card before you download a new certificate. Deleting a certificate applies both to user certificates (in My Certificates folder) and to CA certificates (in CA Certificates folder).
-
ActivClient User Console is installed on your workstation.
-
A certificate is available on your smart card
-
Open the ActivClient User Console and either:
-
Select View My Certificates or View CA Certificates from the Tasks pane related section.
-
Double-click the My Certificates or CA Certificates icon from the right pane.
An icon representing each of your certificate or CA certificates is displayed.
-
Select the certificate(s) you want to delete and either:
-
Select Delete this certificate from My Certificate Tasks section in the left pane.
-
Right-click on the certificate and select Delete this certificate from the menu.
-
Select one or several certificates in the right pane and then select the Delete icon
 from the Standard toolbar.
A confirmation message is displayed asking you to confirm you want to delete your certificate.
-
Click Yes to confirm.
Set a Default Certificate
With Microsoft Windows 8.1 latest update, Windows 10, Windows 11, Windows Server 2012 R2, Windows Server 2016, Windows Server 2019, and Windows Server 2022, the logon process allows you to select a logon certificate when you log on (among certificates compatible with Windows logon).
It is also possible to configure Microsoft Windows 8.1 latest update, Windows 10, and Windows 11 to force using the default certificate (this is controlled by a Microsoft Windows policy).
If your environment requires a "default" certificate, you can use the ActivClient User Console to set a default certificate.
In all other configurations, you do not need to do anything.
-
Open the ActivClient User Console and, to display your certificates, either:
-
Select View My Certificates from the Tasks pane related section.
-
Double-click the My Certificates icon from the right pane.
An icon for each of your certificate is displayed.
-
-
Select the certificate you want to use for Windows PKI logon.
-
Select Set this as default certificate from either the:
-
Certificate right-click menu.
-
My Certificate Tasks section in the Tasks pane.
-
The certificate icon is updated with a green check mark  .
.
Deselect a Logon Certificate
When you no longer need to identify your logon certificate as the default, follow these steps:
-
Open the ActivClient User Console and, to display your certificates, either:
-
Select View My Certificates from the Tasks pane related section.
-
Double-click the My Certificates icon from the right pane.
An icon for each of your certificate is displayed.
-
-
Right-click the certificate set as default (highlighted by a green check mark
). -
Select Set this as default certificate to clear the default check mark.
The certificate icon is updated and the green check mark disappears
.
Make Certificates available to Windows Store
Before you can use the certificates on your smart card, you must make them available to Windows-based applications (for example, Microsoft Edge, Outlook, and Windows logon).
By default, ActivClient automatically registers all certificates on your smart card to make them available to your desktop applications when you insert your smart card. No further action is needed.
Follow the below steps to make certificates available to Windows when automatic registration is disabled:
This operation is needed only once, the first time when you use a new smart card on a new workstation.
In the ActivClient User Console, from the Tools menu, go to Advanced and select Make Certificates Available to Windows.
A message is displayed, informing you that the certificate you selected has been made available for use with most desktop applications.


