Sample Deployments for SAML-Based Single Sign-On Services
This section describes sample deployments for SAML-based Single-Sign-On services.
SAML v2.0 enables online SPs to connect with a separate online IdP such as the ActivID Appliance, for identity, authorization, and access control services.
IdPs control user names or IDs, passwords, and other credentials required to identify, authenticate, and authorize people to access Web applications that the SP hosts.
- Metadata files must be exchanged between the two parties. These files contain ActivID IdP SSO Services URLs, SP AssertionConsumerService URLs, and entity names.
- ActivID IdP signing certificate containing the public key must be provided to the SP in order to verify the signed assertions.
SAML Request configuration – to be signed or not signed.
Assertion configuration – to be encrypted or not encrypted.
Sample Deployment: ActivID IdP Federation with OpenSSO
OpenSSO also known as OpenAM is an open source access management solution from Sun™ Microsystems and now supported by the Open Identity Platform Community.
In this deployment with OpenSSO, the Enterprise Secure Access dataset is used.
A running instance of the ActivID Appliance.
A running instance of OpenSSO Server that is configured as a SP Server and installed with SSL-enabled.
A client machine having:
- A browser with the OpenSSO Web Server certificate root.cer imported in Trusted Root Certification Authorities.
- The ability to resolve both the ActivID Appliance and OpenSSO server names (through the use of DNS).
Prepare OpenSSO SP Server for Federation
-
Log on to the OpenSSO SP server, go to the Federation tab, and then select your SP.
-
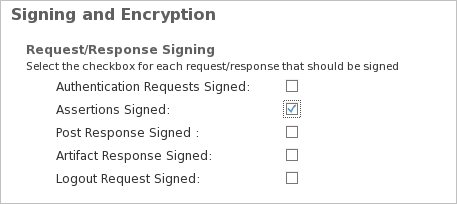
Select the Assertion Signed option in the Assertion content tab to ensure compatibility between the OpenSSO SP and ActivID IdP settings (ActivID IdP systematically signs assertions).
-
Go to the Access Control tab, create an SP user, and set the user password.
-
Make sure the time is synchronized between OpenSSO server and ActivID Appliance.
-
Save the OPENSSO SP metadata file from URL in HTML format: http://<OpensSSOServername:8080>/opensso/saml2/jsp/exportmetadata.jsp
Prepare ActivID IdP Server for Federation
Create the OpenSSO SP Channel
-
Log on to the Management Console as an administrator.
-
Select the Configuration tab.
-
In the Channels menu, select Add to create a SAML SP channel.
-
Import the OpenSSO SP metadata from file saved in previous section.
-
Log on to the Management Console as a configuration manager.
-
In the Polices menu, select Authentication, and then Authentication Polices.
-
Assign the Employee Static Password (AT_EMPPWD) authentication policy to the OpenSSO SP channel.
For more information see Configure SAML Channels/Service Providers.
Add Authentication Policies Mappings
-
Select the Configuration tab, and under the Identity Providers menu, select ActivID Identity Provider.
-
Click Add to add the following mapping:
- SAML Authentication Class – urn:oasis:names:tc:SAML:2.0:ac:classes:PasswordProtectedTransport
- Authentication Policy – Employee Static Password
- GUI Template – Username password.
-
Click Save.

Export IdP Metadata
-
Select the Configuration tab, and under the Identity Providers menu, select ActivID Identity Provider.
-
Clear the Require signed authentication requests option.
-
Click Save.
-
Click Export Metadata, and save it to a file.
Configure Federation (Circle of Trust)
Import ActivID IdP Signing Certificate into OpenSSO
From the ActivID Identity Provider page, you can retrieve the IdP signing certificate using the Download link.
-
Click Download next to the Signing Certificate Subject DN.
-
When prompted, select Save and then click OK to save the ACTIVID_IDP_SIGN.cer file to your chosen location.
-
Import the ACTIVID_IDP_SIGN.cer file to the OpenSSO keystore.
For example, you can import it using a java command:
Javapath>keytool –import –alias 4T-sign –keystore /root/opensso/opensso/keystore.jks –file <path>/ ACTIVID_IDP_SIGN.cer-
Restart the OpenSSO Server.
Add ActivID IdP to Circle of Trust
-
Navigate to the OpenSSO Server.
-
Select Common Tasks, and then Register Remote Identity Provider.
-
When prompted, select the File option, and then upload the ActivID IdP metadata file.
Alternatively, you can upload through a URL:
https://<ActivID Hostname>:8445/idp/export.xhtml?domain=<domainname>
Note: Make sure that the ActivID Appliance host name is resolved and the SSL certificate trusted on the OPENSSO SP Server.If you did not import the ActivID Signing Certificate successfully (as described in Import ActivID IdP Signing Certificate into OpenSSO), you will see a warning in your OpenSSO server while trying to upload the ActivID IdP metadata:
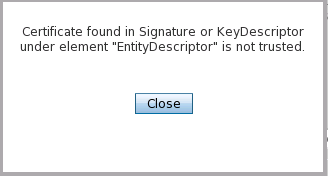
The OpenSSO SP is not able to manage the Assertions signed by ActivID IdP unless the ActivID IdP Signing certificate is present in the OpenSSO java keystore. Repeat the procedure in Import ActivID IdP Signing Certificate into OpenSSO in this case.
-
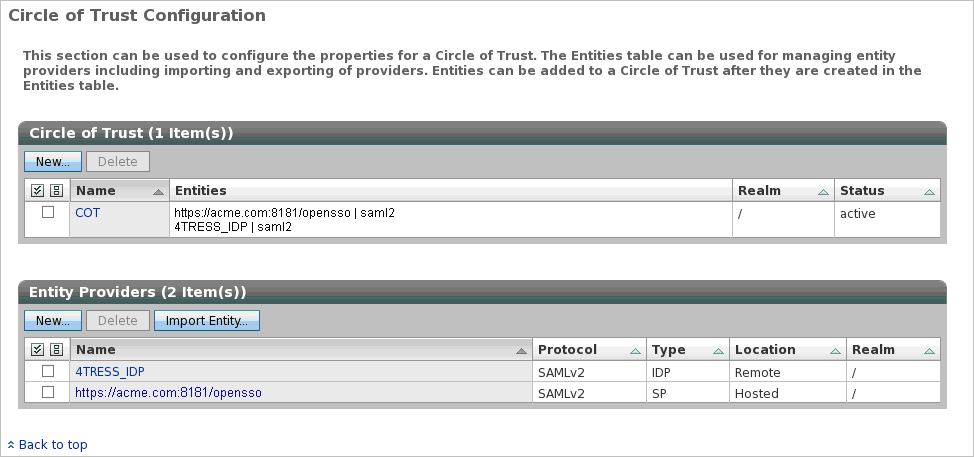
Select the Federation tab.
-
Create a new Circle of Trust with Entity Providers:
- ActivID IdP (Remote IdP, as illustrated in the screenshot)
- OpenSSO SP (Hosted SP)
Test the Web SSO
-
To test the Web SSO, enter an Authentication request in your browser.
As an example, you can send the following request:
Copyhttps://<opensso SP server name:>8181/opensso/saml2/jsp/spSSOInit.jsp?metaAlias=/sp&idpEntityID=4TRESSActivID_IDP&binding=HTTP-POST&AuthnContextClassRef=urn:oasis:names:tc:SAML:2.0:ac:classes:PasswordProtectedTransportThe ActivID Authentication Portal Login page appears.
-
Log on with your username and password.
- If the federation with the Service Provider user has already been made, the access to the Service Provider protected resource is granted.
- If it is the first authentication attempt, then the Service Provider Login page appears:
- Log on with your Service Provider username and password.
Single-sign-on succeeds, and a federated identity alias is created for the ActivID user in association with this OPENSSO Service Provider.
Useful Information
What is the ActivID_IDP name in the request?
It is the name of the IdP Entity AS IT IS NAMED IN THE OPENSSO COT. From this name, OPENSSO will look up this Entity’s Metadata and search the “md:SingleSignOnService Binding” which will give the URL value.
What happens if I haven’t specified an AuthContextClassRef in the OPENSSO request without starting with “urn”?
OPENSSO will automatically add the prefix “urn:oasis:names:tc:SAML:2.0:ac:classes” in the request. Your ActivID IdP mapping (class to GUI) must always start with “urn”.
If the “request is not signed” message appears, what should I do?
This error can occur when the Service Provider does not send signed requests and ActivID IdP has been configured to refuse unsigned requests. If you agree to receive unsigned requests, you can then deselect the Require signed authentication requests option in the ActivID IdP configuration page, wait a few minutes, and then re-export the ActivID IdP metadata. You can then re-import it in the Service Provider Federation configuration to use the new settings.
If the "the requested ACS URL cannot be found in SP metadata" message appears, what should I do?
Check whether the response binding (binding=HTTP-POST) is correctly set in the request sent by the Service Provider.
If the HTTP status 400 error processing authnrequest.Null input message appears when trying to make a signed request, what does it mean?
There can be an issue with the signing key (for example, not having the same alias as the certificate).
If the HTTP status 400 error “the requested resource is not available” message appears when trying to make a signed request, what does it mean?
The Service Provider Server might not be started.
If the HTTP status 400 error “the Service Provider ID is null” message appears when trying to make a signed request, what does it mean?
The OpenSSO server might be configured as an IdP instead of as a Service Provider.
If the "Authentication denied: Duplicated record" or “Access denied” message appears, what does it mean?
This means that the SAML authentication request is signed with an untrusted certificate. The message appears when the ActivID IdP authentication is performed and the authentication fails.
Sample Deployment: ActivID IdP Interoperability with Google Apps
With Google being the SP, the Google Apps SSO service enables other companies to have full control over access to the hosted user accounts, those that require secured access to Web-based applications, such as Gmail and Start Pages.
- A running instance of the ActivID Appliance.
- The server is installed with the basic install.
- A Google Apps account (Premiere Edition) and an associated administrator account.
- Use your <GoogleApps_Domain> URL for all URL’s and configuration files.
The NameID returned in SAML assertion must match the user name on the SP account.
For illustration purposes ONLY, “acme.com” is used as the <GoogleApps_Domain> name. You must replace it with your own <GoogleApps_Domain> name.
Configure Google Apps for Single Sign-On
-
Launch your web browser.
-
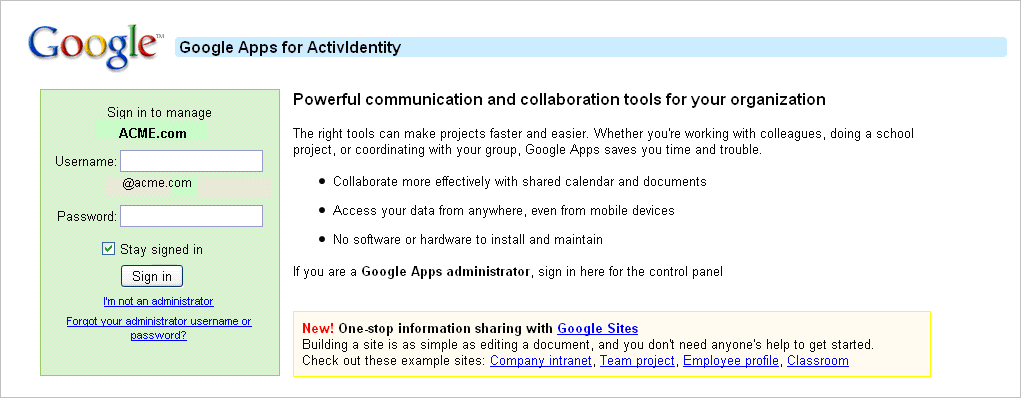
Navigate to the Google Apps administrator page. In the example, the domain's administrative URL is http://google.com/a/acme.com. (Replace acme.com with your GoogleApps_Domain name.)
-
Log on as an administrator with the Username and Password entered.
-
Click Sign in.
-
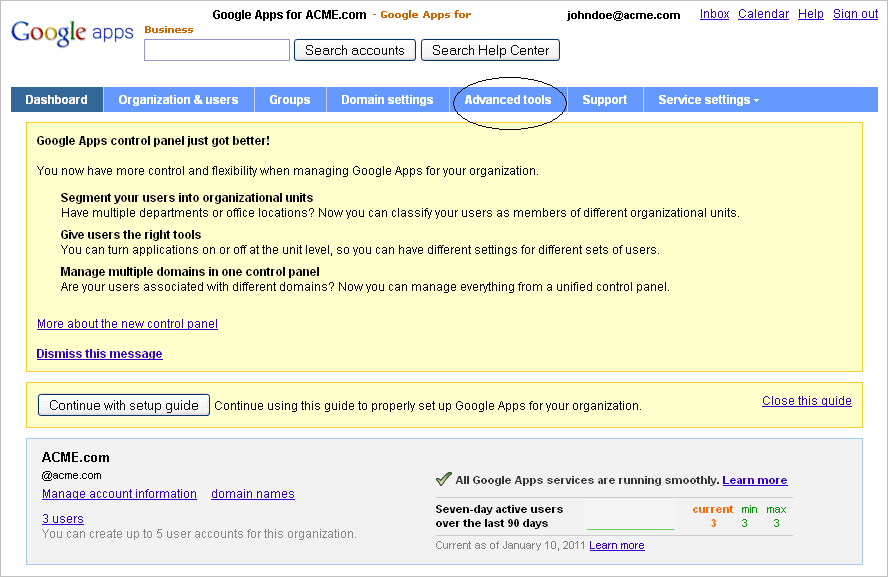
Select the Advanced tools tab.
-
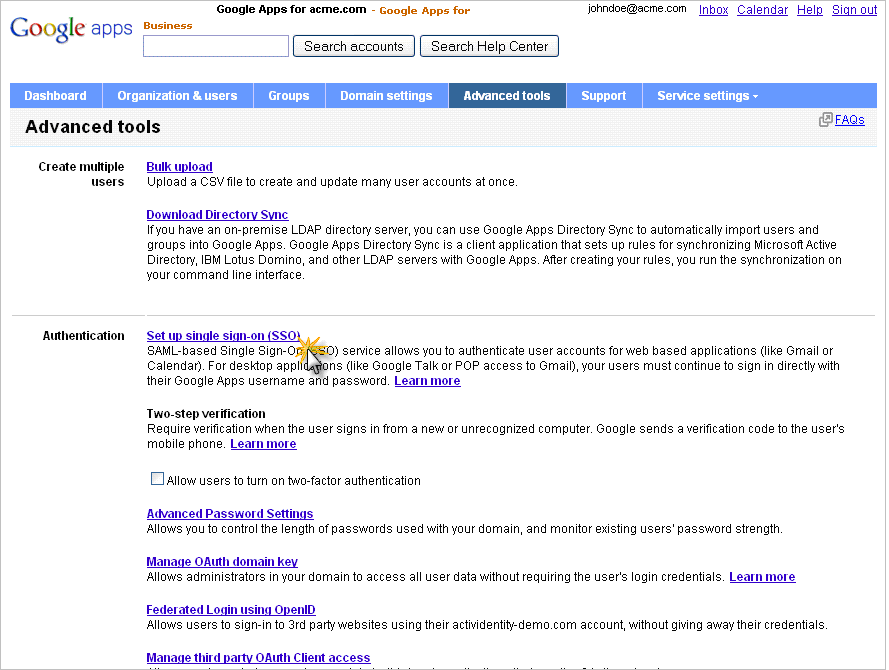
Click Set up single sign-on (SSO).
-
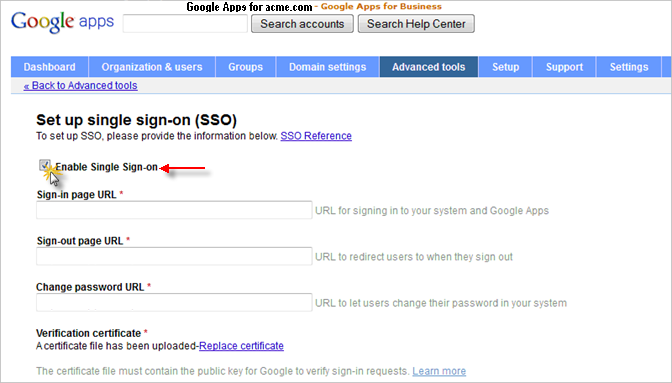
Select the option Enable Single Sign-on.
-
Enter the Sign-in page URL:
https://< ActivID hostname>:8445/idp/DOMAIN1/binding/login-redirect
-
Enter the Sign-out page URL:
https://<ActivID hostname>:8445/idp/DOMAIN1/binding/logout-redirect
-
Enter the Change password page URL:
https:// < ActivID hostname>:8445/idp/DOMAIN1/binding/login-redirect
-
Click Replace certificate.
-
When prompted, upload the IdP signing certificate of the security domain (DOMAIN1).
The IdP signing certificate for security domain DOMAIN1 is named: ACTIVID_CERT_SIGNATURE_DOMAIN1.cer
-
Save the changes.
Configure Google Apps SAML Channel in ActivID IdP
Create the Metadata File
Manually create the GoogleApps metadata file (the WantAssertionsSigned="true"):
<EntityDescriptor entityID="google.com" xmlns="urn:oasis:names:tc:SAML:2.0:metadata"><SPSSODescriptor protocolSupportEnumeration="urn:oasis:names:tc:SAML:2.0:protocol" AuthnRequestsSigned="false" WantAssertionsSigned="true"> <NameIDFormat>urn:oasis:names:tc:SAML:1.1:nameid-format:unspecified</NameIDFormat> <AssertionConsumerService index="1" Binding="urn:oasis:names:tc:SAML:2.0:bindings:HTTP-POST" Location="https://www.google.com/a/acme.com/acs" /> </SPSSODescriptor> </EntityDescriptor>Create the Google Apps SAML Channel
-
Log on to the ActivID Management Console.
-
Select the Configuration tab and, under Policies, select Channels.
-
Click Add in the Channels page.
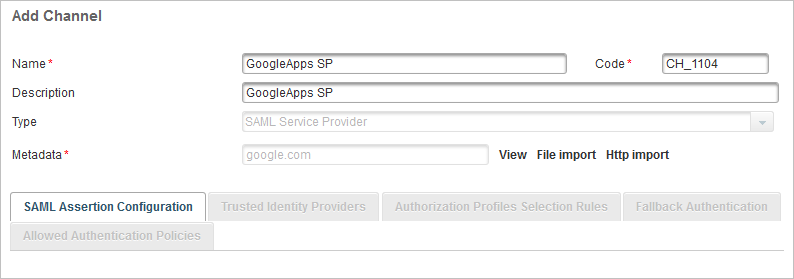
-
Enter a descriptive Name for the channel and, if required, enter the Description.
-
From the Type drop-down list, select SAML Service Provider as the channel type and click Next.
-
Click File Import to import the previously created metadata.
-
Assign the Customer Static Password (AT_CUSTPW) and Customer PKI authentication (AT_CUSTPKI) authentication policies to the GoogleApps SP channel.
Configure IdP Identity Provider Settings
-
Log on to the ActivID Management Console.
-
Select the Configuration tab and, under Policies, select Identity Providers and then ActivID Identity Provider.
-
Clear the Require signed authentication requests option.
-
Add new authentication policies mapping.
- SAML authentication Class : urn:oasis:names:tc:SAML:2.0:ac:classes:PasswordProtectedTransport
- Authentication Policy: Customer Static Password
- GUI Template: Username password
- SAML authentication Class : urn:oasis:names:tc:SAML:2.0:ac:classes:Password
- Authentication Policy : Customer PKI authentication
- GUI Template: Public key infrastructure
-
Save the settings for ActivID Identity Provider.
GoogleApps does not send signed SAML authentication requests.
Depending on the Dataset you are using, you can map either Customer Authentication policies or Employee Authentication policies as in the following examples.

Test Google Apps SSO with PKI Login
The ActivID Appliance is up and running.
You have a smart card loaded with a certificate (card issued via a Card Management System, for example), which will be used to log on.
The root certificates for the PKI that will be used for PKI Login are trusted by your browser.
In deployments with TLS mutual authentication, the dedicated port is 8443 so you must make sure that the:
- Reverse proxy forwards the <public hostname:8443> requests to <actividas hostname:8443>.
- Reverse proxy 8443 port is configured for mutual authentications (request a certificate, trust the client certificates).
- End-user certificate is propagated to the ActivID IdP via a configurable HTTP header.
If the CRL verification is enabled in the browser, then the CRL distribution point must be accessible.
-
Create an ActivID customer user, and register both a Customer static password and a Customer PKI authenticator for this user.
The ActivID user name must match with the user name for one of the GoogleApps accounts.
The PKI authenticator is created by importing the PKI certificate (public key) from the smart card (holding the private key).
The PKI certificate root CA is imported in to the server truststore.
-
Log on to Google Apps. You are redirected to the ActivID Authentication Portal.
-
Log on to the Google Apps portal via the URL http://mail.google.com/<GoogleApps_Domain>.
As the Google SP cannot find an active SAML context for the user trying to authenticate, it redirects the request to the ActivID IdP login page.
-
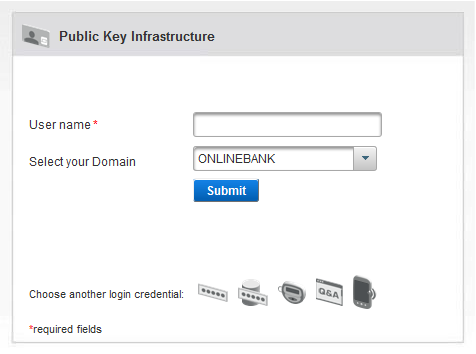
Click the
 icon next to Choose another login credential. The PKI Login page is displayed.
-
Enter the User name.
-
Click Submit.
-
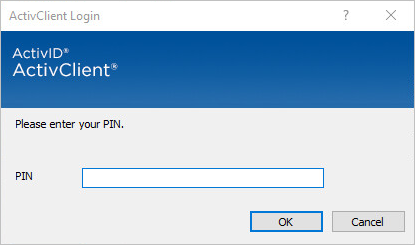
Choose the required certificate, and then click OK.
-
When prompted, enter the PIN for the smart card.
-
Click OK.
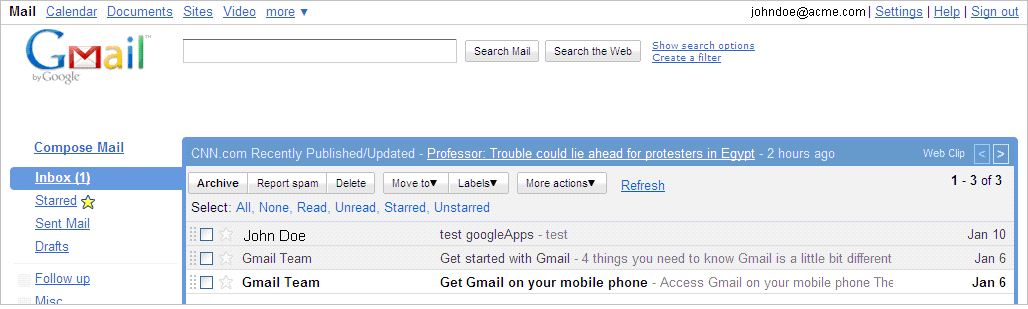
The authentication is successful, and the user Google Apps mail portal is displayed.
Useful Information
-
If you have not configured Google Apps or SSO correctly, then you cannot log on to Google Apps again using the standard user logon interface.
To disable SSO for Google Apps, log on through the Administrative interface at https://google.com/<GoogleApps_Domain>
This interface is not SSO-enabled.
If SSO is not configured correctly, then the user cannot even log on to GoogleApps to fix the configuration. This is a workaround that disables the “single sign on option” (through another interface that will let you access some configuration screens) and then allows you to access the normal interface again.
-
To make sure attributes are supplied in the response, the metadata requirements are as follows:
- If an
AttributeConsumingServiceIndexis supplied in the AuthnRequest, theAttributeConsumingServicewith that index is returned. If no such service exists in metadata, then no attributes are returned. - If an index is not supplied, then the default
AttributeConsumingServiceis returned (the service with an explicitisDefaultset to true). If no such service exists, then no attributes are returned.
- If an
For example, to return attribute values in the SAML response when using Google Apps, it is recommended specifying isDefault="true" in the AttributeConsumingService section of the metadata:
- <AttributeConsumingService index="1" * isDefault="true" >*
  <ServiceName xml:lang="en">G service</ServiceName>
  <RequestedAttribute NameFormat="urn:oasis:names:tc:SAML:2.0:attrname-format:uri" Name="DCID" />
  </AttributeConsumingService>
Sample Deployment: ActivID IdP with Salesforce®
This section explains how to configure ActivID IdP with the Salesforce Service Provider.
If Salesforce single sign-on is configured with an external IdP, then Salesforce acts as the Service Provider.
Salesforce supports federated authentication using SAML. When federated authentication is enabled, salesforce.com does not validate a user's password. Instead, salesforce.com verifies an assertion in the HTTP POST request, and then allows single sign-on if the assertion is true.
For more information, go to https://na9.salesforce.com/help/doc/en/salesforce_single_sign_on.pdf
Configure Salesforce and Export the Metadata
-
Log on to Salesforce, and navigate to <User name> > Setup > Security Controls.
-
Select Single Sign-On Settings.
-
Set the Federated ID information as follows, and then save the settings:
- Activate SAML.
- Set the SAML version to 2.0.
- Set the IdP Entity ID to ActivID IdP: https://<IdP public fully qualified name>/activid.
- Set the authentication certificate to the ActivID IdP Signing certificate.
- Set the SalesForce attribute that is used for federation (the Federated ID attribute or the user’s user ID).
- Set how the User ID is sent (as attribute statement in SAML assertion or as NameID is the assertion’s subject statement).
-
In the configuration summary page, click Export Metadata.
For example:
 <?xml version="1.0" encoding="UTF-8" ?>
 <md:EntityDescriptor xmlns:md="urn:oasis:names:tc:SAML:2.0:metadata" entityID="https://saml.salesforce.com" validUntil="2021-06-13T10:50:58.023Z">
<md:SPSSODescriptor WantAssertionsSigned="true" protocolSupportEnumeration="urn:oasis:names:tc:SAML:2.0:protocol">
  <md:KeyDescriptor use="signing">
<ds:KeyInfo xmlns:ds="http://www.w3.org/2000/09/xmldsig#">
<ds:X509Data>
  <ds:X509Certificate>MIIEijCCA/OgAwIBAgIQPn+ClEjH2V3Jynt7u3v+XzANBgkqhkiG9w0BAQUFADCBujEfMB0 GA1UEChMWVmVyaVNpZ24gVHJ1c3QgTmV0d29yazEXMBUGA1UECxMOVmVyaVNpZ24sIEluYy 4xMzAxBgNVBAsTKlZlcmlTaWduIEludGVybmF0aW9uYWwgU2VydmVyIENBIC0gQ2xhc3MgM zFJMEcGA1UECxNAd3d3LnZlcmlzaWduLmNvbS9DUFMgSW5jb3JwLmJ5IFJlZi4gTElBQklM
(…)RLa7kolgYMu9BSOJsprEsHiyEFGDAmFiRodHRwOi8vbG9nby52ZXJpc2lnbi5jb20vdnNsb 2dvMS5naWYwDQYJKoZIhvcNAQEFBQADgYEAHP9jTz8c1r9YoOhVxbGwdPx/YU4OaEaiJFqR KrdXu4m6tHp2iW7o/7Kc8IxksDB4siloTOcJ25/NsfPRoWDyvwax0aXDzsBRwJ5Qpr+ii3b UI1+QByEdxH4gZVHHu9fMG/+ePr9SHhil20oycE7oe0xvQEad1Hs6xHCRDbJVIr4=</ds:X509Certificate>
  </ds:X509Data>
  </ds:KeyInfo>
  </md:KeyDescriptor>
  <md:NameIDFormat>urn:oasis:names:tc:SAML:1.1:nameid-format:unspecified</md:NameIDFormat>
  <md:AssertionConsumerService Binding="urn:oasis:names:tc:SAML:2.0:bindings:HTTP-POST" Location="https://login.salesforce.com" index="0" isDefault="true" />
  </md:SPSSODescriptor>
</md:EntityDescriptor>-
Change the
NameIDFormatto:
<md:NameIDFormat>urn:oasis:names:tc:SAML:1.1:nameid-format:emailAddress </md:NameIDFormat> The UserID in the SalesForce application is an email format. Therefore, ActivID IdP needs to transmit an assertion with a NameID in email format that matches the Salesforce user name.
Configure ActivID IdP
-
Add a new Authentication Policy mapping called:
-
Create a new SAML channel that is used for Salesforce authentication.
-
Click File Import to import the Salesforce metadata that you exported previously.
-
Assign the channel to the Authentication Policies that are used for Salesforce authentication.
-
Create a user (for example, user1 with an email address that matches the user name in Salesforce).
urn:oasis:names:tc:SAML:2.0:ac:classes:PasswordCustomize Your Web Page
In order to send the SAML IdP-initiated request, you can customize your web page to include the following URL:
<li><a href="https://sso.mycompany.com/idp/DOMAIN1/binding/login-idp-init?SPEntityID=salesforce">My SalesForce Apps</a></li>When you will click the My Salesforce App link on the page, you will be redirected to the SAML IdP and (once authenticated) to the requested Service Provider.
https://sso.mycompany.com/idp/DOMAIN1/binding/login-idp-init?SPEntityID=<Service
Provider Entity ID (URL encoded)>&AuthClassRef=<Requested SAML class (URL encoded)>& NameIdFormat=<Requested NameID format (URL encoded)>


