Manage Report Data Configurations
Add a Report Data Configuration
-
Log on to the ActivID Console and, under Monitoring in the left menu, select Report Data.

-
Click Add.

-
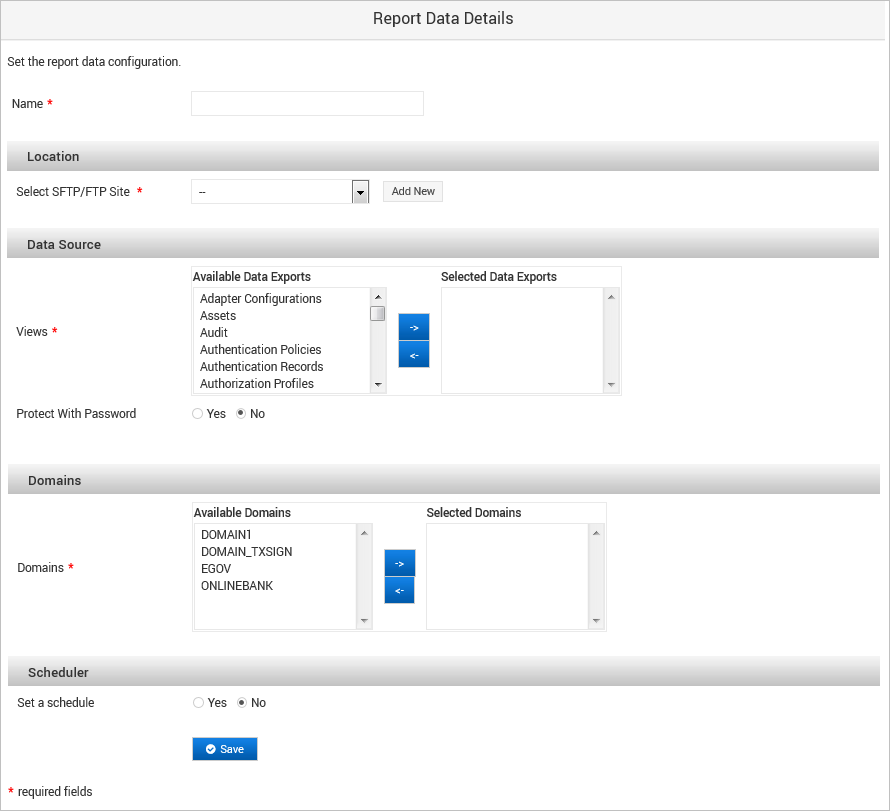
Enter a Name for the configuration.
-
Select the SFTP/FTP Site where the report data package must be copied (or click Add New to configure a new site).
-
In the Data Source section, select the database views to use for generating the data to export.

- Move one or more views from the Available Data Exports list to the Selected Data Exports list using the arrows.
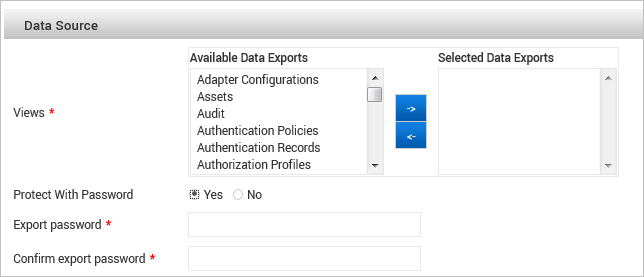
- If you want to protect the exported data with a password, select Yes and then enter (and confirm) the password.Important:
The password:
Must contain between 1 and 20 characters
Can contain special characters except [ ] { } | < > " ' ( )
Must not contain empty characters such as spaces and tabulations
Make a note of this password as it will be required to decrypt the data package
-
In the Domains section, select the domains for which you want to export data by moving one or more domains from the Available Domains list to the Selected Domains list using the arrows.
-
In the Scheduler section, if you want to set a schedule for exporting report data, select Yes and then define the frequency:
 Simple schedule
Define the frequency as:
- Hourly
- Daily (at midnight)
- Weekly (on Sunday)
- Monthly (on the 1st)
- Yearly (on 1st Jan)
- When system boots
 On specific Times and dates…
Define the frequency in:
- Months
- Weekdays
- Days
- Hours
- Minutes
For each criteria (except for Minutes), you can select All or use the Selected option to define the required value. For example, to schedule the backup for every Sunday at 11PM, define the schedule as:
- Months = All
- Weekdays = Sunday
- Days = All
- Hours = 23
- Minutes = 0
Note:- If you leave the Hours criteria set to All, then the archive will be performed every hour of the selected day.
- If you combine multiple criteria such as Weekdays and Days (for example, All Fridays and every 15th of each month), the scheduled operation will be triggered for both.
-
Click Save to apply the configuration.

The new configuration is displayed in the list.
Edit a Report Data Configuration
-
Log on to the ActivID Console and, under Monitoring in the left menu, select Report Data.

-
Click Edit in the Operation column for the report data configuration that you want to edit.
-
Modify the settings as described in Add a Report Data Configuration.
Important: When editing an existing configuration, the following rules are applied for passwords:- For security reasons, passwords previously entered (when the configuration was created or previously updated), are NEVER displayed in the screen. Instead, the field is left empty. To update a password, enter the new value.
- When validating the configuration updates (by clicking Save):
- Passwords, for which the related field was left empty, remain unchanged on the server-side.
- Passwords, for which the related field was filled with a new value, are updated on server-side.
-
Click Save to accept the changes.
Copy a Report Data Configuration
-
Log on to the ActivID Console and, under Monitoring in the left menu, select Report Data.

-
Select the check box(es) of the configuration(s) that you want to duplicate and click Copy.
-
Click Edit in the Operation column for the duplicate report data configuration to edit the settings (for example, to rename it) as described in Add a Report Data Configuration.

Delete a Report Data Configuration
-
Log on to the ActivID Console and, under Monitoring in the left menu, select Report Data.
-
Select the check box(es) of the configuration(s) that you want to duplicate and click Delete.
-
Click Ok to confirm the removal.


