Manage the ActivID Appliance Customization Files
The customization package contains all the customization files (that is, the branding and configuration files) for the ActivID Appliance applications currently installed on the server.
The ActivID application folders (Authentication Portal, Management Console, Self-Service Portal and Mobile Application) in the customization package have the same hierarchy for branding as that on the file system.
The branding files are stored in the <ACTIVID_HOME>/ActivID_AS/applications/branding directory on the file system (referred to as <BRANDING_HOME> from this point).
The package is organized in the following multi-level structure:
-
metadata.properties file − This metadata file provides information on the customization package such as the version (ActivID Appliance can only apply a customization package if the version of the package matches the version of the customization scripts currently installed on the server).
The current version of the customization package is 2.0.
-
AuthenticationServer folder − contains the ActivID Authentication Server configuration files (no branding).
-
AuthenticationPortal folder − contains the ActivID Authentication Portal customization files.
-
ManagementConsole folder − contains the ActivID Management Console customization files.
-
SelfServicePortal folder − contains the ActivID Self-Service Portal customization files.
-
MobileApplication folder − contains the HID Approve mobile application branding file (no configuration) as a .json file.
The application folders (except AuthenticationServer) contain a branding sub-folder with the following category folders:
In all customization packages:
default folder – default branding files that should NEVER be updated manually.
In packages generated on deployments with existing customization:
_common_ folder – customization files common to all domains.
<DOMAIN> folder – domain-specific files (where <DOMAIN> is the domain name).
Each category folder contains the application-specific customization files in dedicated sub-folders where:
-
Authentication Portal – ap
-
Management Console – mc
-
Self-Service Portal – ssp
-
Mobile Application – mobile-app
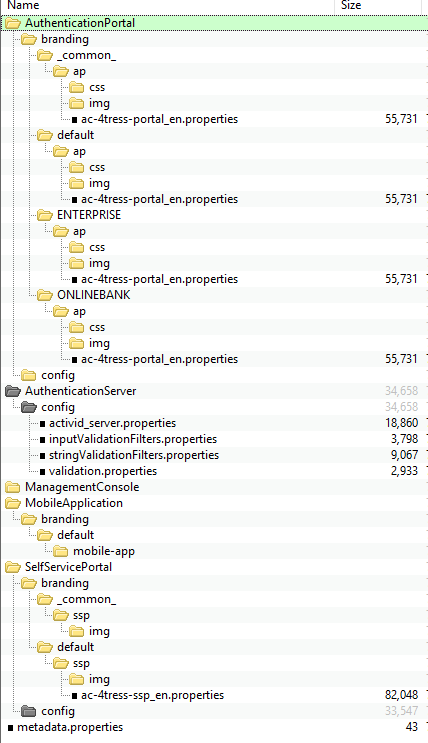
For example, in an ActivID Appliance deployment:
-
With two domains (ENTERPRISE and ONLINEBANK).
-
Localized with English and French labels.
The contents of the ActivID Self-Service Portal branding folder (SelfServicePortal) would be:
Example of ActivID Self-Service Portal Branding Files for Customization
| Folder | Application | Contents | Comment |
|---|---|---|---|
|
_common_ |
ssp |
|
Common to all domains. |
|
default |
ssp |
|
Default images and labels. |
|
ENTERPRISE |
ssp |
|
Domain-specific. |
|
ONLINEBANK |
ssp |
|
Domain-specific. |
Download the Customization Package
- If you previously uploaded a customization package, the one that you will download will contain your customization, not the factory default values.
- If the appliance has never been customized, the downloaded package contains the factory reset values. Any subsequent download will only contain your customized files.
-
Log on to the ActivID Console and, under Configuration in the left menu, select Customization.

-
Under Customization, click Download Package.
-
Save the package to the required location.
-
Unzip the package making sure that you keep the original structure.
Upload the Customization Package
Once the new files are ready, add them to the customization package in the correct location, so that the following are present at the root:
-
<ApplicationFolder>/branding/_common_/<application> for a customization common to all domains.
-
<ApplicationFolder>/branding/<DOMAIN_NAME>/<application> for a domain-specific customization (for the ActivID Authentication Portal and Self-Service Portal only).
-
metadata.properties file.
The domain folder name must correspond to the existing domain name and is case-sensitive.
The file names and file extensions must be kept as-is in the original package.
It is not mandatory to keep the files that are not customized in the package. During upload, the ActivID Console filters and does not save the unchanged files. Only the files that are new or modified are saved in the system.
Do not include the files for portals that are not installed, or that do not support customization, in the package. ActivID Appliance enforces that the package is well-formed and will block the upload if the package is malformed.
-
When the new package is ready, log on to the ActivID Console and stop the appliance applications by clicking Enter Maintenance Mode in the Dashboard.
-
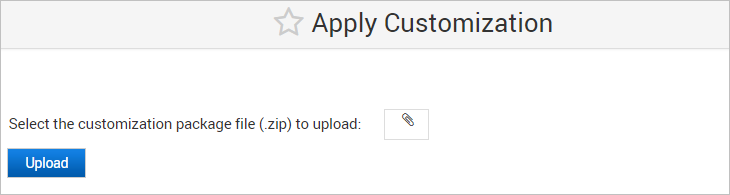
Under Configuration in the left menu, select Customization, and then click Upload Package.
-
Browse to select the package, and then click Upload.
-
When the upload is complete, restart the appliance applications by clicking Exit Maintenance Mode in the Dashboard.
It might take a few minutes for the new customization to appear.
Replication of Customized Files
In a Dual Mode configuration, customized files or new language files that are added are not replicated to the other node.
Manage Customization During Software Updates
When the appliance software is updated through hot fixes or service packs, your previous labels and icons customizations are preserved.
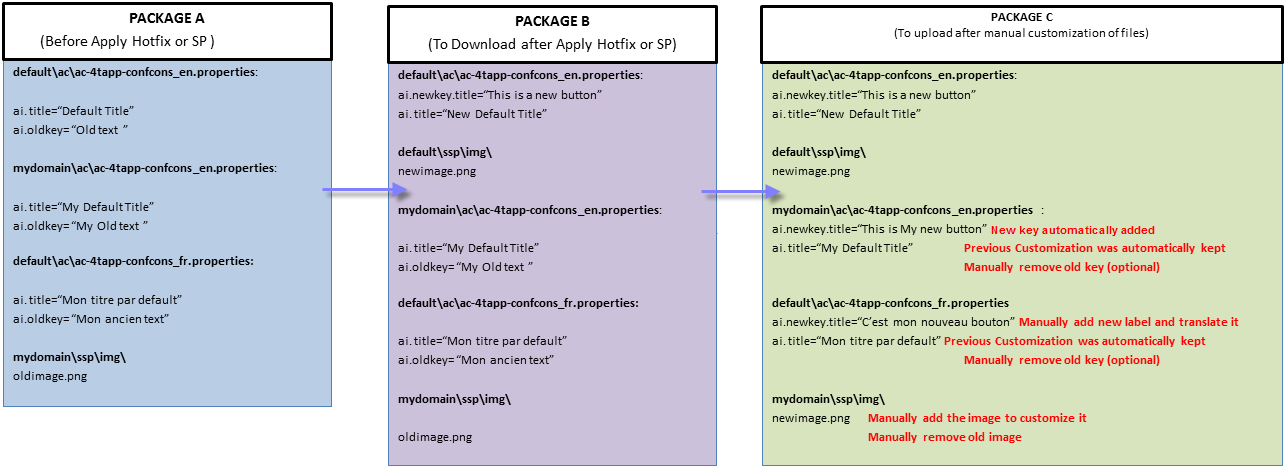
The following list describes the behavior of a software update (hot fix or service pack) on customization files if the update adds, deletes or modifies keys.
If new keys (and the associated label) are added, (that is ai.newkey.title=”This is a new button”):
-
They will be automatically displayed in the English language (the default language).
-
They will be automatically displayed in the customized English language (if available) with their default values.
- They will not be automatically displayed in your non-English languages (if any). You can add them manually by downloading your current customization package, then copying and translating the new keys in your language file.
If the default text of an existing key label is modified, (that is, ai.title=”Default Title” by ai.title=”New Default Title”):
-
Your customizations will be kept if some existed prior to the Hot Fix or Service Pack installation. To fix your customizations you have to apply the manual procedure described below.
- The new text will automatically be displayed in the GUI if no customization existed.
If keys (and associated labels) are deleted, (that is, remove ai.oldkey= “Old text”):
-
They will no longer be displayed.
- They will not be automatically removed from your customized files or language files. Optionally, see the following manual procedure if you wish to delete the old labels.
The following diagram illustrates the workflow to manually update your customized files and language files (to add new labels, remove the deleted labels):
-
As a precaution, save the previous version of the customized files.
-
Download the customization package before upgrading the appliance.
-
Save the customization package as a reference. For illustration purposes, this is Package A.
-
Update the appliance software.
-
Download the new customization package. It will be used to build the new package including the updated customization file for upload. For illustration purposes, this is Package B.
-
Update the customized English files in Package A.
For each New change (automatically added during the software update), apply a customization (if needed) to the customized file.
For each Update change, update the keys with the new text and add any required customization to the customized file, if applicable.
- Optionally, for each Delete change, remove the key from the customized file.
-
Check any remaining differences.
-
Update the customized translated files. Repeat step 6 for all the language files (if you have added any language files).
-
Update the image files. If the new customization package has new images in the <img> folders, replace the images with the desired customized image files.
-
Build the customized package. Replace and/or add all the resulting customized files in Package B. For illustration purposes, this is Package C.
-
Upload the new Package C to the appliance.
For each portal file, get the corresponding changes list delivered with the Service Pack or the Hot Fix (xxx_custoUpdates.txt) that documents all the differences (keys that have been added, removed or modified) between your current ActivID Appliance version and the software update level you are installing.
If you already have installed hot fixes, you will have to manually compare the previous and new xxx_custoUpdates.txt files (or your customized package and the new default customization package) to determine the differences.
Compare the customized file updated at step 6 and the corresponding English file from Package B, and make sure that all keys are customized as needed.


