Managing the Network Configuration
ActivID Appliance Ports and Protocols
The following table lists the ports and protocols that you can choose to open on the network firewall(s) in front of the ActivID Appliance.
| Port | Type | Direction | Application | Description |
|---|---|---|---|---|
| 40 | TCP | Inbound | sshd service | Emergency SSH access for administrators |
| 161 | UDP | Inbound | SNMP Monitoring | SNMP-based notification messaging (opened only if SNMP has been enabled) |
| 443 | TCP | Inbound | HTTPS, SOAP over HTTPS | ActivID Management Console, Authentication Portal, Self Service Portal, Web Services (SAMLv2, OAUTH2.0, OpenID Connect, SCIM, legacy SOAP APIs) |
| 1004 | TCP | Inbound | OpenWire (AMQ) | ActiveMQ Broker (JMS messaging) |
| 1005 | TCP | Inbound | HTTPS | ActivID Console |
| 1812 | UDP | Inbound | RADIUS authentication | For VPN, Routers, Network and Remote Access Device |
| 8443 | TCP | Inbound | HTTPS (mutual authn.) | ActivID Management Console, Authentication Portal, Self Service Portal, Web Services |
- Make sure that the bandwidth and latency on the route between the two appliances are sufficient for replication.
- If you have a VLAN between the two nodes, you have to be particularly careful with the resources dedicated to this VLAN.
- ActivID Appliance uses IPSec to encrypt the communications over the channel.
- If the appliances are not on the same subnet, then you have to open the IP Protocol ID 50 (required for Encapsulating Security Protocol (ESP) traffic to be forwarded) and the following ports for IPSec communication:
Port Type Application Description 500 UDP IKE IPSec Channel 4500 UDP NAT-Transversal NAT
Set the System Date and Time
The ActivID Appliance uses the timestamp provided by the NTP server to set the system data and time to UTC time.
If the automatic synchronization is enabled, the ActivID Appliance automatically synchronizes with the first NTP server in the pre-configured list. If that server is unavailable, it tries the other servers according to the order in the list until it finds an available NTP server. If no server is available, then the time/date settings are not synchronized.
You can add additional NTP servers or, for hardware appliances only, you can manually set the Date and Time.
The times displayed in the ActivID Console are defined in Coordinated Universal Time (UTC).
When different appliance applications are accessed, the time displayed is based on the time zone of the client device.
Configure the Date/Time on a Hardware Appliance
-
Log on to the ActivID Console and, under System in the menu, select Date / Time.
-
To define a new server, select the synchronization method:
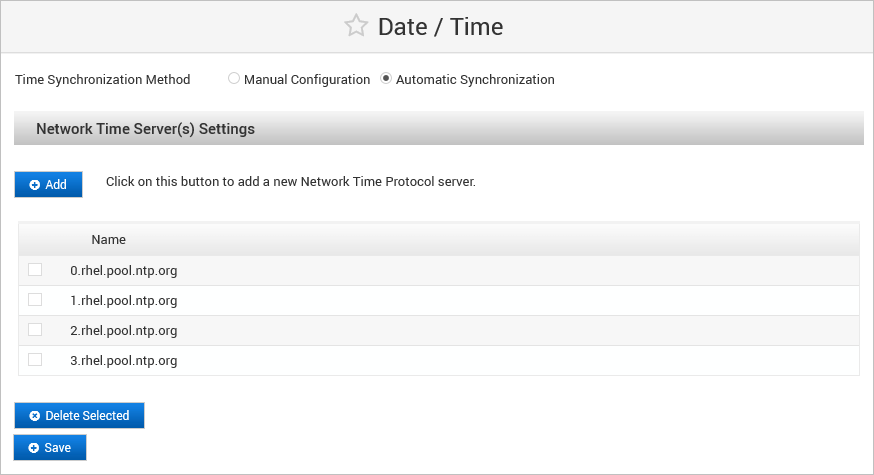
 Automatic Synchronization
-
Select Automatic Synchronization (if not already selected) and click Add.
-
Enter the URL for the NTP Server, and then click Save.
-
Repeat the process for each NTP server that you want to configure.
-
To verify the connection to the NTP server, select the one you want to test, and then click Test.

To remove the server from the list, select the server you want to delete, and then click Delete.
When the last NTP server is deleted, automatic synchronization is disabled.
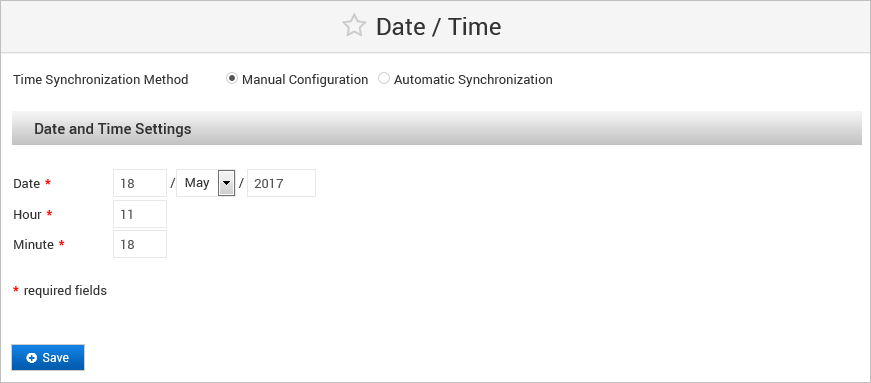
Manual Configuration
-
To manually set the date and time, select Manual Configuration.
- Enter the required Date and Time Settings.
-
-
Click Save to apply the configuration.
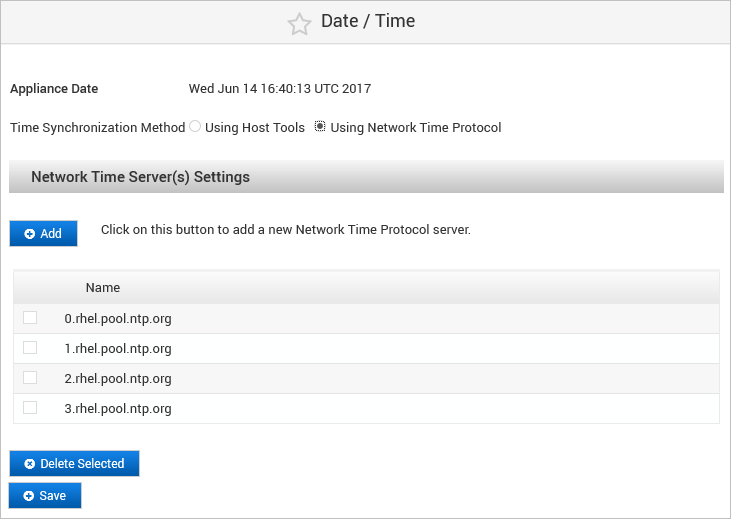
Configure the NTP Server on a Virtual Appliance
By default, the ActivID Appliance uses the host system tools for time synchronization. However, it is recommended that you use NTP.
-
Log on to the ActivID Console and, under System in the menu, select Date / Time.
-
Select Using Network Time Protocol.
-
Click Add to define a new server.
-
Enter the URL for the NTP Server and then click Save.
- Repeat the process for each NTP server that you want to configure.
-
Click Save to apply the NTP server configuration.

When the last NTP server is deleted, automatic synchronization is disabled.
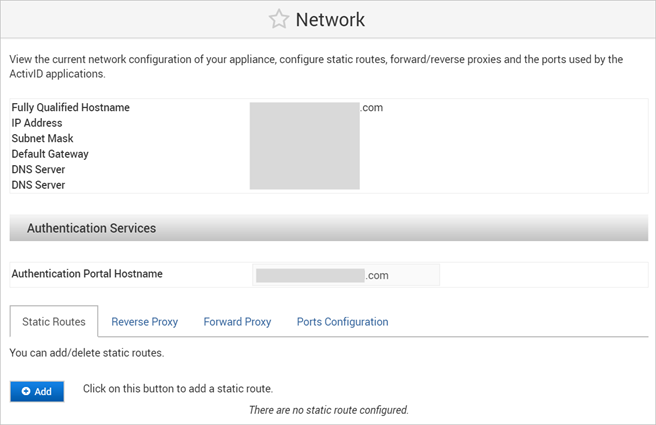
View the Current Network Configuration
Depending on your deployment mode (Single or Dual), the Network Configuration screen enables you to view the current network configuration (that is, the hostnames, IP addresses, subnet masks, default gateways, and DNS servers).
You can also configure the port access to the ActivID Authentication Server and ActivID portals, and enable proxy (reverse and forward) support.
Log on to the ActivID Console and, under System in the menu, select Network.
The details of the current Network Configuration are displayed.
Modify the Network Configuration
- From the UNIX terminal, run the configure_network.sh script.
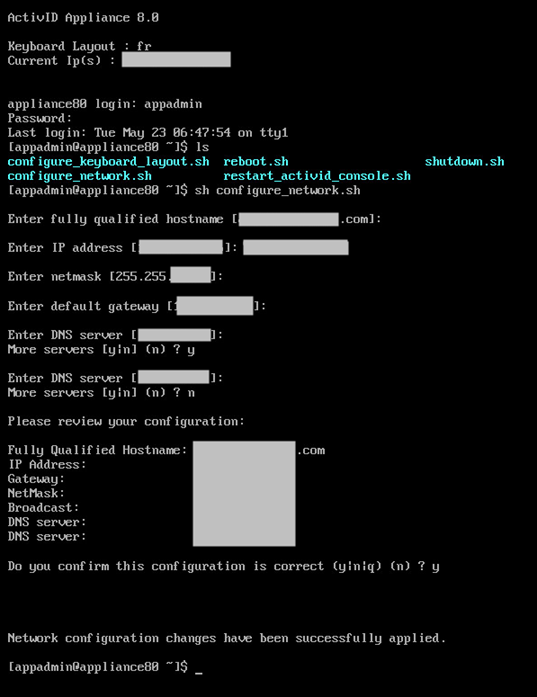
2. Modify the network settings as required:
- Fully Qualified Hostname of the machine hosting the ActivID Appliance
Important:
Make sure that this name does not contain the _ character as it is not supported by DNS
The maximum length of the hostname is 46 characters
- IP Address of the machine
- Netmask of the machine
- Default Gateway
- IP address of the DNS Server
- If you want to enter other DNS servers, enter y when prompted to configure more servers. Otherwise, enter n.
- Review the configuration.
- When prompted, enter y to confirm the configuration is correct, and then press Enter.
Configure Static Routes
A configured static route is bound to the public interface (bond0).
You can display the route table (the default routes from the network configuration when assigning an IP, netmask and default gateway to a network interface) or the manually configured static routes.
- For dual node deployments, the static route configuration should be performed on each node (this configuration is node-specific).
- When adding a new route, you cannot insert a route at a specific line of the route table.
- Only IPv4 addresses are supported, in the standard decimal format. When adding a new route, the validity of the address and netmask is checked.
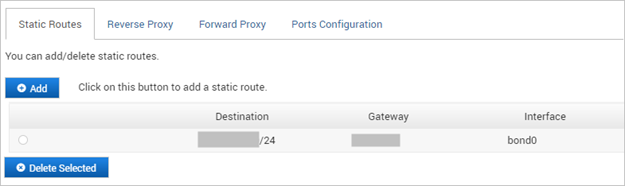
Add a Static Route Configuration
You can configure a new static route by entering a destination network or host, the netmask or Classless Inter-Domain Routing (CIDR) prefix and the gateway to be used.
- Log on to the ActivID Console and, under System in the menu, select Network.
- In the Authentication Services section, select the Static Routes tab and click Add.
- Enter the Destination network or host IP address to which you want to configure a static route.

You can enter the address using the CIDR prefix to specify the netmask (for example, 11.16.102.85/32 for a route to a remote host 11.16.102.85) or only an IP address.
- If you did not enter the netmask CIDR prefix with the address, enter the Dot-decimal or CIDR Destination prefix of the remote network.
If you want to add a route to a specific host, use a prefix of 32 (or netmask of 255.255.255.255).
- Enter the Gateway IP address and click Save.
Delete a Static Route Configuration
- Log on to the ActivID Console and, under System in the menu, select Network.
- In the Authentication Services section, select the Static Routes tab.
- Select the route that you want to delete and click Delete Selected.
The entry is immediately removed from the routing table.
Configure Reverse Proxy Support
By default, the ActivID Authentication Portal is configured to be accessed directly for authentication requests.
If you want to use an SSL-enabled proxy server in front of the ActivID Authentication Portal, then configure the Identity Portal (proxy) hostname and port, and client certificate header.
- If you have configured the ActivID Authentication Portal to support indirect PKI authentication, the public key of the client certificate must be forwarded to the ActivID Authentication Portal in a HTTP request header.
- The ActivID applications’ Cross-Site Request Forgery attack mitigation system and SAML SSO feature should generate and validate URLs based on the reverse proxy hostname and port, instead of the actual application server address. For this, you can either configure one of the following:
- The application server to present a fixed hostname and port matching the reverse proxy address to the ActivID Appliance applications.
- The reverse proxy to preserve the HTTP Host Header set by the HTTP client (for example, for an Apache Proxy, you can use the ProxyPreserveHost On setting) and make sure that the application server is honoring the HTTP Host Header’s hostname and port.
- The reverse proxy to rewrite HTTP host header to its own address and make sure that the application server is honoring the HTTP host header’s hostname and port.
Important: When preserving the Host header, also make sure that you reject any invalid Host header to prevent Host Header Injection attacks. - In high availability deployments, if the appliances are behind a load balancer, the reverse proxy must be configured for sticky session (for example, based on the IP address) so that all calls made by mobile devices during provisioning are directed to the same back-end appliance.
- You should not use web applications (such as the ActivID Management Console, Self-Service Portal or IdP) with the appliance hostname when a reverse proxy is configured.
For example, when using an Apache server as proxy and load balancer, the Apache server can be configured to forward the PEM client certificate base-64-encoded to the ActivID Authentication Portal in the HTTP header (the SSL_CLIENT_CERT environment variable defined in mod_ssl Apache module).
In this scenario, set the Client certificate header to SSL_CLIENT_CERT.
- Log on to the ActivID Console and, under System in the menu, select Network.
- In the Authentication Services section, select the Reverse Proxy tab.
- Select Yes for Configure Reverse Proxy.
- Set the Proxy Hostname and Proxy Port of the ActivID Identity Portal except if the RADIUS Front End is installed on the appliance. This could be the address of a reverse proxy or that of another appliance.
- Enter the Client Certificate Header attribute.
- If a reverse proxy is used to access the ActivID Appliance, make sure that you configure the proxy server TLS certificate (NOT the ActivID Appliance SSL certificate value).
- In deployments with TLS mutual authentication, the dedicated port is 8443 so you must make sure that the:
- Reverse proxy forwards the <public hostname:8443> requests to <appliance hostname:8443>.
- Reverse proxy 8443 port is configured for mutual authentications (request a certificate, trust the client certificates).
- End-user certificate is propagated to the ActivID IdP via a configurable HTTP header.
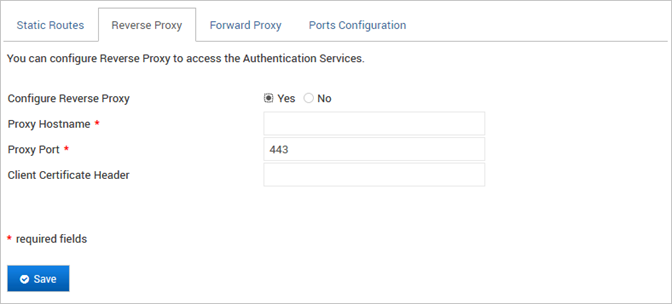
6. Click Save.
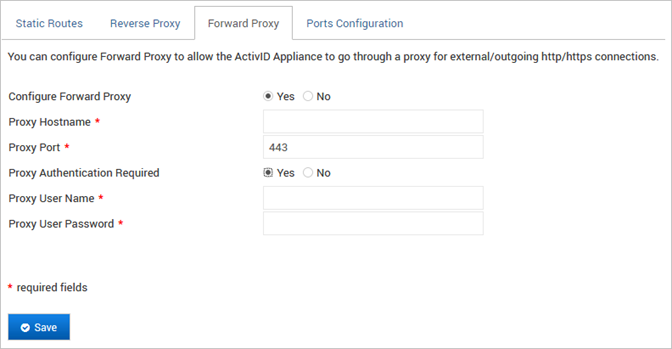
Configure Forward Proxy Support
In deployments with an outgoing/forward proxy (such outgoing HTTPS connections for push-based authentication), you need to configure the proxy in the ActivID Appliance.
- Log on to the ActivID Console and, under System in the menu, select Network.
- In the Authentication Services section, select the Forward Proxy tab.
- Select Yes for Configure Forward Proxy.
- Set the Proxy Hostname and Proxy Port of the ActivID Identity Portal except if the RADIUS Front End is installed on the appliance.
- If Proxy Authentication is required, select Yes and enter the:
- Proxy User Name
- Proxy User Password
- Click Save.
This could be the address of a forward proxy or that of another appliance.
Configure the ActivID Application Ports
You can configure the URLs for the ActivID applications and services by defining the access ports.
The applications/services can be exposed on multiple ports.
- Log on to the ActivID Console and, under System in the menu, select Network.
- In the Authentication Services section, select the Ports Configuration tab.
- TLS1 – TLS port 443
- TLS2 – TLS port 1005
- TLS3 – TLS port 1008
- mTLS1 – TLS with mutual authentication port 8443
- mTLS2 – TLS with mutual authentication port 1009
- TLS1
- mTLS1
- TLS1
- mTLS1
- Edit the configuration as required for your deployment.
- Click Save.
- Restart the applications.
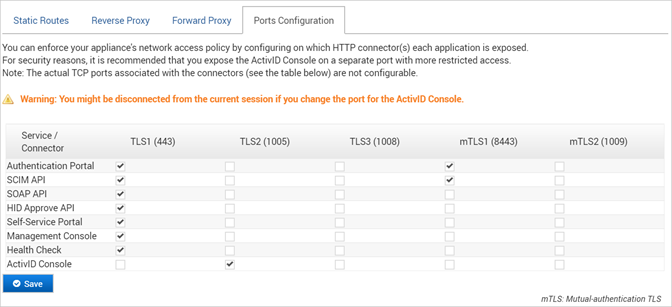
The connectors correspond to the following ports and are not configurable:
The following table describes the ActivID Application/Service default port configuration.
| Application/Service | Description | Default Connector |
|---|---|---|
|
Authentication Portal |
Back end (SAML endpoints, OpenID endpoints, UI URLs) |
|
|
SCIM API |
Back end |
|
|
SOAP API |
Back end |
TLS1 |
|
HID Approve API |
Back end (SCIM and OpenID URL subsets for HID Approve) |
TLS1 |
|
Self-Service Portal |
Back end/front end and only if the application is enabled |
TLS1 |
|
Management Console |
Back end/front end and only if the application is enabled |
TLS1 |
|
Health Check |
Back end |
TLS1 |
|
ActivID Console |
Back end/front end |
TLS2 |
Configure the Back-End Hostname and Port
On a front-end appliance, you can configure the hostname and port for a back-end appliance.
- Log on to the ActivID Console and, under System in the menu, select Network.
- In the Authentication Services section, edit the back-end configuration as required:

- Authentication Services Hostname
- Authentication Services HTTPS Port
The default port value is 443.
- Click Save.
- Restart the appliance.


