Customize the User Authentication Process
You can customize the ActivID Authentication Portal logon process and display so that users are redirected to authentication pages that display only specific items or actions.
To do so, you can create customized:
-
Authentication GUI templates – defines the way an authentication policy is represented in the graphical user interface (GUI) of a logon. It provides the list of input fields presented to the user when the related authentication policy has to be enforced.
-
Authentication process templates – assigns a specific representation of the ActivID Authentication Portal page to a specific channel. You can customize the process so that users are redirected to the appropriate authentication page that displays only the possible actions that the user can perform (such as token activation).
The templates are managed via the ActivID Authentication Portal configuration page in the ActivID Console.
ActivID Appliance includes a set of default authentication GUI templates but not default authentication process templates.
The authentication policies supported by the ActivID Authentication Portal are associated with GUI templates. The following table lists the GUI templates associated with the authentication policy.
| Authentication Policy | GUI Templates |
|---|---|
|
Static Password (Employee Static Password) |
|
|
LDAP Password (LDAP Fallback/Passthrough) |
|
|
Security Questions and Answers (Employee Emergency Q&A) |
|
|
OOB Authentication (Out of Band) (Employee OOB Authentication) |
|
|
One-Time-Password (Employee One Time Password) |
|
|
PKI Authentication (Citizen PKI Authentication) |
|
|
EMV Authentication |
|
|
Mobile push-based Logon Validation |
Legacy template for Push-Based Authentication support. It performs user Static Password authentication, then push-based authentication.
To be used for second step tiered-authentication (for example, with Static Password as the first step authentication). |
|
FIDO U2F authentication |
FIDO device authentication To be used for the second step of a tiered-authentication deployment (for example, with Static Password as the first step authentication). |
Customize an Authentication GUI Template
The authentication GUI templates available when accessing the ActivID Authentication Portal via a Service Provider is determined by the list of:
-
Authentication policies enabled for the channel related to the Service Provider (configured for the channel).
-
Authentication GUI templates per authentication policy defined by the authentication policies mappings configuration in the ActivID Management Console.
You can define custom authentication GUI template and assign it to a channel/authentication policy pair. This template will be then displayed when accessing the ActivID Authentication Portal via the given channel.
-
Log on to the ActivID Console and, under Configuration, select Applications.
-
Click Edit Settings for the ActivID Authentication Portal in the Applications list.
-
Select the Authentication GUI Templates tab.
- Default – templates delivered out of the box and that are read-only. They cannot be altered or deleted.
- Custom – templates that have been uploaded.
-
Click on the name of the required template to download it.
-
Open the downloaded file and edit the required authentication GUI template elements. These include:
- Title
- Explanation message
- User name field and label
- Password or other authentication material field and label

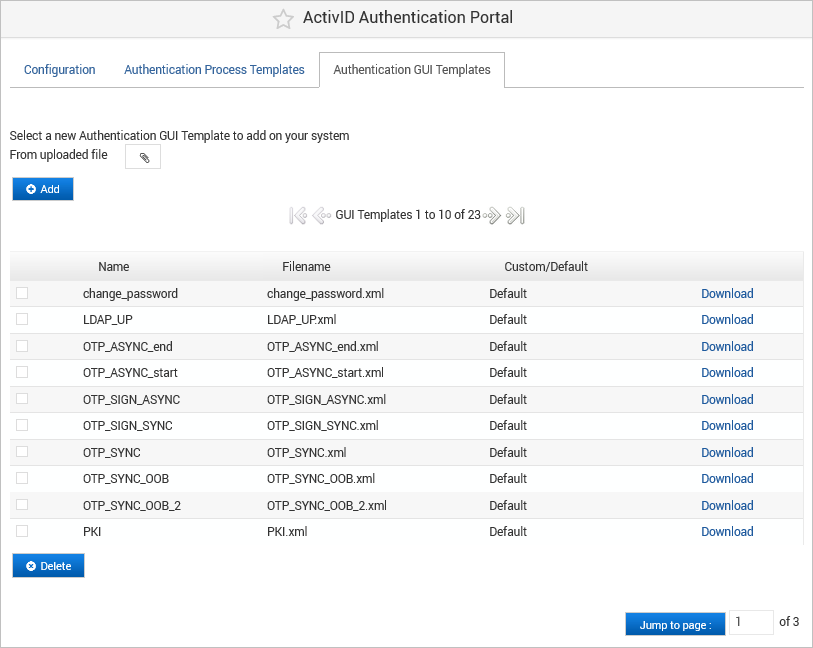
The Authentication GUI Templates section lists all the available templates and their type:
The following table lists the different types of authentication policies with the expected prefix for the related authentication GUI templates:
| Type of Authentication Policy | Authentication GUI Template Prefix |
|---|---|
| Login | UP |
| PKI | PKI |
| OOB Only | OOB_ONLY |
| OTP Only | OTP_ONLY |
| Both OTP and OOB | OTP |
| Memorable Data | SQ |
| LDAP Passthrough | LDAP |
| Mobile push-based validation | TDS_PUSH |
For example, a new Login template should be named UP_MYTEMPLATE.
ActivID Appliance Authentication GUI Template Elements
| Element | Description | Mandatory | Number of occurrences | Attributes |
|---|---|---|---|---|
|
<configuration> |
The root element. |
Yes |
1 |
None |
|
<configuration> |
The GUI template name, used to uniquely identify the template. |
Yes |
1 |
None |
|
<configuration> <description> |
An internal description of the template. |
No |
[0, 1] |
None |
|
<configuration> <entries> |
Contains the ordered list of the GUI Entries (user prompts). |
Yes |
1 |
None |
|
<configuration> |
Describes a data involved in the authentication process (for example, the “user name” and the “static password”). |
Yes |
[2, 10] |
|
|
<configuration> <entry> <value> |
Reserved for future use. |
No |
[0, 1] |
None |
|
<configuration> <entry> <entryCriteria> |
Reserved for future use. |
No |
[0, 1] |
None |
|
configuration> <id> |
Reserved for future use. |
Yes |
1 |
None |
|
<configuration> <id> <id> |
Reserved for future use. |
Yes |
1 |
None |
|
<configuration> <id> <type> |
Reserved for future use. |
Yes |
1 |
None |
|
<configuration> <syntax> |
Description of the restrictions applied to each field of the template (maximum length, data type etc.). |
Yes |
1 |
None |
-
Save the file with the existing template name (it will override the existing template with the same name), or save it with a new name (that corresponds to the purpose of the template).
-
In the Authentication Templates page, upload the new or edited template.
-
Browse to the required template and click Add.
-
Restart the ActivID Appliance applications.
The uploaded template is automatically checked and the content is validated. If the template is not compatible, it is rejected.
-
Declare the new authentication GUI template in the ActivID Management Console:
- If it does not already exist, create a ac-4tress-mgtcons_en.properties file in the ManagementConsole/branding/_common_/mc folder (you can make a copy of the default file in the ManagementConsole/branding/default/mc folder).
-
In this properties file, add the new authentication GUI template name to the (comma-separated) list of available authentication GUI templates by adding it to the list defined in the
ai.configuration.policies.saml.ftressidp.authpolicymapping.guilistproperty. For example:Copyai.configuration.policies.saml.ftressidp.authpolicymapping.guilist=UP_MYTEMPLATE,OTP_ASYNC_start,OTP_SYNC,OTP_SYNC_WT,OTP_SYNC_WT_HIDE,OTP_ASYNC_WT,OTP_ASYNC_WT_HIDE,PKI_auto,PKI,SQ_NOTSEEDED_start,SQ_SEEDED_start,UP_NOTSEEDED,UP_SEEDED_start,OTP_SYNC_OOB,LDAP_UP
The original list is available in the default configuration file (ac-4tress-mgtcons_en.properties in ManagementConsole/branding/default/mc).
-
In the same properties file, add a label for the new authentication GUI template. This label will be used for the authentication policies mappings. The key for the entry must be in the format:
ai.configuration.policies.saml.ftressidp.authpolicymapping.<TEMPLATE_NAME>
For example, add the following label for the UP_MYTEMPLATE:
Copyai.configuration.policies.saml.ftressidp.authpolicymapping. UP_MYTEMPLATE=My User/Password Template -
Restart the ActivID Appliance applications.
-
Configure the authentication policies mapping with the new authentication GUI template using the ActivID Management Console:
After several minutes, the new authentication GUI template will be available in the ActivID Authentication Portal.
Customize an Authentication Process Template
-
If no authentication process templates are specified for a given service provider, or if the ActivID Authentication Portal is accessed via a multi-domains SAML endpoint, then the default authentication flow applies (that is, all the authentication policies configured for that channel are displayed, and the user selects the appropriate one).
-
When an authentication process template is specified, and there is only one domain or the ActivID Authentication Portal is accessed via a single domain endpoint, there are two options:
- If the user has requested a service provider URL that is not bound to an action, the welcome page with direct links is displayed and the user is redirected to the appropriate authentication page depending on the selected link.
- If the user has requested a service provider URL that is bound to an action, the welcome page is not displayed and the user sees only the authentication policies available on both the channel and the authentication process template.
The authentication process templates are common to all domains but an action can be specific to a subset of domains.
Channels of different domains can be differentiated by using different channel codes on the different domains.
You can define custom authentication process templates for a channel. This authentication process template will then be displayed when accessing the ActivID Authentication Portal via the given channel (provided there is no ambiguity on the domain).
-
Log on to the ActivID Console and, under Configuration, select Applications.
-
Click Edit Settings for the ActivID Authentication Portal in the Applications list.
-
Select the Authentication Process Templates tab.
-
Click Download to download the required template.
-
Open the downloaded file and edit the required authentication process template elements. These include:
- Welcome message (for example, “Welcome, what do you want to do?”).
- Name – the name displayed as the link for a given operation (such as “Activate a new token”).
- Channel code (for example, CH_SSP).
- Type – if it is a generic template or channel-specific.
- URL – the URL to the required action within the SP site (for example, in the Self-Service Portal, a direct link to the activation page).
- Description (optional) – Allows displaying a brief description explaining the purpose of the action.
- List of SAML authentication class (optional) per domain.
- SAML authentication classes configured in the template for that domain.
- SAML authentication classes as configured for each channel into the ActivID Management Console IdP screen for that domain.
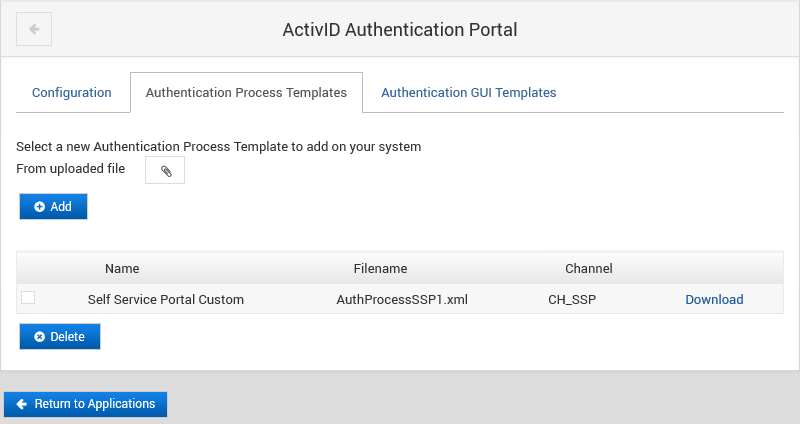
The Authentication Process Templates section lists all the available templates and on which channel they apply.
By default, there are no templates available.
The authentication page that is displayed to the user is the resulting match (intersection) between the lists of:
ActivID Appliance Authentication Process Template Elements
| Element | Description | Mandatory | Number of occurrences | Attributes |
|---|---|---|---|---|
|
<actionspage> |
Root element |
Yes |
1 |
|
|
<actionspage> <name> |
Name of the authentication process template. |
Yes |
1 |
None |
|
<actionspage> <channel> |
A valid channel name (for example, CH_SSP). |
Only if the ActionPage type is set to sp |
1 |
None |
|
<actionspage> <description> |
Description as displayed by the ActivID Authentication Portal. |
No |
[0, 1] |
|
|
<actionspage> <actions> |
Contains the ordered sequence of actions. |
Yes |
1 |
None |
|
<actionspage> <actions> <action> |
Root element on an action. |
Yes |
[1, 10] |
|
|
<actionspage> <actions> <action> <uri> |
The resource URI is used by the service provider to redirect the user after a successful authentication to a specific resource (also known as "SAML relaystate"). For the ActivID Self-Service Portal, this URI should match one of the direct URLs available (for example, /tab/activate-token/activateTokenHome.xhtm). |
Yes |
1 |
type – the URI type. The only possible value is “resource”. |
|
<actionspage> <actions> <action> <name> |
Name of the action as displayed by the ActivID Authentication Portal. |
Yes |
1 |
None |
|
<actionspage> <actions> <action> <background> |
Background image representing the action and displayed by the ActivID Authentication Portal.
|
No |
1 |
None |
|
<actionspage> <actions> <action> <description> |
Description of the action as displayed by the ActivID Authentication Portal. |
No |
1 |
None |
|
<actionspage> <actions> <action> <auth-description> |
Authentication description of the action as displayed by the ActivID Authentication Portal in the login page. If set, this text will overrides the bottom left text of the login page. |
No |
1 |
None |
|
<actionspage> <actions> <action> <authpolicy> |
Root element of the section describing the authentication policy managed by the action. If the <authpolicy> element:
Note: If the SAML request received by the ActivID Authentication Portal contains a list of authentication class URI, then only the intersection between this list and the one defined in the template will be displayed.
|
No |
[0, 1] |
None |
|
<actionspage> <actions> <action> <authpolicy> <authclass> |
Authentication class URI as defined in the ActivID Identity Provider (the authentication class URI can be defined in the ActivID Management Console in the ActivID Identity Provider configuration page). |
Yes |
[1, n] |
None |
|
<actionspage> <actions> <action> <alt-uri> |
Contains a list of URI requiring the same Login page configuration as the action principal URI. |
No |
[0, 1] |
None |
|
<actionspage> <actions> <action> <domains> |
Restricted list of domains (list of domain names comma separated) on which the action is applied. |
No |
[0, n] |
None |
-
Save the file with the existing template name (it will override the existing template with the same name), or save it with a new name (that corresponds to the purpose of the template).
-
In the Authentication Templates page, upload the new or edited template.
-
Click Add.
-
Restart the ActivID Appliance applications.
The uploaded template is automatically checked and the content is validated. If the template is not compatible, it is rejected.
After several minutes, the new authentication process template will be available in the ActivID Authentication Portal.
Example of an Authentication Process Template
<?xml version="1.0" encoding="UTF-8"?>
<actionspage width="370" type="sp">
    <name>Self Service Portal Custom</name>
    <channel>CH_SSP</channel>
    <description font-weight="bold" width="370" >Welcome. What do you want to do?</description>
    <actions>
        <action id="1" width="350" height="170">
            <uri type="resource">/tab/activate-token/activateTokenHome.xhtml</uri>
            <name>Activate a New Token</name>
            <background>box_activate.jpg</background>
            <description>Activate my device so I can use it to login to my applications. Works with mobile phones, tablets, web browsers, PC and OTP tokens.</description>
            <auth-description>Enter your Domain Username and Password</auth-description>
            <authpolicy>
                <authclass>SSP.EMPOTPActivateToken</authclass>
            </authpolicy>
            <alt-uri>
                <uri type="resource">/tab/activate-token/activateHardwareToken.xhtml</uri>
                <uri type="resource">/tab/activate-token/activateWebSoftToken.xhtml?type=STW</uri>
                <uri type="resource">/tab/activate-token/activatePCSoftToken.xhtml?type=STP</uri>
                <uri type="resource">/tab/activate-token/activateSoftTokenApplication.xhtml?type=STM</uri>
            </alt-uri>
        </action>
        <action id="2" width="350" height="170">
            <uri type="resource">/tab/my-devices/list/deviceList.xhtml</uri>
            <name>Manage an Existing Token</name>
            <background>box_devices.jpg</background>
            <description>View, update, test or discard any of my devices.</description>
            <auth-description>Enter your Username and OTP with PIN</auth-description>
            <authpolicy>
                <authclass>SSP.EMPOneTimePassword</authclass>
            </authpolicy>
            <alt-uri>
                <uri type="resource">/tab/my-devices/test/testDeviceSelect.xhtml</uri>
                <uri type="resource">/tab/my-devices/list/renameDeviceSelect.xhtml</uri>
            </alt-uri>
        </action>
        <action id="3" width="350" height="170">
            <uri type="resource">/tab/my-problem/cannot-login/cannotLogin.xhtml</uri>
            <name>Emergency Access</name>
            <background>box_problem.jpg</background>
            <description>Troubleshoot problem login in to applications or report lost, stolen or damaged device.</description>
            <auth-description>Enter your Domain Username and Password</auth-description>
            <authpolicy>
                <authclass>SSP.LDAPFallback</authclass>
            </authpolicy>
            <alt-uri>
                <uri type="resource">/tab/my-problem/lost/deviceLost.xhtml</uri>
                <uri type="resource">/tab/my-problem/myProblemHome.xhtml </uri>
            </alt-uri>
        </action>
    </actions>
</actionspage>
Displays as:


