Configure Microsoft Azure for Authentication
To enable authentication for the federated users, configure a valid public client in your Microsoft Azure Directory:
-
Log on to the Microsoft Azure AD portal (https://aad.portal.azure.com/) and go to the App Registrations page.

-
Click New registration to add a new public client or, in the list of Owned applications, select an existing public client.

-
In the Authentication page, under Advanced settings, select Yes to Allow public client flows.

-
In the API permissions page, under Configured permissions, select Grant admin consent for… your directory.
-
Configure your Microsoft Azure directory as a SCIM federated datasource using POST /User/Repository/ScimFed.
Make sure the "userAuthenticationEndpoint" section contains the authentication endpoint of your Microsoft Azure directory:
Copy"userAuthenticationEndpoint": {
"issuerUri": "<url of your Microsoft Azure AD or ADFS Oauth2 provider>",
"clientId": "4fafef0d-79fc-470b-9e5e-7a1ed4fd549f"
}-
Where:
-
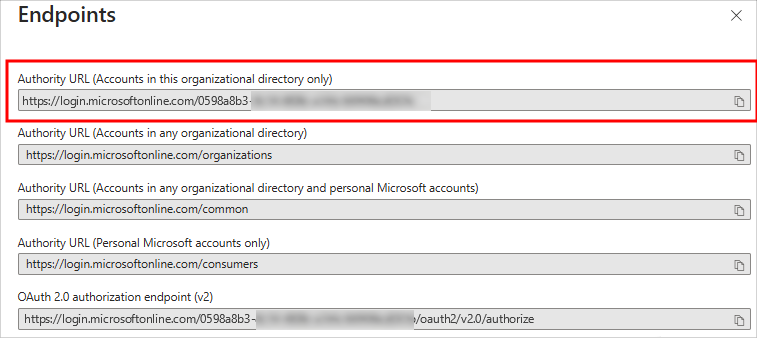
issuerUri - is the <Authority URL> for the application’s endpoint in the https://login.microsoftonline.com/<client ID>/v2.0 format.
You can get the <Authority URL> value from your application's list of endpoints:
-
clientId - is the ID of the client to connect to the directory host
-
You can verify the configuration using GET /User/Repository/ScimFed.
{
    "schemas": ["urn:ietf:params:scim:api:messages:2.0:ListResponse"],
    "totalResults": 1,
    "resources": [   {
        "schemas": ["urn:hid:scim:api:idp:2.0:User:Repository"],
        "id": "DS_c",
        "meta":       {
            "resourceType": "UserRepository",
            "location": "https://[base-server-url]/{tenant}/v2/User/Repository/ScimFed/DS_c",
            "version": "1"
        },
        "name": "scim fed AAD",
        "type": "SCIM_FED_AD",
        "adminGroupAssignment":       {
            "type": "Group",
            "value": "USG_FTEMP",
            "$ref": "https://[base-server-url]/{tenant}/v2/Groups/USG_FTEMP"
        },
        "roleAssignments":       [
            {
                "roleId": "RL_AUDITV",
                "mappingCriteria": {"groupMembership": "475f23fa-ad47-4ca9-b535-9792c9494daa"}
                },
            {
                "roleId": "RL_DEVADM",
                "mappingCriteria": {"groupMembership": "b94f8737-0885-4193-b91e-6249974d9df3"}
            }
        ],
        "provisioningAgentCredential":       {
            "type": "User",
            "value": "123",
            "$ref": "https://[base-server-url]/{tenant}/v2/Users/123"
        },
        "userAuthenticationEndpoint":       {
            "issuerUri": "<url of your Microsoft Azure/Entra ID or ADFS Oauth2 provider>",
            "clientId": "4fafef0d-79fc-470b-9e5e-7a1ed4fd549f"
        }
    }]
} -
-
Test the connection to the SCIM federated directory using POST /User/Repository/ScimFed/{uid}.
Once the Microsoft Azure users are provisioned into ActivID Appliance by the sync service, the users can then authenticate with their LDAP password.

After successful authentication via the ActivID Self-Service Portal channel (SSP) with LDAP fallback activated, an LDAP authenticator is automatically created for the user:


