Customize the Push Solution Behavior
Customize the Key Protection Methods
Keys provisioned on the mobile can be protected by different means. According to the security level required, users might need to enter a password or select a biometric (fingerprint/face) prior to using the keys.
These protection methods will impact how the end user uses mobile keys to:
-
Validate a logon request
-
Validate an action
-
Generate a new Secure Code
This policy ensures that the user experience is the same for all the mobile operations using the service - either never being prompted for a password/biometric, or being prompted for a single (identical) password.
If you want users to use different passwords, or a different type of protection for each operation, it is recommended that you use the HID Approve SDK.
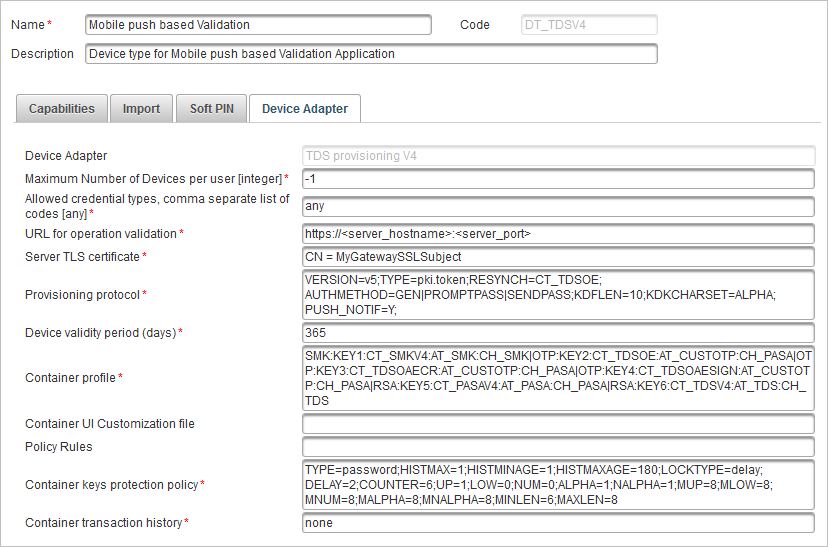
To customize the Key Protection Method, go to the Device Type and edit the Container keys protection policy according to the following table.
The password is set by the user during Service registration.
The password to unlock the private keys is the same for all private keys for a particular Service in the HID Approve application.
The password can be different from one Service to another.
The biometric (fingerprint/face) credential is set independently of the Service registration workflow.
Only one biometric (fingerprint/face) credential can be set for Services registered with the application.
|
Protected Logon Validation
|
Protected Action Validation
|
Protected Secure Code
|
|---|
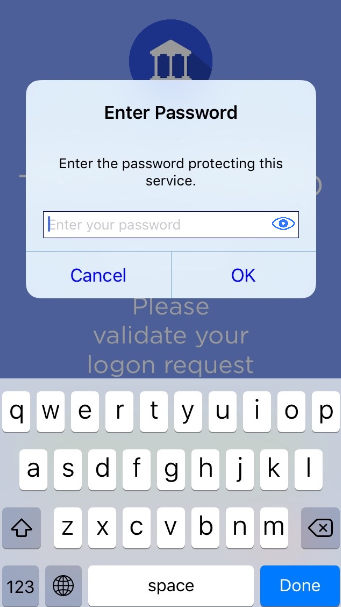
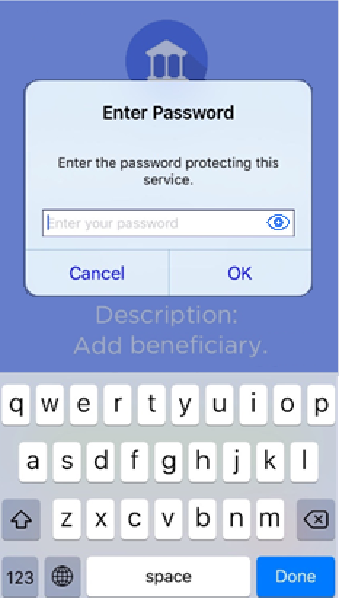

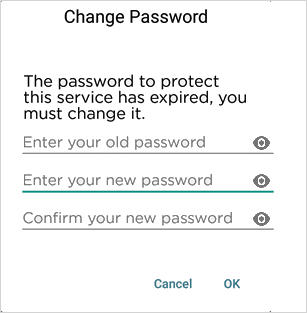
If a password has already expired, the user will automatically be prompted to set a new password when they next use the protected service.
Configure the Protection Method per Key
-
Log on to the ActivID Management Console as a Configuration Manager.
-
Select the Configuration tab and, under Polices, select Authentication and then Credential Types.
-
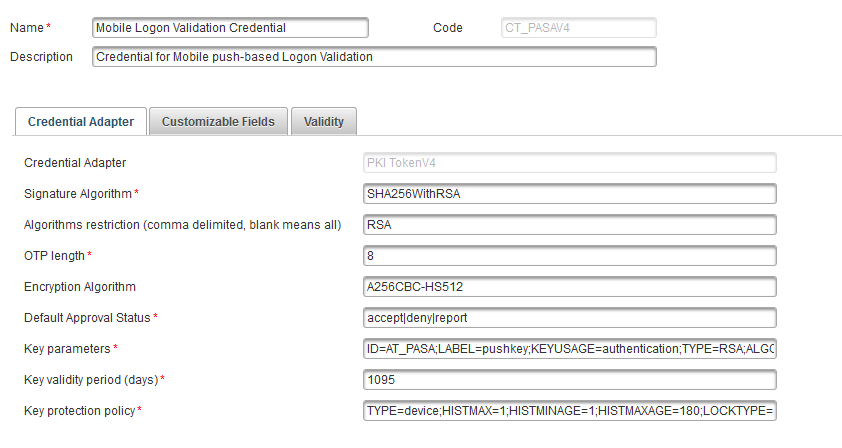
Select a push-based credential type (that is, Mobile Action Validation Credential or Mobile Logon Validation Credential).
-
In Credential Adapter tab, specify the Key protection policy – that is, one of the policies listed in Protection method.
Configure the Protection Method for All Keys
-
Log on to the ActivID Management Console as a Configuration Manager.
-
Select the Configuration tab and, under Polices, select Authentication and then Device Types.
-
Select the Mobile push based Validation Device type.
-
Select the Device Adapter tab.
-
Specify the Container keys protection policy – that is, one of the policies listed in Protection method.
-
Click Save.
Customize the Secure Code Settings
The Secure Code can be configured by editing the Credential Type. For further information, see OTP Key Parameters (Secure Code).
Secure Code Settings for One-Time Password (OTP)
| Parameter | Values |
|---|---|
|
Algorithm mode |
|
|
OTP length |
|
Secure Code Settings for Challenge/Response
| Parameter | Values |
|---|---|
|
Algorithm mode |
|
|
Challenge length |
|
Secure Code Settings for Signature
| Parameter | Values |
|---|---|
|
Algorithm mode |
|
Customize the Application Password Caching Mode
The HID Approve application allows the Service Protection to be kept in cache during the handling of the Push operations.
For the password caching policy parameters, see Key Protection Policy Parameters.
Customize the Maximum Number of Devices Allowed per User
You can restrict the number of devices a user can register (per ActivID AS domain) for the push solution.
This value can be set in the Maximum Number of Devices per user parameter of the Mobile push based Validation device type (DT_TDSV4).
-
If you do not define a restriction (that is, keep the default value of -1), the user can register services on an unlimited number of devices with the HID Approve application.
-
If you define a restriction, when the user reaches the maximum number of allowed devices and attempts to register a service on a new device, they will see an error message in the registration portal.
Customize the Devices Allowed for Service Registration
The HID Approve application allows defining a set of rules restricting the service registration according to the mobile platform characteristics.
All rules are optional, and multiple rules can be defined targeting either all or specific platforms.
You can exclude platforms from Service registration based on the following criteria:
-
Specific OS (Android / iOS / macOS / Windows)
-
Specific OS version or a range of versions (by defining the maximum and minimum values)
-
Specific key store mode (software or hardware)
-
Specific root state (corresponding to a rooted Android phone or a jailbroken iOS phone)
When a platform is excluded, a warning is displayed during service registration on the user’s device and audited on the server. This warning can be customized on the server-side.
The "rules" are defined using the following JSON payload for the "provisioning" claim:
| Parameter | Description |
|---|---|
|
ruleid (required) |
An identifier for the rule Several rules can be added in the JSON (for example, one per version) |
|
phonestates (required) |
A list of platform characteristics containing one or more of the following optional parameters: |
|
"os" – defines the OS platform Possible values are:
|
|
|
"osversion" – defines the major version of the OS platform |
|
|
"keystore" – defines the key store mode (Android only) Possible values are:
|
|
|
"isRooted" – defines the rooted/jailbroken state of the mobile device (Android and iOS only) Possible values are:
|
|
|
"maxosversion" – defines the maximum major OS version permitted (inclusive) |
|
|
"minosversion" – defines the minimum major OS version permitted (inclusive) |
|
|
outcome (required) |
Defines the result of the rule Only deny is supported |
|
message (required) |
A customizable warning message displayed to the user when the rule is applied |
For Android devices only, it is also possible to define authentication rules to restrict biometric authenticators. If the rule is not defined, by default, only strong (class 3) biometric authenticators are authorized. The rules are defined using the following JSON payload for the "authentication" claim:
| Parameter | Description |
|---|---|
|
ruleid (required) |
An identifier for the rule |
|
bioclass (required) |
An integer value corresponding to the minimum authorized biometric class security level Possible values are:
|
|
outcome (required) |
Defines the result of the rule Only allow is supported |
For example, JSON data with two rules and one authentication rule to allow class 2 biometrics:
HID Approve Rules Parameters
"rules": {
	"version": 1,
	"provisioning": [
		{
			"ruleid": 1,
			"phonestates": [
				{
					"os": "Android",
					"osversion": "8",
					"isRooted": "true"
				},
				{
					"os": "Android",
					"keystore": "sw"
				}
			],
			"outcome": "deny",
			"message": "Not allowed to provision for Android version 8 rooted phone or Android device with software key store"
		},
		{
			"ruleid": 2,
			"phonestates": [
				{
					"os": "iOS",
					"minosversion": "13"
				}
			],
			"outcome": "deny",
			"message": "Not allowed to provision for iOS version below 13"
		}
	],
	"authentication":[
		{
			"ruleid":3,
			"bioclass":2,
			"outcome":"allow"
		}
	]
}
To apply the defined rules:
-
Log on to the ActivID Management Console as a Configuration Manager.
-
Select the Configuration tab and, Under Polices, select Authentication and then Device Types.
-
Select the Mobile push based Validation Device type (DT_TDSV4).

-
Paste the JSON content into the Policy Rules field and save your changes.
Alternatively, you can apply the rules by adding your definitions in the policyRule parameter using the Device Type REST API.
Customize the HID Approve Windows Universal App Activation Link (URI)
For the HID Approve Windows Universal App, a URI can be used to automatically start a service registration from a web page. It can be customized as follows:
The URI must respect the following syntax:
hidglobal-approve://activate?name={AppName}&qrcode={ ActivationCode }Where:
{AppName}
-
Is part of a mandatory query
-
Is the web application friendly name that will be displayed to the user (maximum of 30 characters, and can contain only letters, numbers, spaces and dashes)
-
Format is percent-encoding UTF-8 based
{ ActivationCode }
-
Is part of a mandatory query
-
Is the activation code that will be used to register a new service for the user (maximum of 1000 characters)
-
Format is base64 encoding
Customize Multiple Device Types
Multiple device types can be configured on ActivID AS to allow different branding or policy settings on a single Security Domain.
You can customize Device Types to meet your requirements, taking into consideration that:
- Each device type can use a specific Customization file (allowing a different look and feel within the same domain).
- When several device types co-exist in a domain, the registration portals must reflect the possible choices to allow registering services for one or the other.
Customize the HID Approve Activation Mode
HID Approve can be activated using one or both of the following modes that determine the available methods:
- In online mode:
- HID Approve and ActivID AS communicate to register the service during the activation process
- Both push-based authentication and OTP authentication are supported
- Available methods:
- Scan QR code
- Enter Invite code
- Click Activation URL (only for HID Approve for Windows 10)
- In offline mode (for example, if the device does not have an adequate internet connection):
- HID Approve and ActivID AS do not communicate during the activation process
- Only OTP authentication is supported
- Users can only rename or delete a service
- Available methods:
- Scan QR code
- Enter Key Secret
- Click Activation URL (only for HID Approve for Windows 10)
- It is recommended that you use the online activation mode as it is more secure.
- For offline activation, it is recommended that you enforce service-protection.
By default, ActivID AS is configured for online activation only. To enable offline activation (per domain and per administration group), configure the Token Activation Settings.
You can also disable online activation for all domains by editing the ActivID Self-Service Portal settings.
- If you disable online mode but do not configure offline mode, the online activation will be available in the ActivID Self-Service Portal as the default option with the default values.
- The offline Key Secret activation method is only available for time-based HID Approve Offline Soft Tokens where the device type uses the following default configuration:
OTP type - TOTP
Hashing algorithm - SHA1
OTP length - 6 digits
Timestep - 30 seconds
For further details, see Configure HID Approve Offline Soft Tokens.
See also:
Customize the HID Approve Application


