Configuring ActivID CMS for Use with Entrust Authority Security Manager
This section briefly introduces the architecture for integrating the ActivID Credential Management System (CMS) with the Entrust Authority™ Security Manager. It describes how to configure Entrust Authority Security Manager to work with ActivID CMS and also presents information on the following topics:
-
Completing prerequisites prior to managing and configuring Entrust Authority Security Manager and ActivID CMS.
-
Understanding the Entrust Authority Security Manager and ActivID CMS architecture.
-
Configuring ActivID CMS to issue certificates using Entrust Authority:
-
Configuring Entrust Authority X.509/Entrust Entelligence Security Provider (ESP) certificates.
-
Adding the Entrust Certification Authority (CA).
-
-
Renewing an expired Entrust CA certificate.
-
Configuring key history recovery.
Prerequisites
This section introduces a number of prerequisites. You must complete these before attempting to manage and configure the Entrust Authority Security Manager and ActivID CMS. These prerequisites include the following:
-
Creating the appropriate user accounts. For detailed information, refer to Required Account Types and Privileges.
-
Installing ActivID CMS and ensuring that it is up and running.
-
Configuring ActivID CMS to connect to the Active Directory®. For detailed information, refer to Configuring Repositories.
-
Installing Entrust Authority Security Manager on the ActivID CMS server and ensuring that it is up and running.
-
Obtaining the following information before attempting to configure ActivID CMS to issue the Entrust X.509/ESP certificates using the Entrust Authority Security Manager:
-
Full name (including the path) of the correct entrust.ini file that is created when you installed the Entrust Certificate Authority (CA).
-
There are several entrust.ini files on the Entrust server. You must use the following file from this directory location:
drive:\Program Files\Entrust\Security Manager\Tools\config\ini
-
-
Making sure that the entrust.ini file contains the following entry:
Copy[FIPS Mode]FIPS=0-
You must know the full name (including the path) of the .epf file that contains the Entrust Administrator’s credentials.
Note: If the Entrust Administrator’s credentials are generated in an HSM, you must know the file name and path of the .tkn file that contains the credentials, as well as the HSM PIN and the HSM partition (for HSMs with more than one partition).Copy the file identified in this line (Entrust settings= Entrust configuration filename) on to the ActivID CMS server.
-
Make sure that you know the password or PIN protecting this credential. Copy the file identified in this line (Entrust admin certificate= Entrust profile filename) onto the ActivID CMS server. There are no special requirements for installing Entrust Authority Security Manager.
-
For more information about the Entrust Authority Security Manager, go to http://www.entrust.com.
About the Entrust Authority Security Manager Architecture
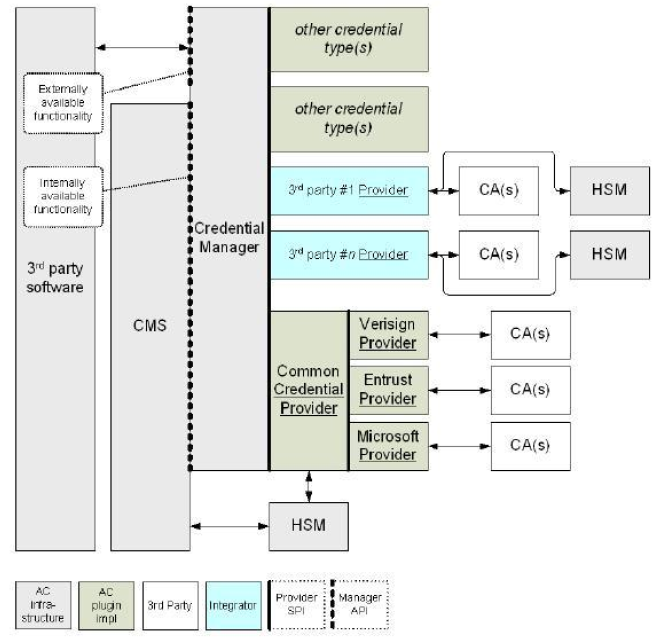
This section briefly introduces the architecture for integrating ActivID CMS with Entrust Authority Security Manager. The following figure shows the Credential Provider architecture that supports the issuance of the Entrust X.509 and ESP certificates.
This architecture is based on the Credential Provider Interface which uses the Java-based Entrust XML Administration Protocol (XAP) since ActivID CMS 5.1. This protocol offers more secure communications than the former Entrust ASH protocol.
For more information, refer to
Architectural Overview of ActivID CMS and Entrust Authority Security Manager Integration

Topics in this section:


