Configuring Microsoft CA
This section describes how to configure Microsoft CA to support device issuance with PIV Personal Identity Verification (technical standard of "HSPD-12") and PIV-I Personal Identity Verification - Interoperable-compliant certificate templates.
The procedures are illustrated using Microsoft CA installed on Microsoft Windows Server® 2008. The procedures are similar, but not exactly the same, if you use Microsoft CA installed on later versions of Microsoft Windows Server.
Unless explicitly stated, these procedures apply to both PIV and PIV-I environments. They are optional for CIV Commercial Identity Verification environments.
Configure the OCSP
Configure the Online Certificate Status Protocol (OCSP) to follow the PIV standard.
-
Open the Microsoft CA and, in the console tree, select your specific CA.
-
On the Action menu, click Properties.
-
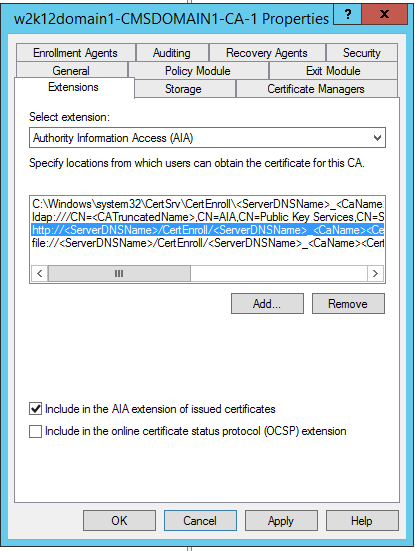
In the Extensions tab, under Select extension, click Authority Information Access (AIA).
-
Select Include in the AIA extension of issued certificates.
-
In the list of OCSP responders under Specify the locations from which users can obtain the certificate for this CA, make sure that the HTTP one is the only one specified (remove the LDAP and file ones).
-
Click OK.
Configure the Validity Period
The validity period of the PIV certificates should be set in the device policy.
The validity period value passed to the CA at certificate personalization time should never be superior to the validity period defined in the CA certificate template being used. It is recommended that you set the validity period in the credential profile to the same value as the one in the CA certificate template.
In addition, PIV-I compliance requires that the certificate validity period does not exceed 3 years. This cap is automatically applied in PIV-I mode. It is optional in PIV mode.
To enable the validity period feature:
-
Open a Command Prompt window, and execute the following lines:
Copycertutil -setreg policy\EditFlags +EDITF_ATTRIBUTEENDDATE
net stop certsvc
net start certsvc -
Restart Microsoft CA.
Configure the NACI (PIV Only)
You must configure Microsoft CA so that it supports the PIV extension ‘National Agency Check with Inquiries” (NACI). To enable this support:
-
Open a Command Prompt window and execute the following line:
Copycertutil -setreg policy\EnableRequestExtensionList +2.16.840.1.101.3.6.9.1 -
Restart Microsoft CA.
-
Set the NACI Extension attribute to Non-Critical.
-
This does not apply to PIV-I environments. ActivID CMS does not pass NACI information to the credential provider when issuing in PIV-I mode.
Enable Serial Number in Certificate Subject (PIV-I Only)
The CARD_AUTHENTICATION certificate requires that a serialNumber component be set in its certificate subject in PIV-I mode.
-
Use the following command on the CA server to check that the Microsoft CA allows using this attribute in the certificate subject:
Copycertutil -getreg ca\SubjectTemplateDeviceSerialNumber should appear in the list.
-
If it does not, use the following command to add it:
CopyCertutil -setreg ca\SubjectTemplate +DeviceSerialNumber -
Restart Microsoft CA.


