Configuring a PKI Application Using an Entrust Authority CA
This section describes how to configure a PKI application using an Entrust Authority CA The Certificate Authority (CA) issues and manages security credentials and public keys for message encryption in a networks environment. (X.509/ESP).
-
Go to the Device Policy - Creation page (see Creating a Device Policy, if needed).
-
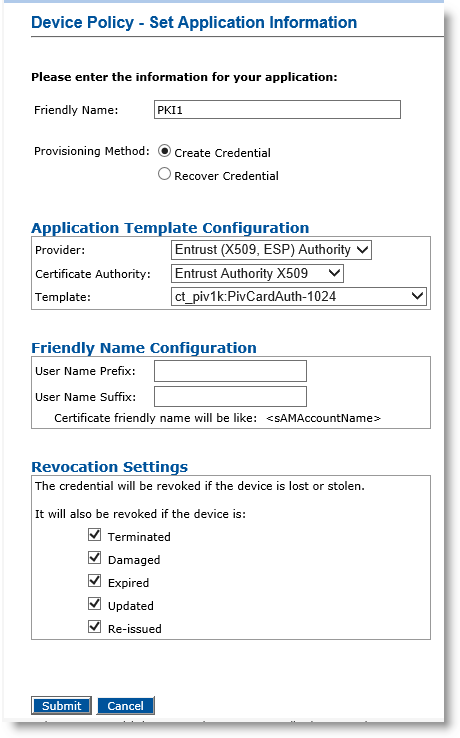
In the Action column, next to PKI1, click Add, and then click Configure. The Device Policy - Set Application Information page appears:
-
Friendly Name field—Enter a name that easily identifies the type of application you have selected for the device policy.
-
Provisioning Method —Select Create Credential.
-
Provider drop-down list—Select Entrust (X509, ESP) Authority.
-
Certificate Authority drop-down list—Select the Entrust CA connected to ActivID CMS that issues the certificate for this application (for devices issued with this device policy).
-
Template drop-down list—Select the template to use to issue the certificate. The template specifies how the PKI credentials can be used (for example, digital signature).
-
In the User Name Prefix and User Name Suffix fields, enter a prefix and suffix for the certificate, if applicable.
-
Revocation Settings — By default, the credentials are revoked for all the listed states of the device. You can clear the check box(es) to indicate any state(s) for which you do not want to revoke the credentials. For example, if you clear the Damaged check box, the credentials in a device in the Damaged state will not be revoked.
-
Click Submit. The Configure PKI Signature Application page appears.
-
Make any necessary changes.
For the User Distinguished Name, User Principal Name, or Email Address fields, you can select an option and set a dynamic parameter by specifying a directory attribute that contains the value to be used for this entry by ActivID CMS.
-
Click Set. The Device Policy - Creation page appears again. The application name will be changed from red to green to indicate that the application has been configured.
-
When you have completed configuring the application, click Save. A confirmation message appears.
-
Click Done.


