Setting Parameters for User Attributes
-
Select the Configuration tab, and then select the Customization sub-tab.
-
From the Select a Topic drop-down list, click User Attributes.

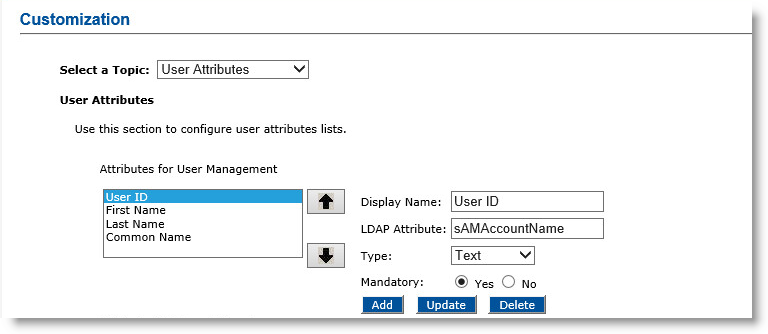
This illustration is the first part of the page that is displayed. Begin by specifying the parameters of the user information fields that are shown in the Operator Portal. By default, the user management attributes are the first four shown in the list in the illustration.
-
In the Attributes for User Management section, you can change the order of the LDAP Lightweight Directory Access Protocol attributes for which an operator must provide information when adding or updating a new user.
-
Change the Display Name, if desired.
-
Define the LDAP Attribute.
Note:
To Maintain Consistency:When you have the same LDAP attribute in multiple lists, use the same display name in each list for that LDAP attribute.
If you have defined multiple LDAP directories for ActivID CMS to support, then the attributes you select for these lists must exist in all the defined LDAP directories.
Except for the UID LDAP attribute, you may change or delete the default attributes in the lists.
-
From the Type drop-down list, select the type of each attribute
The options are Text, Picture, or Password. Use only the Password type for the LDAP attribute that stores the LDAP password of the user.
-
For the Mandatory option, select Yes or No to decide whether or not an attribute is mandatory when adding/updating a user. If it is mandatory in the directory, then it must also be mandatory in ActivID CMS.

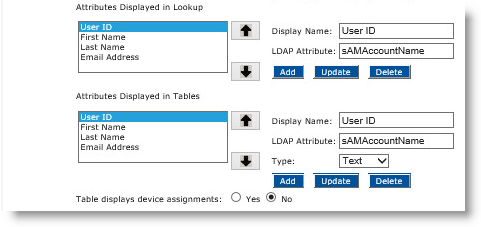
This illustration is the second part of the page.
-
In the Attributes Displayed in Lookup section, you can change the order of the user attributes displayed in lookup.
By default, the user Lookup attributes are the first four shown in the list in the illustration. This section displays the LDAP attributes that display in a user Lookup page (the criteria to select from when searching for a user in a directory). Lookup allows you to adjust the order in which they display.
-
In the Attributes Displayed in Tables section, you can change the order of the user attributes in tables.
By default, the attributes are the first four shown in the list in the illustration. This section displays user information (specified by LDAP attributes) that are listed in tables in the Operator Portal, and in the order in which the attributes are shown.
-
For the Table displays device assignments option, select Yes to display the device serial number that is assigned to the user.
-
In the Length of device serial number to be displayed field, enter the maximum length of the device serial number that is displayed in the lookup result. If the value specified is smaller than the actual serial number length, then only the last characters of the serial number will be shown.

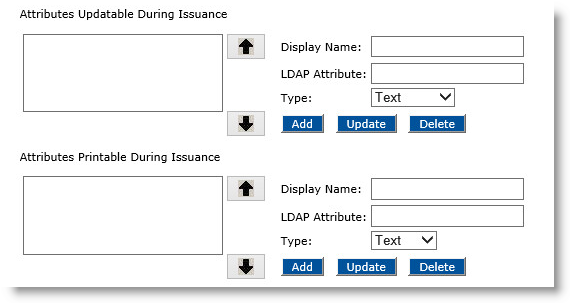
This illustration is the third part of the page.
-
In the Attributes Updatable During Issuance section, you can change the order of the LDAP attributes that can be updated in the LDAP directory during device issuance.
You can also rearrange the order of the attributes in the ActivID CMS device issuance pages.
-
In the Attributes Printable During Issuance section, you can define the fields that can be printed on the card. These fields match the attributes defined in the device layout.

-
In the LDAP Attribute field, enter the attribute name as defined in LDAP.
-
From the Type drop-down list, click Text if you want to use a signature, or click Picture if you want to use an image.
For information on how to configure the printer, see Configuring ActivID CMS for Printing.
-
If necessary, you can click Revert to revert back to the previously saved settings.
-
Click Set. A confirmation message appears.
Tips for Using the Customization Page
The following sections provide details on how to customize the user attributes.
-
In the Display Name field, enter the name to use in ActivID CMS for the attribute.
-
In the LDAP Attribute field, enter the LDAP directory attribute value to link to the display name.
-
Click Add. The new attribute appears in the list.
-
Highlight the attribute in the appropriate list.
-
Update the entry field as necessary.
-
Click Update.
-
Highlight the attribute in the appropriate list.
-
Click Delete.
-
Highlight an attribute in the appropriate list.
-
Click the up or down arrow adjacent to the list to move the attribute either up or down, respectively.


