Configuring Entrust Authority X.509/ESP Certificates
First, open the ActivID CMS Repositories Management page.
-
On the Operator Portal, click the Configuration tab.
-
Click Repositories. The Repositories Management page appears.
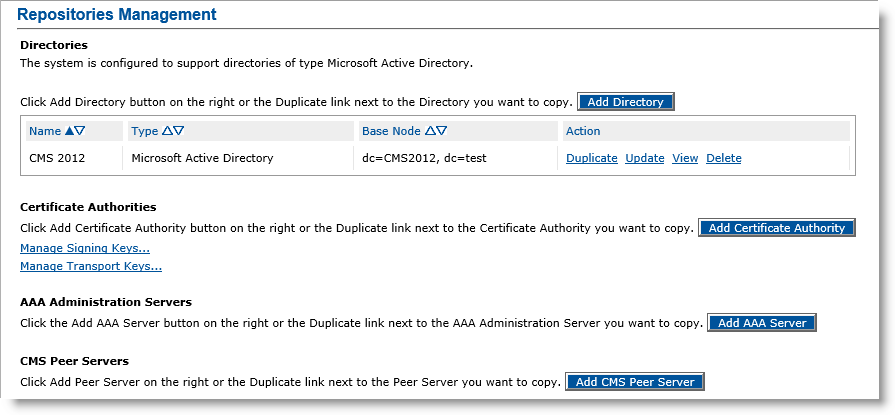
For additional information about the Repositories Management page, refer to Configuring Repositories.
-
Click Add Certificate Authority. The Certificate Authority Creation page appears.
-
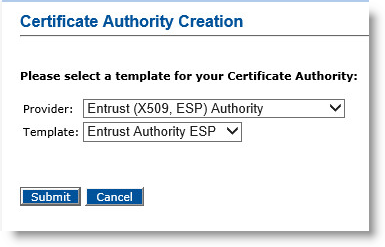
In the Provider drop-down menu, select Entrust Authority (X509, ESP).
-
In the Template drop-down menu, select Entrust Authority X509.
-
Click Submit. The Certificate Authority Creation page appears.
-
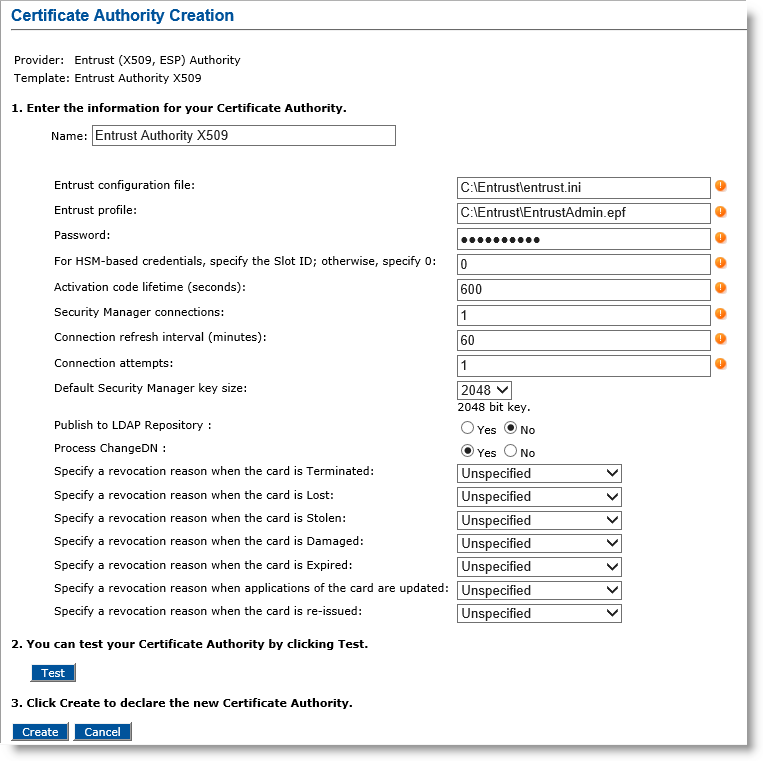
Name—Enter the configuration name identifier of the CA within ActivID CMS (in this example, it is Entrust Authority X509).
-
Entrust configuration file—Enter the full name (including the path) of the entrust.ini file on the ActivID CMS server (in this example, it is C:\my_ent\entrust.ini).
-
Entrust profile—Enter the full name (including the path) of the Administrator .epf file on the ActivID CMS server (in this example, it is C:\my_ent\First Officer.epf). If you are using a Registration Authority (RA) credential In the context of ActivID, a credential is a collection of one or more credential elements that together provide some form of digitally provable identity. In the context of PIV, a credential refers to the completed PIV card itself. in the HSM A Hardware Security Module (HSM) securely stores secret key material. They are similar to large-storage, multisession smart cards. However, unlike smart cards, they are used mainly on the server side of a system., it is a .tkn file rather than an .epf file.
-
Password—Enter the password that protects the .epf file. If you are using an RA credential in the HSM, enter the HSM PIN (which acts as the token password).
-
For HSM-based credentials, specify the Slot ID; otherwise, specify 0 —Enter the ID number of the HSM slot used for the Entrust credential (only used if the Entrust profile configured is a .tkn file; i.e., if the RA credential is in the HSM).
If the Entrust profile is configured as a .epf file (case of an RA credential not in an HSM), this value must be set to 0. -
Activation code lifetime (seconds)—Enter the activation code lifetime period in seconds (the recommended value is 600).
-
Security Manager connections—Enter the maximum number of concurrent connections that the Credential Provider will open to the Entrust Authority Security Manager (the number of connections range from 1 through 50, with 50 being the recommended value).
-
Connection refresh interval (minutes)—Enter the number of minutes for the refresh connection interval (this defines when it is routinely refreshed). The interval ranges from 1 through 1440 minutes, with the recommended value being 120.
Note: The more connections you open to the Credential Provider, the faster ActivID CMS can issue additional cards concurrently. -
Connection attempts—Enter the number of times that a context thread can attempt to create a security manager connection before it is considered to have failed and is reported (the recommended value is 3).
-
Default Security Manager key size—Select the default key size (in bits) for certificates in the Entrust Authority Security Manager (in this example, it is 2048 bits).
Note: The value you enter must match the default key size that is configured in the Entrust Authority Security Manager. -
Publish to LDAP Repository—Select Yes if you want to publish Entrust user to the LDAP Lightweight Directory Access Protocol repository.
-
Locate the possible state of the card for which you want to update the revocation reason. For details about the revocation reason code, refer to step 6 of Procedure 2: Updating a Connection to a CA.
Note: To ensure that publishing to the LDAP repository functions properly, you have to update the usertype.templates of the Entrust CA so that the overrideCommonNameFormat in the [Person] section is commented out. -
Click Test to verify that the connection to the CA works.
-
Click Create. A confirmation message appears.
-
Click Done.


