Issuing an Initial Device to a User in Your Directory
Configured repositories,
Created a device policy, and
Created a group assignment.
-
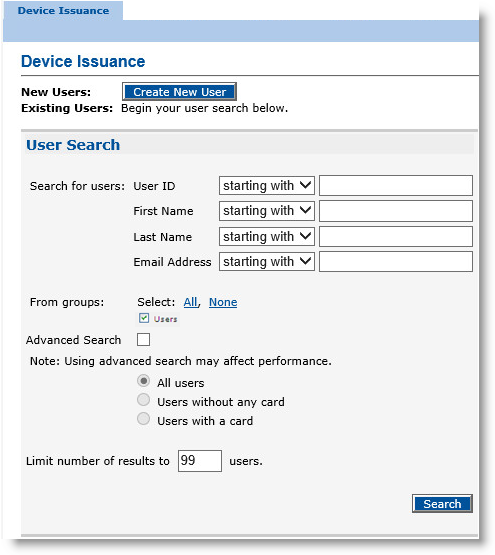
Select the Device Issuance tab.
-
In the Search for users drop-down lists, accept the default starting with to search using any one of the listed user identifiers.
Alternatively, select matching from one or more of the drop-down lists for specific user identifiers, and then enter the attribute(s) in the field(s).
To add a custom search field, see Setting Parameters for User Attributes.
-
From groups: Select one or more options. (You might see options listed that are not illustrated.) ActivID CMS displays options in the From groups section based on the groups that exist in your system.
-
To restrict the search, select the Advanced Search option, and then select one of the following options:
-
All Users (applies no restrictions to the search).
-
Users without any card (users without a card but who are in the directory).
- Users with a card (users who have an active or inactive, lost, stolen, damaged, or forgotten card).
-
-
In the Limit number of results to field, enter a number. To improve performance, set the value between 1 and 10.
-
Click Search.

If a record matches the search criteria, then that user’s information appears in the Device Issuance page.
-
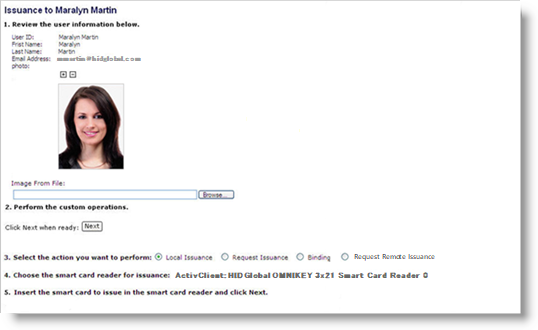
In the User ID column, click the name of the user.
The Issuance to <user name> page appears:
-
If your system is configured to allow updates to some of the user’s information, then complete the attributes as required.
This can include capturing the user’s picture by clicking Browse and navigating to the location where the user’s image resides.
-
Select the action you want to perform from the following choices:
-
Local issuance—Face-to-face issuance. A device is issued by an operator in the presence of the user. This is the type of issuance described in this section.
-
Request issuance—An operator submits a device issuance request. Another operator processes and approves the request, and issues the device through local issuance. For more information on how to create issuance requests for this option, see Creating an Issuance Request.
-
Binding—An operator records the serial number of a device to be issued to a user in the future. Only this device can be issued to this user. For more information on how to bind a device to a user, see Binding a Device.
- Request Remote Issuance (Mobile Smart Cards only)—An administrator configures the remote issuance for the mobile smart card device. Then the user receives an email including all the information needed to enroll his/her mobile device. For more information on remote issuance, see Configuring Remote Issuance.
Note: Support for mobile smart cards has been deprecated starting with ActivID CMS 5.4. -
-
Choose whether or not to print. Select Yes if you have configured a printer and want to print the card locally.
-
Choose the card layout for issuance. The name of the default card layout is displayed. Select the card layout from the list, if available.
-
Accept the default card reader or choose another card reader.
Note: YubiKey devices inserted in the client machine appear as a card reader with a card inserted. -
Insert the card into the reader, and then click Next.
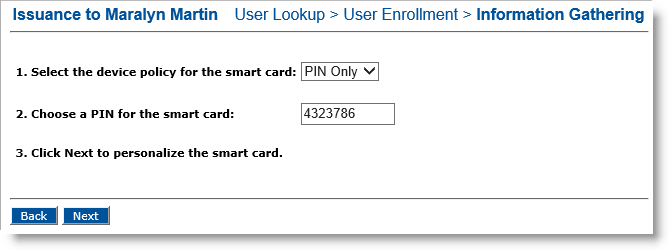
The Issuance to <user name> page appears:
-
In the Select the device policy for the smart card drop-down list, select the device policy for chip personalization.
-
If only one device policy is configured, then the device policy is selected by default.
- If you are just binding the card, choose the device policy that you want the person to use when s/he enrolls the card using the ActivID CMS User Portal.
-
-
In the Choose a PIN for the smart card field, enter a valid PIN.
If a PIN appears in the field, then ActivID CMS is configured to generate a random PIN. If you want to change the PIN, then enter a new PIN in the text box.
If there are two fields showing PINs with asterisks instead of alphanumeric values, then enter the same PIN in both fields.
-
Click Next. A progress page appears.
The synchronization messages under the progress bar can be used to follow the issuance process. The synchronization messages can be personalized by modifying the statusMessages.properties file located in the client_event directory listed in the following path:
cms_portal\data\com\activcard\cms\service\tcd\client\event
-
If you had selected to print the card locally, a confirmation page related to printing appears:

-
Click Accept to accept the printed card. Click Reject if you consider that the card quality is not good and want to reject the card.
-
When ActivID CMS has finished personalizing the card, remove the card from the printer or card reader.
If the device issuance process fails for any reason, then the system changes the device’s status to the Invalid State. This appears under In Process on the Inventory Report page. Before you try to re-issue the device, you must:
-
Recycle the device. For more information, see Recycling a Device.
- Cancel or retry the issuance request that has been automatically created. Go to the Help Desk page, search for the user whose device you failed to issue, and click Cancel or Retry in the Requests tab (there will be a failed production request for this user).
-
If you select Retry, then you do not have to re-enter the device issuance data (that is, the PIN code and device policy).


