Procedures for Managing Directories
-
From the ActivID CMS Operator Portal main page, select the Configuration tab.
-
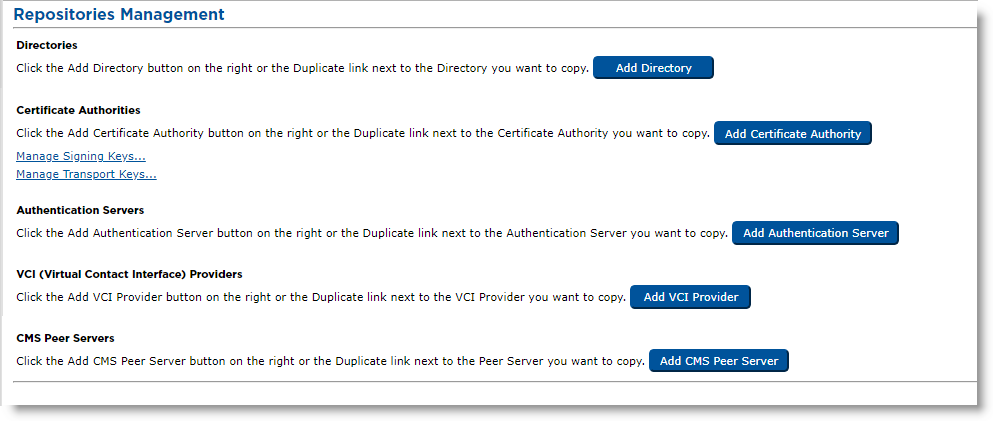
Click the Repositories sub-tab. The Repositories Management page appears:
-
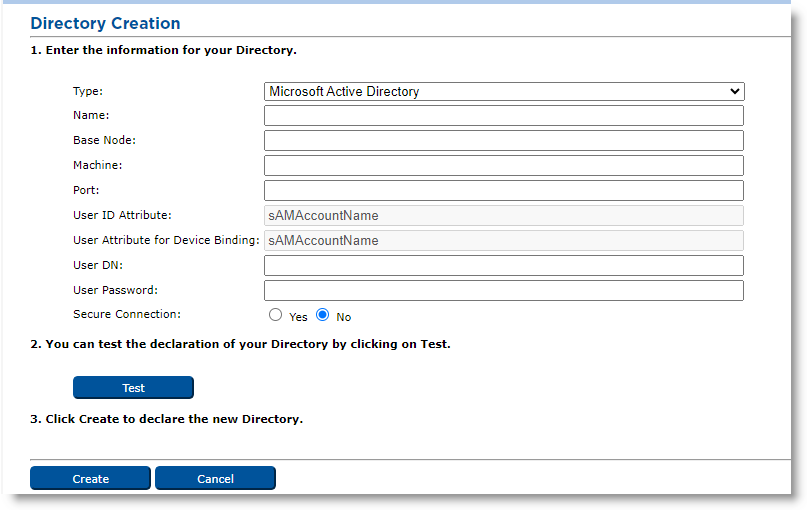
Click Add Directory. The Directory Creation page appears:
-
From the Type drop-down list, select a directory type.
Directory types can include:
Microsoft Active Directory
IBM Tivoli Directory Server / Novell eDirectory (UID) / Oracle Directory Server
Critical Path / Siemens DirX
Microsoft Active Directory LDS (Lightweight Directory Services)
Novell eDirectory (UniqueID)
OpenLDAP
-
Enter the appropriate information and select the Secure Connection option:
-
Name—Enter a logical name for the directory (the name that ActivID CMS will use to reference the LDAP Lightweight Directory Access Protocol directory). This name must be unique in ActivID CMS.
-
Base Node—Enter the directory’s base node in LDAP format (for example: ou=IT,dc=domain,dc=com).
-
Machine—Enter the host name or IP address of the system where the directory is running.
-
Port—Enter the port by which to connect to the directory. The default is 389.
Note: The User ID Attribute and User Attribute for Device Binding fields are automatically filled in based on the type of directory selected. The default values for the directories are listed in the following table:UserID
Directory Types
sAMAccountName
Microsoft Active Directory
uid
Microsoft LDS
cn
Critical Path / Siemens DirX
uid
IBM Tivoli Directory Server/Novell eDirectory (UID)/Oracle Directory Server
uniqueID Novell eDirectory (UniqueID) uid OpenLDAP -
User DN—Enter the distinguished name of the user. The distinguished name is the one that is used by ActivID CMS to connect to the directory. For example:
cn=administrator,cn=users,dc=domain,dc=com
At a minimum, this user must have permission to read the directory.
If you plan to manage users, or if you want to deploy ActivID CMS with an ActivID AAA server, then this user must have permission to write and delete in the directory.
Important: When ActivID CMS is configured with directories of different types, AAA credentials (i.e., SKI, OATH) are not supported.-
User Password—Enter the password for the specified user.
-
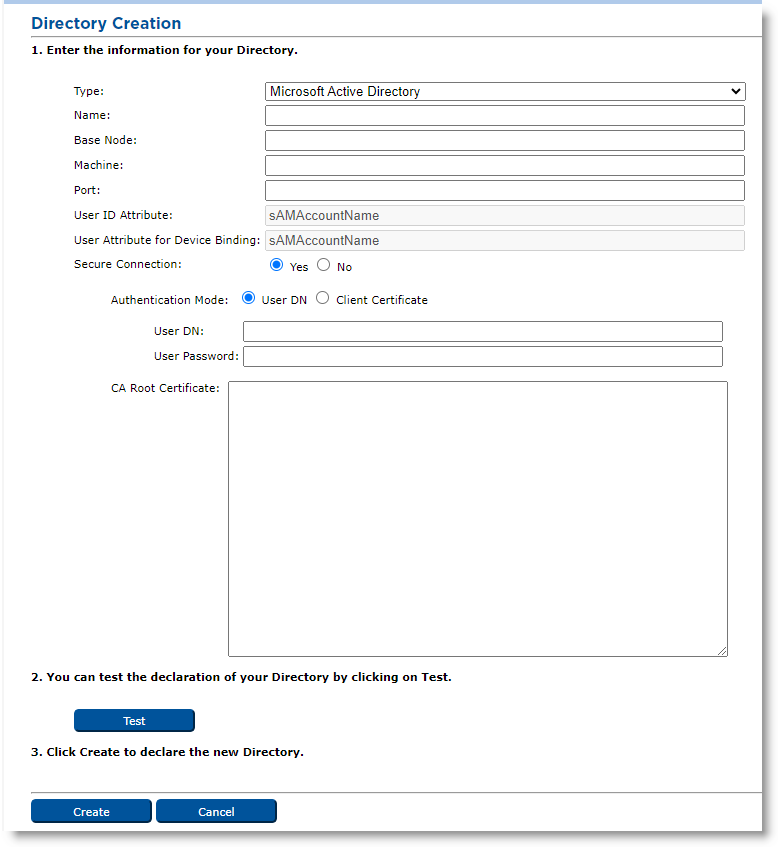
Secure Connection—If you want ActivID CMS to communicate to the LDAP directory through a secure connection (LDAPS protocol), then select Yes. For details, see Configuring Connections to the LDAP Directory Using LDAPS Protocol.
-
If you do NOT want to enable a secure connection to the LDAP directory, then select No and continue with step 5 of Scenario 2 below.
Configuring Connections to the LDAP Directory Using LDAPS Protocol
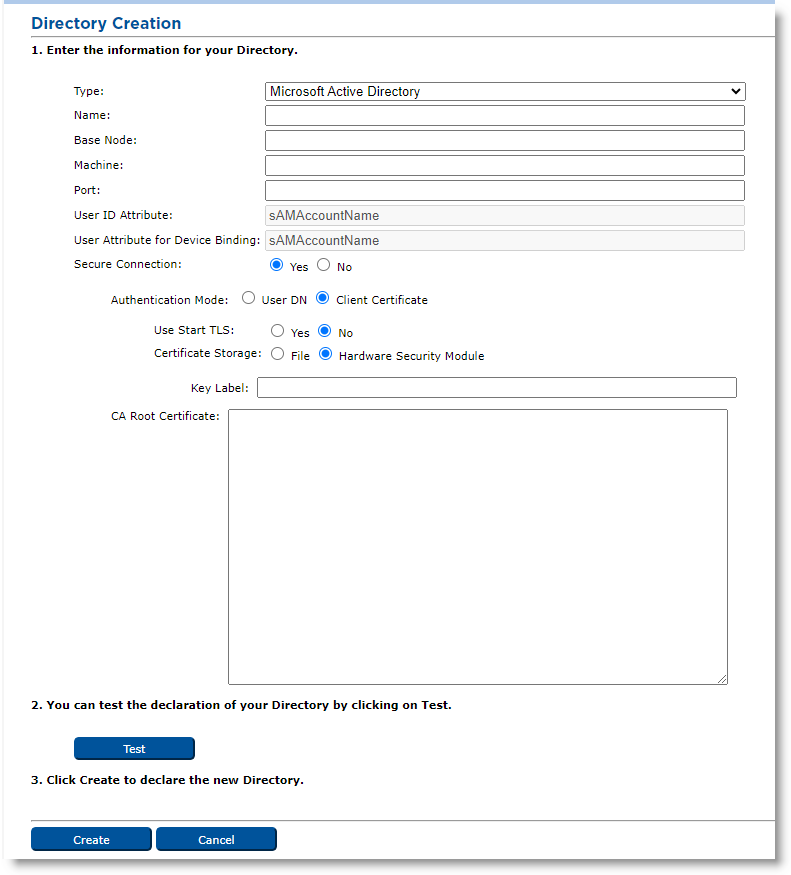
Secure binding to the LDAP directory enables ActivID CMS to bind using a user DN and password, or via a client certificate and a private key. The latter method is also known as Simple Authentication and Security Layer (SASL), whereby the certificate and private key can be stored either in a file or in a Hardware Security Module (HSM).
With this configuration, you can enable a secure connection to the directory (LDAPS) using the User DN and User password.
To enable this configuration, complete the following steps:
-
For Secure Connection, select Yes.
-
For Authentication Mode, select User DN.
-
For User DN, enter a valid distinguished name for the user.
-
For User Password, enter the valid password for this user.
-
For CA Root Certificate, paste the CA root certificate in base64 format.
Note: This is the root of the CA which generated the SSL certificate of the LDAP.
With this configuration, you can enable a secure connection to the directory (LDAPS) using a client certificate through SASL external authentication. The SASL authentication depends upon the following conditions:
-
Depending on the third-party LDAP directory configuration, the SASL external authentication can be configured over SSL or TLS protocols, using a secure port (636) or a non-secure port (389) with the Start TLS extension mechanism.
-
When using Red Hat® Directory Server with SASL external authentication using port 626, you must not select the Start TLS option in ActivID CMS. In addition, you must enable the Allow Client Authentication option in the Red Hat Directory Server.
To enable this configuration, complete the following steps:
-
For Secure Connection, select Yes.
-
For Authentication Mode, select Client Certificate.
-
For Use Start TLS, select Yes if you want to enable SASL external authentication using a non-secure port (389) with the Start TLS extension mechanism.
-
For Certificate Storage, choose between the following:
-
Select File if you want to store the client certificate and private key in a file on your server. (Not illustrated.) The path to the client certificate and the password protecting the .pfx file must be specified. You also need to insert the CA Root certificate in base64 format.
-
Select Hardware Security Module if you want to store the client certificate and private key in the HSM. The key label of the client certificate in the HSM must be specified, as well as the CA Root certificate in base64 format.
-
-
Click Test to verify that the connection is working.
-
Click Create to declare the new directory, and a confirmation message appears.
-
Click Done.
-
From the Repositories Management page, in the Directories section of the page, locate the desired directory in the Name column.
-
In the Action column, click Update. The Directory Update page appears:
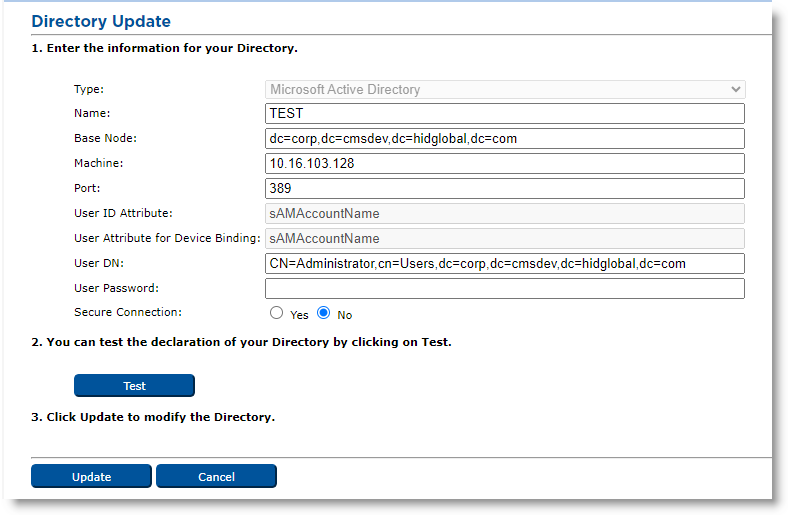
The fields and steps are the same as those described in Procedure 1: Adding a Directory.
-
Modify the fields as needed, then click Update.
-
When the confirmation page appears, click Done.
-
From the Repositories Management page, in the Directories section of the page, locate the desired directory in the Name column.
-
In the Action column, click View. The Directory Information page appears:
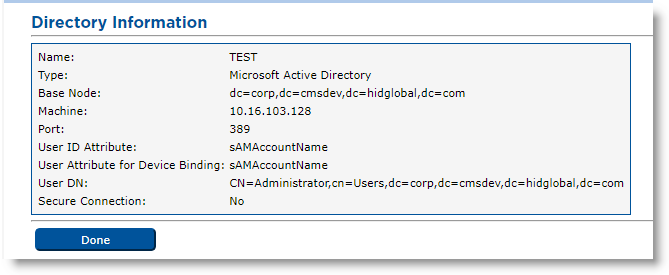
-
Click Done.
Removing a directory from the ActivID CMS database does not physically delete the directory itself––it only removes the connection between ActivID CMS and the database.
ActivID CMS will not warn you that an LDAP directory is referenced by other CMS elements before you delete it.
-
From the Repositories Management page, in the Directories section of the page, locate the desired directory in the Name column.
-
In the Action column, click Delete. The Directory Deletion page appears:

-
Click Delete to remove the directory.
-
When the confirmation page appears, click Done.


