ActivID CMS Portal Configuration
To configure an ActivID CMS Portal, complete the following tasks.
-
Issue a certificate from a certificate authority trusted by your ActivID CMS.
-
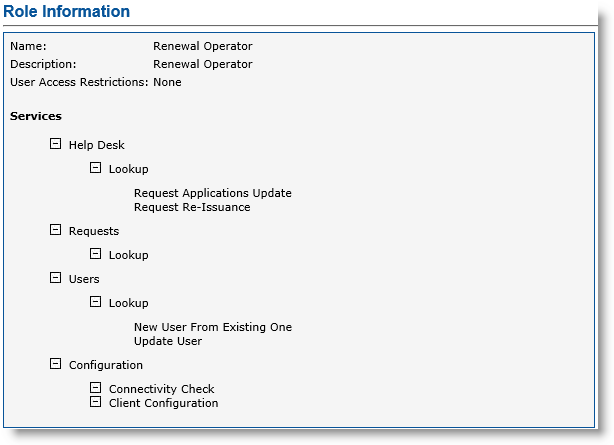
Link this certificate to an ActivID CMS operator who has the minimum following role privileges (as illustrated next).
-
Help Desk:
-
Lookup
-
Request Applications Update
-
Request Re-Issuance
-
-
Requests:
-
Lookup
-
-
Users:
-
Lookup
-
New User From Existing One
-
Update User
-
-
-
Configuration:
-
Connectivity Check
-
Client Configuration
-
-
-
Copy the operator certificate to the Automatic_Cert_Renewal/conf/certificates directory, and rename the file to renewalOperator.pfx.
-
Create an ActivID CMS server truststore that contains the certificate trust list to authenticate the ActivID CMS Web server, and then copy it to the Automatic_Cert_Renewal/conf/certificates directory, and rename it to server.trustore.
For information on how to create a truststore, see Creating a Server Truststore.
-
Locate the common.xml file found inside the conf folder (in the Automatic_Cert_Renewal/conf/ directory).
-
Edit the common.xml file. Locate the XML element cmsPortal.
Copy<cmsPortal>
<url>https://cmsserver.domain.com:32456</url>
<clientCertificate storage=”file”>
<filename>./conf/certificates/renewalOperator.pfx</filename>
<password isSecret="true" isEncrypted="false">password</password>
<hsmKeyLabel>keyLabel</hsmKeyLabel>
<hsmConfigurationFile>./conf/pkcs11.cfg</hsmConfigurationFile>
<hsmPin isSecret="true" isEncrypted="false">hsmPin</hsmPin>
</clientCertificate>
<serverCertificate storage="file">
<filename>./conf/certificates/root.cer</filename>
<password isSecret="true" isEncrypted="false">password</password>
</serverCertificate>
<pollingInterval>5000</pollingInterval>
<pollingMaxAttempts>50</pollingMaxAttempts>
</cmsPortal> -
Locate the URL element and modify it to match your configuration (for example, <url>https://cmsserver.domain.com:32456</url>, where cmsserver.domain.com represents the hostname of the ActivID CMS portal.
-
Locate the clientCertificate element. You can configure the PKI renewal software to use the client certificate of the ActivID CMS operator stored either in a pfx file or in an HSM A Hardware Security Module (HSM) securely stores secret key material. They are similar to large-storage, multisession smart cards. However, unlike smart cards, they are used mainly on the server side of a system.. Set the storage attribute value storage=“file” (in bold above) to the appropriate value. "file" is the default. You can also use "hsm". Refer to the following guidelines:
-
If you set this attribute to "file", then locate both the filename and password element in the clientCertificate section. If needed, modify the filename element value to the appropriate path for the client certificate file, and set the password of the client certificate file using the password element attribute value. You can ignore all other parameters in the clientCertificate section.
-
If you set this attribute to "hsm", then locate these three elements (hsmKeyLabel, hsmConfigurationFile, and hsmPin) in the clientCertificate section. Set the key label of the client certificate in the HSM to the appropriate value in the hsmKeyLabel element. Set the path to the HSM configuration file in the hsmConfigurationFile element. A default configuration file (pkcs11.cfg) comes with the PKI renewal tool in the conf folder. You can edit this default file or replace it with the file from the ActivID CMS server (stored in the %PROGRAMDATA%\HID Global\Credential Management System\Local Files directory).
-
If you configured the PKI Renewal in the unattended mode, then set the HSM PIN value in the hsmPin element. Otherwise, ignore this parameter. You will be prompted for the HSM PIN when running the PKI Renewal tool. For related information, see PKI Renewal Software Configuration.
-
-
Locate the serverCertificate section. You can configure the PKI renewal software to use the trust list required to authenticate the ActivID CMS server stored either in a single file (.cer file) or in a truststore. See Creating a Server Truststore. To do this, set the storage attribute value to the appropriate value: "file" (default) or "truststore". There are other file server certificate configuration parameters that must be set depending upon the storage mode you chose using the following guidelines:
-
If you set this attribute to "file", then locate the filename element in the serverCertificate section, and set the path for the root certificate file (.cer file) in the filename element. You can ignore all other parameters in the serverCertificate section.
-
If you set this attribute to "truststore", then there is no need to modify the filename element if you generated your certificate trust list as described previously. Otherwise, set the filename element value to the appropriate path to the certificate trust list file, and set the password of the certificate trust list file in the password element.
-
-
Save and close the file to save your configuration changes.


