Add Servers to the Pool
You can add a server to the server pool:
-
Using SSL communications (HTTPS). See Add a Server Using SSL Communications.
-
Not using SSL communications (HTTP). See step 10 in Add a Server Using SSL Communications.
The load balancing configuration you are using determines whether or not you configure the server using SSL communications.
-
All the servers must point to the same database.
-
Keys must be stored in the database for each configured peer server.
-
Each ActivID CMS instance:
-
Has its own cache information. The peer server configuration allows each ActivID CMS instance to synchronize its internal cache.
-
Shares the same keystore, which is stored in the ActivID CMS database.
-
Shares the ActivID CMS Peer Server configuration. You must configure the Client Certificate for each peer server.
-
-
On the Operator Portal, select the Configuration tab.
-
Click Repositories. The Repositories Management page appears.
-
Click Add CMS Peer Server.
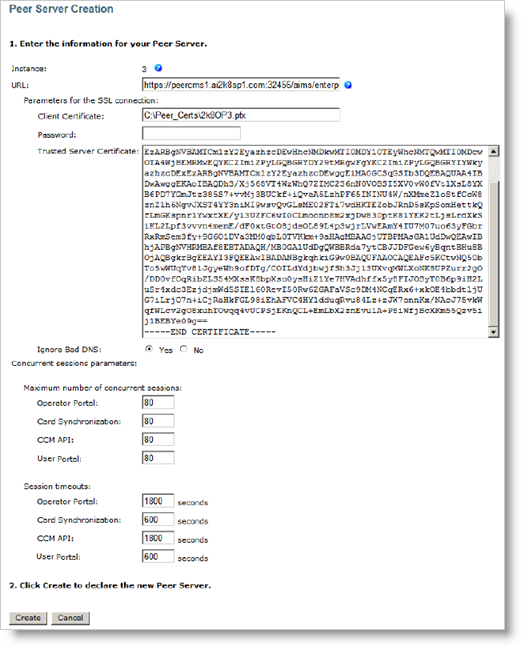
The Peer Server Creation page appears:
-
In the URL field, enter the peer server URL used to access the batch API In the context of ActivID CMS, an Application Programming Interface (API) is an external interface (for example, the CCM API) that makes it possible for applications not supported by HID Global to incorporate ActivID functionality.. Use the format: https:// {peer-server-hostname}:{port}/aims/enterprise/batch
-
In the Client Certificate field, enter the name of the authenticating .pfx file, which allows each server in the pool to check its status and synchronize its information to this server. For example, C:\CMS\loadbalancer\certificates\clientPeer1.pfx for PEER1, … certificates\clientPeer2.pfx for PEER2 and so on. (These certificates are stored in the same folder on every ActivID CMS peer.)
-
In the Password field, enter the password for the Client Certificate file. This is used to connect to this instance of the server. It is stored encrypted. For information about updating your password, refer to Managing Passwords.
-
In the Trusted Server Certificate field, paste the trusted CA The Certificate Authority (CA) issues and manages security credentials and public keys for message encryption in a networks environment. certificate from the CA that issued the server certificate.
-
Next to Ignore Bad DNS, select Yes.
You must select Yes when using an HTTPS connection and a load balancer because all servers share the same DNS name, and the connection between peer servers is made using IP addresses. If you do not select Yes, the server generates an error when a server certificate does not match the URL.
-
Click Create.
The server is added under CMS Peer Servers on the Repositories Management page. For example:

-
Restart IIS and CMS Server services in order to synchronize the peer servers.
-
On the Operator Portal, select the Configuration tab.
-
Click Repositories. The Repositories Management page appears.
-
Click Add CMS Peer Server.
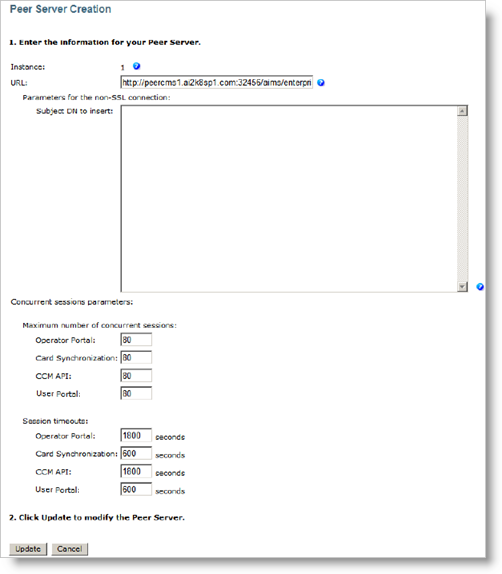
The Peer Server Creation page appears:
-
In the URL field, enter the server URL used to access the batch API in the peer server. Use the format http://hostname:port/aims/enterprise/batch.
-
In the Subject DN to insert field, paste the subject DN to insert for SSL-terminated environments. It can be a Base64 certificate or a plain subject DN string of the form CN=, depending on the setting for SSL termination.
-
Click Create.
The server is added under CMS Peer Servers on the Repositories Management page. For example:

-
Restart IIS and CMS Server services in order to synchronize the peer servers.


