Using Entrust Certificate Authority
This section describes how to configure PIV Personal Identity Verification (technical standard of "HSPD-12") policies with Entrust CA certificate templates.
-
In the Action column, next to PIV_AUTHENTICATION, click Configure.
-
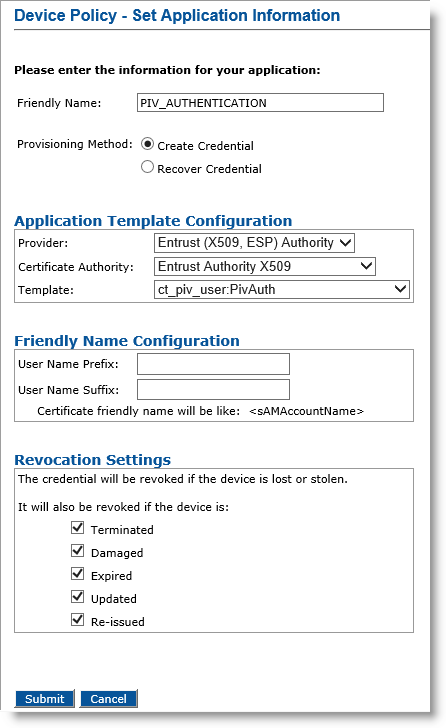
Friendly Name field— Enter a friendly name for the application.
-
Provisioning Method —Select Create Credential.
Note: Selecting the Create Credential option is the equivalent of setting the former Recover Application option (available in previous ActivID CMS versions) to No. -
Provider drop-down list—Select Entrust (X509, ESP) Authority.
-
Certificate Authority drop-down list— Select the second instance of the Entrust certificate authority (see the note in Configure PIV-Compliant Face-to-Face Device Policies).
-
Template drop-down list—Select the template that was configured for this application (for example, ct_piv_user:PivAuth).
-
-
In the User Name Prefix and User Name Suffix fields, enter a prefix and suffix for the certificate, if applicable.
-
Revocation Settings — By default, the credentials are revoked for all the listed states of the device. You can clear the check box(es) to indicate any state(s) for which you do not want to revoke the credentials. For example, if you clear the Damaged check box, the credentials in a device in the Damaged state will not be revoked.
-
Click Submit. The Configure PIV AUTHENTICATION Application page appears.
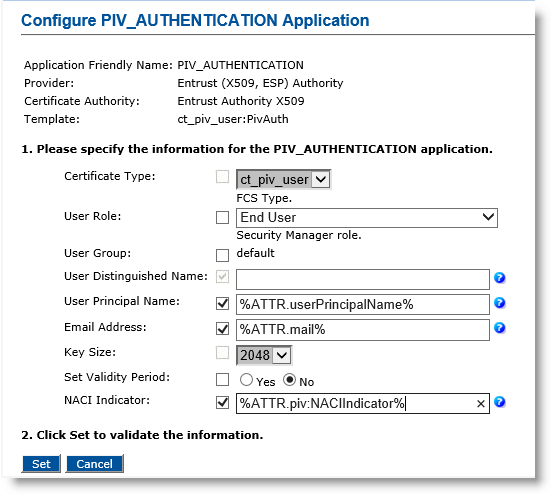 Note: About entering LDAP attributes: Selecting the checkbox adjacent to a parameter name (for example, Email Address), allows you to set the parameter value as dynamic. The parameter value may reference an LDAP Lightweight Directory Access Protocol attribute. If the checkbox is not selected, the parameter value is set as static.
-
Make any necessary changes. For the User Distinguished Name, User Principal Name, or Email Address parameters, you can set a dynamic value by selecting the corresponding checkbox and entering a directory attribute in the corresponding field.
-
User Role—Select End User.
-
User Distinguished Name—Keep as default.
-
User Principal Name—Select the checkbox, and in the text box, enter %ATTR.userPrincipalName% (or optionally enter %ATTR.piv:UPN%).
-
Email Address—Select the checkbox, and in the text box enter %ATTR.mail% (or optionally enter %ATTR.piv:Email%).
-
Set Validity Period—Select No.
-
NACI Indicator—Select the checkbox, and in the text box, enter %ATTR.piv:NACIIndicator%.
-
-
Click Set. The Device Policy - Creation page appears again. The application name will be changed from red to green to indicate that the application has been configured.
-
If you have finished configuring the applications, click Save. A confirmation message appears.
-
Click Done.
-
Optionally, in the Action column, next to CARD_AUTHENTICATION, click Add, and then click Configure.
-
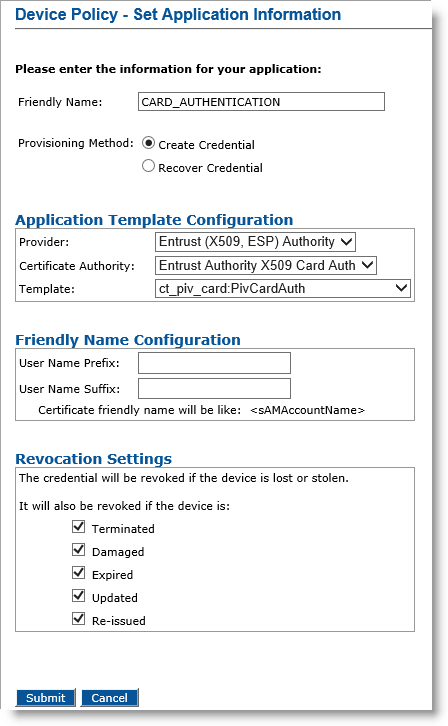
Friendly Name field— Enter a friendly name for the application.
-
Provisioning Method —Select Create Credential.
-
Provider drop-down list—Select Entrust (X509, ESP) Authority for the Card_Authentication application.
-
Certificate Authority drop-down list— Select the first instance of the Entrust certificate authority (for example Entrust Authority X509-2 (see the note in Configure PIV-Compliant Face-to-Face Device Policies)).
-
Template drop-down list—Select the template that was configured for this application (for example, ct_piv_card:PivCardAuth).
-
-
Click Submit. The Configure CARD_AUTHENTICATION application page appears.
-
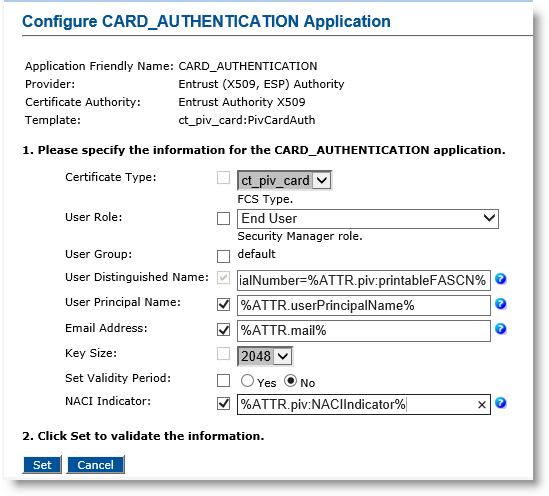
User Role—Select End User.
-
User Distinguished Name— Enter serialNumber=%ATTR.piv:printableFASCN%.
-
User Principal Name—Select the checkbox, and in the text box, enter %ATTR.userPrincipalName% (or optionally, enter %ATTR.piv:UPN%).
-
Email Address — Select the checkbox, and in the text box enter %ATTR.mail% (or optionally enter %ATTR.piv:Email%).
-
Set Validity Period—Select No.
-
NACI Indicator— Select the checkbox, and in the text box, enter %ATTR.piv:NACIIndicator%.
-
-
Click Set at the bottom of the page to return to the main Device Policy Configuration page.
-
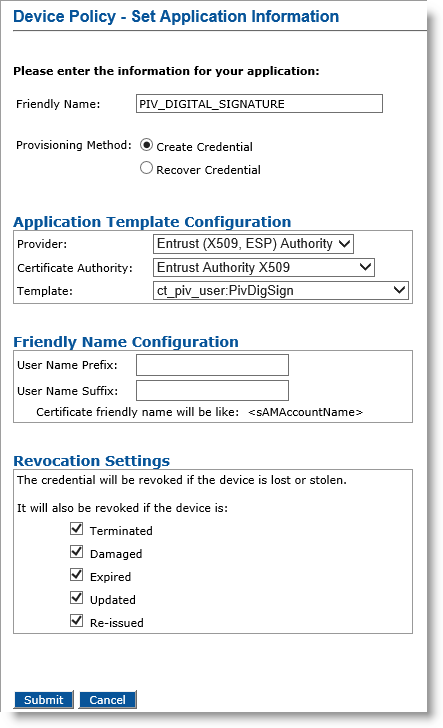
Optionally, in the Action column, next to PIV_DIGITAL_SIGNATURE, click Add, and then click Configure.
-
Friendly Name field— Enter a friendly name for the application.
-
Provisioning Method —Select Create Credential.
-
Provider drop-down list—Select Entrust (X509, ESP) Authority.
-
Certificate Authority drop-down list— Select the second instance of the Entrust certificate authority (see the note in Configure PIV-Compliant Face-to-Face Device Policies).
-
Template drop-down list—Select the template that was configured for this application (for example, ct_piv_user:PivSignAuth).
-
-
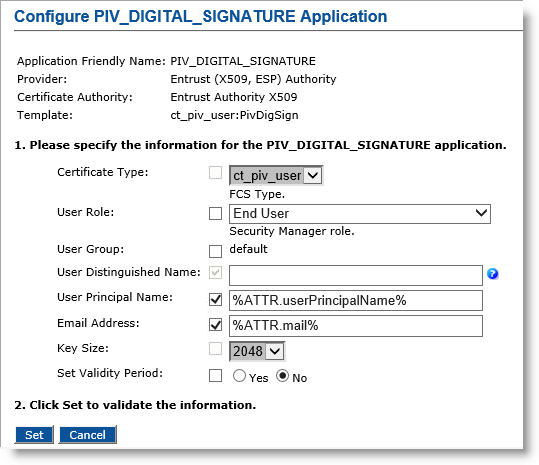
Click Submit. The Configure PIV_DIGITAL_SIGNATURE application page appears.
-
User Role—Select End User.
-
User Principal Name—Select the checkbox, and in the text box, enter %ATTR.userPrincipalName% (or optionally, enter %ATTR.piv:UPN%).
-
Email Address—Select the checkbox, and in the text box, enter %ATTR.mail% (or optionally, enter %ATTR.piv:Email%).
-
Set Validity Period—Select No.
-
-
Click Set to return to the main Device Policy Configuration page.
-
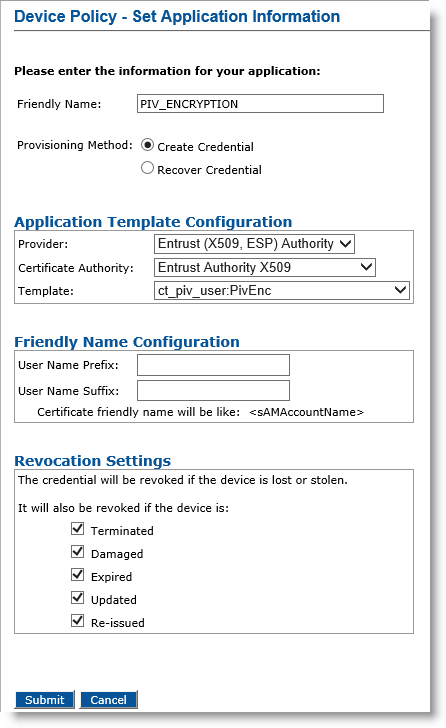
Optionally, in the Action column, next to PIV_ENCRYPTION, select Update/Add, and then click Configure.
-
Friendly Name field— Enter a friendly name for the application.
-
Provisioning Method —Select Create Credential.
-
Provider drop-down list—Select Entrust (X509, ESP) Authority.
-
Certificate Authority drop-down list— Select the second instance of the Entrust certificate authority (see the note in Configure PIV-Compliant Face-to-Face Device Policies).
-
Template drop-down list—Select the template that was configured for this application (for example, ct_piv_user:PivEnc).
-
-
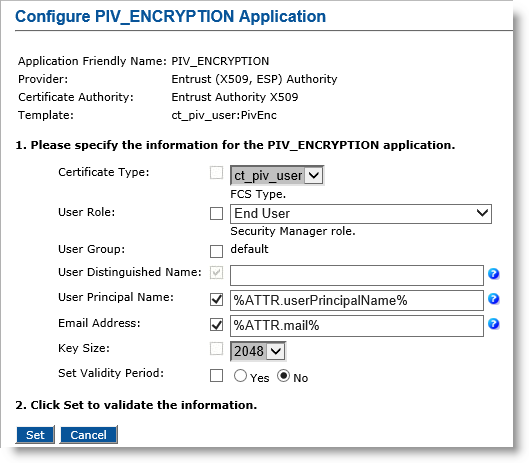
Click Submit. The Configure PIV_ENCRYPTION Application page appears.
-
User Role—Select End User.
-
User Principal Name—Select the checkbox, and in the text box, enter %ATTR.userPrincipalName% (or optionally, enter %ATTR.piv:UPN%).
-
Email Address— Select the checkbox, and in the text box, enter %ATTR.mail% (or optionally, enter %ATTR.piv:Email%).
-
Set Validity Period—Select No.
-
-
Click Set to return to the main Device Policy Configuration page.
-
Click Save, and then click Done.


