Using Microsoft Certificate Authority
This section describes how to configure PIV Personal Identity Verification (technical standard of "HSPD-12") policies with Microsoft® CA certificate templates.
-
Next to the PIV_AUTHENTICATION object, click Configure.

-
On the Set Application Information page, make sure that the correct Certificate Authority and Template are displayed, and then click Submit.
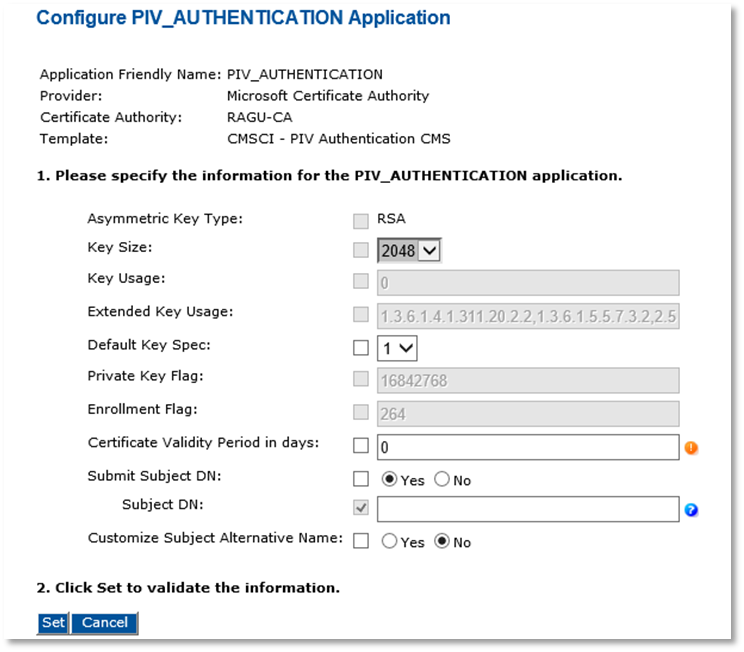 Note: The Asymmetric Key Size option is automatically assigned the value RSA or ECC according to the device profile you use. In the current version of ActivID CMS, ECC keys are only available for PIV or CIV Commercial Identity Verification Card Authentication certificates used with the Microsoft CA.
-
Key Size—Select the key size according to the device profile you use and to the Asymmetric Key Type.
-
Default Key Spec—Select 1.
-
Certificate Validity Period in days—Define the certificate validity period according to your organization’s security policy.
-
Submit Subject DN—Select Yes.
-
-
Click Set to return to the main Device Policy Configuration page.
-
Optionally, to add and configure the CARD_AUTHENTICATION application, in the Action column, next to CARD_AUTHENTICATION, select Add, and then click Configure.
-
On the Set Application Information page that is displayed, make sure that the correct Certificate Authority and Template are selected, and then click Submit.
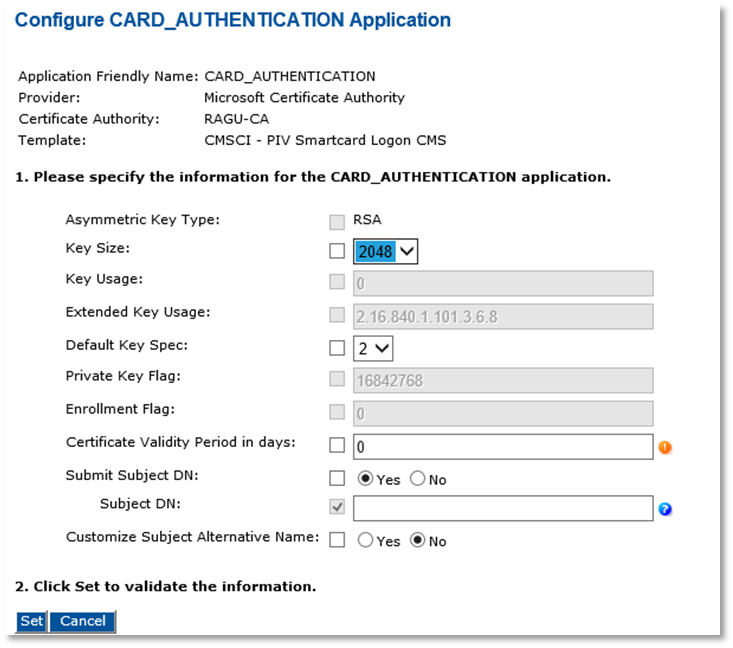 Note: The Asymmetric Key Size option is automatically assigned the value RSA or ECC according to the device profile you use. In the current version of ActivID CMS, ECC keys are only available for PIV or CIV Card Authentication certificates used with the Microsoft CA.
-
Key Size—Select the key size according to the device profile you use and to the Asymmetric Key Type.
-
Default Key Spec—Select 2.
-
Certificate Validity Period in days—Define the certificate validity period according to your organization’s security policy.
-
Submit Subject DN—Select No.
-
-
Optionally, for PIV_DIGITAL SIGNATURE, PIV_ENCRYPTION, and any of the PIV_KEY_MANAGEMENT_KEY_HISTORY, next to the application name, select Add, and then click Configure.
-
On the Set Application Information page displayed, make sure that the correct Certificate Authority and Template are selected, and then click Submit.
-
Key Size—Select the key size according to the device profile you use.
-
Default Key Spec—Select 2 for Digital Signature, select 1 for PIV Encryption and Key History.
-
Certificate Validity Period in days—Define the certificate validity period according to your organization’s security policy.
-
Submit Subject DN—Select No.
-
-
Click Set to return to the main Device Policy Configuration page.
-
Click Save, and then click Done.


