Configuring Network HSMs
This section provides details on how to configure Thales network HSMs for use with ActivID CMS. For network HSMs (Thales SafeNet Network HSM / Thales TCT Luna SA for Government HSM), where the Thales / Thales TCT client software is operated, you must use a vendor-provided utility to prepare the HSM for ActivID KMS (and later ActivID CMS).
Network HSM Product Versions
Refer to ActivID CMS System Environment for the list of supported Thales (formerly Gemalto) SafeNet Network / Thales TCT (formerly SafeNet AT) Luna SA HSMs.
PKI key escrow/recovery requires specific Thales SafeNet / Thales TCT Luna models that support Key Export (KE), also referred to as Cloning Key Export (CKE). By default, Thales SafeNet / Thales TCT Luna HSMs do not support KE. Make sure to order a Thales SafeNet / Thales TCT Luna HSM model that supports KE/CKE.
Two models of these HSMs exist on the market: Trusted Path Authentication with PED (PIN Entry Device) or Password Authentication without PED.
Thales SafeNet PED PIN Entry Device

Connect to and Set Up the HSM
This section assumes that the Thales / Thales TCT client software has been installed in your specific environment (for example: on a Windows, Linux®, or Solaris™ platform). To verify, check the contents on the Client Software installation package delivered with the HSM. It will have specific instructions about installing the vendor software.
Before you attempt to set up the HSM for the first time, establish a serial connection between the workstation and the HSM. A Terminal Emulation tool (for example, TeraTermPro) must be used for setting up the serial communication using the following settings:
-
Serial port baud rate: 115200
-
N, 8, 1 (no parity, 8 data-bits, one stop-bit)
-
VT-100 terminal emulation
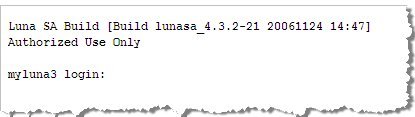
During the first login attempt, you will be required to set up a new password for the HSM. Remember that both username and password are case-sensitive. The following operations are the responsibility of the HSM administrator:
-
Set up,
-
Record and assign partitions, and
-
Exchange the certificates.
The set of commands listed in Procedure 1: Set Date, Time, and Timezone provides an example of the code required to perform the operation. These values change for each HSM being set up and reflect the settings in which the network HSM will operate.
This section illustrates how to set the date, time, and timezone. The same command is used for setting the date (sysconf –date...) and time (sysconf –time...). The settings for date, time, and timezone are read using the syntax status –date, status –time, and status –zone, respectively. Set the date, time, and timezone using the following sample as a guide:
cmslunasa] lunash:> sysconf -timezone -set US/Eastern
Timezone set to US/Eastern
Command Result : 0 (Success)If the network uses the Domain Name System (DNS), the hostname for the HSM must be entered into the DNS record of the network to which the HSM connects. If DNS is not used in the network, then you can enter an arbitrary hostname. Set the hostname using the following sample as a guide:
cmslunasa] lunash:>net hostname ade_luna_sa
Success: Hostname ade_luna_sa set.
Command Result : 0 (Success)This operation sets the domain name in which the HSM operates. Set the domain name using the following sample as a guide:
ade_luna_sa] lunash:>net domain luna_sa.test.com
Success: DomainName luna_sa.test.com set.
Command Result : 0 (Success)This operation sets a new IP address for the DNS name server (this operation is optional if there is no DNS involved). Change the IP address of the DNS name server using the following sample as a guide:
ade_luna_sa] lunash:>net -dns -nameserver 192.168.5.78
Success: Nameserver 192.168.5.78 added
Command Result : 0 (Success)This operation sets up the IP address for the Ethernet device for the HSM port (eth0 or eth1). Set up the IP address for an Ethernet device using the following sample as a guide:
[ade_luna_sa] lunash:>net interface -static -device eth0 -ip 192.168.5.200 -netmask 255.255.255.0 -gateway 192.168.5.1If you are sure that you want to restart the network, then type 'proceed'; otherwise, type 'quit':
> proceed
Proceeding...
Restarting network service...
Shutting down loopback interface:  [ OK ]
Setting network parameters:  [ OK ]
Bringing up loopback interface:  [ OK ]
Bringing up interface eth0:  [ OK ]
Command Result: 0 (Success)To verify your settings, use the ping command to ping the server name from the HSM environment using the following sample as a guide:
net ping <servername> or IP@
[ade_luna_sa] lunash:>net ping supreme.testLunadomain.testval.activcard.com
PING supreme.testLunadomain.testval.activcard.com (192.168.5.24) from
192.168.5.200 : 56(84) bytes of data.
64 bytes from supreme.testLunadomain.testval.activcard.com (192.168.5.24): icmp_seq=0 ttl=128 time=492 usec
--- supreme.testLunadomain.testval.activcard.com ping statistics ---
1 packets transmitted, 1 packets received, 0% packet loss
round-trip min/avg/max/mdev = 0.492/0.492/0.492/0.000 ms
Command Result: 0 (Success)This operation adds a Network Time Protocol (NTP) server to the HSM server list. Add a server to the HSM server list using the following sample as a guide.
[ade_luna_sa] lunash:>sysconf ntp -addserver 192.168.5.200
Shutting down ntpd:                                  [ OK ]
Starting ntpd:                                       [ OK ]
NTP server 192.168.5.200 added
Command Result: 0 (Success)The client’s network application and the HSM securely exchange data through a Network Trust Link (NTL). This operation changes the default certificate that is recorded in the HSM for NTLS (Network Trust Link Service) protected communications. Generate a new HSM server certificate using the following sample as a guide:
[ade_luna_sa] lunash:>sysconf regencert 192.168.5.200
WARNING!! This command will overwrite the current server certificate and private key.
All clients will have to add this server again with this new certificate.
If you are sure that you wish to proceed, then type 'proceed'; otherwise type 'quit':
> proceed
Proceeding...
'sysconf regenCert' successful. NTLS must be (re)started before clients can connect.
Please use the 'ntls show' command to ensure that NTLS is bound to an appropriate network device or IP address/hostname for the network device(s) NTLS should be active on. Use 'ntls bind' to change this binding if necessary.
Command Result: 0 (Success)NTLs are secure, authenticated network connections between the HSM and the client’s network application. NTLS uses two-way digital certificate authentication and SSL data encryption to protect sensitive data as it is transmitted between the HSM partitions and the client’s application. NTLS resides on the HSM, NTLA resides on the client, and the NTL is the secure connection between NTLS and NTLA. To create an NTL, the client and the HSM must first exchange certificates. Those certificates are used to identify each protagonist and are shared before the NTL link is considered to be up and running.
The ntls show command is used in cases where there is no DNS involved. Whenever DNS is involved, the following command is called:
Copy[ade_luna_sa] lunash:>sysconf regencert
This command restarts NTLS on the HSM. Restart NTLS using the following sample as a guide:
[ade_luna_sa] lunash:>service r ntls
Checking for connected clients before stopping NTLS service:
There are no connected clients.  Proceeding...
Stopping ntls:                                             [ OK ]
Starting ntls:                                             [ OK ]
Command Result: 0 (Success)The following command must be sent to bind NTLS (in the HSM) to the physical Ethernet port (eth0 or eth1). Bind NTLS using the following sample as a guide:
[ade_luna_sa] lunash:>ntls bind none -bind 192.168.5.200
Success: NTLS binding hostname or IP Address 192.168.5.200 set.
NOTICE: The NTLS service must be restarted for new settings to take effect.
If you are sure that you wish to restart NTLS, then type 'proceed'; otherwise type 'quit':
> proceed
Proceeding...
Restarting NTLS service...
Stopping ntls:                                             [ OK ]
Starting ntls:                                             [ OK ]
Command Result: 0 (Success)ade_luna_sa] lunash:>ntls bind eth0To check the correct execution of the binding, use the following command:
[ade_luna_sa] lunash:>ntls show
NTLS bound to network device: none IP Address: "192.168.5.200" (eth0)
Command Result: 0 (Success)
Managing HSM Partitions
A partition is a secure, independent, protected area in the HSM where sensitive attributes can be stored (for example, cryptographic keys, certificate strings, or access passwords). Each partition has its own data, access controls, security policies, and separate administration access. The HSM implements a form of firewall between all partitions.
At a minimum, a partition connects to a client machine. In practice, each partition can connect to one or more clients. Each partition is assigned to a Partition Owner who holds an iKey (Black PED Key) that controls access to the partition.
Each partition is set with the following:
-
A client password (password generated by the PED device and used by the client application to authenticate against the partition).
-
A black PED key (USB key holding the Partition Owner PIN).
There are two partition types:
-
Physical partitions are also known as standard partitions.
-
Virtual partitions, for High Availability (HA) mode. This partition type does not physically exist in the HSM. It is a partition type that is visible from the client, but it points to a group of physical partitions present in the HSM that comprises this HA group. For details, see About High Availability Mode.
As delivered, Thales SafeNet Network HSMs / Thales TCT Luna SA HSMs can support a number of partitions (1, 2, or more). Each partition can store a high number of data objects (certificates or key-pairs), the exact number depends on the memory configuration. For details, contact your Thales / Thales TCT representative.
This option displays information related to the licenses, especially partition licenses. Display the maximum number of partitions that are available in your HSM using the following command (this sample illustrates a two-partition maximum):
[ade_luna_sa] lunash:>hsm displayLicenses
This option returns the HSM
HSM CAPABILITY LICENSES
License ID    Description
======     ===========
0, 9768e         K5Base
0, 9765f         ECC
0, 97660         KCDSA
0, 97656         Objects320
0, 97651         Performance1200
0, 97659         2 Partitions
0, 9768d         Offboard Storage KE
0, 9764d         FIPS3
Command Result: 0 (Success)This operation completely clears up the HSM content. For example, existing partitions, keys, or any data that are recorded in the HSM are deleted.
During this procedure, a SafeNet iKey must be plugged into the PED device and assigned with a blue sticker. This iKey is owned by the HSM administrator. The HSM administrator is prompted to enter his PED key PIN directly on the PED device.
The HSM administrator may be prompted to create a red PED key called a Domain key. The Domain key contains the Key Domain Vector (shared across a group of HSMs) which is used to duplicate partitions in a clone HSM An exact copy of a Principal HSM. The keys stored in the Clone HSM are identical to those stored in the Principal HSM, allowing you to use multiple card issuance servers with the same card issuance master keys. Created with HSM manufacturer tools.. The initialization of the red PED key is optional for use in the ActivID KMS environment.
The following sample illustrates HSM initialization with a new label: ade_luna_sa. After performing the init operation, the administrator must login again.
lunash:> hsm init -label ade_luna_sa
[ade_luna_sa] lunash:>hsm init -label ade_luna_sa
CAUTION:      Are you sure you wish to re-initialize this HSM? All partitions and data will be erased.
              Type 'proceed' to initialize the HSM, or 'quit' to quit now.
              > proceed
Luna PED operation required to initialize HSM - use gray and blue PED keys.
Luna PED operation required to login as HSM Administrator - use blue PED key.
Luna PED operation required to generate cloning domain - use red PED key.
'hsm init' successful.
Please wait while the HSM is reset to complete the initialization process.
Command Result: 0 (Success)Use the following command to display the HSM policies:
[ade_luna_sa] lunash:>hsm -showPolicies
HSM Label:   ade_luna_sa
Serial #:    950217
Firmware:    4.6.1
The following capabilities describe this HSM, and cannot be altered except using firmware or capability updates.
Description                              Value
===========                   =====
Enable PIN-based authentication          Disallowed
Enable PED-based authentication          Allowed
Performance level                        9
Enable M of N                            Allowed
Enable domestic mechanisms & key sizes   Allowed
Enable masking                           Allowed
Enable cloning                           Allowed
Enable special cloning certificate       Disallowed
Enable full (non-backup) functionality   Allowed
Enable ECC mechanisms                    Allowed
Enable non-FIPS algorithms               Allowed
Enable MofN auto-activation              Allowed
Enable SO reset of partition PIN         Allowed
Enable network replication               Disallowed
Enable Korean Algorithms                 Allowed
FIPS evaluated                           Disallowed
Manufacturing Token                      Disallowed
Enable Remote Authentication             Allowed
Enable forcing user PIN change           Allowed
Enable offboard storage                  Allowed
Enable partition groups                  Disallowed
Enable non-FIPS accelerator mode         Disallowed
The following policies are set due to current configuration of this HSM and cannot be altered directly by the user.
  Description                              Value
===========                     =====
PED-based authentication                 True
Require M of N                           False
The following policies describe the current configuration of this HSM and maybe changed by the HSM Administrator. Changing policies marked "destructive" will zeroize (erase completely) the entire HSM.
Description                              Value        Code      Destructive ===========                  =====     ====    ===========
Allow masking                            On           6         Yes
Allow cloning                            On           7         Yes
Allow non-FIPS algorithms                On           12        Yes
Allow M of N auto-activation             On           13        No
SO can reset partition PIN               On           15        Yes
Allow Remote Authentication              On           20        Yes
Force user PIN change after set/reset    Off          21        No
Allow offboard storage                   On           22        Yes
Command Result: 0 (Success)This operation physically creates a partition in the HSM that is identified by a partition name. During this process, the user will be asked to plug in an iKey that is assigned to the partition owner. The user must put a black sticker on the iKey, and then enter a PIN code.
In return, the PED displays a password that must be written down (see the following sample). This password is used later by the client application to authenticate to the partition.
[luna_sa1] lunash:>par cr -partition luna_sa1_part1
(Do not forget to save the password partition; for example: pTYF-45xG-pXbE-AHs4)
Please ensure that you have purchased licenses for at least this number of partitions:      1
If you have purchased licenses for at least this number of partitions then type 'proceed'; otherwise type 'quit':
> proceed
Proceeding...
Please ensure that you copy the password from the Luna PED and that you keep it in a safe place.
Luna PED operation required to create a partition - use black PED key.
'partition create' successful.
Command Result: 0 (Success)This operation modifies policies 22 and 23 and allows for activation and auto-activation on partitions. These changes are needed for a HSM with PED. Partition Activation (Policy 22) enables a partition holder to authenticate once to the partition and not require the partition holder to leave his or her black PED key remaining connected to the PED device.
Auto-Activation consists of an automatic re-activation of the partition in cases where short power outages occur (the client application can reconnect and continue using the partition without re-asking the partition owner’s consent). Use the following sample as a guide:
[luna_sa1] lunash:>partition changePolicy -partition luna_sa1_part1 -policy 22 -value 1
'partition changePolicy' successful.
Policy "Allow activation" is now set to: 1
[luna_sa1] lunash:>partition changePolicy -partition luna_sa1_part1 -policy 23 -value 1
'partition changePolicy' successful.
Policy "Allow auto-activation" is now set to: 1
Notice:  Auto activation parameters will be stored during next activation. It is recommended you activate this partition now.
Command Result: 0 (Success)This operation allows any registered client application to activate and use the partition. The client application passes the password returned by the PED device at the time the partition was created. The black PED key from the partition owner is plugged into the PED which requires the partition owner to enter the PIN for the PED key (as shown in the following sample):
[luna_sa1] lunash:>partition activate -partition luna_sa1_part1
Please enter the password for the partition:
> *******************
pTYF-45xG-pXbE-AHs4
Luna PED operation required to activate partition - use black PED key.
'partition activate' successful
Command Result: 0 (Success)This option can be enabled on each of the partitions. This mode may be used if the High Availability mode is configured. The High Availability (HA) mode of operation is described briefly in this section. For details, see About High Availability Mode. For information about HSM support for HA mode, please refer to Thales / Thales Trusted Cyber Technologies documentation.
You can change the password that is used by the client to authenticate to a partition. Use the following sample as a guide:
[luna_sa1] lunash:>partition changePw -partition luna_sa1_part1 -newpw 12365478 -oldpw pTYF-45xG-pXbE-AHs4There are other options that are not documented in this documentation that you can use to manage (or aid your understanding of) existing partitions in the HSM. For more information, refer to the Thales / Thales Trusted Cyber Technologies documentation for details. For example, to use the Delete Partition option, the Security Officer or HSM administrator must be logged into the HSM (using a PED blue key), in addition to the partition owner using a black PED.
This section explains how to record the client (ActivID CMS/KMS) on the DNS from the network server (using TestLuna as an example). The ActivID CMS server/KMS must be known by the DNS associated with TestLuna. Using the Microsoft Terminal Services Commands and its utility, run the following commands:
mstsc.exe in C:\WINDOWS\system32, Connect to client (192.168.xxx.xxx),
<username>, <password>
-
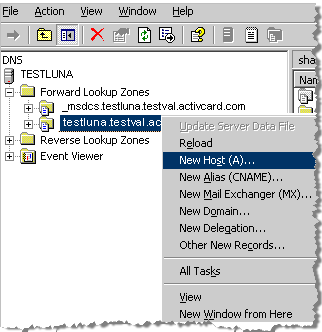
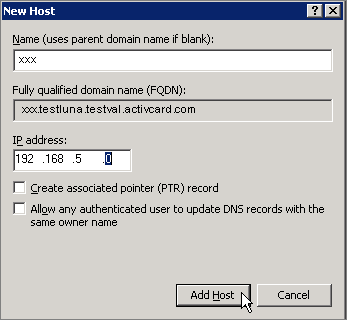
Under Administrative Tools, click DNS, and then under TESTLUNA right-click testluna.testval.activecard.com and then click New Host (A). The New Host window is displayed.
-
Name—Enter the name of the client machine.
-
IP address—Enter the corresponding IP address using dotted decimal notation.
-
Click Add Host.
Exchanging Certificates between the Client System and the HSM
One certificate is attached to the HSM (which is generated internally), and a second certificate is generated on the client system. These certificates are used to mutually authenticate the HSM and the client, and thus encrypt the transport of sensitive data between them using the NTL protocol. To perform the exchange of certificates between the client system and the HSM, complete the following procedures.
At this point in the process, you have completed the first leg of the NTL protocol with the HSM having created a new NTLS certificate. In the following description, it is assumed that the client system operates in a Windows environment (refer to the Thales / Thales TCT software installation package for specific information about Linux-based environments).
To request the certificate from the HSM, open a command prompt window, and then call the PuTTY Secure Copy (PSCP) utility provided by Thales / Thales TCT.

The server.pem file is stored in the calling directory (for example, C:\Program Files\SafeNet\LunaClient). This file contains the HSM Server certificate.
To register the HSM server certificate with a Windows-based client system, you must use the Utility Virtual Tape Library (vtl) executable provided by Thales / Thales TCT. Use the following sample commands as a guide to registering the HSM server certificate on the server list.

If you are working with DNS, then you must use the domain name instead of the IP address for the clientHostName. For example:
xxx.yyyyyy.testval.activcard.comIf you are not working with a DNS, then you must use the following command format. Use the dotted decimal notation format for the clientHostName (for example, the client IP address in the following example is 192.168.5.174).

After the completion of this request, the private key and certificate files containing the client certificate and associated private key are stored on the client system.
Once created, the client certificate must be transmitted to the HSM. Use the following export process sample as a guide.

To assign the client certificate to the HSM, use the PuTTY tool or Secure Shell (SSH) to perform this procedure. In a Windows-based environment, the freeware PuTTY utility establishes SSH communication with the HSM. In a Linux-based environment, use SSH to perform the same procedure. Use the following sample as a guide to register the client certificate.
[ade_luna_sa] lunash:> client -register -client supreme -hostname supreme-
testLunadomain.testval.activcard.com
'client register' successful- If you are not using a DNS, you must use the IP address instead of the hostname as shown in the following sample:
- The name of the client can be any string that uniquely identifies the client certificate.
- To verify that the client certificate is properly registered, the following command is called:
[ade_luna_sa] lunash:> client –register –client supreme –ip 192.168.5.174.[ade_luna_sa] lunash:> client –list
Registered client 1: supremeThe client system can access only specific partitions that the HSM administrator has enabled or assigned to the client, as shown in the following example:

[ade_luna_sa] lunash:>partition list
Partition: 902514001, Name: ade_partition.Use the commands in the following sample as a guide to verify the partition or partitions assigned to a specific client:
[ade_luna_sa] lunash:>client –show –client supreme
Client ID:     supreme
IPAddress:     192.168.5.174
Partitions: “ade_partition”In the previous procedure, a check was made of the contents of the HSM and the association (if any) between the client and HSM, on the HSM side (with verification performed on the HSM side). To perform a similar verification on the client side, open a command window and issue the vtl verify command as illustrated next.
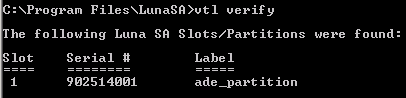
At this point, the HSM is ready for use in an ActivID KMS installation for initializing the cryptographic keys in each partition. When the keys have been generated/loaded using ActivID KMS, the HSM is connected to ActivID CMS to provision the cards.
About High Availability Mode
The Thales SafeNet Network HSM / Thales TCT Luna SA HSM implements a High Availability (HA) mode that connects one or more HSMs together to form a virtual device. The client application accesses only the virtual partition exposed by the HA group. It does not access each HSM individually. All HSMs involved in the HA belong to that group. A virtual partition consists of a phantom partition that identifies physical partitions existing in one or more HSMs.
HA provides load balancing across all the HSMs from this virtual group. HA load balancing provides improved performance and reduces the overall response time during HSM access. In case of failure in any HSM part of the group, the HA mode automatically redirects the requests to the other remaining operational HSMs. From the client perspective, there is no interruption of services.
Using HA is an option that requires the physical presence of several HSMs during deployment. These HSMs must be of the same type: either Trusted Path Authentication or Password Authentication.
Before you create an HA group, verify the following list of prerequisites.
-
The Allow Cloning and Enable Network Replication parameters are enabled.
-
Allow Cloning is already enabled according to parameters listed in Using the ‘showPolicies’ Command. For details, see Creating Partitions. Make sure that Enable Network Replication is enabled by running the following command:
Copy[adr_luna_sa] lunash;>hsm –changePolicy –policy 16 -value 1
-
All HSM group members that belong to the same cloning domain must use the same red PED key.
-
Each HSM must have at least one partition created. There is no requirement to use the same partition name. However, each partition must be set using the same password. This is the password that authenticates the client.
-
Record the serial number of each partition that is created on each HSM. These partition numbers are required during the creation of the HA group.
-
Each partition can be configured to be Auto-Activated (if this is not already the case).
-
Assign the client to each partition (found on each HSM). For details, see Procedure 6: Assign a Client to an HSM Partition.
-
On the client system, open a DOS window from the following location (C:\Program Files\SafeNet\LunaClient), and then call the vtl software using the haAdmin option. For example:
CopyVtl haAdmin –newGroup –serialNum 902514001 –label ade_test –password 12345678 -
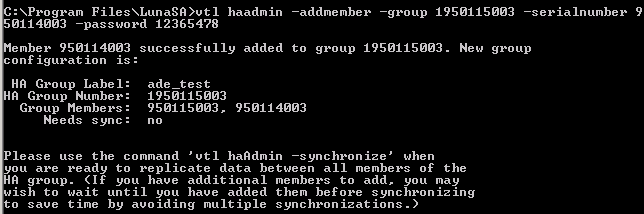
To access other partitions that are on other existing HSMs in the HA group, run the following commands:
CopyVtl haAdmin –addmemember –group [groupname] –serialNum {serial number for the other partition] –password [Partition password]

This section describes how to delete an HA group. Use the commands in the following example as a guide:

Accessing Partitions from ActivID KMS/CMS
Depending upon how the HSM was configured using the Thales / Thales TCT tools, the HSM may expose one or more partitions to ActivID KMS and ActivID CMS.
ActivID KMS forces the operator to select the partition to use during an ActivID KMS session when there is more than one partition available. If there is only a single partition, that partition is automatically selected. Each partition is identified by a slot ID number as well as a token name (partition name). To identity a partition, ActivID KMS displays both the slot ID and token name for each partition.
To choose the correct partition, configure an ActivID CMS file, which includes either the recorder slot ID or token name (partition name). For example, for ActivID CMS for Windows, perform the following steps:
-
Locate the cmsslot.ini file on the ActivID CMS distribution.
-
In the <CMS_distribution>\HSM folder:
-
Copy the cmsslot.ini file to the Windows folder of your ActivID CMS server.
-
In the cmsslot.ini file specify either a TokenName or a SlotID (if the cmsslot.ini file is not found, ActivID CMS chooses to connect to the slot that has the fewer number of sessions).
Note: If High Availability has been configured, the cmsslot.ini file must contain a reference to either a physical partition or to a virtual partition.
-
-
Locate the %PROGRAMDATA%\HID Global\Credential Management System\Local Files\pkcs11.cfg file and add the following line:
Copyslot=xxxxxx
where xxxxx is the SlotID.
Upgrading Firmware
You can check for new firmware versions as they become available on the customer website for Thales / Thales TCT, where you can download them. Downloading firmware requires that you complete the following two steps.
-
Use the ctp utility to transfer the new firmware to the HSM.
-
Use the update firmware command as shown in the following sample:
Copy[ade_luna_sa] lunash:>hsm update firmware
-
The HSM Administrator/Security Officer must be logged in prior to performing the firmware upgrade (using the blue PED key).
-
Any partition that is activated prior to the firmware update must be reactivated following the firmware update.
The following code sample illustrates the completion of a firmware update request, which displays the process for an earlier firmware release (4.5.3) and is presented for information purposes only.
[ade_luna_sa] lunash:>hsm login
Luna PED operation required to login as HSM Administrator - use blue PED key.
'hsm login' successful.
[ade_luna_sa] lunash:>hsm update firmware
CAUTION:  This command updates the HSM firmware. This process cannot be reversed.
          Any connected clients will have their connections closed.
          All clients should disconnect and the NTLS should be stopped before
proceeding.
          Type 'proceed' to continue, or type 'quit' to quit now.
proceed
Update Result: 0 (Success)
Command Result: 0 (Success)

[ade_luna_sa] lunash:>hsm show

Appliance Details:
   ==================
   Software Version:                3.3.0-5
   HSM Details:
   ============
   HSM Label:                       ade_luna_sa
   Serial #:                        902514
   Firmware:                        4.5.3
   Hardware Model:                  Luna K3
   Authentication Method:           PED keys
   HSM Admin login status:          Not Logged In
   HSM Admin login attempts left:   3 before HSM zeroization!
   MofN activation status:          M of N not used
   Partitions created on HSM:
   ==========================
   There are no partitions.
   FIPS 140-2 Operation:
   ==========================
   The HSM is NOT in FIPS 140-2 approved operation mode.


