Managing Users
ActivID CMS retrieves information about users from directories. In most cases, the directory is already populated with user information before ActivID CMS is deployed. In other cases, an organization creates a directory so that they can add users who will require access to resources through ActivID CMS, which can create, update, or delete users. But, for example, an operator must have permission to create a user in the account that ActivID CMS uses to connect to the directory.
For a list of supported directories, refer to ActivID CMS System Environment.
The sections listed below detail the actions you can perform from the Users page.
-
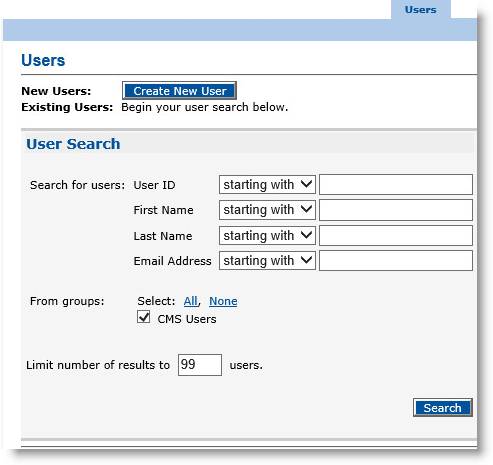
Select the Users tab.
-
In the Search for users drop-down lists, accept the default starting with to search using any one of the listed user identifiers.
Alternatively, select matching from one or more of the drop-down lists for specific user identifiers, and then enter the attribute(s) in the field(s).
To add a custom search field, see Setting Parameters for User Attributes.
-
For the From groups option, you can restrict your search by selecting one or more of the following options:
-
All to include all of the displayed groups.
-
None to clear any selected group.
- Select one or more individual groups in which you want to search.
-
-
In the Limit number of results to field, enter a value. To improve performance, set the value between 1 and 10.
-
Click Search.
If a record matches the search criteria, then the user information appears in the table at the bottom of the Users page.

-
Locate the user.
-
In the Action column, click the action you want to take.
The actions available depend on your operator role and access rights, the device status, and the device type.
-
To complete the corresponding task, see the appropriate procedure described in this documentation.
-
Click Done.
-
Select the Users tab.
-
Click Create New User.
The User Creation page appears:
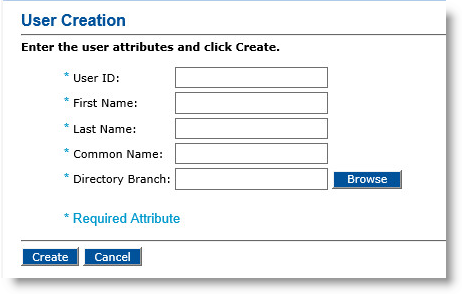
The fields illustrated above are the default fields. Depending on your ActivID CMS configuration, your page might be different.
-
Enter a User ID for the new user.
-
Enter the First Name of the user.
-
Enter the Last Name of the user.
-
Enter a Common Name.
-
For the Directory Branch, click Browse to locate the appropriate branch.
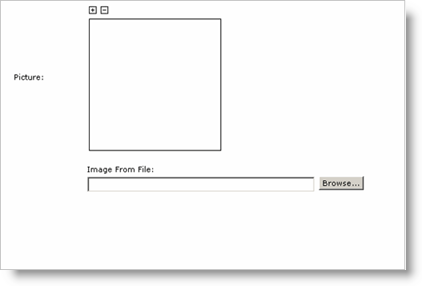
For information on how to configure ActivID CMS with Active Directory, refer to Configuring ActivID CMS for Use with Microsoft Active Directory. If your system is configured to accept a photograph of the user, the following fields will appear.
-
In the Image From File field, click Browse to search for the image.
After the image is imported, it appears in the Picture box.
-
Click the + or - icon shown in the ActivID CMS dialog to format the size of the photograph.
-
Click Create to add the new user to your directory.
-
Select the Users tab.
-
Search for the user. When the results appear, locate the user’s name in the User ID column.
-
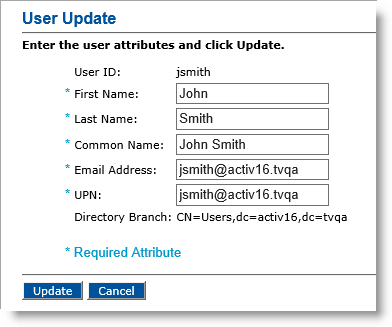
In the Action column, click Update. The User Update page appears:
-
Edit the user’s information as needed. Depending on the configuration of the ActivID CMS User Management feature, you may not be able to update certain fields. The User Update page may also contain more fields than are shown in this example.
-
Click Update. When ActivID CMS has updated the user in the directory, a confirmation message appears.
Deleting a user removes this user from the directory. You cannot delete a user who has an assigned device; you must terminate the user’s device before deleting the user.
-
Select the Users tab.
-
Search for the user. In the User ID column, locate the user.
-
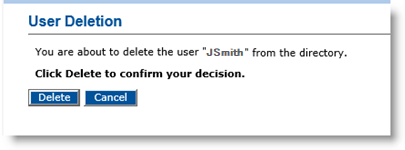
In the Action column, click Delete. The User Deletion page appears:
-
Click Delete. A confirmation message appears.
-
Click Done.


