Configuring IIS 7 and IIS 8
For a three-tier configuration using IIS 7 or IIS 8, there are no configuration changes required on the ActivID CMS application server. To install the IIS redirector on an IIS 7 server or IIS 8.0 server (tier 1), complete the following steps.
-
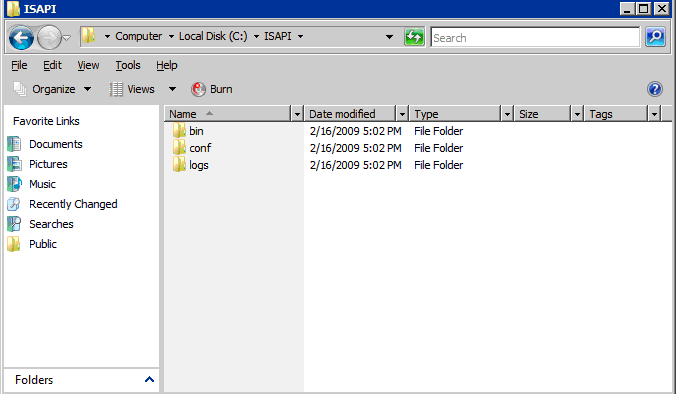
Go to the ISAPI folder and copy ISAPI folder <CMS install path>\ISAPI\ from the installed ActivID CMS server to the IIS 7 server that is acting as the redirector server.
-
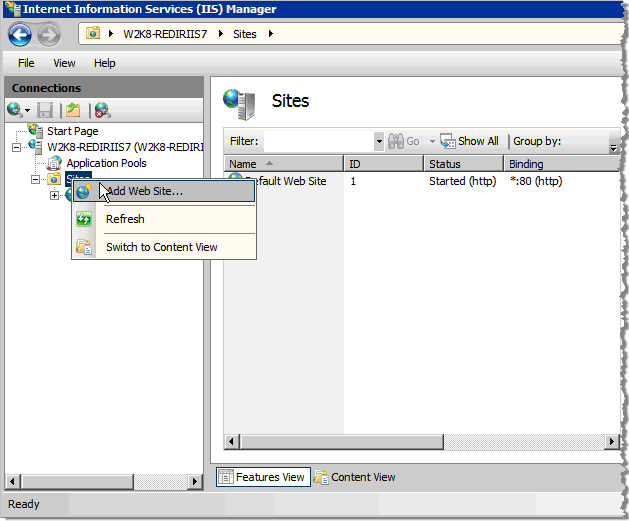
To add a new ActivID CMS website to the IIS redirector server, go to the Connections panel in the Internet Information Services (IIS) Manager main window.
-
Right-click on Sites, and then click Add Web Site. The Add Web Site dialog is displayed.
-
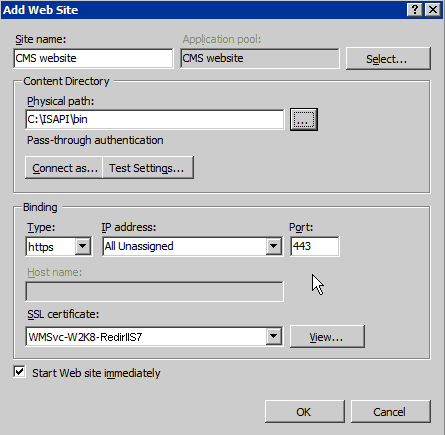
Enter the Site name of the ActivID CMS website (in this example, the name is CMS website).
-
Verify that the Physical path contains a valid path (in this example, it is C:\ISAPI\bin).
-
Select https as the Binding Type.
The Binding enables you to configure the binding to https (Hypertext Transfer Protocol Secure).
-
Select the SSL certificate that was generated previously for this server (in this example, the SSL certificate is W2K8-RedirIIS7).
-
Optionally, select the option Start Web site immediately.
-
Click OK. This creates the ActivID CMS website.
-
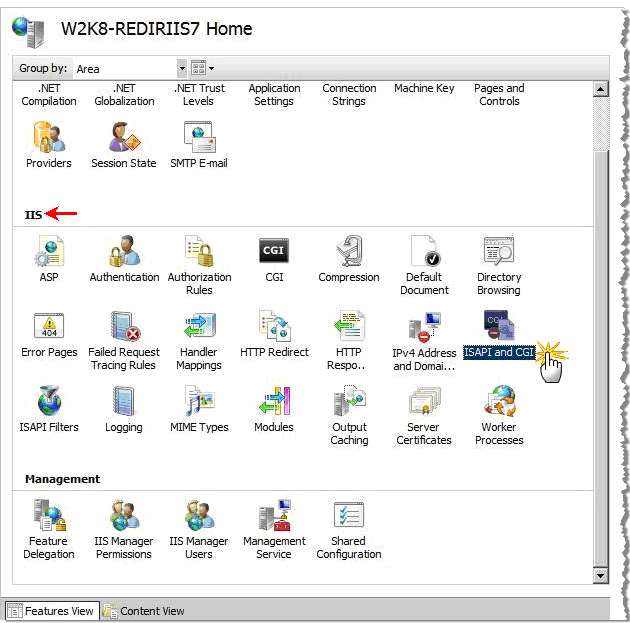
From the IIS Manager main window, select the IIS Server in the Connections panel. The IIS Server Home page appears.
-
Scroll down to locate the IIS panel of the Home page.
(Make sure that you have selected the IIS server in the Connections panel.)
-
Click ISAPI and CGI. The ISAPI and CGI Restrictions page appears.
From this page, you can add ISAPI and CGI restrictions at the IIS server level.
-
On the ISAPI and CGI Restrictions page, right-click to display the shortcuts menu, and then click Add ISAPI and CGI Restrictions.
-
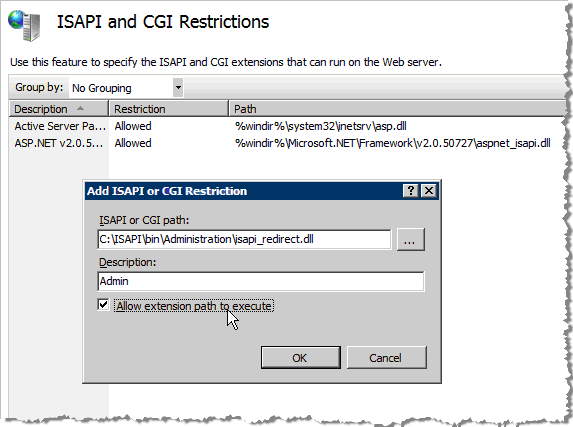
In the Add ISAPI or CGI Restriction dialog, click Browse to locate the ISAPI or CGI path for the server file.
-
Enter a meaningful Description (for example “Admin”).
-
Select the option Allow extension path to execute.
-
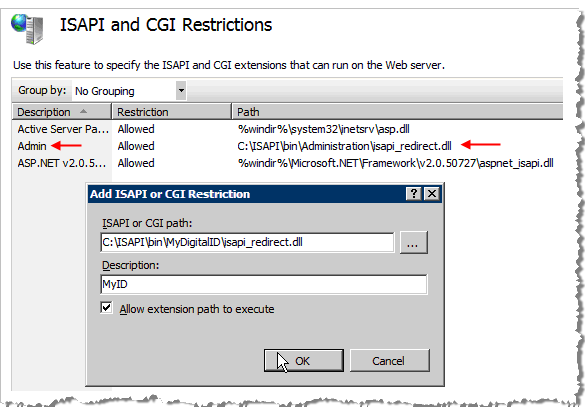
Click OK. The ISAPI and CGI Restrictions page appears with the new values you just configured (see the red arrow in the next illustration).
-
From the Home page, click ISAPI and CGI again. The ISAPI and CGI Restrictions page reappears.
-
Click Browse to locate the ISAPI or CGI path for the server ID file.
-
Enter a meaningful Description (for example, “MyID”).
-
Select the option Allow extension path to execute.
-
Click OK to configure these restrictions settings. The ISAPI and CGI Restrictions page appears with the new values you just configured.
-
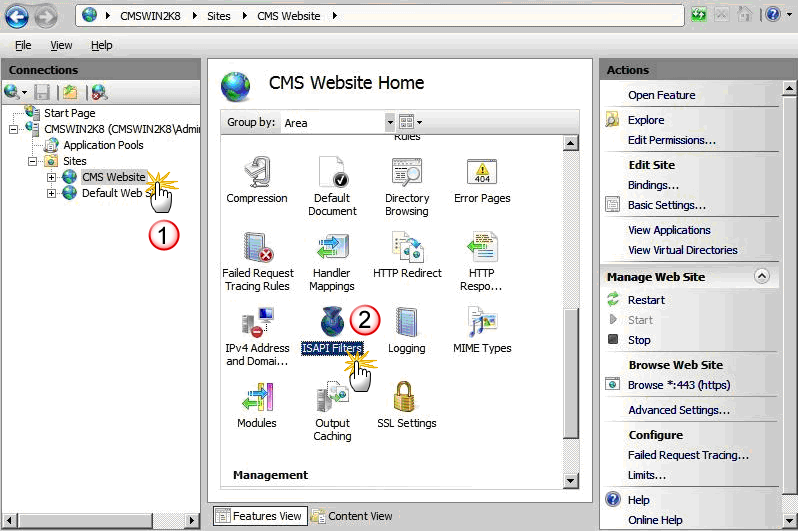
Return to the Connections panel, and then expand the Sites folder, if needed.
-
In the Connections panel, click CMS Website. The CMS Website Home page appears (where you will configure two ISAPI filters).
-
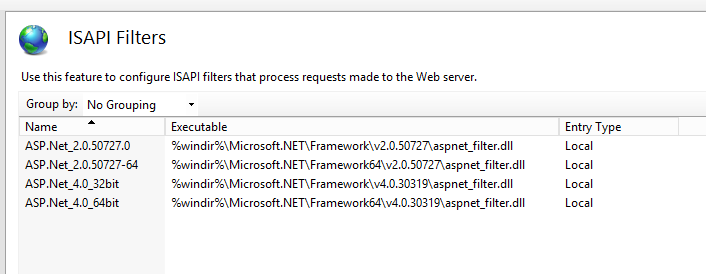
Click ISAPI Filters. The ISAPI Filters page appears.
From the ISAPI Filters page, you can add ISAPI filters at the IIS server level.
-
Right-click to display the shortcuts menu, and then click Add ISAPI Filter.
-
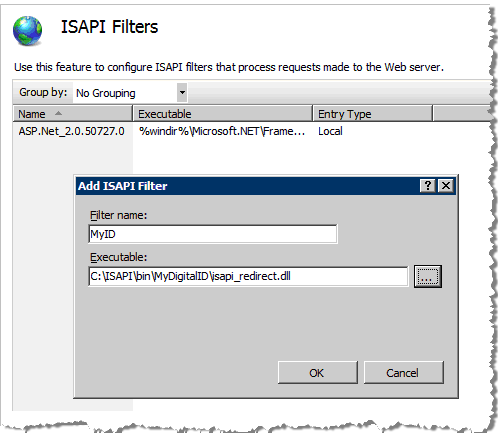
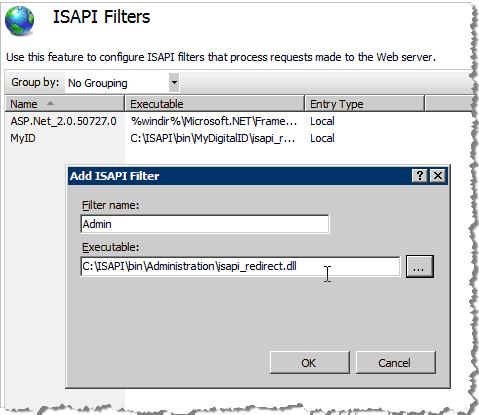
Enter a Filter name for the first of two filters (for example, “MyID”).
-
Click the browse button to locate and enter the full path to the Executable .dll file.
-
Click OK to configure the ISAPI filter settings for the first filter.
-
Repeat step 27 to 29 for the second filter.
-
Return to the Connections panel.
-
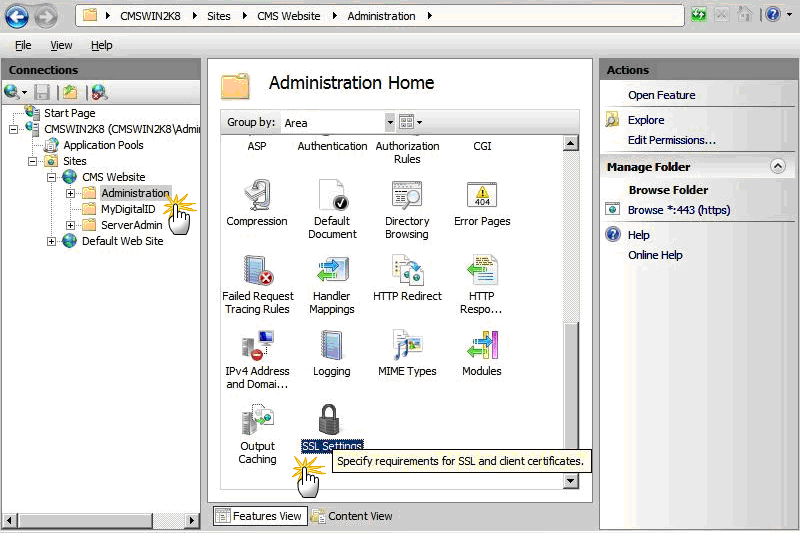
In the Connections panel, under CMS Website, click Administration. The Administration Home page appears.
-
In the IIS panel in the Admin Home page, click SSL Settings. The SSL Settings page appears.

-
To configure SSL settings in the Admin virtual directory (and SSL Settings window), select the Require SSL option.
-
Under Client certificates, select the Require option.
-
In the Actions panel, click on Apply to save the changes.
-
In the Connections panel under CMS Website, click MyDigitalID. The MyDigitalID Home page appears.
-
In the IIS panel, click SSL Settings. The SSL Settings window reappears.
-
To configure SSL settings in the MyDigitalID virtual directory (and SSL Settings window), select the Require SSL option.
-
Under Client certificates, select the Ignore option.
-
In the Actions panel, click on Apply to save the changes.
The next step is to Configure Handler Mappings.
Configure Handler Mappings
-
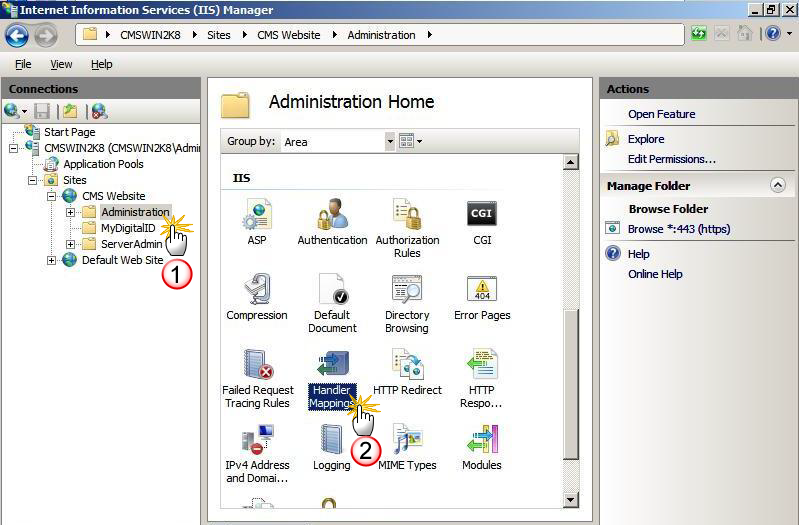
In the Connections panel, under CMS Website, click Administration.
-
On the Administration Home page, click Handler Mappings. The Handler Mappings page appears.

-
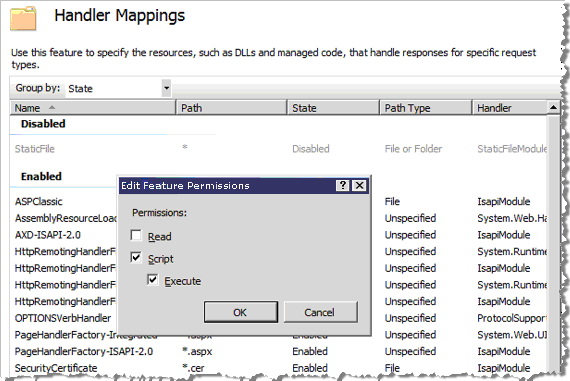
On the Handler Mappings page, right-click to display the shortcuts menu, and then click Edit Feature Permissions. The Edit Feature Permissions dialog appears.
-
To configure Handler Mappings in the Admin virtual directory, select the Script option and the Execute option.
-
Click OK to save your configuration choices.
-
To configure the Edit Feature Permissions for the MyID virtual directory, in the Connections panel, select the CMS Website.
-
Click MyDigitalID.
-
In the Handler Mappings page, right-click to display the shortcuts menu, and then click Edit Feature Permissions. The Edit Feature Permissions dialog appears.
-
To configure Handler Mappings in the MyDigitalID virtual directory, select the Script option and the Execute option.
-
Click OK to save your configuration choices.
The next step is to Enable Anonymous Authentication for Anonymous Users .
Enable Anonymous Authentication for Anonymous Users
To enable anonymous authentication for ActivID CMS anonymous users, perform the following steps.
-
In the Connections panel, select the CMS Website.
-
Click Authentication. The Authentication page appears.
-
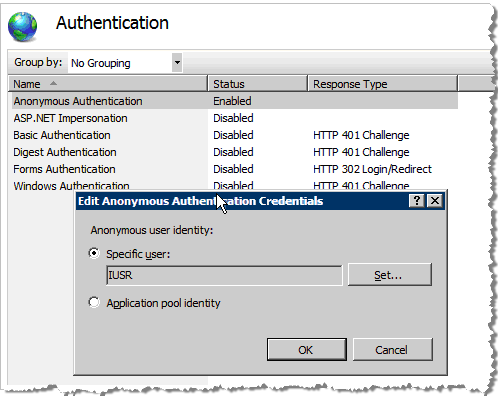
In the Authentication page, right-click to display the shortcuts menu, and then click Edit Anonymous Authentication Credentials. The Edit Anonymous Authentication Credentials dialog appears.
-
Select the Specific user option. The default username appears automatically.
-
Optionally, click Set.
The Set Authentication Credentials dialog appears. You can enter a specific username, and enter and confirm a password to authenticate the credentials for a specific user.
-
Click OK to save your configuration settings.
The next step is to Update the ISAPI Configuration Properties File .
Update the ISAPI Configuration Properties File
To update the ISAPI configuration properties file with the host name of the ActivID CMS server, perform the following steps.
-
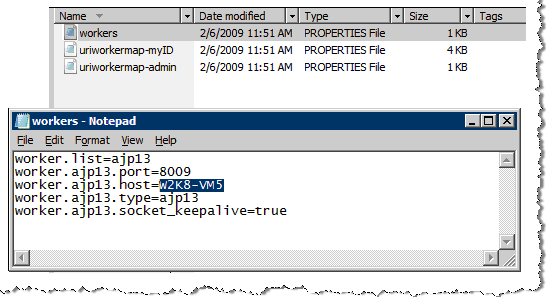
Go to the directory where the properties files reside (in this example, it is “C:\ISAPI\conf”).
-
Double-click the configuration properties file, it launches the file in a common text editor, such as Notepad.
In this example, it is the workers.properties file. The workers.properties file contains the host= line that defines the host name of the ActivID CMS server. In this example, it is worker.ajp13.host=.
-
Edit the existing host= line to define the name of the ActivID CMS server. In this example, it is W2K8-VM5.
-
Add a line starting with the parameter worker.ajp13.secret, where the value is the required secret from the above standalone.xml entry (named secret-checker) from the Tier 2 ActivID CMS server as described in section Configuring the Tier 2 ActivID CMS Server (screenshot below).

In this example, it is:
Copyworker.ajp13.secret=27CE7144C6455F228511668EE95DFEWarning!
In cases where modifications are made that alter the ActivID CMS application on the ActivID CMS server itself, make sure that you perform the above two steps. This is required because during a repair procedure, the standalone.xml file is reconfigured and a new secret is generated. -
To save your configuration changes, select the File menu, and then click Save.
-
To update the install path in the isapi_redirect.properties file for the UserPortal folder, go to the directory where this properties file resides. In this example, it is C:\ISAPI\bin\MyDigitalID.
-
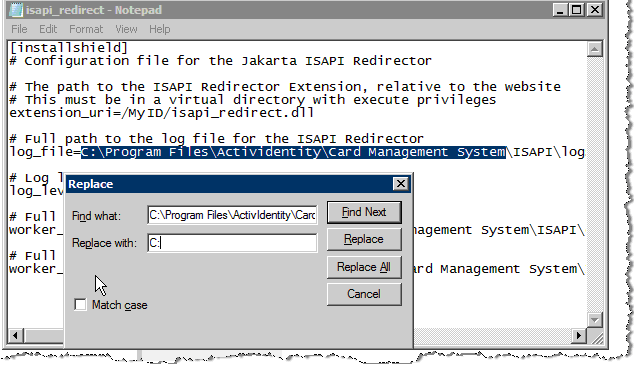
Double-click the properties file that you want to update, it launches the file in a common text editor, such as Notepad.
In this example, it is the isapi_redirect.properties file. This properties file contains the path location in the log_file= line that defines the path name of the ISAPI Redirector log file. In this example, the path to the Redirector log file is:
C:\Program Files\HID Global\Credential Management System\ISAPI\logs\isapi_redirect-myID.log
-
Change the path to C:\ISAPI\logs\isapi_redirect-myID.log.
-
Change the work_file= and work_mount_file= paths accordingly.
-
From the File menu, click Save to save the changes made to the isapi_redirect.properties file.
-
To update the install path in the isapi_redirect.properties file for the Administration folder, go to the directory where the ISAPI properties files reside (in this example, it is C:\ISAPI\bin\Administration).

-
Double-click the ISAPI Redirector properties file you want to update, it launches the file in a common text editor, such as Notepad.
In this example, it is the isapi_redirect.properties file. The selected properties file contains the path location in the log_file= line that defines the path name of the ISAPI Redirector log file. In this example, the path to the Redirector log file is:
C:\Program Files\HID Global\Credential Management System\ISAPI\logs\isapi_redirector.log isapi_redirect-admin.log
-
Change the path to C:\ISAPI\logs\isapi_redirect-admin.log.
-
Change the work_file= and work_mount_file= paths accordingly.
-
From the File menu, click Save to save the changes made to the isapi_redirect.properties file.
-
Go to the directory where your security certificates are stored (in the following example, it is the Security Certificate folder in the root directory).

-
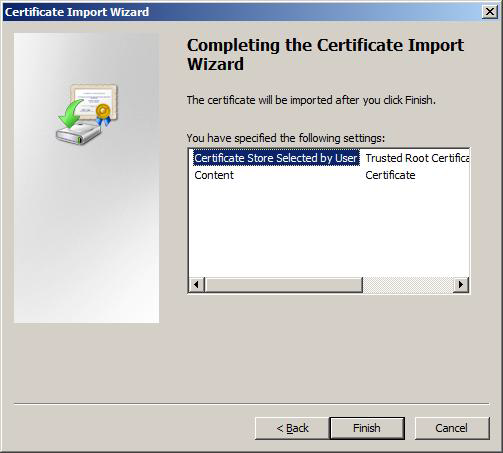
Double-click the directory where the security certificates reside. The Certificate Import Wizard dialog appears.
-
In the Certificate Import Wizard dialog, select the Place all certificates in the following store option.
-
Browse to locate and enter the path to the Certificate store. This location is the certificate store where you can place all certificates if the root certificate authority (CA) is not trusted.
-
Click Next at the bottom of the dialog (not illustrated).
-
Click Finish.


