PKI Renewal Software Configuration
This section provides procedures for setting up and configuring the PKI renewal software.
Copy the entire Tools folder and the entire SDK folder of the ActivID CMS distribution into the following directory location: C:\Program Files\HID Global (or any other location of your choice on your hard drive).
Configuration Files
Configuration files are stored in the conf folder. The main configuration file is named common. It is a database-dependent file. The ActivID CMS installation provides two configuration files:
-
common_ORACLE.xml for systems using an Oracle database
-
common_SQLSERVER.xml for systems using an SQL Server database
Make a duplicate of the common_<database>.xml configuration file for the type of database you are using, and rename the copy of the file to: common.xml. This is the XML configuration you are about to update in the following sections of this documentation.
Security Modes
The PKI renewal software can be configured to start in either of two modes: attended or unattended. The PKI renewal software enables the ActivID CMS operator client certificate to be stored either as a pfx file, or in a hardware security module (HSM). The following table lists the supported configurations in this ActivID CMS release.
|
ACR Mode |
Operator Client Certificate Storage |
PFX File Password |
Hardware Security Module (HSM) PIN |
User Database Password |
|---|---|---|---|---|
|
Unattended |
PFX file |
XML configuration file |
N/A |
XML configuration file |
|
Unattended |
HSM |
N/A |
XML configuration file |
XML configuration file |
|
Attended |
HSM |
N/A |
Prompted |
Prompted |
The attended mode is compatible only with the manual renewal process. The attended mode is for use with an HSM-based configuration (operator client certificates stored in the HSM).
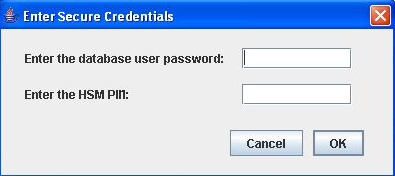
When running the manual renewal process in attended mode, the operator is prompted for the following information in the Enter Secure Credentials window:
-
Database user password
-
HSM Personal Identification Number (PIN)
In the unattended mode, the credentials stored in the XML configuration file are obfuscated.
Configure the security mode implemented by editing the securityMode= line as shown in the following example:
<?xml version=”1.0” encoding=”UTF-8”?>
<common securityMode=”unattended”>
Modify the security mode by editing the common.xml file as follows:
-
Locate and open the common.xml file (typically in the conf folder).
-
Locate the XML root element common.
-
Modify the securityMode= attribute to match the desired security mode:
-
“unattended” for the unattended mode
-
“attended” for the attended mode
If the unattended mode is selected, you need to perform the secret key configuration as follows:
-
Locate the secret key configuration section:
Copy…
<secret filename="./conf/secrets.jks" encryptedPassword="password" attended="false"/>
… -
Replace “password” with a password of your own choosing by entering this password in clear text.
Refer to Password Encryption for more information on the password encryption.
Important: Before executing the check.bat file, you should perform all the configuration steps detailed in PKI Renewal Software Configuration.
-
-
Save and close the common.xml file to save your configuration changes.
Database Access
This section covers the configuration of the Oracle and Microsoft SQL Server databases, as well as the re-encryption of the database passwords.
To configure the Oracle database, edit the common.xml file.
-
From the installation directory, locate the common.xml file in the conf folder.
Copy<cmsDatabase>
<dataSource>oracle.jdbc.pool.OracleDataSource</dataSource>
<url>jdbc:oracle:thin:@cms411w2k3sp2:1521:CMS</url>
<userName>AIMSEE</userName>
<password isSecret="true" isEncrypted="false">password</password>
</cmsDatabase> -
Locate the XML element cmsDatabase.
-
Modify the URL element to match your specific environment. Copy the URL from the “url” property in the database.properties file located in the ActivID CMS Shared Files folder, available at %PROGRAMDATA%\HID Global\Credential Management System\Shared Files.
Warning!
Do not change the user name (XML element = userName). -
Set the AIMSEE password in the configuration files. You can enter this password in clear text because it is encrypted the first time that the renewal tool is started.
-
Save and close the file to save your configuration changes.
To configure the SQL server database, edit the common.xml file.
-
From the installation directory, locate the common.xml file in the conf folder.
Copy<cmsDatabase>
<dataSource>com.microsoft.sqlserver.jdbc.SQLServerDataSource</dataSource>
<url>jdbc:sqlserver://cmsserver.domain.com/AIMSEE;serverName=cmsserver.domain.com;
databaseName=AIMSEE;socketTimeout=600</url>
<userName>AIMSEE</userName>
<password isSecret="true" isEncrypted="false">password</password>
</cmsDatabase> -
Locate the XML element cmsDatabase.
-
Modify the URL element to match your specific environment. Copy the URL from the “sqlserver.AIMSEE.url” property in the database.properties file located in the ActivID CMS Shared Files folder (available at %PROGRAMDATA%\HID Global\Credential Management System\Shared Files.
-
Set the AIMSEE password in the configuration files. You can enter this password in clear text because it is encrypted the first time that the renewal tool is started.
-
If the database connection uses 'Windows Authentication", then use the following configuration. Accept the userName and password (not defined) as illustrated next.
Copy<cmsDatabase>
<dataSource>com.microsoft.sqlserver.jdbc.SQLServerDataSource</dataSource>
<url>jdbc:sqlserver://SQL2008/AIMSEE;serverName=SQL2008;databaseName=AIMSEE;socketTimeout=600;domain=XXXX;integratedSecurity=true</url>
<userName></userName>
<password isSecret="true" isEncrypted="false"></password>
</cmsDatabase>-
Save and close the file to save your configuration changes.
Warning!
You must not change the user name (XML element = userName).
-
This section describes how to configure the common.xml file to re-encrypt the database password.
-
In the <common> XML element, change 'action' to 'update' as illustrated below.
-
In the <password> XML element, change 'isEncrypted' to 'false' as illustrated below.
Copy?xml version="1.0" encoding="UTF-8"?>
<common securityMode="unattended" action="update"/>
<secret filename="./conf/secrets.jks" encryptedPassword="c0FJFQdMGVt3DD2/1vRCZw==" attended="false" />
<cmsDatabase>
<dataSource>com.microsoft.sqlserver.jdbc.SQLServerDataSource</dataSource>
<url>jdbc:sqlserver://localhost/AIMSEE;serverName=localhost;failoverPartner=(local);databaseName=AIMSEE;socketTimeout=600</url>
<userName>AIMSEE</userName>
<password isSecret="true" isEncrypted="false">Password</password>
</cmsDatabase>
<cmsPortal>
<url>https:///win-b1h8s2evoie.cms423.sayuri.com:32456</url>
<clientCertificate storage="file">
<filename>./conf/certificates/renewalOperator.pfx</filename>
ActivID CMS Portal Configuration
To configure an ActivID CMS Portal, complete the following tasks.
-
Issue a certificate from a certificate authority trusted by your ActivID CMS.
-
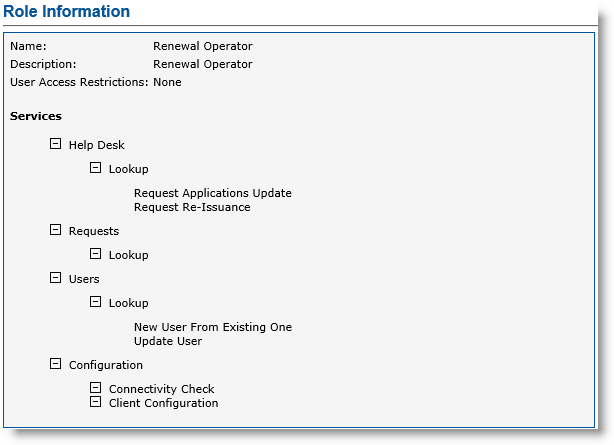
Link this certificate to an ActivID CMS operator who has the minimum following role privileges (as illustrated next).
-
Help Desk:
-
Lookup
-
Request Applications Update
-
Request Re-Issuance
-
-
Requests:
-
Lookup
-
-
Users:
-
Lookup
-
New User From Existing One
-
Update User
-
-
-
Configuration:
-
Connectivity Check
-
Client Configuration
-
-
-
Copy the operator certificate to the Automatic_Cert_Renewal/conf/certificates directory, and rename the file to renewalOperator.pfx.
-
Create an ActivID CMS server truststore that contains the certificate trust list to authenticate the ActivID CMS Web server, and then copy it to the Automatic_Cert_Renewal/conf/certificates directory, and rename it to server.trustore.
For information on how to create a truststore, see Creating a Server Truststore.
-
Locate the common.xml file found inside the conf folder (in the Automatic_Cert_Renewal/conf/ directory).
-
Edit the common.xml file. Locate the XML element cmsPortal.
Copy<cmsPortal>
<url>https://cmsserver.domain.com:32456</url>
<clientCertificate storage=”file”>
<filename>./conf/certificates/renewalOperator.pfx</filename>
<password isSecret="true" isEncrypted="false">password</password>
<hsmKeyLabel>keyLabel</hsmKeyLabel>
<hsmConfigurationFile>./conf/pkcs11.cfg</hsmConfigurationFile>
<hsmPin isSecret="true" isEncrypted="false">hsmPin</hsmPin>
</clientCertificate>
<serverCertificate storage="file">
<filename>./conf/certificates/root.cer</filename>
<password isSecret="true" isEncrypted="false">password</password>
</serverCertificate>
<pollingInterval>5000</pollingInterval>
<pollingMaxAttempts>50</pollingMaxAttempts>
</cmsPortal> -
Locate the URL element and modify it to match your configuration (for example, <url>https://cmsserver.domain.com:32456</url>, where cmsserver.domain.com represents the hostname of the ActivID CMS portal.
-
Locate the clientCertificate element. You can configure the PKI renewal software to use the client certificate of the ActivID CMS operator stored either in a pfx file or in an HSM. Set the storage attribute value storage=“file” (in bold above) to the appropriate value. "file" is the default. You can also use "hsm". Refer to the following guidelines:
-
If you set this attribute to "file", then locate both the filename and password element in the clientCertificate section. If needed, modify the filename element value to the appropriate path for the client certificate file, and set the password of the client certificate file using the password element attribute value. You can ignore all other parameters in the clientCertificate section.
-
If you set this attribute to "hsm", then locate these three elements (hsmKeyLabel, hsmConfigurationFile, and hsmPin) in the clientCertificate section. Set the key label of the client certificate in the HSM to the appropriate value in the hsmKeyLabel element. Set the path to the HSM configuration file in the hsmConfigurationFile element. A default configuration file (pkcs11.cfg) comes with the PKI renewal tool in the conf folder. You can edit this default file or replace it with the file from the ActivID CMS server (stored in the %PROGRAMDATA%\HID Global\Credential Management System\Local Files directory).
-
If you configured the PKI Renewal in the unattended mode, then set the HSM PIN value in the hsmPin element. Otherwise, ignore this parameter. You will be prompted for the HSM PIN when running the PKI Renewal tool. For related information, see PKI Renewal Software Configuration.
-
-
Locate the serverCertificate section. You can configure the PKI renewal software to use the trust list required to authenticate the ActivID CMS server stored either in a single file (.cer file) or in a truststore. See Creating a Server Truststore. To do this, set the storage attribute value to the appropriate value: "file" (default) or "truststore". There are other file server certificate configuration parameters that must be set depending upon the storage mode you chose using the following guidelines:
-
If you set this attribute to "file", then locate the filename element in the serverCertificate section, and set the path for the root certificate file (.cer file) in the filename element. You can ignore all other parameters in the serverCertificate section.
-
If you set this attribute to "truststore", then there is no need to modify the filename element if you generated your certificate trust list as described previously. Otherwise, set the filename element value to the appropriate path to the certificate trust list file, and set the password of the certificate trust list file in the password element.
-
-
Save and close the file to save your configuration changes.
Email Configuration
This section covers how to configure the email server, as well as the sending of emails to users and administrators.
To configure the email server, complete the following tasks.
-
From the installation directory, locate the common.xml file in the conf folder.
-
Locate the XML element email.
Copy<email>
<type>SMTP</type>
<hostname>smtp.wanadoo.fr</hostname>
<from>pkirenewal_dma_TEST@hidglobal.com</from>
<emailUser sendEmail="true">
<subject>Your device needs to be updated</subject>
<messageTemplate>
Dear user,
You are receiving this email because one of the certificates stored in your device is about to expire.
To renew this certificate, please login to the User Portal web server and follow the process to update your device.
https://mtpsmdasrv2.mtpsmda2.hidglobal.com:32456/aims/enterprise/user.
</messageTemplate>
</emailUser>
<emailAdministrator sendEmail="true">
<to> john.doe@hidglobal.com</to>
<renewalSubject>PKI Renewal Report(s)</renewalSubject>
<administrationSubject>PKI AdministrationReports</administrationSubject>
<updateSubject>PKI Update Reports</updateSubject>
</emailAdministrator>
</email> -
Modify the XML element hostname so that it matches the hostname of your SMTP server.
-
Save and close the file to save your configuration changes.
To configure the sending of an email to users when an applications update request is posted, complete the following tasks.
-
Locate the XML element emailUser.
Copy<emailUser sendEmail="true">
<subject>Your device needs to be updated</subject>
<messageTemplate>
Dear user,
You are receiving this email because one of the certificates stored into your device is about to expire.
To renew this certificate please login to the User Portal web server and follow the process to update your device.
https://mtpsmdasrv2.mtpsmda2.activcard.com:32456/aims/enterprise/user.
</messageTemplate>
</emailUser> -
To configure the sending of emails to users, set the sendEmail attribute to true. Otherwise, set the sendEmail attribute to false (emails not sent to users).
-
Save and close the file to save your configuration changes.
To configure the sending of an email to administrators when a batch has been posted, complete the following tasks.
-
Locate the XML element emailAdministrator.
Copy<emailAdministrator sendEmail="true">
<to>john.doe@hidglobal.com</to>
<renewalSubject>PKI Renewal Report(s)</renewalSubject>
<administrationSubject>PKI Administration Reports</administrationSubject>
<updateSubject>PKI Update Reports</updateSubject>
</emailAdministrator> -
To configure the sending of emails to administrators, set the sendEmail attribute to true. Otherwise, set the sendEmail attribute to false (emails not sent to administrators).
-
Configure the to XML element with the email address of the administrators. You can add multiple email addresses, separated by a comma.
-
Configure the XML elements renewalSubject for a renewal batch or administrationSubject for an administration batch, or updateSubject for an update batch to suit your specific needs.
-
Save and close the file to save your configuration changes.
Reporting
To configure the renewal batch reporting process, complete the following tasks.
-
From the installation directory, locate the common.xml file within the conf folder.
-
Locate the XML element reports and edit the common.xml file.
<reports csvseparator =",">If this attribute is not set, the default value ";" (semi-colon) is used.
The reports are generated in the reports folder, available at: \Tools\Automatic_Cert_Renewal\reports.
The reports folder contains the following sub-folders for each type of report:
-
Administration
-
Renewal
-
Update
The report is generated in the csv format.
Start the Renewal process, either an Applications Update or a Re-Issuance. The date used as the filter for the report is based on the expiration date of the certificates.
-
Locate the XML element renewal.
Copy<renewal>
<foldername>./reports/renewal</foldername>
<messageTemplate>Dear Administrator,
Please find attached the reports containing the renewal batch process (%PROCESS_ID%) which took place on %DATE% and lasted approximately %PROCESS_DURATION% minutes.
This batch was configured to scan device certificates which expired between %PERIOD_BEGIN_DATE% and %PERIOD_END_DATE%.
This batch processed %NB_DEVICES% devices. From this number:
- %NB_DEVICES_PKIRENEWAL% were processed and received a PKI application update request. This request will be executed the next time they log in to the User Portal.
- %NB_DEVICES_PENDING% were not processed because a request was already posted.
- %NB_DEVICES_ERROR% were not processed because an error occurred during the batch. Please open the file containing these devices and take the appropriate action.
Best Regards</messageTemplate>
</renewal>Note: Since version 5.0.1 of ActivID CMS, the keywords %NB_DEVICES, %NB_DEVICES_PKIRENEWAL%, %NB_DEVICES_PENDING%, %NB_DEVICES_ERROR% replace the following deprecated keywords: %NB_SMARTCARDS%, %NB_SMARTCARDS_PKIRENEWAL%, %NB_SMARTCARDS_PENDING%, %NB_SMARTCARDS_ERROR%.
The support of these deprecated keywords will be removed in an upcoming version. -
The XML element foldername shows the name of the folder which contains all the files related to the renewal reports including:
-
REP_RNW_SUMMARY_YYYYMMDDHHMMSS.txt—provides a summary of the batch renewal process.
-
REP_RNW_REQ_PENDING_YYYYMMDDHHMMSS.csv—lists devices with a certificate about to expire, but with a pending request.
-
REP_RNW_PKI_UPDATE_ YYYYMMDDHHMMSS.csv—lists devices with a certificate about to expire, with no pending request, and a PKI update request successfully posted.
-
REP_RNW_ERROR_ YYYYMMDDHHMMSS.csv—lists devices with a certificate about to expire, and for which an error occurred during the posting of the applications update.
-
-
The XML element messageTemplate lets you configure the report summary and also the email body sent to the administrator. This message template can also contain dynamic data. This data is defined by keywords that can be inserted anywhere in the message template including:
-
%PROCESS_ID%—the ID of the process as defined in the renewalProcesses.xml file.
-
%DATE%—the date the batch was processed.
-
%PROCESS_DURATION%—the time it takes (in minutes) to process the batch.
-
%PERIOD_BEGIN_DATE%—the starting date for which the renewal batch starts to scan for expiring certificates.
-
%PERIOD_END_DATE%—the end date for which the renewal batch finishes to scan for expiring certificates.
-
%NB_DEVICES%—the number of devices the renewal batch has processed.
-
%NB_DEVICES_PKIRENEWAL%—the number of devices for which a PKI application update was successfully posted.
-
%NB_DEVICES_PENDING%—the number of devices that could not be processed because a request was pending.
-
%NB_DEVICES_ERROR%—the number of devices that could not be processed because an error occurred during the batch.
-
This will list the Administration report of certificates.
-
Locate the XML element administration.
Copy<administration>
<foldername>./reports/administration</foldername>
<messageTemplate>Dear Administrator,
Please find attached the reports containing the administration batch process (%PROCESS_ID%) which took place on %DATE% and last approximately %PROCESS_DURATION% minutes.
This batch was configured to scan device certificate which expired between %PERIOD_BEGIN_DATE% and %PERIOD_END_DATE%.
This batch processed %NB_DEVICES% devices. These devices contain at least one certificate which will expire during the specified period.
Best Regards</messageTemplate>
</administration> -
The XML element foldername shows the name of the folder which contains all of the files related to the renewal reports including:
-
REP_ADM_SUMMARY_YYYYMMDDHHMMSS.txt—summarizes the batch administration process.
-
REP_ADM_PKI_UPDATE_YYYYMMDDHHMMSS.csv—a comma-separated value (CSV) file containing all of the devices for which a certificate is about to expire in a given period.
-
-
The XML element messageTemplate lets you configure the report summary and also the email body sent to the administrator. The message template can also contain dynamic data. This data can be defined by keywords that can be inserted anywhere in the message template including:
-
%PROCESS_ID%—the ID of the process as defined in the renewalProcesses.xml file.
-
%DATE%—the date that the batch was processed.
-
%PROCESS_DURATION%—the duration time (in minutes) for the batch to process.
-
%PERIOD_BEGIN_DATE%—the starting date for which the administration batch starts scanning for expiring certificates.
-
%PERIOD_END_DATE%—the end date for which the administration batch finishes scanning for expiring certificates.
-
%NB_DEVICES%—the number of devices that the administration batch processed.
-
Start the Update process by returning all the devices where the certificates have been updated on the certificate repository (PKI_CREDENTIAL_DETAILS_PCD) during an ActivID CMS upgrade or some “missed” certificates. The date used as the filter for the report is based on the issuance date of the certificates.
-
Locate the XML element update.
Copy<update>
<foldername>./reports/update</foldername>
<messageTemplate>Dear Administrator,
Please find attached the reports containing the update batch process (%PROCESS_ID%) which took place on %DATE% and lasted approximately %PROCESS_DURATION% minutes.
This batch was configured to scan devices issued between %PERIOD_BEGIN_DATE% and %PERIOD_END_DATE% and missing in the certificate repository.
This batch processed %NB_CREDENTIALS% certificates. From this number:
- %NB_CREDENTIALS_ALREADY_PRESENT% were already present in the certificate repository
- %NB_CREDENTIALS_INSERTED% were inserted into the certificate repository.
- %NB_CREDENTIALS_ERROR% were not processed because an error occurred during the batch. Please open the file containing these certificates and take the appropriate action.
Best Regards</messageTemplate>
</update> -
The XML element foldername shows the name of the folder which contains all the files related to the update reports including:
-
REP_UPD_SUMMARY_YYYYMMDDHHMMSS.txt—summarizes the batch update process.
-
REP_UPD_PKI_UPDATE_YYYYMMDDHHMMSS.csv—a CSV file containing all certificates that have been added to the repository.
-
REP_UPD_PKI_ERROR_YYYYMMDDHHMMSS.csv—a CSV file containing all certificates that should have been added to the repository, but were not because an error occurred during processing.
-
REP_UPD_PKI_ALREADY_INSERTED_YYYYMMDDHHMMSS.csv—a CSV file containing all certificates that are already present in the repository.
-
-
The XML element messageTemplate is made to configure the report summary and also the email body sent to the administrator. The message template can also contain dynamic data. This data is defined by keywords that can be inserted anywhere in the message template including:
-
%PROCESS_ID%—the ID of the process as defined in the updateProcesses.xml file.
-
%DATE%—the date that the batch was processed.
-
%PROCESS_DURATION%— the duration time (in minutes) for the batch to process.
-
%PERIOD_BEGIN_DATE%—the starting date for which the update batch starts scanning for certificates issued after this starting date.
-
%PERIOD_END_DATE%—the end date for which the update batch finishes scanning for certificates issued before this end date.
-
%NB_CREDENTIALS%—the number of certificates the update batch processed.
-
%NB_CREDENTIALS_ALREADY_PRESENT%—the number of certificates already present in the repository.
-
%NB_CREDENTIALS_INSERTED%—the number of certificates inserted during the update process.
-
%NB_CREDENTIALS_ERROR%—the number of certificates which produced an error during insertion into the certificate repository.
-
Device Policies Configuration
-
From the installation directory, locate the common.xml file in the conf folder.
-
Locate the XML element policies.
Copy<policies>
<policy from="MS PKI" to="MS PKI" reissuance="true"/>
<policy from="Verisign PKI" to="Verisign PKI" reissuance="true"/>
</policies> -
The XML element policies contains a list of element policies, and each of these elements corresponds to a possible transition from one policy to another (or the same policy) based on the posting of a device update request in ActivID CMS.
-
Batch renewal uses the device policy configuration to determine the target policy that corresponds to the current device policy, as follows:
-
from—corresponds to the current device policy.
-
to—corresponds to the device policy that will be applied when an ActivID CMS applications update request is posted.
-
A device policy (such as a PKI Policy) can only be used once in the "from" attribute; this means, if a device policy is used once in the "from" attribute, it should not be used again in the "from" attribute in the same common.xml file.
If, during the batch renewal, a device corresponding to a specific device policy is found, and that device policy is not present in this configuration file, then an error is generated.
-
-
By default, a transition can be made only through a device applications update request. However, you can specify a device reissuance request by setting the argument reissuance=true attribute (as shown in the following example).
Copy<policy from="PKI Policy" to="PKI Policy" reissuance=”true”/>
Verifying the Installation
This section briefly describes how to verify if the Automatic Certificate Renewal installation has been properly performed. To verify that the Automatic Certificate Renewal installation has been properly completed and that the ActivID CMS server-based solution can connect to the ActivID CMS server:
-
Run the check.bat batch file located in the bin folder of the PKI renewal solution.
-
If the check.bat batch file returns the proper values for the ActivID CMS database version and the ActivID CMS portal version, then this verifies that the installation has been properly performed.
For all other processes, when “attended” is the security mode setting (securityMode= “attended”), the Enter Secure Credentials window is displayed when running the verification process.
Password Encryption
The first time you launch the check.bat file, all passwords are encrypted and stored in base64 format as shown in the following example:
<common securityMode="unattended">
  <secret filename="./conf/secrets.jks" encryptedPassword=
   "ucB0S2pfUZ5+dj6IZ5B+xg==" attended="false" />
  <cmsDatabase>
   <dataSource>com.microsoft.sqlserver.jdbc.SQLServerDataSource</dataSource>
  <url>jdbc:sqlserver://cmsserver.domain.com/AIMSEE;serverName=cmsserver.domain.com;
 databaseName=AIMSEE;socketTimeout=600</url>
 <userName>AIMSEE</userName>
  <password isSecret="true" isEncrypted="true">j+ecrMjSlkeaxAxsIdaqKg==</password>
 </cmsDatabase>
 <cmsPortal>
  <url>https://cmsserver.domain.com:32456</url>
  <clientCertificate storage="file">
   <filename>./conf/certificates/renewalOperator.pfx</filename>
   <password isSecret="true"isEncrypted="true">j+ecrMjSlkeaxAxsIdaqKg==</password>
   <hsmKeyLabel>keyLabel</hsmKeyLabel>
   <hsmConfigurationFile>./conf/pkcs11.cfg</hsmConfigurationFile>
   <hsmPin isSecret="true" isEncrypted="true">+8nTcb4i79LwDBzdcn9SdA==</hsmPin>
  </clientCertificate>
  <serverCertificate storage="file">
   <filename>./conf/certificates/root.cer</filename>
   <password isSecret="true"isEncrypted="true">j+ecrMjSlkeaxAxsIdaqKg==</password>
  </serverCertificate>
  <pollingInterval>5000</pollingInterval>
  <pollingMaxAttempts>50</pollingMaxAttempts>
 </cmsPortal>


