Configure PIV-Compliant Face-to-Face Device Policies
This section describes how to configure an ActivID CMS Face-to-Face device policy to issue PIV-compliant smart cards for different certificate authorities.
For the purpose of demonstrating the issuance of SP 800-73-3-compliant cards, this document uses the PIV FIPS 201 F2F Java Card – OT 2.3.2 -2048 device policy.
This section summarizes the actions that must be taken to issue a test PIV-compliant smart card. To test PIV Personal Identity Verification (technical standard of "HSPD-12") configuration, you must create a Face-to-Face PIV Device policy for one-step issuance. Four of the applications are mandatory. For details, review Face-to-Face (F2F) Device Policy Configuration. To summarize what you will do:
-
Add Device policy.
-
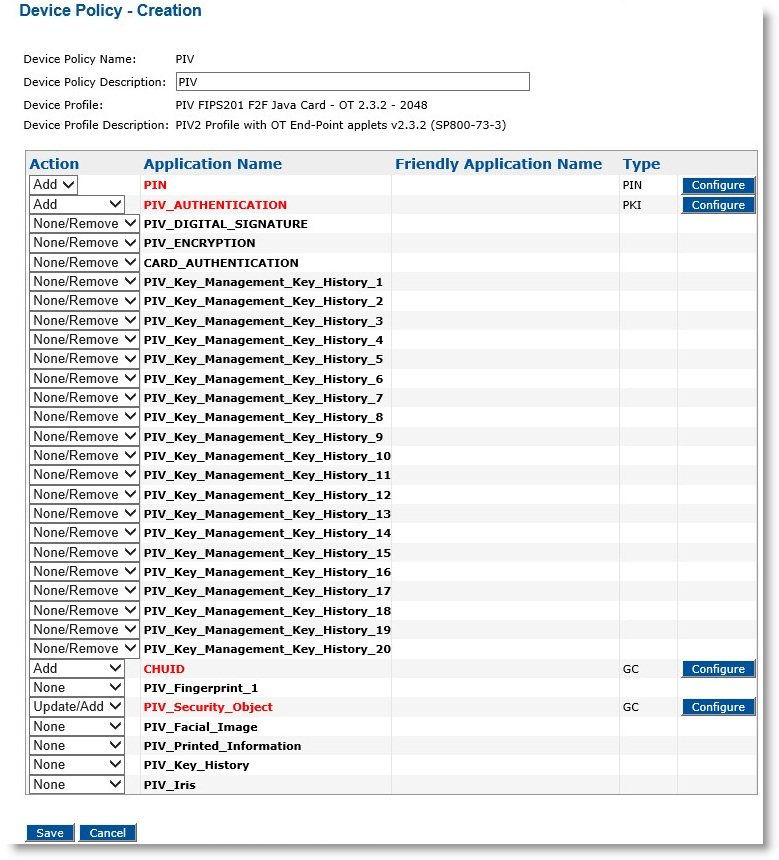
Configure each application in the device policy (first four are mandatory, and the remainder are optional for testing purposes):
-
PIN
-
PIV Security Object
-
PIV Authentication (steps are CA-specific)
-
Optional applications
-
Card Authentication (steps are CA-specific)
-
PIV Digital Signature (steps are CA-specific)
-
PIV Encryption (steps are CA-specific)
-
PIV Key Management History (steps are CA-specific)
-
PIV Fingerprint, Facial Image, Printed Info, PIV Iris
-
PIV Key History
-
The following section provides step-by-step instructions to complete the summarized previous summary of steps. Where the application configuration is CA-specific, please refer to subsequent sections that describe your CA.
Before you begin, make sure that:
-
A CA account configured for PIV workflow is available.
-
Certificate templates are configured for the PIV PKI applications that will be defined in the device policy.
-
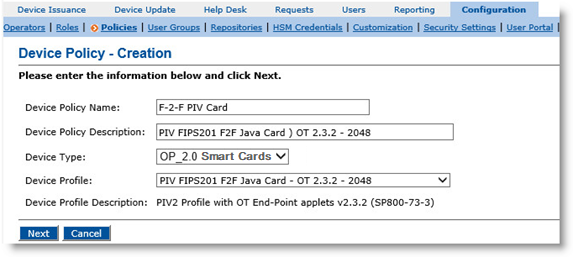
Log on to ActivID CMS, select the Configuration tab, click Policies, and then click Add Device Policy.
-
Populate the fields as displayed for OCS PIV Endpoint cards.
-
Device Policy Name—Enter a name for your device policy.
-
Device Policy Description—Enter a description of your device policy.
-
Device Type—From the drop-down list, select OP_2.0 Smart Cards.
-
Device Profile—From the drop-down list, select the device profile to use depending on the type of device you are using.
-
-
Click Next. The Device Policy Configuration page is displayed.
-
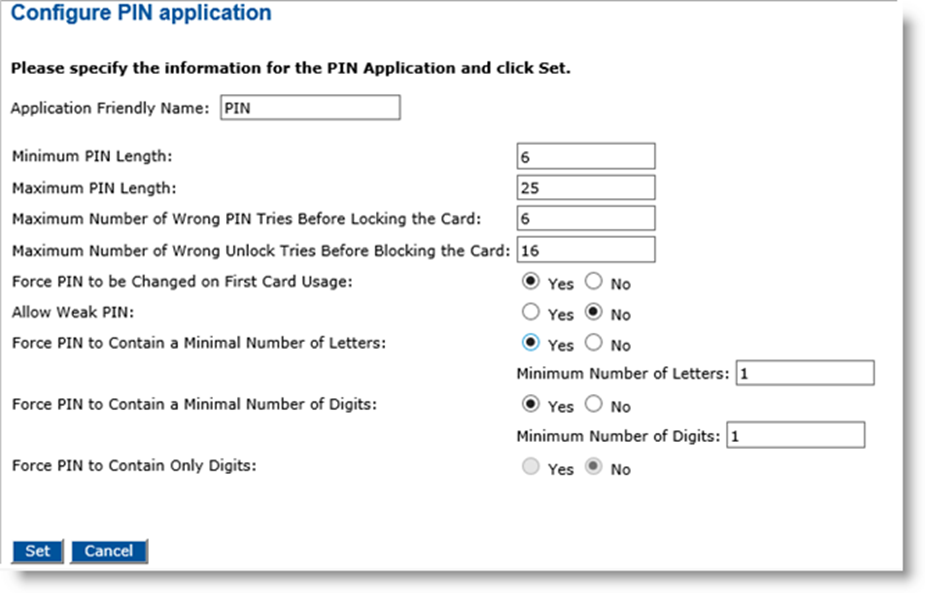
Next to the PIN application, click Configure.
-
For the Application Friendly Name field, enter a friendly name for your application.
-
Set the following values and options according to your organization’s security policy:
-
Minimum and Maximum PIN length
-
Maximum number of wrong PIN tries permitted before the card locks (applies only to ActivID Applets – not applicable to third party PIV applets)
-
Maximum number of wrong PIN unlock tries before the card is blocked (applies only to ActivID Applets – not applicable to third party PIV applets)
-
Force a PIN to be changed on first card usage
-
Weak PIN allowed or not
Note: These options are configured in the card by ActivID CMS, and enforced by the client middleware (either ActivID ActivClient or ActivID CMS Client). The other options visible in the ActivID CMS user interface (Force PIN to Contain Letters, Force PIN to Contain Digits) are not applicable to cards configured with a PIV Personal Identity Verification (technical standard of "HSPD-12"), PIV-I Personal Identity Verification - Interoperable or CIV Commercial Identity Verification profile– they are not enforced by ActivClient or other PIV middleware.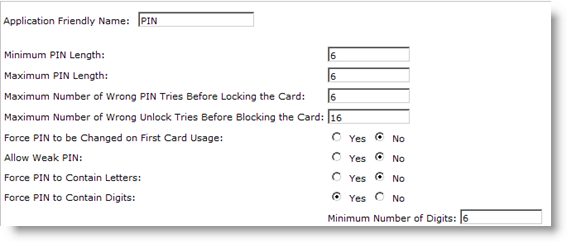
-
-
Click Set at the bottom of the page to return to the main Device Policy Configuration page.
-
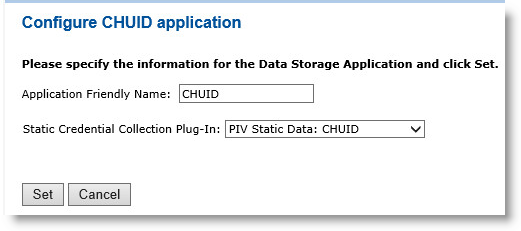
Next to the CHUID object, click Configure.
-
For the Application Friendly Name field, enter a friendly name for your application.
-
From the Static Credential Collection Plug-In drop-down list, select PIV Static Data: CHUID.
-
-
Click Set to return to the main Device Policy Configuration page.
-
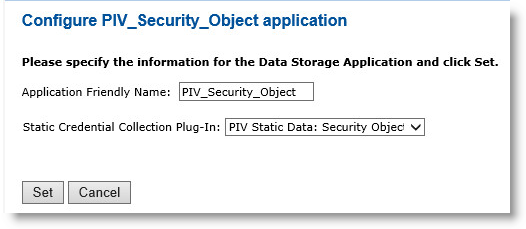
Next to the PIV_Security_Object object, click Configure.
-
For the Application Friendly Name field, enter a friendly name for your application.
-
From the Static Credential Collection Plug-In drop-down list, select PIV Static Data: Security Object.
-
-
Click Set to return to the main Device Policy Configuration page.
-
Optionally, if you want to add the following applications to the policy, then select Add from the drop-down list, and then click Configure.
-
For PIV_Fingerprint_1, PIV_Facial_Image, PIV_Printed_Information, and PIV_Iris, select the corresponding Static Credential Collection Plug-In.
-
For the PIV_Key_History, it is recommended that you configure the recovery of the previous application, for example:
-
PIV_Key_Management_Key_History_1 recovers PIV_ENCRYPTION.
-
PIV_Key_Management_Key_History_2 recovers PIV_Key_Management_Key_History_1.….
-
PIV_Key_Management_Key_History_(n) recovers PIV_Key_Management_Key_History_(n-1).
-
-
Click Set to return to the main Device Policy Configuration page.
-
Continue the remainder of the procedure in the corresponding CA section (see below).
This section describes how to configure PIV Personal Identity Verification (technical standard of "HSPD-12") policies with Entrust CA certificate templates.
-
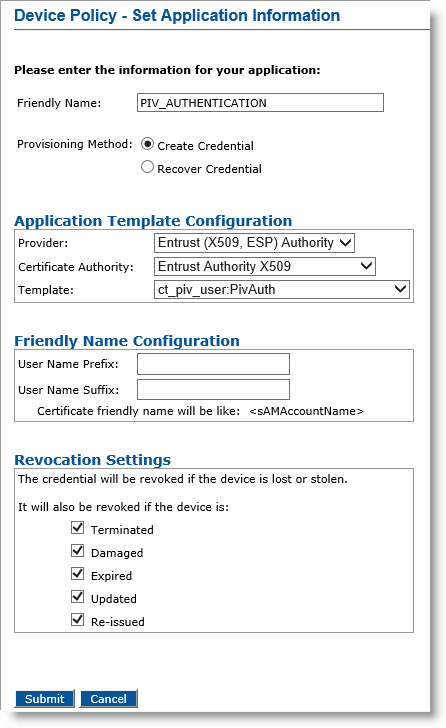
In the Action column, next to PIV_AUTHENTICATION, click Configure.
-
Friendly Name field— Enter a friendly name for the application.
-
Provisioning Method —Select Create Credential.
Note: Selecting the Create Credential option is the equivalent of setting the former Recover Application option (available in previous ActivID CMS versions) to No. -
Provider drop-down list—Select Entrust (X509, ESP)Authority.
-
Certificate Authority drop-down list— Select the second instance of the Entrust certificate authority (see the note in Configure PIV-Compliant Face-to-Face Device Policies).
-
Template drop-down list—Select the template that was configured for this application (for example, ct_piv_user:PivAuth).
-
-
In the User Name Prefix and User Name Suffix fields, enter a prefix and suffix for the certificate, if applicable.
-
Revocation Settings — By default, the credentials are revoked for all the listed states of the device. You can clear the check box(es) to indicate any state(s) for which you do not want to revoke the credentials. For example, if you clear the Damaged check box, the credentials in a device in the Damaged state will not be revoked.
-
Click Submit. The Configure PIV AUTHENTICATION Application page appears.
 Note: About entering LDAP attributes: Selecting the checkbox adjacent to a parameter name (for example, Email Address), allows you to set the parameter value as dynamic. The parameter value may reference an LDAP Lightweight Directory Access Protocol attribute. If the checkbox is not selected, the parameter value is set as static.
-
Make any necessary changes. For the User Distinguished Name, User Principal Name, or Email Address parameters, you can set a dynamic value by selecting the corresponding checkbox and entering a directory attribute in the corresponding field.
-
User Role—Select End User.
-
User Distinguished Name—Keep as default.
-
User Principal Name—Select the checkbox, and in the text box, enter %ATTR.userPrincipalName% (or optionally enter %ATTR.piv:UPN%).
-
Email Address—Select the checkbox, and in the text box enter %ATTR.mail% (or optionally enter %ATTR.piv:Email%).
-
Set Validity Period—Select No.
-
NACI Indicator—Select the checkbox, and in the text box, enter %ATTR.piv:NACIIndicator%.
-
-
Click Set. The Device Policy - Creation page appears again. The application name will be changed from red to green to indicate that the application has been configured.
-
If you have finished configuring the applications, click Save. A confirmation message appears.
-
Click Done.
-
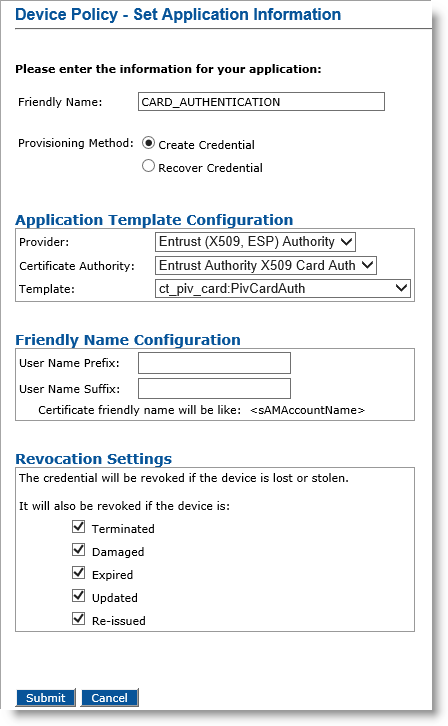
Optionally, in the Action column, next to CARD_AUTHENTICATION, click Add, and then click Configure.
-
Friendly Name field— Enter a friendly name for the application.
-
Provisioning Method —Select Create Credential.
-
Provider drop-down list—Select Entrust (X509, ESP) Authority for the Card_Authentication application.
-
Certificate Authority drop-down list— Select the first instance of the Entrust certificate authority (for example Entrust Authority X509-2 (see the note in Configure PIV-Compliant Face-to-Face Device Policies)).
-
Template drop-down list—Select the template that was configured for this application (for example, ct_piv_card:PivCardAuth).
-
-
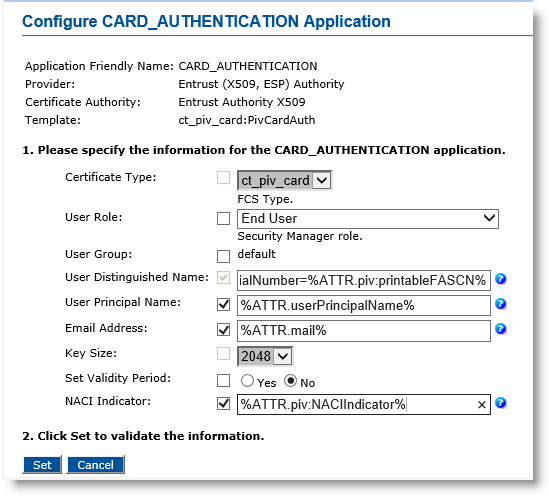
Click Submit. The Configure CARD_AUTHENTICATION application page appears.
-
User Role—Select End User.
-
User Distinguished Name— Enter serialNumber=%ATTR.piv:printableFASCN%.
-
User Principal Name—Select the checkbox, and in the text box, enter %ATTR.userPrincipalName% (or optionally, enter %ATTR.piv:UPN%).
-
Email Address — Select the checkbox, and in the text box enter %ATTR.mail% (or optionally enter %ATTR.piv:Email%).
-
Set Validity Period—Select No.
-
NACI Indicator— Select the checkbox, and in the text box, enter %ATTR.piv:NACIIndicator%.
-
-
Click Set at the bottom of the page to return to the main Device Policy Configuration page.
-
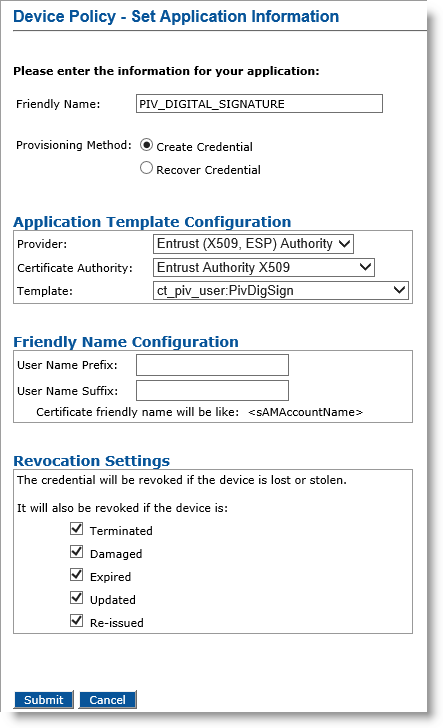
Optionally, in the Action column, next to PIV_DIGITAL_SIGNATURE, click Add, and then click Configure.
-
Friendly Name field— Enter a friendly name for the application.
-
Provisioning Method —Select Create Credential.
-
Provider drop-down list—Select Entrust (X509, ESP) Authority.
-
Certificate Authority drop-down list— Select the second instance of the Entrust certificate authority (see the note in Configure PIV-Compliant Face-to-Face Device Policies).
-
Template drop-down list—Select the template that was configured for this application (for example, ct_piv_user:PivSignAuth).
-
-
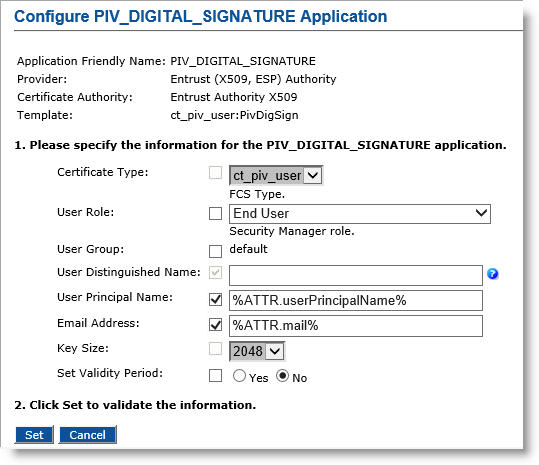
Click Submit. The Configure PIV_DIGITAL_SIGNATURE application page appears.
-
User Role—Select End User.
-
User Principal Name—Select the checkbox, and in the text box, enter %ATTR.userPrincipalName% (or optionally, enter %ATTR.piv:UPN%).
-
Email Address—Select the checkbox, and in the text box, enter %ATTR.mail% (or optionally, enter %ATTR.piv:Email%).
-
Set Validity Period—Select No.
-
-
Click Set to return to the main Device Policy Configuration page.
-
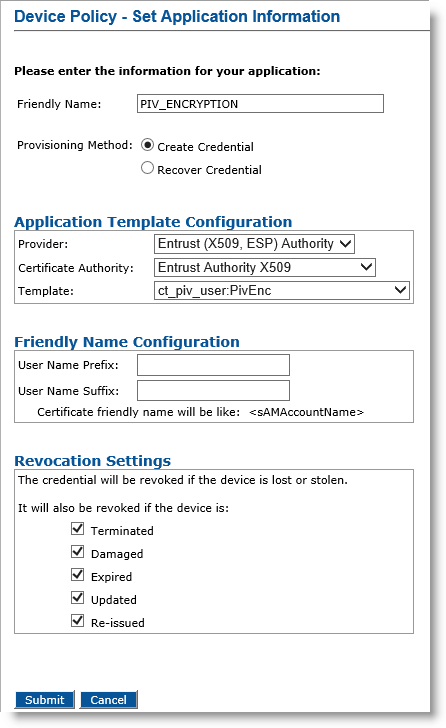
Optionally, in the Action column, next to PIV_ENCRYPTION, select Update/Add, and then click Configure.
-
Friendly Name field— Enter a friendly name for the application.
-
Provisioning Method —Select Create Credential.
-
Provider drop-down list—Select Entrust (X509, ESP) Authority.
-
Certificate Authority drop-down list— Select the second instance of the Entrust certificate authority (see the note in Configure PIV-Compliant Face-to-Face Device Policies).
-
Template drop-down list—Select the template that was configured for this application (for example, ct_piv_user:PivEnc).
-
-
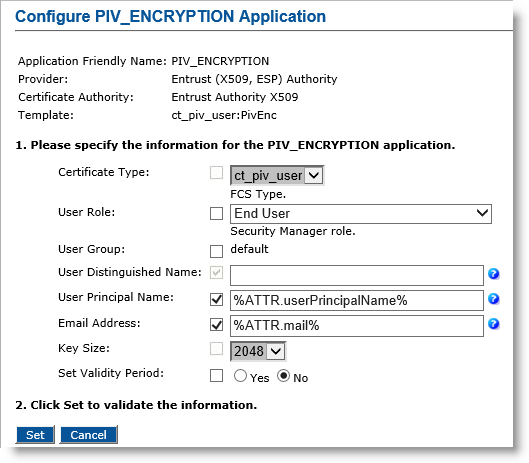
Click Submit. The Configure PIV_ENCRYPTION Application page appears.
-
User Role—Select End User.
-
User Principal Name—Select the checkbox, and in the text box, enter %ATTR.userPrincipalName% (or optionally, enter %ATTR.piv:UPN%).
-
Email Address— Select the checkbox, and in the text box, enter %ATTR.mail% (or optionally, enter %ATTR.piv:Email%).
-
Set Validity Period—Select No.
-
-
Click Set to return to the main Device Policy Configuration page.
-
Click Save, and then click Done.
This section describes how to configure PIV Personal Identity Verification (technical standard of "HSPD-12") policies with Microsoft® CA certificate templates.
-
Next to the PIV_AUTHENTICATION object, click Configure.

-
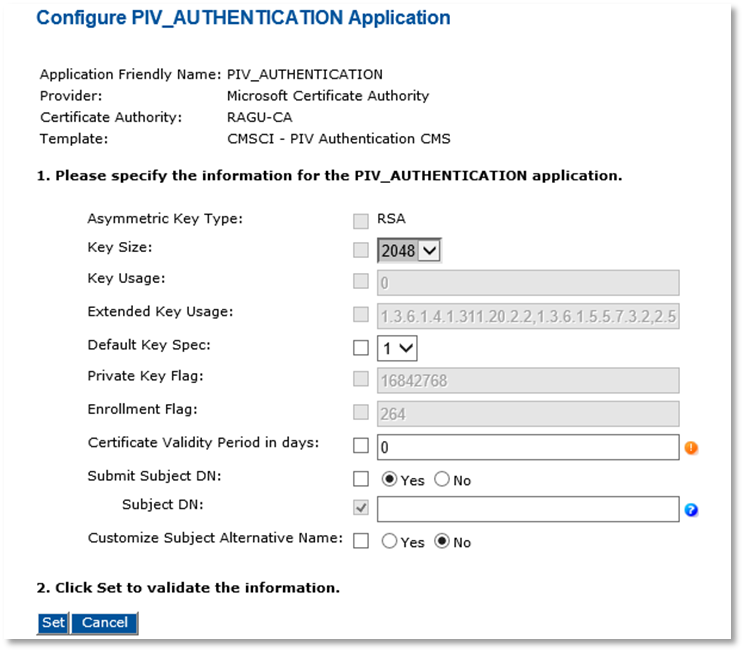
On the Set Application Information page, make sure that the correct Certificate Authority and Template are displayed, and then click Submit.
 Note: The Asymmetric Key Size option is automatically assigned the value RSA or ECC according to the device profile you use. In the current version of ActivID CMS, ECC keys are only available for PIV or CIV Commercial Identity Verification Card Authentication certificates used with the Microsoft CA.
-
Key Size—Select the key size according to the device profile you use and to the Asymmetric Key Type.
-
Default Key Spec—Select 1.
-
Certificate Validity Period in days—Define the certificate validity period according to your organization’s security policy.
-
Submit Subject DN—Select Yes.
-
-
Click Set to return to the main Device Policy Configuration page.
-
Optionally, to add and configure the CARD_AUTHENTICATION application, in the Action column, next to CARD_AUTHENTICATION, select Add, and then click Configure.
-
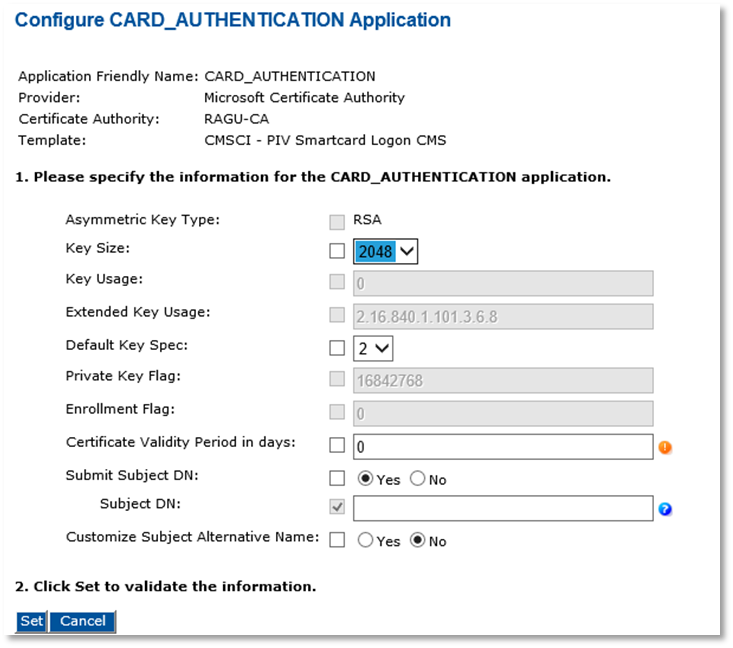
On the Set Application Information page that is displayed, make sure that the correct Certificate Authority and Template are selected, and then click Submit.
 Note: The Asymmetric Key Size option is automatically assigned the value RSA or ECC according to the device profile you use. In the current version of ActivID CMS, ECC keys are only available for PIV or CIV Card Authentication certificates used with the Microsoft CA.
-
Key Size—Select the key size according to the device profile you use and to the Asymmetric Key Type.
-
Default Key Spec—Select 2.
-
Certificate Validity Period in days—Define the certificate validity period according to your organization’s security policy.
-
Submit Subject DN—Select No.
-
-
Optionally, for PIV_DIGITAL SIGNATURE, PIV_ENCRYPTION, and any of the PIV_KEY_MANAGEMENT_KEY_HISTORY, next to the application name, select Add, and then click Configure.
-
On the Set Application Information page displayed, make sure that the correct Certificate Authority and Template are selected, and then click Submit.
-
Key Size—Select the key size according to the device profile you use.
-
Default Key Spec—Select 2 for Digital Signature, select 1 for PIV Encryption and Key History.
-
Certificate Validity Period in days—Define the certificate validity period according to your organization’s security policy.
-
Submit Subject DN—Select No.
-
-
Click Set to return to the main Device Policy Configuration page.
-
Click Save, and then click Done.
This section describes how to configure PIV Personal Identity Verification (technical standard of "HSPD-12") policies with Symantec MPKI 8.0 CA certificate templates.
-
In the Action column, next to PIV_AUTHENTICATION, click Configure.
-
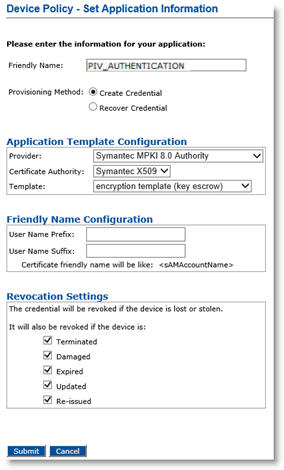
In the Friendly Name field, enter a valid, descriptive name for the certificate in use for the device policy.
-
In the Provider drop-down menu, select Symantec MPKI 8.0 Authority.
-
Depending on the selection of Provisioning Method, the fields appear differently. Perform the appropriate tasks based on your selection.
Note: Selecting the Create Credential option is the equivalent of setting the former Recover Application option (available in previous ActivID CMS versions) to No.-
Provisioning Method set to Create Credential
-
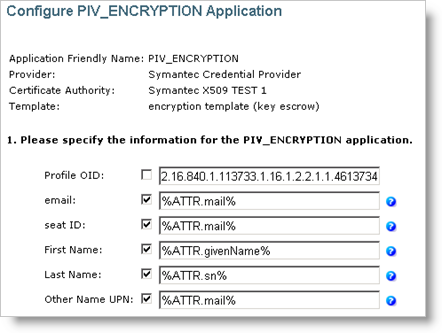
If you select Create Credential for the Provisioning Method, set the Template to encryption template (key escrow) or authentication template (non-escrow) as per your requirement. The encryption template allows key escrow.
-
Click Submit.
-
In the Profile OID field, make sure the profile OID matches with the certificate profile template that you want to associate with this device policy. You can find the certificate profile OID by logging into the Symantec PKI Manager portal. For details, refer to Configuring ActivID CMS for Use with Symantec Managed PKI v8
-
Click Submit.
-
Click Set.
-
-
-
Click Save.
You can perform the similar steps for other device policies.
This section describes how to configure PIV Personal Identity Verification (technical standard of "HSPD-12") policies with the Verizon UniCERT UPI CA certificate templates.
-
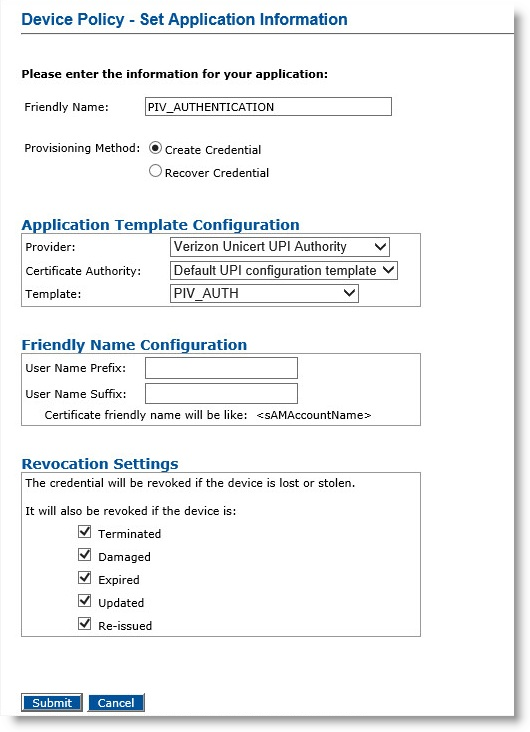
In the Action column, next to PIV_AUTHENTICATION, select Add, and then click Configure. The Device Policy - Set Application Information page appears.
-
Friendly Name—Enter a name for the application.
-
Provisioning Method —Select Create Credential.
Note: Selecting the Create Credential option is the equivalent of setting the former Recover Application option (available in previous ActivID CMS versions) to No. -
Provider—Select Verizon UniCERT UPI Authority.
-
Certificate Authority—Select the Default UPI configuration template.
-
Template—Select default template, which corresponds to the certificate template configured in Verizon UniCERT UPI CA for the PIV_Authentication application.
-
-
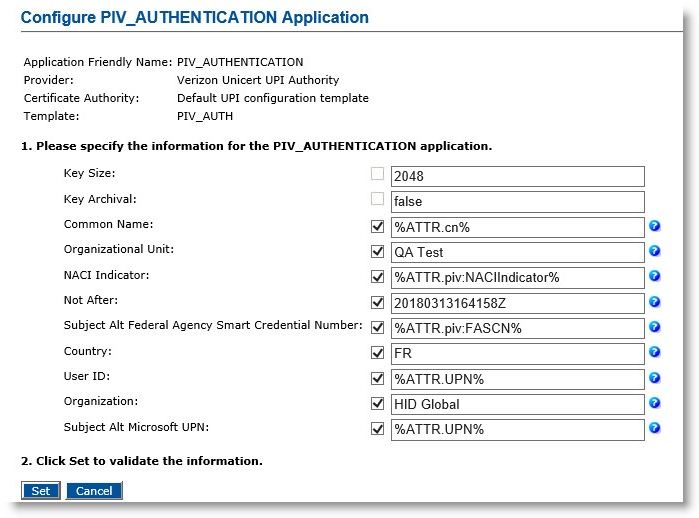
Click Submit. The Configure PIV_AUTHENTICATION Application page appears.
-
Enter appropriate values in all the required fields.
-
Click Set to return to the main Device Policy Configuration page.
-
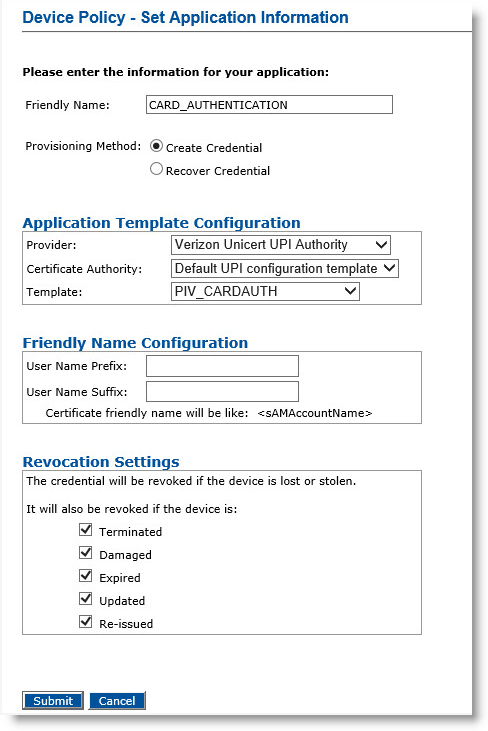
Optionally, in the Action column, next to CARD_AUTHENTICATION, select Add, and then click Configure.
-
Friendly Name—Enter a friendly name for the application.
-
Provisioning Method —Select Create Credential.
-
Provider—Select Verizon UniCERT UPI Authority.
-
Certificate Authority—Select your Default UPI configuration template.
-
Template—Select default template, which corresponds to the certificate template configured in Verizon UniCERT UPI CA for the CARD_AUTHENTICATION application.
-
-
Click Submit. The Configure CARD_AUTHENTICATION Application page appears.
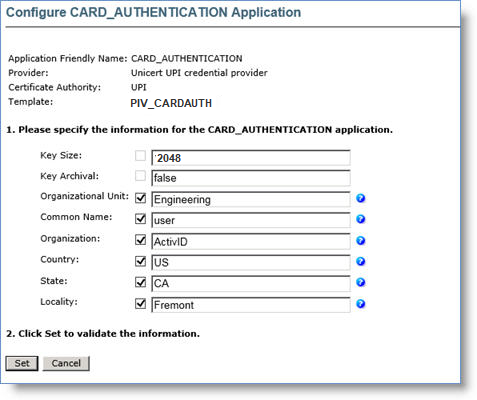
-
Enter appropriate values in all the required fields.
-
Click Set to return to the main Device Policy Configuration page.
-
Optionally, in the Action column, next to PIV_DIGITAL_SIGNATURE, select Add, and then click Configure.
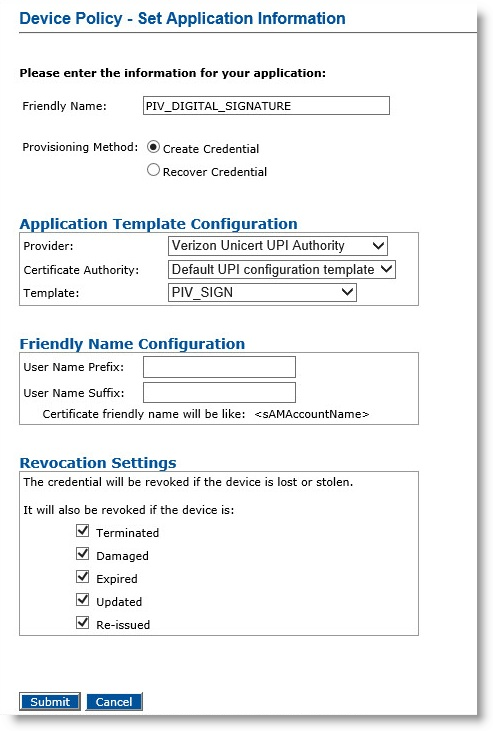
-
Friendly Name—Enter a name for the application.
-
Provisioning Method —Select Create Credential.
-
Provider—Select Verizon UniCERT UPI Authority.
-
Certificate Authority—Select your Default UPI configuration template.
-
Template—Select default template, which corresponds to the certificate template configured in UniCERT UPI CA for the PIV_Digital_Signature application.
-
-
Click Submit. The Configure PIV_DIGITAL_SIGNATURE Application page appears.
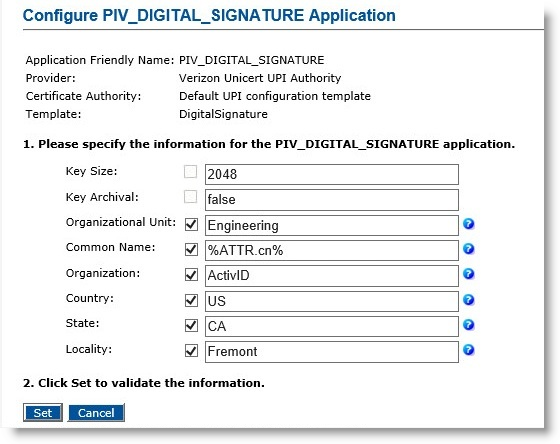
-
Enter appropriate values in all the required fields
-
Click Set to return to the main Device Policy Configuration page.
-
Optionally, in the Action column, next to PIV_ENCRYPTION, select Update/ Add, and then click Configure.
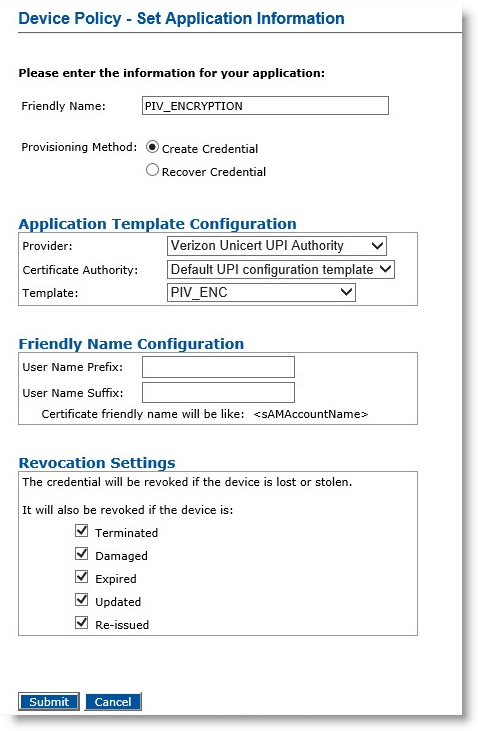
-
Friendly Name—Enter a friendly name for the application.
-
Provisioning Method —Select Create Credential.
-
Provider—Select Verizon UniCERT UPI Authority.
-
Certificate Authority— Select your Default UPI configuration template.
-
Template—Select default template, which corresponds to the certificate template configured in UniCERT UPI CA for the PIV_ENCRYPTION application.
-
-
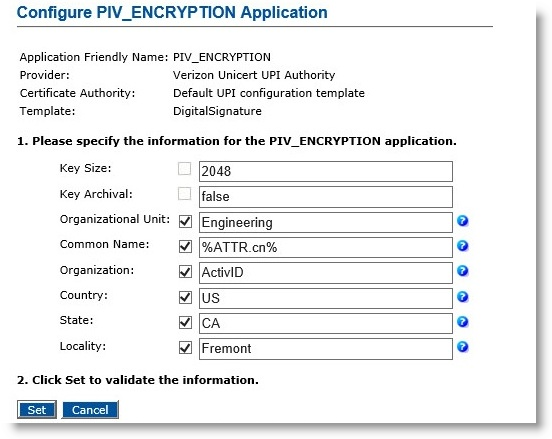
Click Submit. The Configure PIV_ENCRYPTION Application page appears.
-
Enter appropriate values in all the required fields
-
Click Set to return to the main Device Policy Configuration page.
-
Click Save, and then click Done.


