Configuring Microsoft Certificate Templates
This section describes how to make Microsoft certificate templates PIV/PIV-I/CIV compliant.
To create a PIV, PIV-I or CIV compliant device policy, up to four PKI applications containing a digital certificate and private key will be configured on the card.
The following is the list of the PKI applications:
-
PIV_AUTHENTICATION—Contains a PKI certificate and key-pair used to authenticate the user.
-
CARD_AUTHENTICATION—This key and certificate (if the key is an asymmetric key) supports PIV Card Authentication for device-to-device authentication purposes (physical access). When the Card Authentication Key is a symmetric key, the CHUID Card Holder Unique Identifier authentication key map must be present and must specify the cryptographic algorithm and key storage location.
-
PIV_DIGITAL_SIGNATURE—This key and certificate support the use of digital signatures for the purpose of document signing.
-
PIV_ENCRYPTION—This key and certificate support the use of encryption for the purpose of confidentiality. This key pair is escrowed by the issuer for key recovery purposes.
PIV and PIV-I Certificate Templates
The same CA certificate templates cannot be used for both PIV and PIV-I environments due to differences in the policy configuration.
Therefore, new CA certificate templates dedicated to PIV-I must be defined in the CA, one per PIV certificate.
The procedures in this section apply to both PIV and PIV-I environments, and the mode-related configuration is specified where applicable.
The issuer should NOT use the PIV-I policy OIDs directly, but instead use their own OIDs that can be mapped later to the PIV-I OIDs via cross-certification.
Getting Started
-
Run mmc.exe to open the Microsoft Management Console.
-
On the File menu, click Add/Remove Snap-in.
-
In the Available snap-ins window, click Certificate Template, and then click Add.
-
Click OK.
-
In the console tree, expand your CA.
-
In the list of templates provided by default by Microsoft CA, right-click on Smartcard Logon template, and select Duplicate Template.
-
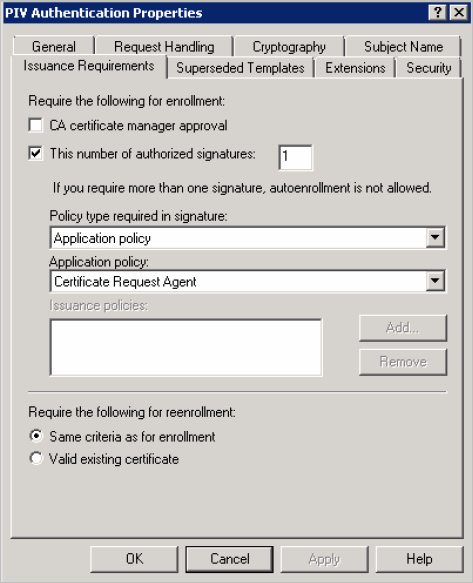
In the Issuance Requirements tab, edit the settings as follows:
-
Select the This number of authorized signatures option. This allows ActivID CMS to issue a card.
-
From the Application policy drop-down list, select Certificate Request Agent.
-
Select the Same criteria as for enrollment option.
-
-
Click OK.
-
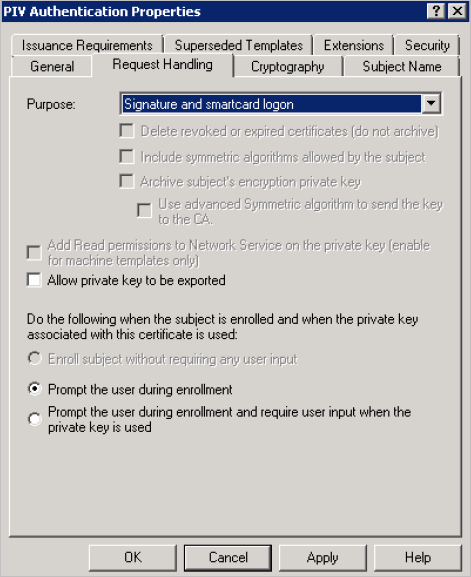
In the Request Handling tab, from the Purpose drop-down list, select Signature and smartcard logon.
-
Select the Prompt the user during enrollment option, and click OK.
-
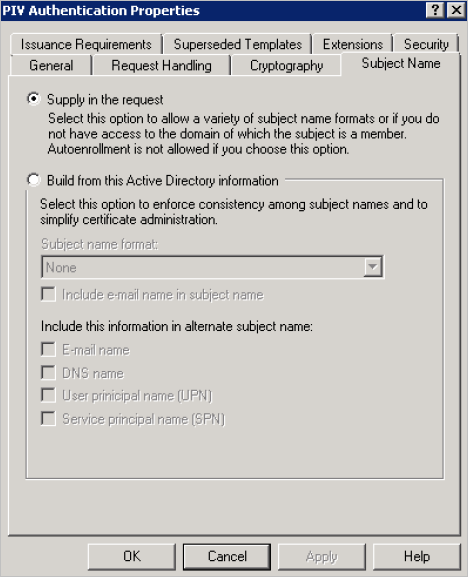
In the Subject Name tab, select the Supply in the request option. The Subject Name is supplied by ActivID CMS.
-
Click OK.
-
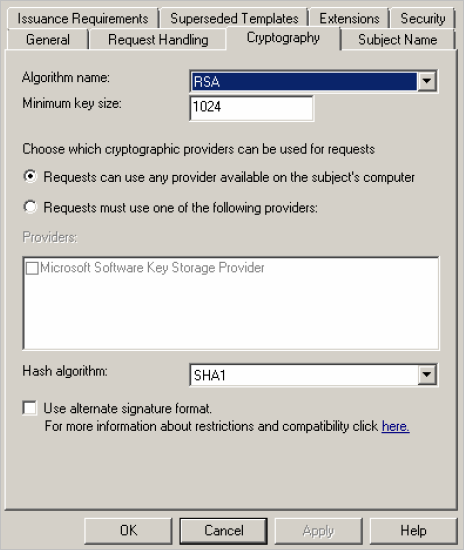
If available, select the Cryptography tab and set the Algorithm name, Minimum key size (should be set to 2048), and Hash algorithm (should be set to SHA256). Then, click OK.
-
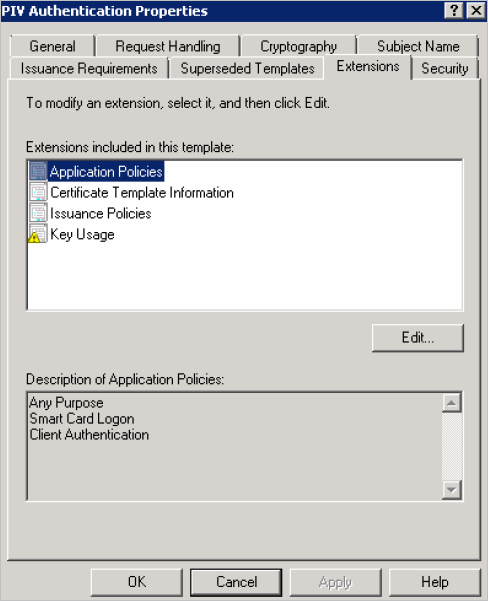
In the Extensions tab, in the Extensions included in this template section, select Application Policies.
Note:-
If required to support specific applications, the extension may include the anyExtendedKeyUsage value.
-
If anyExtendedKeyUsage is not included, the following 3 values for keyPurposeID must be included:
-
Smart Card Logon,
-
TLS Client Authentication and
-
id-pkinit-KPClientAuth.
Additional key purposes may be specified.
-
-
Organizations that choose not to include the anyExtendedKeyUsage value may experience interoperability issues if the specific EKU required by an application is absent.
-
anyExtendedKeyUsage is named Any Purpose in Microsoft CA. This label can be customized.
-
-
Review the Description of Application Policies information.
-
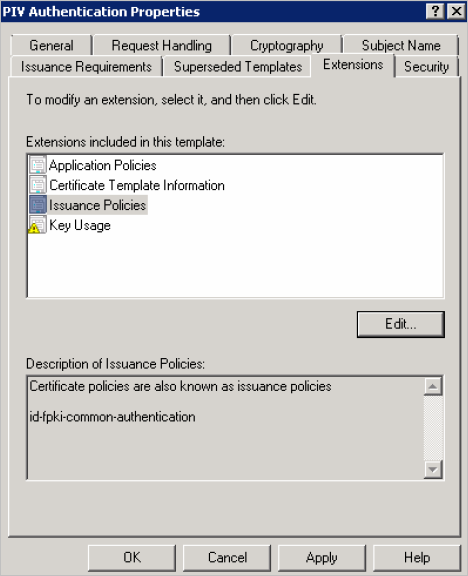
In the Extensions included in this template section, select Issuance Policies and click Edit.
-
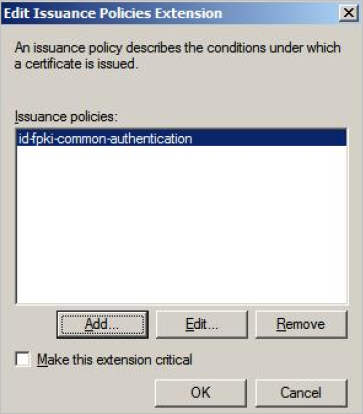
Click Edit.
-
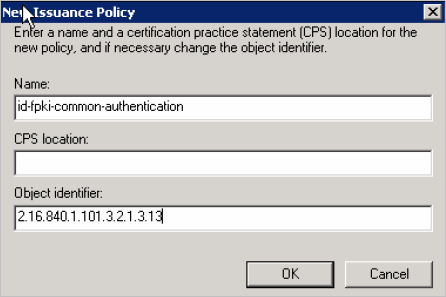
Enter the required information according to the mode:
Field
PIV
PIV-I
Name
id-fpki-common-authentication
id-fpki-certpcy-pivi-hardware
Object identifier
2.16.840.1.101.3.2.1.3.13
2.16.840.1.101.3.2.1.3.18
-
Click OK.
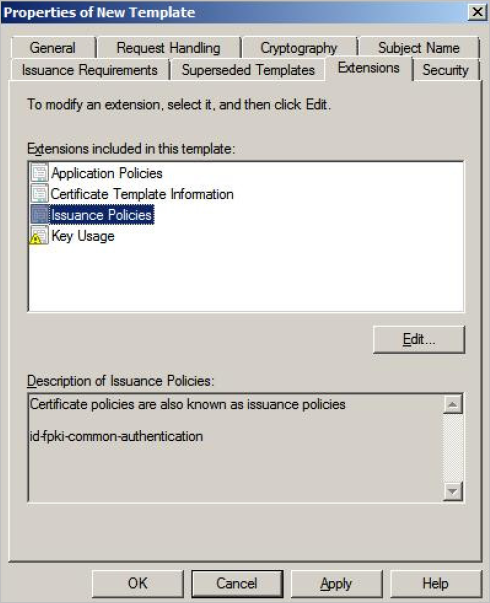
-
Click OK.
-
In the list of templates provided by default by Microsoft CA, right-click on the User template, and then select Duplicate Template.
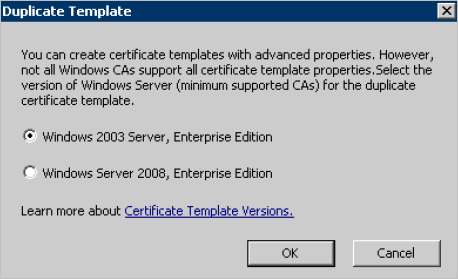
-
Select a server version, and then click OK.
-
In the Issuance Requirements tab, select This number of authorized signatures (if it is not already selected).
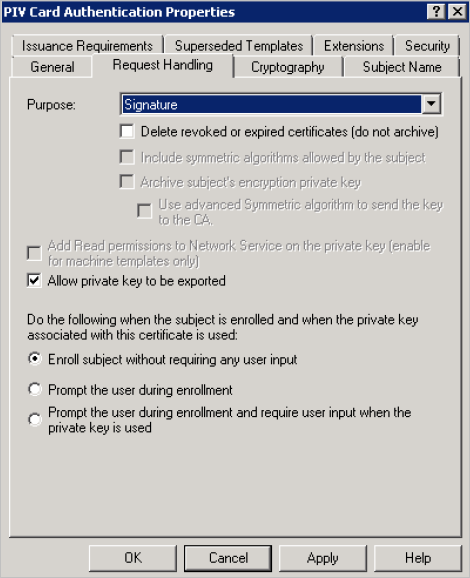
-
In the Request Handling tab, from the Purpose drop-down list, select Signature.
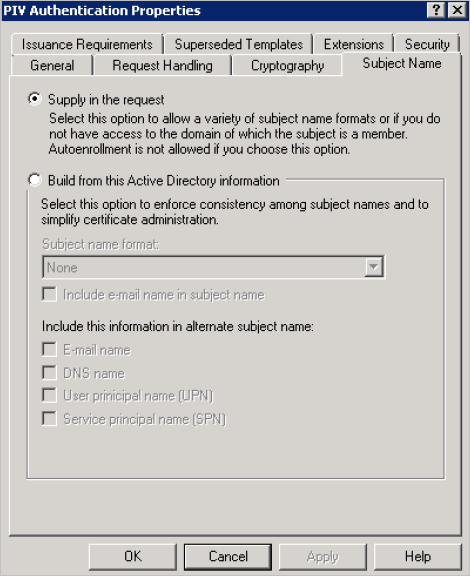
-
In the Subject Name tab, click Supply in the request. The Subject Name is supplied by ActivID CMS.
-
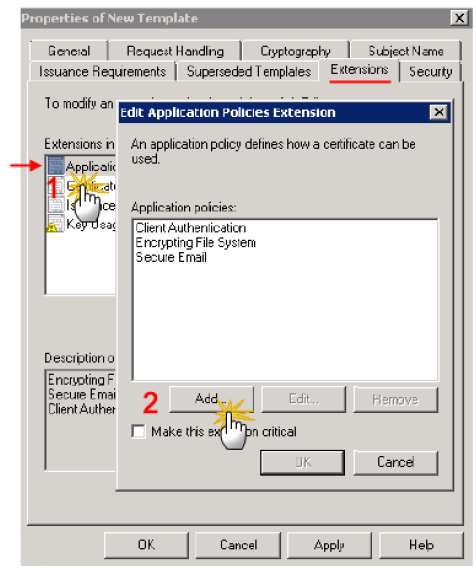
In the Extensions tab, in the Extensions included in this template section, select Application Policies, and then click Edit (not illustrated).
-
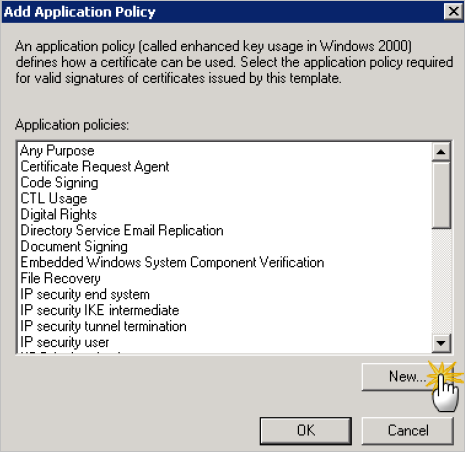
In the Edit Application Policies Extension dialog, click Add.
-
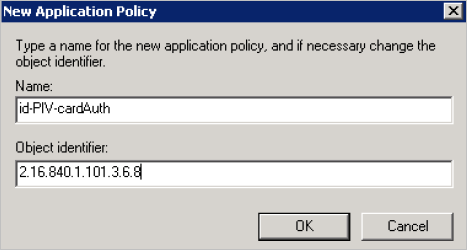
Click New.
-
Enter:
-
Name—id-PIV-cardAuth
-
Object identifier—2.16.840.1.101.3.6.8
-
-
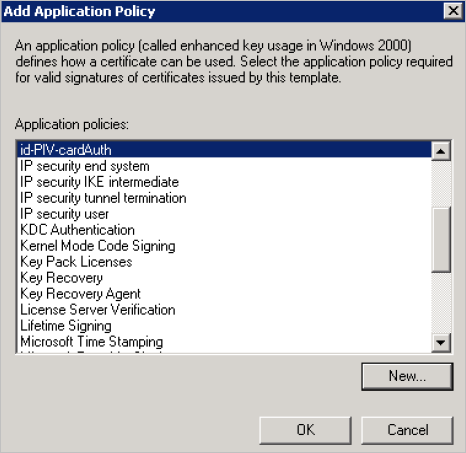
Click OK.
-
Highlight the id-PIV-cardAuth policy, and then click OK.
-
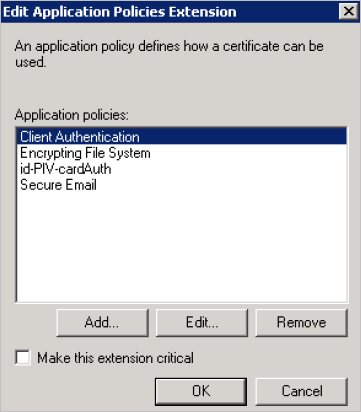
In the Application policies section, remove all the policies EXCEPT id-PIV-cardAuth.
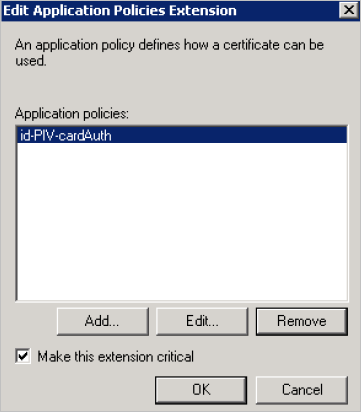 Note: The ONLY available application policy should be id-PIV-cardAuth as illustrated above.
-
Select the Make this extension critical option, and then click OK.
-
-
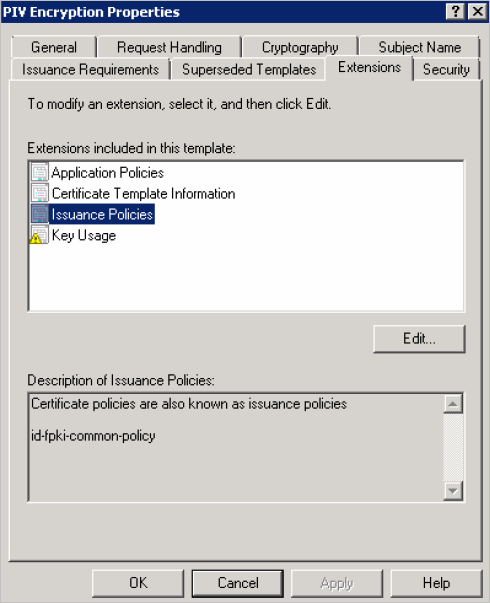
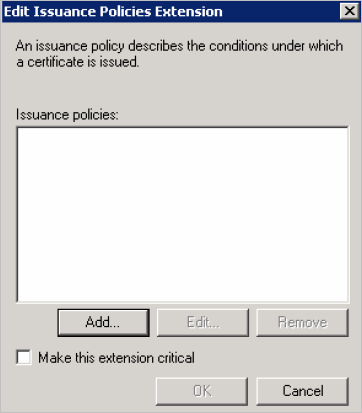
In the Extensions tab, select Issuance Policies, and then click Edit.
-
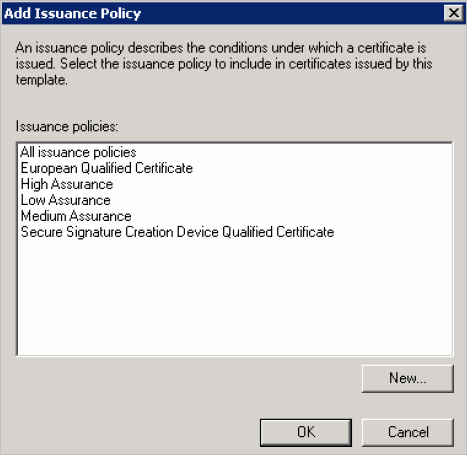
Click Add.
-
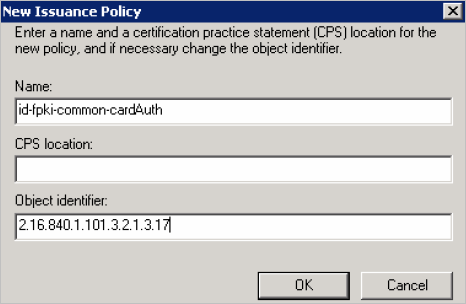
Click New.
-
Enter the required information according to the following mode:
Field
PIV
PIV-I
Name
id-fpki-common-cardAuth
id-fpki-certpcy-pivi-cardAuth
Object identifier
2.16.840.1.101.3.2.1.3.17
2.16.840.1.101.3.2.1.3.19
-
Click OK.
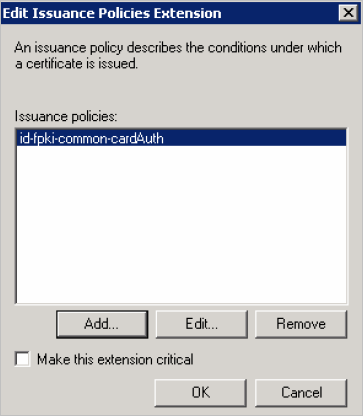
-
Highlight the required policy according to the mode, and then click OK:
-
For PIV mode – id-fpki-common-cardAuth
-
For PIV-I mode – id-fpki-certpcy-pivi-cardAuth
-
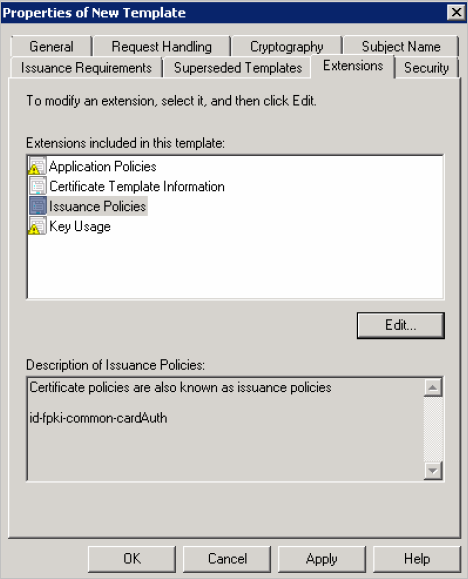
-
-
Click OK.
-
In the list of default templates provided by Microsoft CA, right-click on the User Signature Only template, and then select Duplicate Template.
-
Select a template, and then click OK.
-
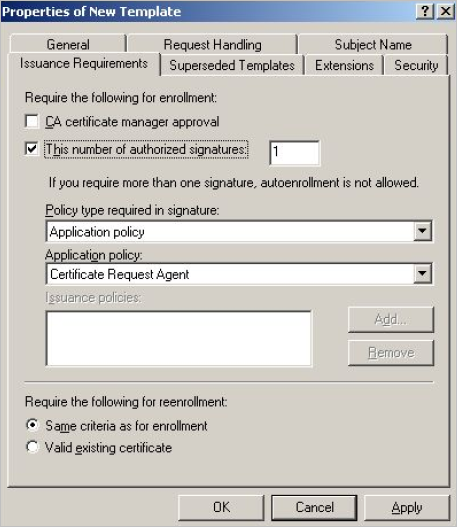
In the Issuance Requirements tab, select the This number of authorized signatures option. This allows ActivID CMS to issue a card.
-
From the Application policy drop-down list, select Certificate Request Agent.
-
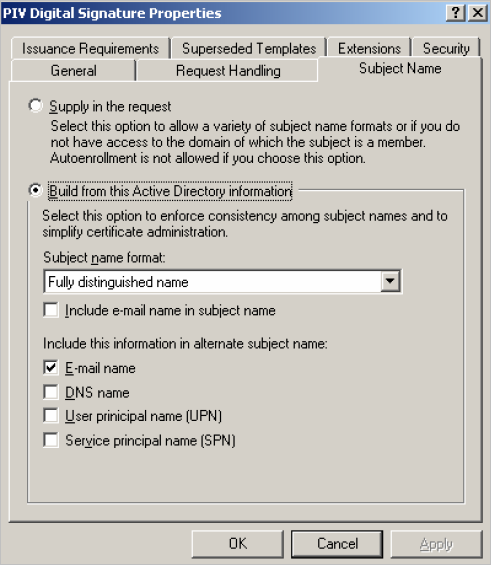
In the Subject Name tab, apply the following configuration:
-
For PIV mode, select Build from this Active Directory information. Make sure that only E-mail name is selected to be included in the alternate subject name.
Note: If you are using a directory other than Microsoft Active Directory, select Supply in the request. -
For PIV-I mode, select Supply in the request. The Subject Name is supplied by ActivID CMS.
-
-
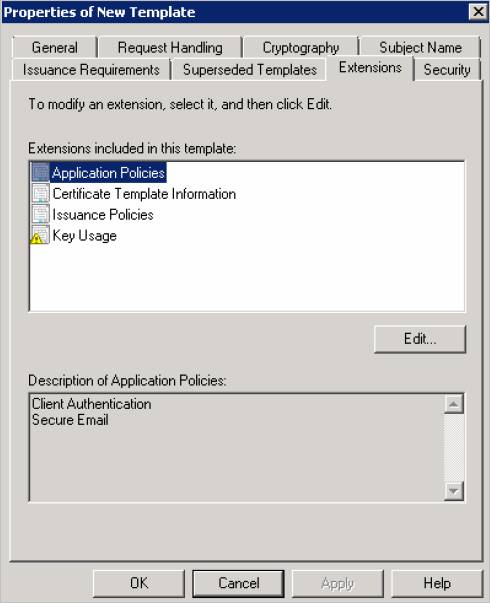
In the Extensions tab, in the Extensions included in this template section, select Application Policies.
-
Verify the Description of Application Policies.
-
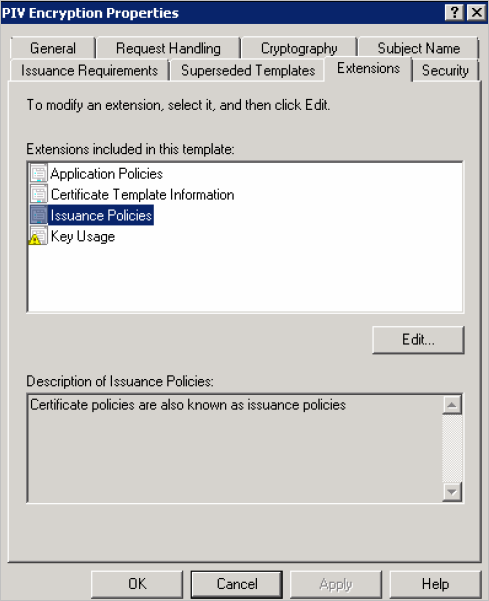
Select Issuance Policies and click Edit.
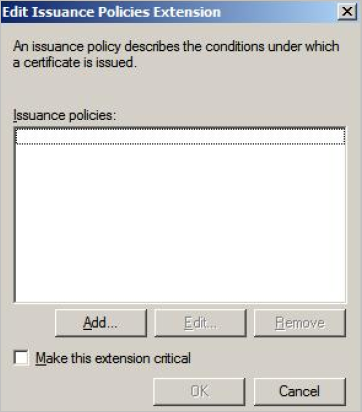
-
Click Add.
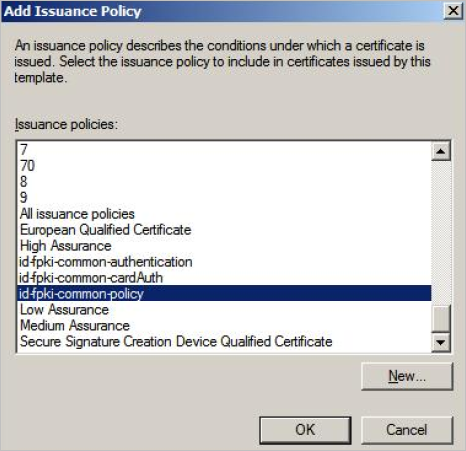
-
Click New.
-
Enter the required information according to the mode:
Field
PIV
PIV-I
Name
id-fpki-common-policy
id-fpki-certpcy-pivi-hardware
Object identifier
2.16.840.1.101.3.2.1.3.6
2.16.840.1.101.3.2.1.3.18
-
Click OK.
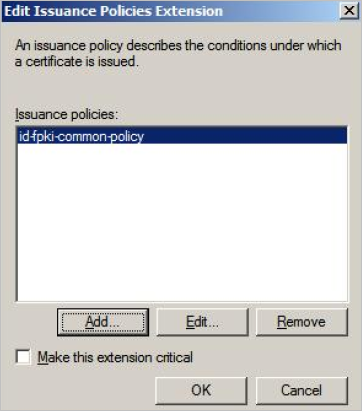
-
Highlight the required policy according to the mode, and then click OK:
-
For PIV mode – id-fpki-common-policy
-
For PIV-I mode – id-fpki-certpcy-pivi-hardware
-
-
-
Return to the Extensions tab and, in the Extensions included in this template section, select Key Usage and click Edit.
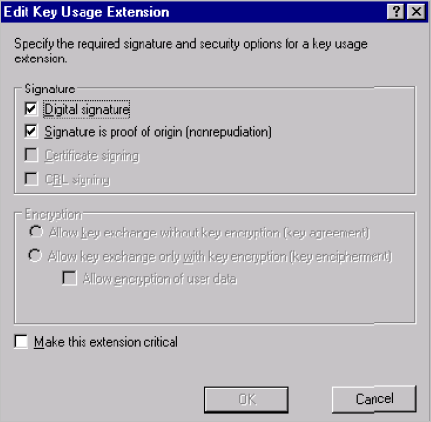
-
Select the Digital signature and Signature is proof of origin (nonrepudiation) options.
-
Click OK.
-
In the list of default templates provided by Microsoft CA, right-click on the Exchange User template, and then select Duplicate Template.
-
In the Issuance Requirements tab, select the This number of authorized signatures option. This allows ActivID CMS to issue a card.
-
From the Application policy drop-down list, select Certificate Request Agent.
-
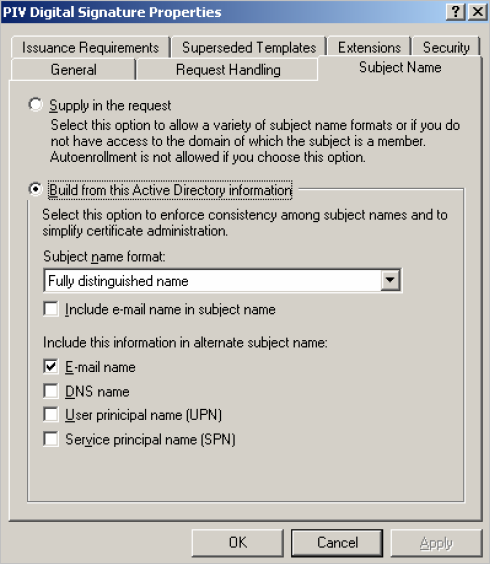
In the Subject Name tab, apply the following configuration:
-
For PIV mode, select Build from this Active Directory information. Make sure that only E-mail name is selected to be included in the alternate subject name.
Note: If you are using a directory other than Microsoft Active Directory, select Supply in the request. -
For PIV-I mode, select Supply in the request. The Subject Name is supplied by ActivID CMS.
-
-
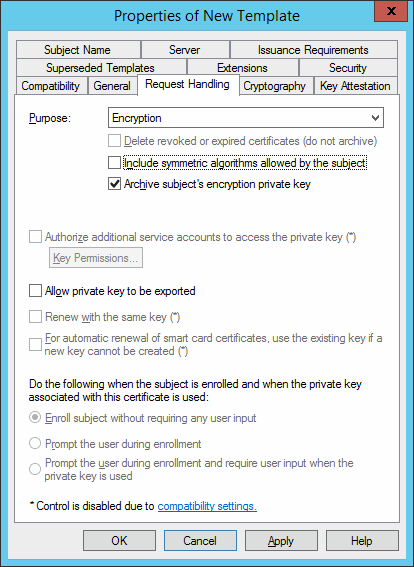
In the Request Handling tab, select Encryption and Archive subject’s encryption private key.
-
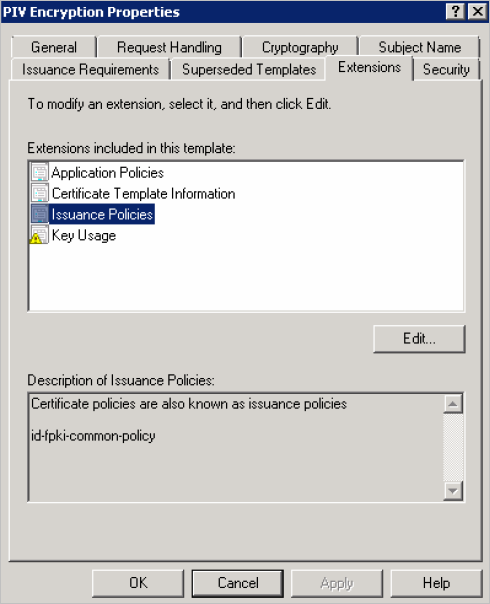
In the Extensions tab, in the Extensions included in this template section, select Issuance Policies.
-
Click Edit.
-
Click Add.
-
Highlight the required policy according to the mode, and then click OK:
-
For PIV mode – id-fpki-common-policy
-
For PIV-I mode – id-fpki-certpcy-pivi-hardware
-
-
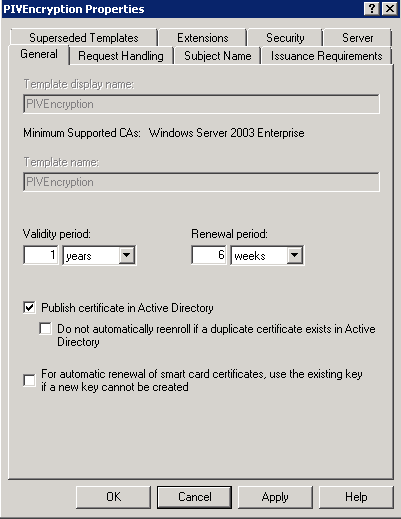
In the General tab, select Publish certificate in Active Directory.
-
Click OK.
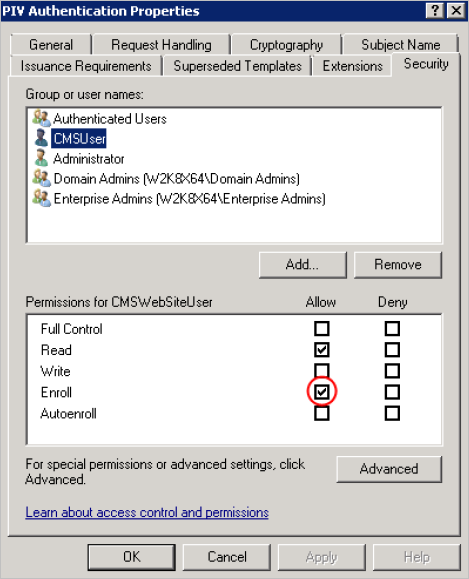
For each of the four templates, you must add the permissions for the ActivID CMS User (CMSWebSiteUser).
-
In the Security tab, select the CMSUser.
-
In the Permissions section, select the Enroll option, and then click OK.
-
Repeat this procedure for the other templates.
CIV Certificate Templates
New CA certificate templates dedicated to CIV Commercial Identity Verification can be defined in the CA. You can issue CIV cards with all the CAs that are supported by ActivID CMS.
Getting Started
-
Run mmc.exe to open the Microsoft Management Console.
-
On the File menu, click Add/Remove Snap-in.
-
In the Available snap-ins window, click Certificate Template, and then click Add.
-
Click OK.
-
In the console tree, expand your CA.
-
In the list of templates provided by default by Microsoft CA, right-click on Smartcard Logon template, and select Duplicate Template.
-
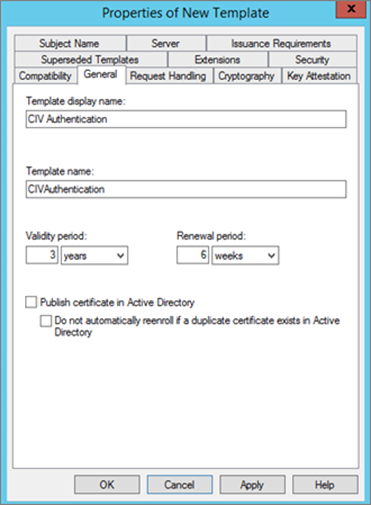
In the General tab, clear the Publish certificate in Active Directory option (if selected), and then click OK.
-
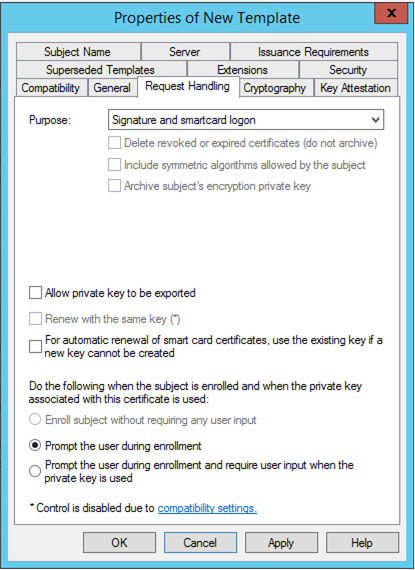
In the Request Handling tab, from the Purpose drop-down list, select Signature and smartcard logon.
-
Select the Prompt the user during enrollment option, and then click OK.
-
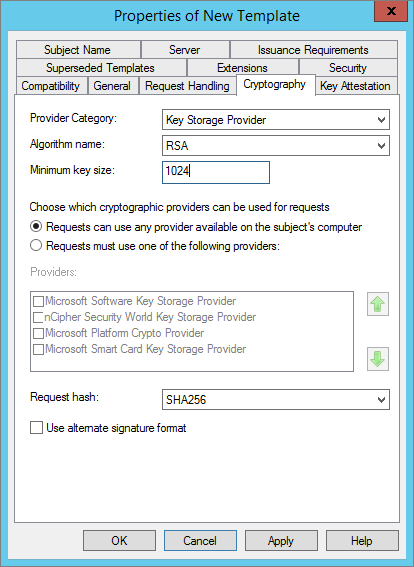
In the Cryptography tab, select the Algorithm name, Minimum key size (should be set to 2048), and Hash algorithm (should be set to SHA256). Then, click OK.
-
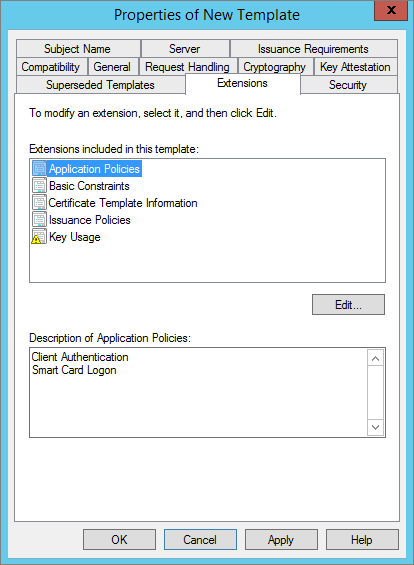
In the Extensions tab, in the Extension included in this template section, select Application Policies, and then click Edit.
-
In the Description of Application Policies box, verify that the Client Authentication and Smart Card Logon policies are present, and then click OK.
-
In the Extension included in this template section, select Issuance Policies.
-
Verify that no issuance policies are added.
-
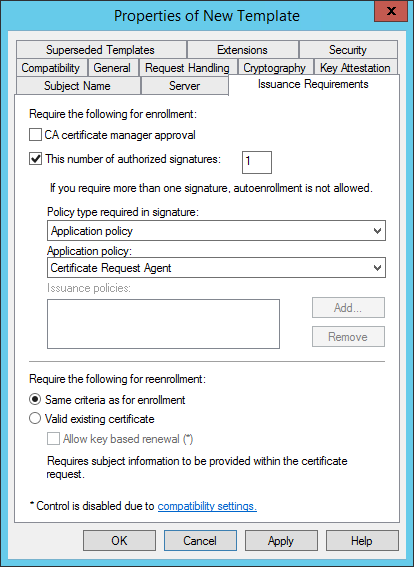
In the Issuance Requirements tab, edit the settings as follows:
-
Select the This number of authorized signatures option. This allows ActivID CMS to issue a card. In the text box, enter the required number.
-
From the Application policy drop-down list, select Certificate Request Agent.
-
Select the Same criteria as for enrollment option.
-
Click OK.
-
-
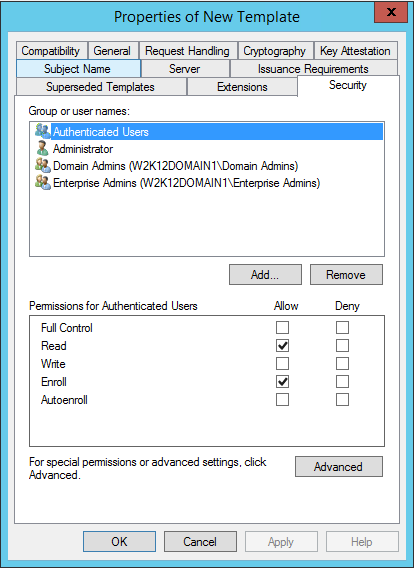
In the Security tab, click Authenticated Users and, in the Allow column, select the Read and Enroll permissions. Then, click OK.
-
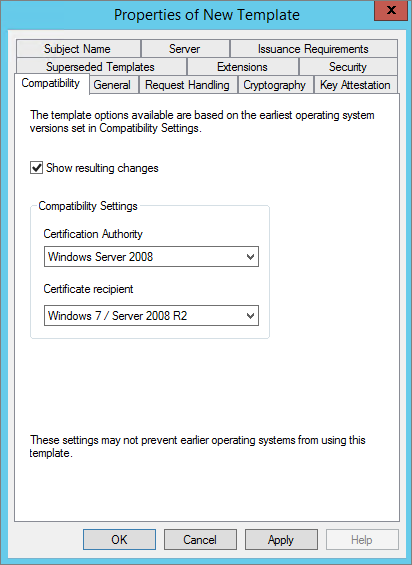
In the list of templates provided by default by Microsoft CA, right-click on the User template, and then select Duplicate Template.
-
Select a template, and then click OK.
-
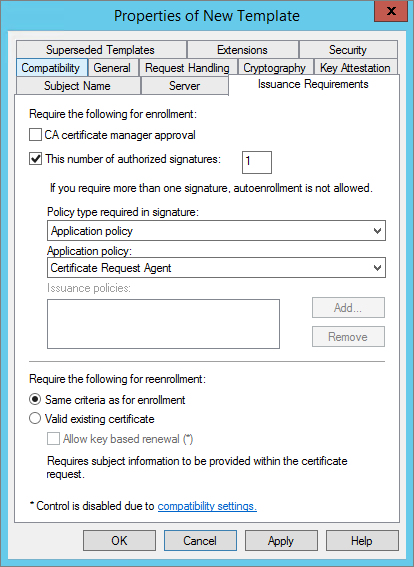
In the Issuance Requirements tab, select This number of authorized signatures (if it is not already selected).
-
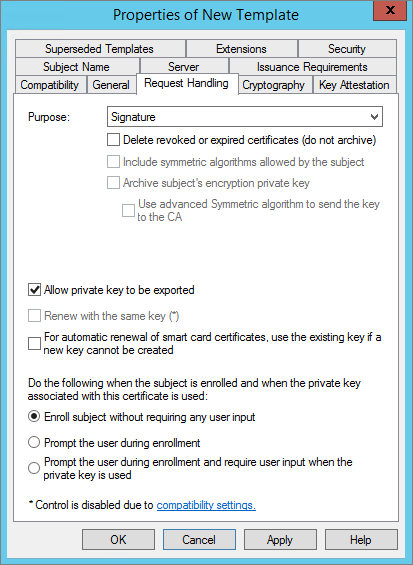
In the Request Handling tab, next to Purpose, select Signature.
-
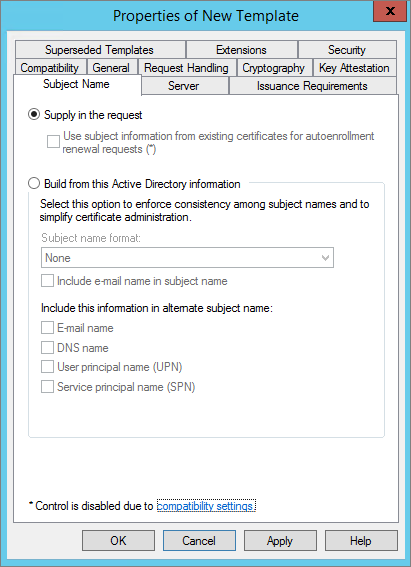
In the Subject Name tab, select Supply in the request. The Subject Name is supplied by ActivID CMS.
-
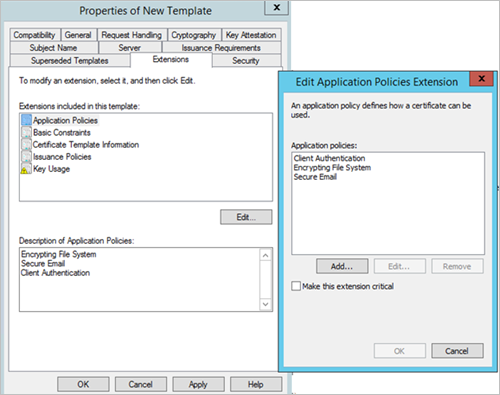
In the Extensions tab, in the Extensions included in this template box, select Application Policies, and then click Edit.
-
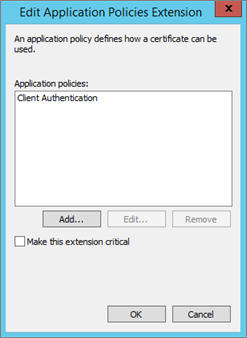
In the Edit Application Policies Extension window, select the policy that you want to remove, and then click Remove.
-
Delete all policies, except the Client Authentication policy. Verify the Client Authentication description and then click OK.
-
Go back to the Extensions tab and select Issuance Policies, and then click Edit.
-
Verify that no issuance policies are added.
-
Click OK.
-
In the list of default templates provided by Microsoft CA, right-click on the User Signature Only template, and then select Duplicate Template.
-
Select a template, and then click OK.
-
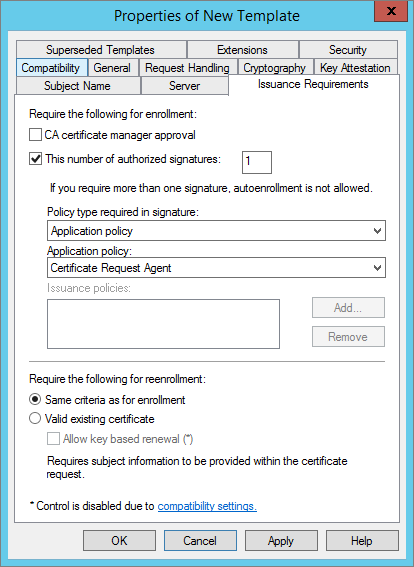
In the Issuance Requirements tab, select the This number of authorized signatures option. This allows ActivID CMS to issue a card.
-
From the Application policy drop-down list, select Certificate Request Agent.
-
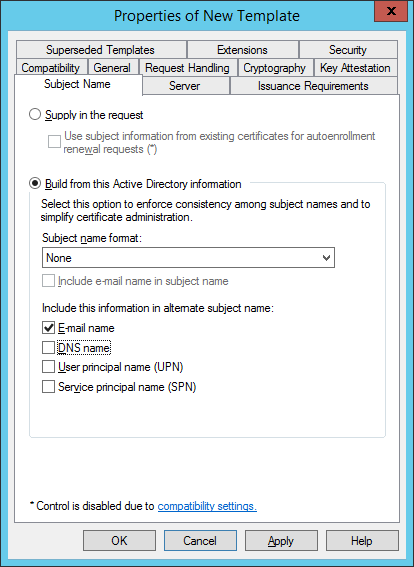
In the Subject Name tab, for CIV mode, select Build from this Active Directory information. Make sure that only E-mail name is selected to be included in the alternate subject name.
Note: If you are using a directory other than Microsoft Active Directory, select Supply in the request.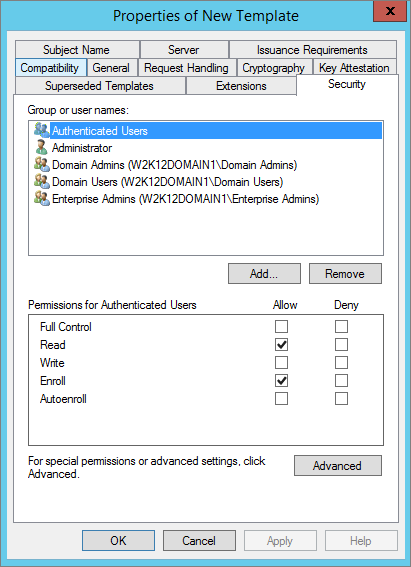
-
In the Security tab, in the Group or user name section, select Authenticated Users.
-
Select the Read and Enroll permissions.
-
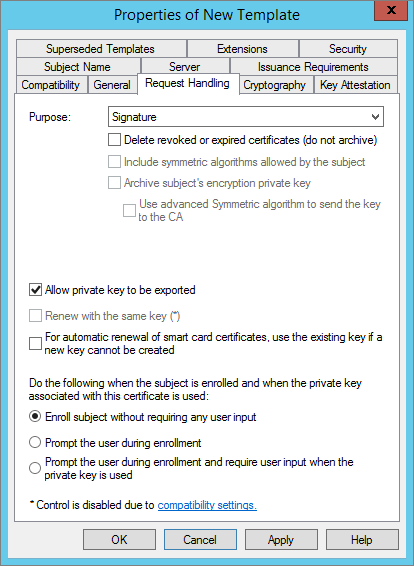
In the Request Handling tab, next to Purpose, select Signature.
-
Click OK.
-
In the list of default templates provided by Microsoft CA, right-click on the Exchange User template, and then select Duplicate Template.
-
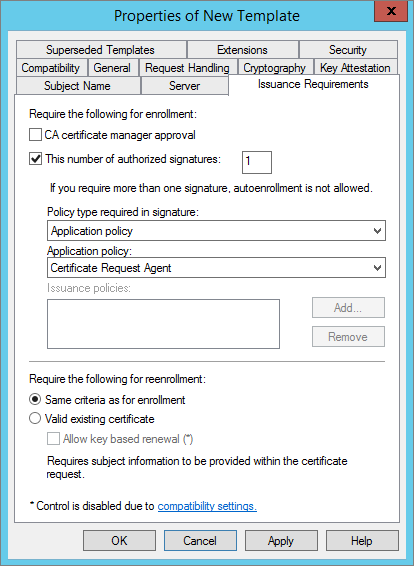
In the Issuance Requirements tab, select the This number of authorized signatures option. This allows ActivID CMS to issue a card.
-
From the Application policy drop-down list, select Certificate Request Agent.
-
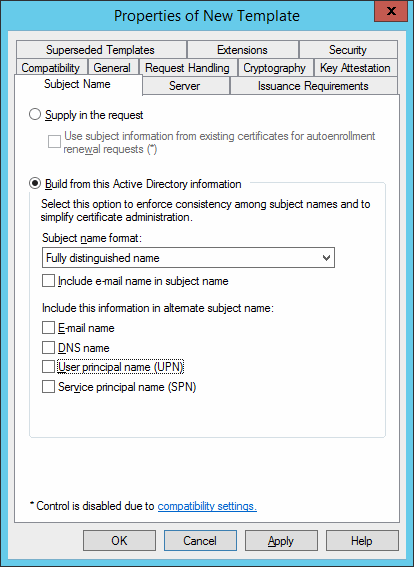
In the Subject Name tab, for CIV mode, select Build from this Active Directory information.
Note: If you are using a directory other than Microsoft Active Directory, select Supply in the request.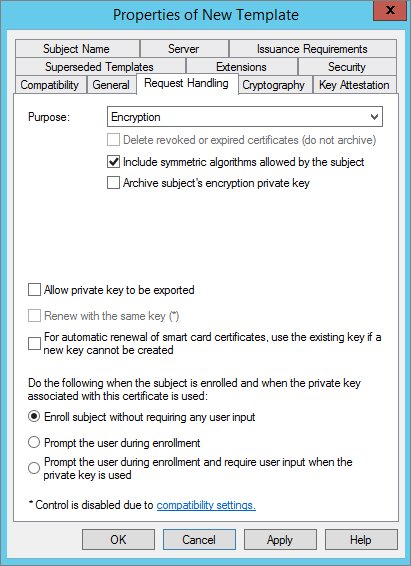
-
In the Request Handling tab, select the Encryption option.
-
In the Extensions tab, in the Extensions included in this template section, select Issuance Policies.
-
Verify that no issuance policies are added.
-
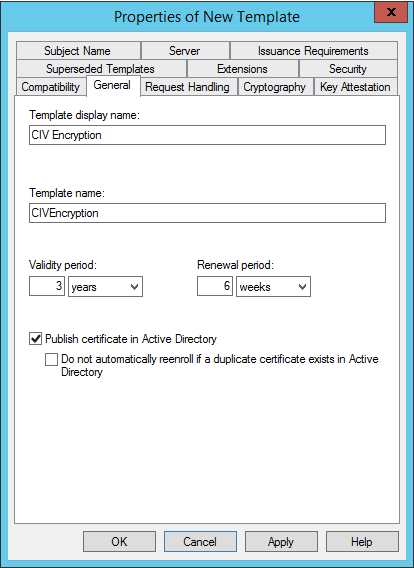
In the General tab, select Publish certificate in Active Directory.
-
Click OK.


