Setting Up an nShield Solo
This section describes how to set up an nShield Solo HSM for use with ActivID Key Management System (KMS) and ActivID Credential Management System (CMS).
-
You must install one of the following Java™ products prior to installing the nCipher components:
-
Java Runtime Environment™ (JRE)
- Java Developer Kit™ (JDK)
-
-
You must install the 64-bit version of the nCipher Security World software.
-
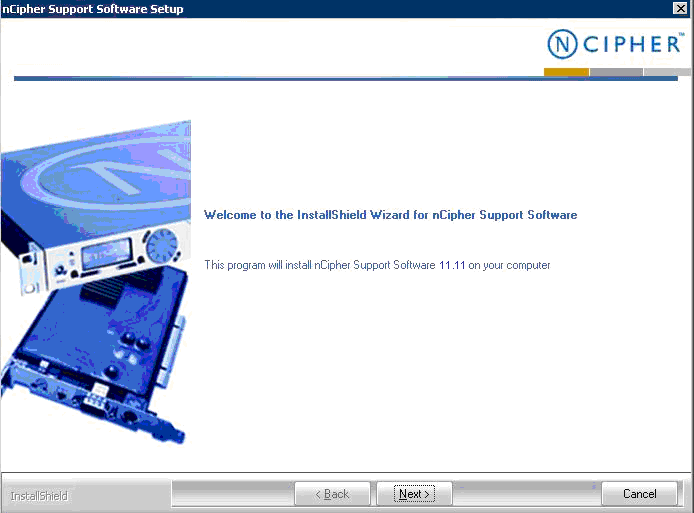
Run the Setup.exe file.
-
When the Welcome page appears, click Next.
-
Accept the license agreement, and then click Next.
Note: The following steps are not intended to replace nCipher technical documentation. For specific details, see the nCipher technical documentation, follow the prompts, and take note of any tips presented here.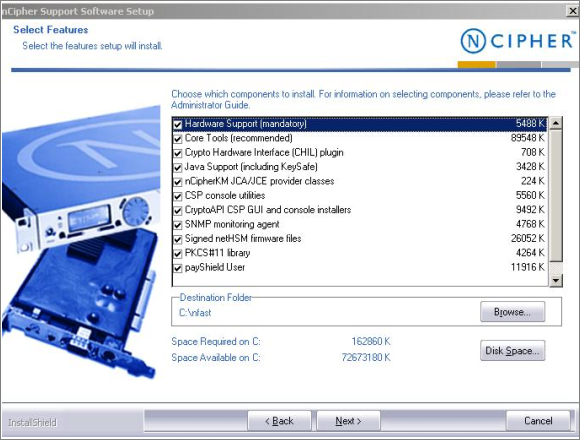
-
When the Select Features page appears:
-
Accept the default options that are already selected.
-
Accept the default installation directory.
Important: It is strongly recommended that you accept the default installation directory. In this document, the installation directory is referred to as <installdir>. -
Click Next.

-
-
When the Configure PKCS#11 Security Assurance Mechanism page appears, perform the following tasks:
-
Select Yes (default option), which enables the Security Assurance Mechanism.
-
Click Next.
-
Click Finish when the displayed message indicates that installation has been completed.
-
-
Turn off your PC.
-
Install the nShield Solo PCI-E card in your PC.
Note: Consult the hardware installation manual prior to installing the HSM in the system on which ActivID KMS is installed. -
To prepare for configuring nCipher Security World, perform the following tasks:
-
Set the HSM to its pre-initialization state by setting the Mode switch to I (see the rear panel for switch settings).
-
Start the KMS workstation.
-
-
Launch the KeySafe utility, which displays the following message after receiving the first request to run the software.

-
Click Press to exit.
-
Navigate to the C:\ProgramData\nCipher\Key Management Data directory, and then open the configuration file.
-
Uncomment the nonpriv_port and priv_port lines in the server_startup section.
-
Edit the lines to reflect the values of nonpriv_port=9000 and privport=9001 so that the KeySafe utility can start.
-
Reboot the system after updating the configuration file.
Note: The device should now appear in Device Manager, and the nFast server service should be running (see the following illustration that shows the Device Manager window).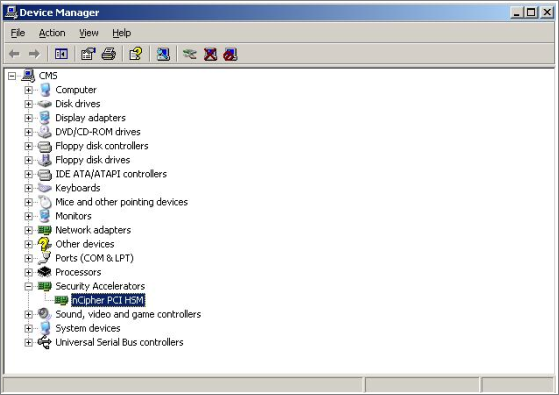
Security World is an nCipher proprietary concept. Each Security World is comprised of an HSM unit and smart cards:
-
ACS (the Administrator Card Set), which contain credentials for managing a specific Security World and to use for recovery operations.
-
OCS (the Operator Card Set), which control access to the Application Keys (for example, ActivID KMS and ActivID CMS).
Each Security World also includes keys and certificates that are encrypted by the Security World Key and stored on the computer where the Security World has been created (in the C:\ProgramData\nCipher\Key Management Data directory).
-
Each Security World is stored in a different subdirectory (kmdata_nn). Before you can use a Security World HSM with ActivID KMS, you must configure the Security World on the HSM. Key materials are stored in the nCipher Security World.
-
During the HSM cloning process using ActivID KMS, the Security World is also cloned onto other HSMs.
There are two procedures for creating a new Security World:
To create a new Security World, you must use the nCipher KeySafe utility and complete the following steps.
ActivID CMS only supports a value of K=1; other values do not work.
-
Set the HSM to its pre-initialization state. For a PCI-E HSM, you must manually set the Mode switch on the PCI card to (I).
-
Turn your PC On.
-
Launch the nCipher KeySafe utility.
-
Click Modules to display the Initialize Security World page.
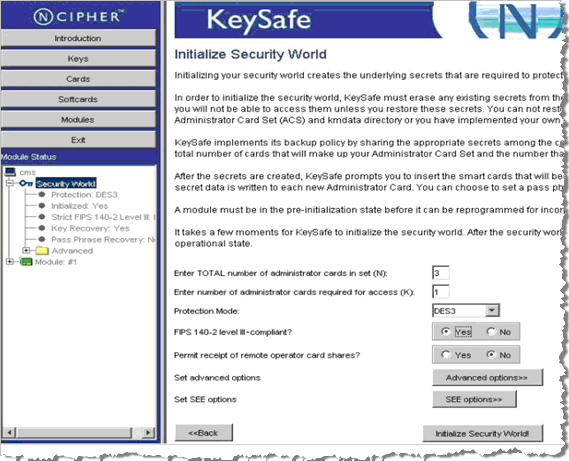
The following illustration is an example of Security World configuration for multiple administrators.
-
Respond to the parameter prompts to configure your Security World. Perform the following steps.
-
Enter a value in the Enter TOTAL number of administrator cards in set (N): text box (in this example, N=3).
-
Enter a value in the Enter number of administrator cards required for access (K): text box (in this example, K=1).
-
Select either AES or DES3 from the Protection Mode drop-down menu. The mode you choose selects the algorithm that will be used to protect the Security World keys.
Note: The example illustrates the number of administrator cards (ACS: Administrator Card Set) as 3/1 (N/K), which allows multiple administrators to perform administrative tasks. -
-
Select the FIPS 140-2 level III-compliant option (Yes or No), which sets the security level (FIPS 140-2 or FIPS 140-3) that is applicable for your HSM. This security level only applies to the Security World to be created and does not define the security level that the HSM physically supports.
-
Accept the default No option for the Permit receipt of remote operator card shares prompt.
-
Do not select the Advanced options (the Set advanced options setting is not required at this time).
-
Do not select the SEE options (the Set SEE options setting is not required for the HSM to work in the ActivID CMS environment; SEE refers to Secure Engine Execution).
-
Click Initialize Security World. You will be prompted to insert your administrator card.
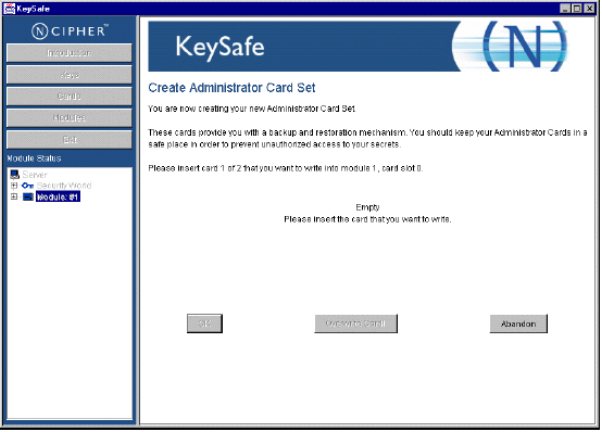
-
Insert the first of the N administrator cards (in the example N=3).
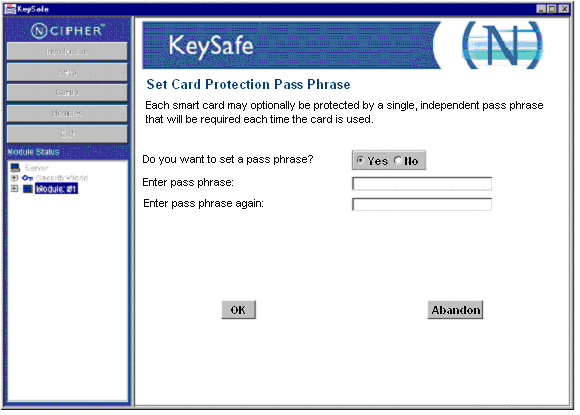
KeySafe displays a page where you can set a pass phrase (PIN) that protects the card using a single, independent pass phrase that is required each time the card is used.
-
Select Yes to set a pass phrase.
-
Enter and confirm a pass phrase, and then click OK.
-
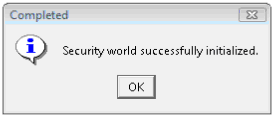
Repeat this procedure to configure the second and third smart cards. When the Security World has been initialized, the following confirmation message is displayed.
-
Click OK.
-
Set the HSM back to Operational (O) mode using the Mode switch on the back panel, and then reboot your system.
-
Launch KeySafe and verify that the HSM can be contacted, and that the Security World has been created (you should see an entry corresponding to the new Security World).
To create an Operator Card Set to protect access to the ActivID CMS keys, complete the following steps.
-
Launch KeySafe.
-
Click Cards.
-
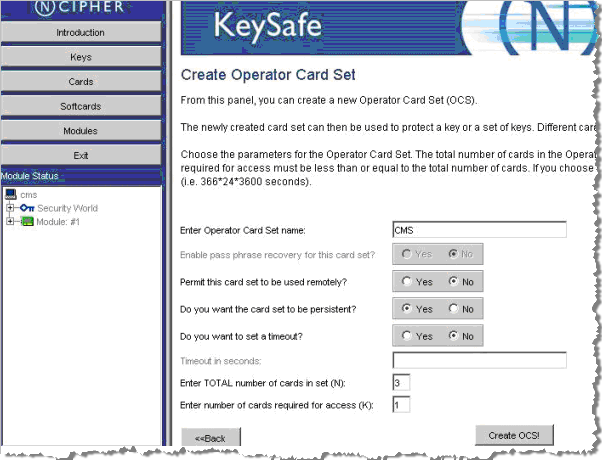
Click Create New OCS, which displays the Create Operator Card Set window.
-
Respond to the parameter prompts to configure your Security World. Perform the following tasks.
-
Enter a new card set name (for example, CMS) in the Operator Card Set name field.
-
Select No for the Permit this card to be used remotely? option.
-
Select Yes for the Do you want the card set to be persistent? option. When you click Yes to have the card set to be persistent, the keys protected by an OCS card remain available in the module even if the card is removed from the nCipher card reader.
Important: It is recommended that you set this option, which enables several applications to access the HSM at the same time without forcing multiple operators to insert their cards during a session. -
Click No for the Do you want to set a timeout? option (if you choose to set a timeout, this value cannot exceed one year in length).
-
Enter a value for the total number of cards in the set (N). The total number of cards in the OCS cannot exceed 64.
-
Enter the number of cards required for access (K). The number of cards required for access must be less than or equal to the total number of cards in use.
Warning!
As per nCipher Security World requirements, if you cannot present the proper number of cards (K/N) if and when required, then the keys that are protected using that card may be unusable. As previously described in the Administrator Card Sets, the total number of cards in an ACS set is (N) and the number of administrator cards required for access is (K). This formula is the same for an Operator Card Set. -
-
Click Create OCS. You will be prompted to set card protection, just as when you created pass phrases for N cards for the ACS (as done previously when you set the pass phrase).
-
When prompted, enter and confirm a pass phrase (equivalent to HSM Operator PIN) for all the cards.
When you have finished creating the Operator Card Set, the HSM is ready for use in ActivID KMS and ActivID CMS.


