Administrator Operations - Certificate Issuers
To view the Certificate Issuers page, from the Administrator menu, click Certificate Issuers.

This page shows a list of registered certificate issuers, each representing a single certificate authority. You can update or delete them. When Multi-Person Control is enabled, this page lists both active and inactive issuers.
The following list summarizes the characteristics of a certificate issuer:
-
Contains one or more CA certificates, which can be self-signed, self-issued, or issued by another CA.
-
All CA certificates issued to an issuer must use the same subject distinguished name, which uniquely identifies the issuer. An issuer may hold multiple public keys.
-
Is configured with an optional delegated OCSP signing certificate and an optional delegated CRL signing certificate.
-
Becomes active after it has been sponsored by the required minimum number of Management Console users having the administrator role.
-
Only active issuers can perform path discovery and validation.
Validation Authority only performs revocation status checking and path discovery and validation for registered certificate issuers.
Issuer Details
-
To view the Details for Certificate Issuer page of a specific issuer, click the magnifying glass to the left of that issuer Nickname.

-
To change the nickname of this issuer, enter the new nickname in the Nickname field.
-
To view the revocation list, click available.
Note: You must have both the Administrator and Officer roles to be able to view the revocation list. When a CRL has been registered, the available link becomes available. Otherwise, none is displayed. -
Select the OCSP Response Lists option to allow pre-generated OCSP response lists to be generated for this issuer.
-
The Name section lists the subject distinguished name that uniquely identifies the issuer.
-
Click Download Issuer Certificate to download the certificate that identifies this issuer.
The Issuer Certificates section lists each certificate that was issued to the certificate issuer, the serial number and expiration date of each certificate.
Some browsers allow you to view the certificate. Internet Explorer running on a Windows server allows this option. Other browser and operating system combinations might not.
-
To add another certificate that has been issued to this issuer, click Browse to locate the certificate.
-
To upload a delegated CRL Signing Certificate for this issuer, click Browse to locate the certificate.
-
From the CRL IDP Behavior drop-down list, select the option that specifies how Validation Authority handles CRLs it receives from this issuer.
CRL IDP Behavior contains an Issuing Distribution Point (IDP) extension that is used to designate how a CRL is partitioned (that is, if it contains only a portion of the full CRL for an organization). You can configure Validation Authority to Treat as partitioned CRL, Treat as full CRL, or Reject CRL.
-
To download the certificate that Validation Authority will include in OCSP responses for this issuer, click Download Default VA Certificate.
Some browsers allow you to view the certificate. Internet Explorer running on a Windows server allows this option. Other browser and operating system combinations might not.
Alternatively, you can replace the default certificate. Click Browse to locate a new delegated OCSP signing certificate that has been issued by the issuer to Validation Authority. The public key in the certificate that you specified must correspond to the private signature key of Validation Authority. The delegated OCSP signing certificate must be signed by one of the issuer certificates associated with the issuer and must be issued to the public signature key of Validation Authority. An issuer may contain one delegated OCSP signing certificate for each key pair used by the CA.
To get a new certificate:
-
Create a CSR.
-
Submit the CSR to the certificate issuer to generate the certificate.
-
Update the certificate in the keystore to replace the existing certificate. For more details, refer Configuration System Settings - Key Store.
-
-
Click Update Issuer to save your changes and return to the Issuers page.
If you do not want to save the changes, click Cancel to return to the Issuers page.
If Multi-Person Control is enabled, then you can view the sponsorship status for the issuer certificate, including how many sponsors a certificate has and who the sponsors are. After Multi-Person Control is enabled, only active issuers are used when generating OCSP response lists or certification path data.
Click the Sponsor This Issuer link to sponsor the certificate issuer. The Details for Certificate Issuer page is redisplayed with a message indicating that the issuer was successfully sponsored and showing whether the issuer is active or inactive.
To remove sponsorship for a certificate issuer, click the Remove Sponsorship link. The Details for Certificate Issuer page is redisplayed with a message indicating that the sponsorship was successfully removed and showing whether the issuer is active or inactive.
Delete An Issuer
-
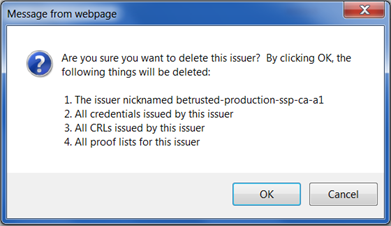
To delete an issuer, click delete next to an issuer nickname.

-
When prompted to confirm if you want to delete the issuer, click OK.
To cancel the changes, click Cancel.
Register New Certificate Issuer

-
To register a new certificate issuer, click register a new certificate issuer.

-
To specify the certificate for this issuer, enter the path in the Certificate file field, or click Browse to locate the appropriate file containing a binary (DER-encoded) or PEM (Base64-encoded) certificate.
-
Optionally, enter an Issuer nickname. If you leave it blank, the Management Console will automatically create a nickname.
-
When you have entered all the appropriate information, click Register Certificate Issuer.
Alternatively, click Cancel if you do not want to create the certificate issuer. The Issuers page is displayed.


