Configure Data Input - Issuer Certificate Publication
Validation Authority can publish CA certificates for use by Validation Responders in responding to DPD requests. For information on DPD request, refer to Delegated Path Discovery.
-
On the Configuration page, click configure Issuer Certificate Publication.
-
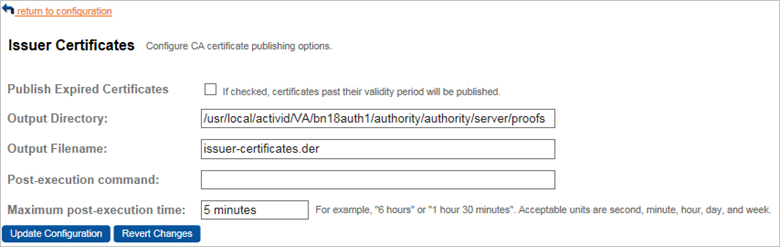
Select the Publish Expired Certificates option to force Validation Authority to include expired CA certificates in the published data. Clear this option to omit such certificates from the published data.
-
Enter the Output directory that specifies the location where Validation Authority writes the issuer certificate data file.
-
Enter the Output Filename that specifies the name of the file in which Validation Authority writes the issuer certificate data.
-
Depending on your OS, enter the Post-execution command that specifies a command that Validation Authority should execute immediately after the issuer certificate data file is created. Typically, you can copy the newly generated data file to a new location for retrieval by a Validation Responder.
For example, on a Validation Authority running on a Unix operating system, run a similar command as follows:
Copy/usr/local/scripts/securecopy {} /mnt/server/stagingWhere {} will be automatically replaced by the newly generated file’s path.
On a Validation Authority running on a Windows operating system, run a similar command as follows:
Copyxcopy.exe /Y {} F:\stagingWhere {} will be automatically replaced by the newly generated file’s path and /Y indicates that the script should overwrite older files without prompting.
-
Enter the Maximum post-execution time that specifies (in seconds) how long a post-execution command is allowed to execute before being forced to terminate by Validation Authority.
-
Once you have made the desired changes, click Update Configuration to save your changes.
Alternatively, click Revert Changes to discard your changes and revert to the previously saved settings.


