Customize the HID Approve Application
You can customize the features and design of the HID Approve application by creating a customized JSON file.
Create the Customization Package
The template below illustrates the parameters and features that you can customize:
- Cosmetic parameters to customize the look and feel
- Transaction Signature fields
- QR code scanning
- ‘Contact’ menu information
HID Approve Customization JSON
{
	"appcustomization": {
		"uicustomization": {
			"version": 1,
			"label": {
				"id": "1",
				"value": "Development Bank"
			},
			"color": {
				"id": "2",
				"value": "#032569"
			},
			"bitmap": {
				"id": "3",
				"value": " /9O/znDIq1z3el3lpL7WU/ +fWPmc89pnK945r32uVe GQxM2QwN2NlZDU3NWViMzA4MmFiODE3NTY3jE92bu3V4/mUl/Tp8f372nuo3Y/GQxM2QwN2NlZDU3NWViMzA4MmFiODE3NTY3"
			},
			"fontcolor": {
				"id": "4",
				"value": "#02597F"
			},
			"ocrafields": [
				{
					"label": {
						"id": "5",
						"value": "AccountId"
					}
				},
				{
					"label": {
						"id": "6",
						"value": "Date"
					}
				},
				{
					"label": {
						"id": "7",
						"value": "Amount"
					}
				}
			],
			"ocraallowscan": true
		},
		"contactdetails": {
			"phonenumber": "+33612345678",
			"email": {
				"address": "user@hidglobal.com",
				"subject": "Message from {$userid} for {$service}"
			},
			"website": "https://www.hidglobal.com",
			"deviceid": true,
			"devicesn": true
		}
	}
}-
Customize the .json file properties as required and save the file.
- Apply your customization package.
Customize the Application Look and Feel per Service
The HID Approve application allows the Service Provider to customize the look and feel of the application. Each Service Provider can use a:
-
Service label
-
Service background color
-
Bitmap image (logo) that will serve as a graphical representation of the service
-
Font color of the text/label
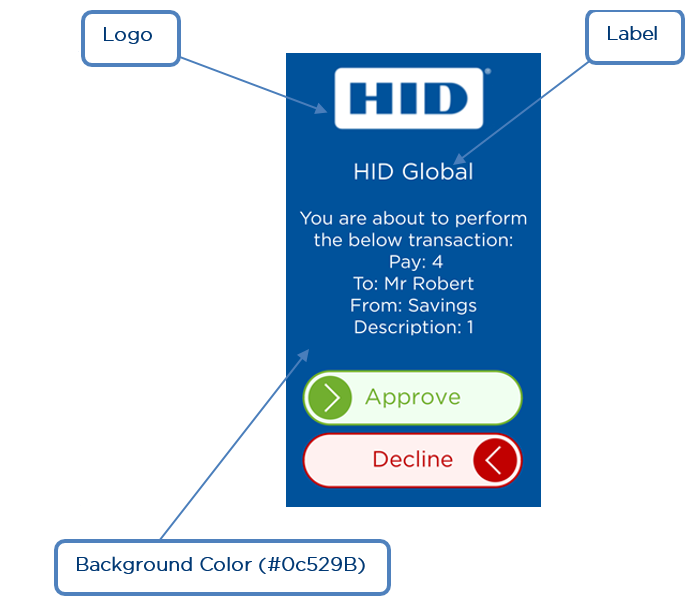
Service name – HID Global
Background color – #084586
Logo – the HID logo (base64-encoded)
Text/label color – #FFFFFF (white)
-
Select an image to use and encode it in base64 (using a tool such as http://www.motobit.com/util/base64-decoder-encoder.asp).
-
Build a JSON file and add the id and value pairs of your customized design in the ""uicustomization section:
- "label" - the Service name as a text value
- "color" - the background color as an HTML color value
- "bitmap" - the logo as a .png file (base64-encoded)
- "fontcolor" - the color of the text/label as an HTML color value
Important: The maximum length allowed for the Service name is 50 characters. Names that exceed this limit will be truncated by the HID Approve application.Note:- You are not required to customize each item. If an item is not defined or incorrectly configured, the default values will be used. However, if you define a custom background or font color, make sure the color selection renders the service label readable.
The "version" value cannot be customized. This field is reserved for future use.
-
If the file contains non-ASCII characters, encode it in UTF-8 (so all text characters will be displayed correctly).
-
Save the customized file.
- Apply your customization package.
For example:
HID Approve Look and Feel Parameters
{
	"appcustomization": {
		"uicustomization": {
			"version": 1,
			"label": {
				"id": "1",
				"value": "<label-value>"
			},
			"color": {
				"id": "2",
				"value": "<color-value>"
			},
			"bitmap": {
				"id": "3",
				"value": "<bitmap-value-base64>"
			},
			"fontcolor": {
				"id": "4",
				"value": "<color-value>"
			}
		}
	}
}Customize the Transaction Signature Fields
The HID Approve application must be updated to specify the OCRA transaction signature fields to be displayed on the user’s screen.
-
Build a JSON file containing a sub-section, specifying the id and value pairs of the "label" for the required fields in the "ocrafields" section.
For example:
CopyHID Approve Transaction Signature Field Parameters
{ "appcustomization": { "uicustomization": { "ocrafields": [ { "label": { "id": "5", "value": "AccountId" } }, { "label": { "id": "6", "value": "Date" } }, { "label": { "id": "7", "value": "Amount" } } ] } } } -
If the file contains non-ASCII characters, encode it in UTF-8 (so all text characters will be displayed correctly).
-
Save the customized file.
- Apply your customization package.
Customize the Capture Mode to Enable QR Code Scanning
The HID Approve application must be updated to enable Quick Response Code (QR Code) scanning to capture the OCRA-based Challenge or transaction data.
HID Approve can capture the details of a multi-parameter OCRA transaction via a QR code scan.
This requires formatting the string (to encode the QR) with the correct syntax, and the ocrafields id tags must correspond to the identifiers (id) of the "label" pairs defined for the ocrafields section in the customization JSON.
The data is encoded using simplified format of unordered UTF-8 key/value pairs.
The expected syntax is:
ocra://TAG1:VALUE1;TAG2:VALUE2;TAGn:VALUEn;;Where:
- Prefix is ocra://
- Literal delimiter characters within the tag or value strings are escaped with a backslash ( \ )
- Tag/values are separated by a colon ( : )
- Fields are separated by one semicolon ( ; )
- Closing characters are a double semicolon ( ;; )
Supported Tag values:
| Tag | Value |
|---|---|
| S | serviceUrl + & + userId |
| C | Challenge value |
| ocrafields id | Signature field value |
Example of a Signature QR Code:
ocra://S:myservice.com\:443\\DOMAIN&user;5:Account\:123;6:30-11-2020;7:$100;;

Example of a Challenge/Response QR Code:
ocra://S:myservice.com\:443\\DOMAIN&user;C:1234567;;

-
Build a JSON file containing a sub-section, setting the "ocraallowscan" feature to true in the
"uicustomization"section.For example:
CopyHID Approve QR Code Parameter
{ "appcustomization": { "uicustomization": { "version": 1, "ocraallowscan": true } } } -
If the file contains non-ASCII characters, encode it in UTF-8 (so all text characters will be displayed correctly).
-
Save the customized file.
- Apply your customization package.
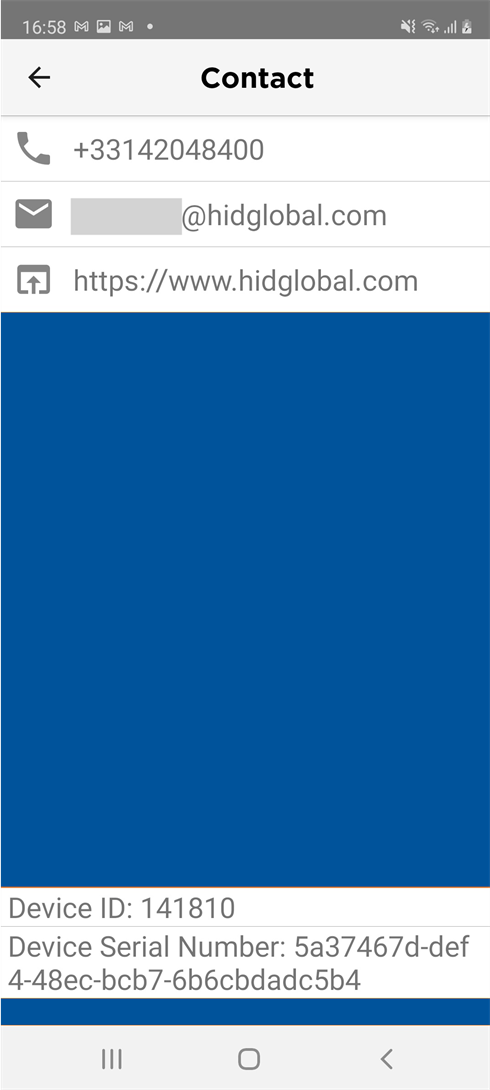
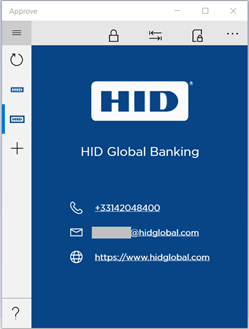
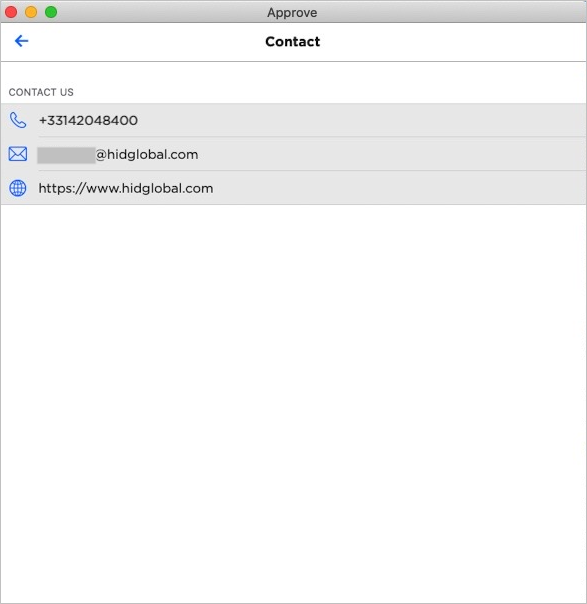
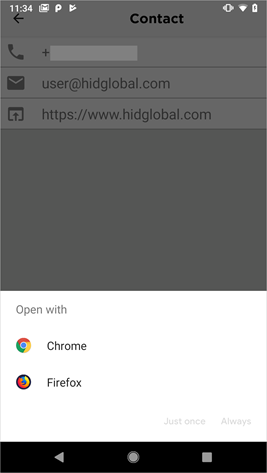
Customize the Contact Information
You can add the optional ‘Contact’ menu feature and customize the contact information, allowing end users to request assistance or information for the relevant service.
|
Android |
macOS |
Windows 10 |
|---|---|---|
|
|
|
The ‘Contact’ option will only be displayed if the HID Approve JSON customization package includes the required configuration for one of more of the contact methods.
Only the correctly configured contact methods will be available in the Contact menu. For example, if the customization package includes details for contact via email but not details by phone or website, then only the email contact method will be displayed.
In this version, the contact details cannot be localized.
The user can return to the HID Approve app using the ‘back’ control in the top left hand corner of the screen
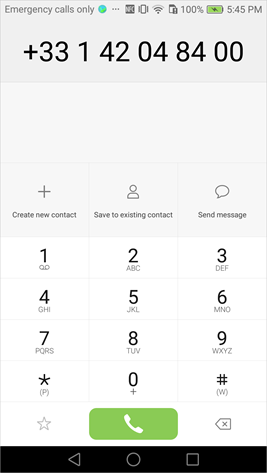
Phone number
When the user taps the ‘Phone’ Contact option, HID Approve invokes the device’s dialer app (or prompts to select an app if more than one is detected) and pre-fills the phone number with that defined by the customization package.
|
Android |
iOS |
|---|---|
|
|
|


When the call is terminated, or if the user cancels the call, they are redirected back to the HID Approve Contact screen.
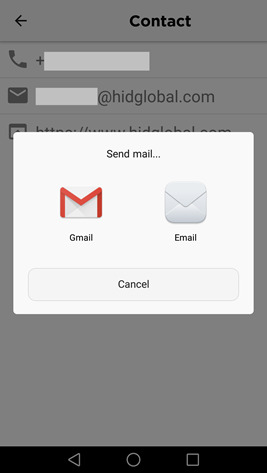
Email address
When the user taps the ‘Email’ Contact option, HID Approve invokes the device’s default email client (or prompts to select an app if more than one is detected) and populates the email address, email subject, and email message body.
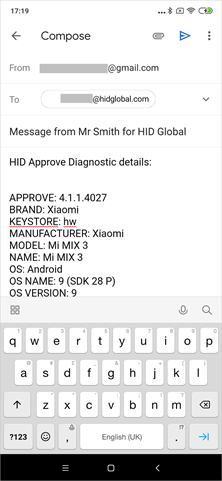
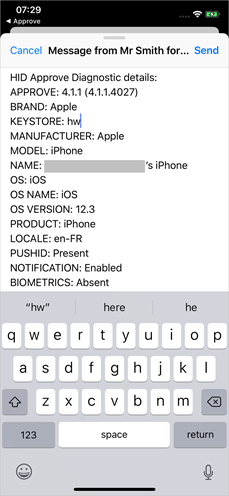
HID Approve adds diagnostic information to the email body and the user can add any additional content to the message.
The diagnostic information includes:
- Device details such as manufacturer, model, OS and OS version
- HID Approve app details such as version (and build number) and PushID
|
Android |
iOS |
|---|---|
|
|
|
When the email is sent, or the user cancels the email, the user must use the device's functionality to return to the previous application (that is, HID Approve).
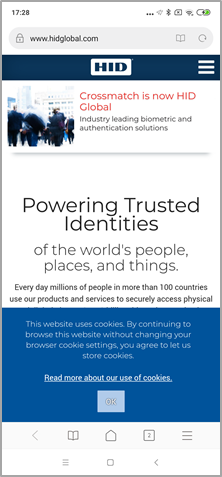
Website
When the user taps the ‘Web’ Contact option, HID Approve invokes the device’s default browser (or prompts to select a browser if more than one is detected) and redirects the user to the URL defined by the customization package.
|
Android |
iOS |
|---|---|
|
|
|

Device Information
You can configure the Contact menu to display the user's unique device ID (specific to HID Authentication Service) and/or device serial number.
This feature can be helpful in customer environments where service desk operators might prefer to search for users by their device serial numbers or IDs during requests for assistance and troubleshooting. This feature is disabled by default.
-
Build a JSON file and add a section called "contactdetails" with the following parameters and your customized values:
CopyHID Approve Contact Parameters
{
	"appcustomization": {
		"contactdetails": {
			"phonenumber": "+33612345678",
			"email": {
				"address": "user@hidglobal.com",
				"subject": "Message from {$userid} for {$service}"
			},
			"website": "https://www.hidglobal.com",
			"deviceid": true,
			"devicesn": true
		}
	}
}
Note: You cannot customize the labels for the parameters (for example, “telephone” instead of “phonenumber”. You must keep the default labels.- "phonenumber" – enter the contact telephone number including country and area codes.
- "email" – for contact via email:
- "address" – enter the full email address.
If the email address is incorrectly formatted, HID Approve will ignore the contact option.
- "subject" – enter the default subject for the email message.
The {$userid} and {$service} values are retrieved by the application or you can enter static text values.
- "website" – enter the URL for the website or page.
All standard telephone numbers are supported and they can include “+” or ”()” prefixes.
The URL must include the https:// prefix.
-
Optionally, you can add the following to parameters to display the device information:
- Include and set the "deviceid" parameter to true so the device ID can be used to
- Include and set the "devicesn" parameter to true so the device serial number can be used to
- Include and set the "deviceid" parameter to true so the device ID can be used to
- If the file contains non-ASCII characters, encode it in UTF-8 (so all text characters will be displayed correctly).
-
Save the customized file.
- Apply your customization package.
Customize the Application Certificate Pinning Behavior
The certificate pinning mechanism uses the HID Authentication Service (or Reverse Proxy) public key pins to enforce that HID Approve only communicates with the server (or Reverse Proxy) that perfectly matches the TLS information stored during Service registration.
If the values do not match, the connection will be refused and the operation will fail.
Certificate pinning is used in the following operations:
-
Retrieve transaction details
-
Delete the service
-
Device information update (that is, the Push ID)
-
Customization update (that is, the look and feel or new public key pins for an upcoming Server Certificate renewal)
For further information, go to https://www.owasp.org/index.php/Certificate_and_Public_Key_Pinning.
This option is not available by default and it can be added as follows:
-
Build a JSON file and add the "public-key-pins" section with the following parameters and your customized values:
- "max-age" – defines the validity (in seconds) of the listed certificate pins
After this period, the listed certificate hashes are considered invalid and new ones must requested by the application. The default and recommended value is 1296000 seconds (15 days).
- "known-pins" – list of certificate pins and the array must contain two entries, each containing:
- "alg" – the value of the hash algorithm used (that is, SHA256)
- "pin" – the certificate pin value which is the Certificate Subject Public key computed hash (base64-encoded)
The two entries correspond the current and new certificates and it is recommended that you maintain this configuration for each certificate renewal.
You can use the same "pin" value in the two entries listed in "known-pins".
However, NIST recommends that system owners maintain the ability to replace all certificates on their systems within two days to respond to security incidents such as CA compromise, vulnerable algorithms, or cryptographic library bugs. To do so, you could have a valid backup certificate from a different CA.
For example:
CopyHID Approve Certificate Pinning Parameters
{
	"appcustomization": {
		"public-key-pins": {
			"max-age": 60,
			"known-pins": [
				{
					"alg": "sha256",
					"pin": "<current-cert-pin-value-base64>"
				},
				{
					"alg": "sha256",
					"pin": "<new-cert-pin-value-base64>"
				}
			]
		}
	}
}
Important: Certificate Rollover GuidelinesYou must anticipate the rollover timing of the proxy SSL certificates.
At a minimum, it is recommended issuing the new certificate and add its "pin" value to the Customization file before the expiration of the current certificate. You should do so at least "max-age" x2 or "max-age" x3 before the certificate expiration date to avoid service disruption.
 Note: The user must launch the HID Approve app at least once during the rollover period to update the certificate pinning data and avoid service disruption.
You can also create a server-side task to trigger the update using the Tasks REST API.
-
For a DER-encoded certificate file (for example, <cert-path> = <path>/my-certificate.der):
Copyopenssl x509 -inform DER -in <cert-path> -pubkey -noout | openssl rsa -pubin -outform der | openssl dgst -sha256 -r | sed "s/\([0-9a-f]*\) \*stdin/\1/" | tr -d "\n" | openssl enc -base64 -
For certificate files (for example, <cert-path> = <path>/my-certificate.crt or <path>/my-certificate.cer):
Copyopenssl x509 -in <cert-path> -pubkey -noout | openssl rsa -pubin -outform der | openssl dgst -sha256 -r | sed "s/\([0-9a-f]*\) \*stdin/\1/" | tr -d "\n" | openssl enc -base64
 Computing the "pin" values
To compute the Certificate Subject Public "pin" value, the following examples use openssl (https://www.openssl.org/):
The output is the base64 value to use for Certificate public key pin value.
- "max-age" – defines the validity (in seconds) of the listed certificate pins
-
If the file contains non-ASCII characters, encode it in UTF-8 (so all text characters will be displayed correctly).
-
Save the customized file.
- Apply your customization package.
Customize the Credential Expiration Warnings
For users who have not yet upgraded to the latest version of HID Approve, the Credential Expiration Warnings can be added to the HID Approve application.
This legacy option is available for earlier versions of HID Approve and it displays warning messages to users regarding credential expiration. However, it does not allow the actual renewal of the Service keys as users must delete and re-register their service to actually renew the keys.
As this option is not enabled by default, it can be enabled as follows:
-
Build a JSON file and add a section called "legacywarnings" with the following item and set the value to "on".
- To disable the legacy warnings, set the value to "off".
-
Save the customized file.
- Apply your customization package.
Once the option is enabled, when the user starts the application and if a service has keys that are about to expire, or that have already expired:
-
A global status message is displayed, summarizing the expiration status. If there are several services, several messages will be displayed, one after the other.
-
If the users has multiple services, a warning icon is displayed next to the Service name:
- A yellow icon indicates that the key is about to expire
- A red icon indicates that the key has already expired
-
For keys that are about to expire:
- A status message is displayed in the active screens of the service (Secure Code, Challenge/Response or Signature)
- The message displays the remaining validity period in hours or days (if above 24h) for the credential
-
For keys that have already expired, a status message is displayed when the user selects the service or a notification for the service
Apply the Customization Package
Customize the Devices Allowed for Service Registration
The HID Approve application allows defining a set of rules restricting the service registration according to the mobile platform characteristics.
All rules are optional, and multiple rules can be defined targeting either all or specific platforms.
You can exclude platforms from Service registration based on the following criteria:
-
Specific OS (Android / iOS / macOS / Windows)
-
Specific OS version or a range of versions (by defining the maximum and minimum values)
-
Specific key store mode (software or hardware)
-
Specific root state (corresponding to a rooted Android phone or a jailbroken iOS phone)
When a platform is excluded, a warning is displayed during service registration on the user’s device and audited on the server. This warning can be customized on the server-side.
The "rules" are defined using the following JSON payload for the "provisioning" claim:
| Parameter | Description |
|---|---|
|
ruleid (required) |
An identifier for the rule Several rules can be added in the JSON (for example, one per version) |
|
phonestates (required) |
A list of platform characteristics containing one or more of the following optional parameters: |
|
"os" – defines the OS platform Possible values are:
|
|
|
"osversion" – defines the major version of the OS platform |
|
|
"keystore" – defines the key store mode (Android only) Possible values are:
|
|
|
"isRooted" – defines the rooted/jailbroken state of the mobile device (Android and iOS only) Possible values are:
|
|
|
"maxosversion" – defines the maximum major OS version permitted (inclusive) |
|
|
"minosversion" – defines the minimum major OS version permitted (inclusive) |
|
|
outcome (required) |
Defines the result of the rule Only deny is supported |
|
message (required) |
A customizable warning message displayed to the user when the rule is applied |
For Android devices only, it is also possible to define authentication rules to restrict biometric authenticators. If the rule is not defined, by default, only strong (class 3) biometric authenticators are authorized. The rules are defined using the following JSON payload for the "authentication" claim:
| Parameter | Description |
|---|---|
|
ruleid (required) |
An identifier for the rule |
|
bioclass (required) |
An integer value corresponding to the minimum authorized biometric class security level Possible values are:
|
|
outcome (required) |
Defines the result of the rule Only allow is supported |
For example, JSON data with two rules and one authentication rule to allow class 2 biometrics:
HID Approve Rules Parameters
"rules": {
	"version": 1,
	"provisioning": [
		{
			"ruleid": 1,
			"phonestates": [
				{
					"os": "Android",
					"osversion": "8",
					"isRooted": "true"
				},
				{
					"os": "Android",
					"keystore": "sw"
				}
			],
			"outcome": "deny",
			"message": "Not allowed to provision for Android version 8 rooted phone or Android device with software key store"
		},
		{
			"ruleid": 2,
			"phonestates": [
				{
					"os": "iOS",
					"minosversion": "13"
				}
			],
			"outcome": "deny",
			"message": "Not allowed to provision for iOS version below 13"
		}
	],
	"authentication":[
		{
			"ruleid":3,
			"bioclass":2,
			"outcome":"allow"
		}
	]
}
To apply the rules, edit the deice type (or create a new one) with the Device Type REST API.
For example, for the Mobile push based Validation (DT_TDSV4) device type, add your rule definitions in the policyRule parameter.


