Integrating Citrix Support
The following sections describe the built-in support for Citrix products provided with our DigitalPersona Workstation and Kiosk components.
Definitions
-
XenApp enables launching a Citrix published application or entire desktop, hosted on a XenApp server in a data center, from anywhere, using your desktop computer, laptop, tablet or even a mobile phone.
-
XenDesktop uses the same technology, but provides each user with a unique (not shared) instance of the desktop operating system with any Citrix published applications.
-
Citrix Receiver is the Citrix local client that provides shared, encrypted access to a Citrix published application or desktop, without needing to configure or launch a separate VPN client.
Supported Citrix Platforms
DigitalPersona Workstation and DigitalPersona Kiosk can be installed and run on the Citrix XenApp and XenDesktop virtualization platforms.
At the time of release, support for the Citrix platform includes:
-
Citrix XenApp 7.5 and above
-
Citrix XenDesktop 7.5 and above
-
Citrix Receiver 3.4.0 and above
Integrating Citrix with DigitalPersona Components
The optimum integration is to ensure that Citrix has been installed, configured and tested in your environment prior to installing the DigitalPersona client. If so, you can integrate the DigitalPersona components with Citrix by simply installing a DigitalPersona client component on the Citrix server and on the client computer.
-
If Citrix was not present prior to installing the DigitalPersona client, the files necessary to support Citrix will not be included as part of the component installation.
You must run the DigitalPersona client installer and select Repair in order to enable Citrix support and then reboot the computer in order for the changes to take effect.
-
In some cases, you may want to locate the DPICACnt.dll file in the DigitalPersona AD\Clients\Citrix Support folder of the DigitalPersona product package, and copy it to the folder on the client computer where the Citrix client components are located (it might be the "Program Files\Citrix" folder).
Then, from the command line, using the regsvr32.exe program, register the DPICACnt.dll library. For example, regsvr32 <$FilePath\DPICACnt.dll>
-
If you have several Citrix clients installed on a computer, deploy the DPICACnt.dll library to the Citrix client folder for each client to be used with DigitalPersona AD software.
Disable Automatic Client Updates
It is possible that a Citrix update to the client could interfere with DigitalPersona functionality. To prevent this from happening, you may want to disable the automatic updating of clients from either the client or server machine.
XenDesktop Limitation
Due to the nature of XenDesktop’s Credential Provider implementation, it is not possible to support using DigitalPersona credentials to log on to XenDesktop. After logging on to XenDesktop, DigitalPersona credentials may be used to log on to websites, applications and network resources through the DigitalPersona Password Manager application.
Resolve Duplicate DigitalPersona System Tray Icons
In some cases, two DigitalPersona icons may be displayed in the system tray on the DigitalPersona Workstation.
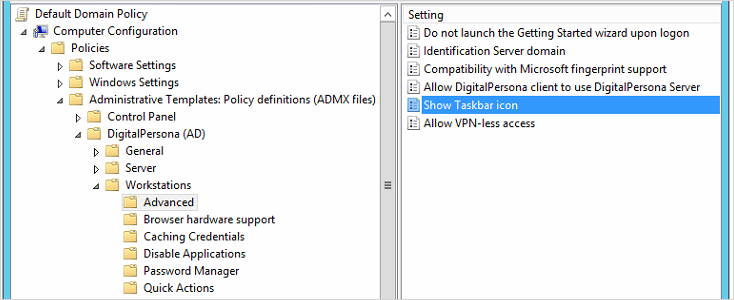
To resolve this issue, on the XenApp server, set the Show taskbar icon setting to disabled. The setting is located at the following location in the Policy Editor:
Computer configuration >Polices > Administrative Template Policy definitions > DigitalPersona Client > General Administration
Resolve Missing DigitalPersona System Tray Icon
A missing DigitalPersona system tray icon may be an indication that DpAgent failed to load, most probably due to recent changes in Citrix XenApp that disables systray agents by default. Password Manager relies on the systray agent to indicate that DPAgent has been loaded.
To stop Citrix from disabling systray agents:
On the XenApp server, open the registry and search for the setting SeamlessFlags or navigate to the setting at HKEY_LOCAL_MACHINE/System/CurrentControlSet/Control/Citrix/wfshell/TWI
-
If the setting does not exist, create the SeamlessFlags setting with a type of REG_DWORD and set its Hexadecimal value to 0x20, which will disable the Disable Systray Agent flag.
-
If the setting already exists, add the value 0x20 to any previous (Hexadecimal) value contained in the setting.
For example, to use two flags with values of 0x1 and 0x200, add them for a result of 0x201, (that is, the hexadecimal value for SeamlessFlags would be 0x1 + 0x200 = 0x201).
If you need to create a registry flag on many servers, it might be worthwhile to create it first on one server, then export the registry key as a .Reg file, which can then be easily distributed to the other servers. To export a .Reg file from the Regedit file menu, select Export.


