Integrating the DigitalPersona NPS Plugin
The DigitalPersona NPS Plugin, an optional component available for your DigitalPersona Premium solution that provides integrated DigitalPersona authentication for your RADIUS VPN.
When connecting to your domain through a VPN, there will be a period of 30 minutes from your login to the current Windows session before managed logons will be shown on the Managed Logons tab. You must be connected to the domain (through VPN) before the 30 minutes is up in order to gain access to your managed logons.
Recommended Configuration
The following sections describe setting up your VPN using the DigitalPersona VPN extension and the MS-CHAPv2 or PAP protocols.
If you need to use the CHAP protocol, see Configuration Required when using CHAP before performing the procedures in this section.
Using Microsoft NPS as your RADIUS Server
To take advantage of DigitalPersona authentication, you will need to deploy the Microsoft Network Policy Server (NPS) and configure your VPN solution to use NPS as the RADIUS server for authentication as described in https://msdn.microsoft.com/en-us/library/Cc732912.aspx
NPS is a server role of Windows Server 2012 R2 and later that performs authentication, authorization, and accounting for wireless, authenticating switch, and remote access dial-up and virtual private network (VPN) connections.
Install Network Policy Server (NPS)
-
Open the Server Manager console Dashboard and click Add Roles and Features.
-
Select Role-based or feature-based installation and click Next.
-
On the Select destination server page, choose Select a server from the server pool, then select your server and click Next.
-
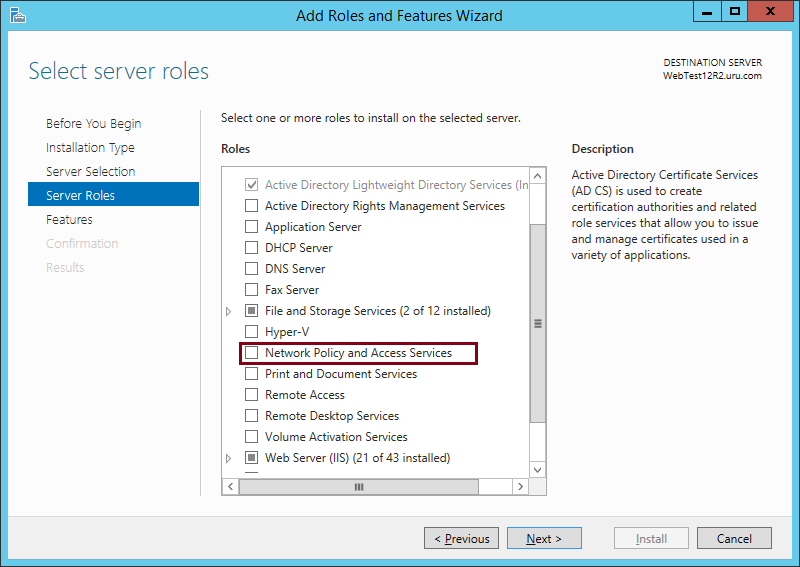
On the Select server roles page, select Network Policy and Access Services and click Next.
-
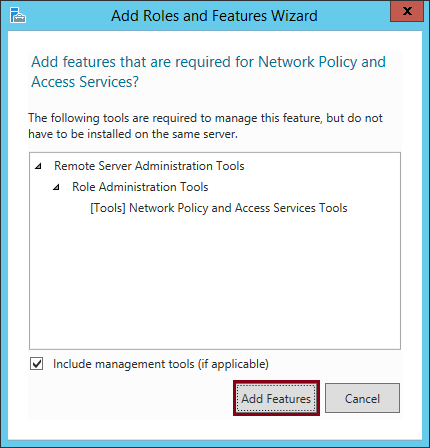
On the Add Features dialog, click Add Features.
-
Click Next.
-
On the Select Features page, click Next.
-
On the Network Policy and Access Services page, click Next.
-
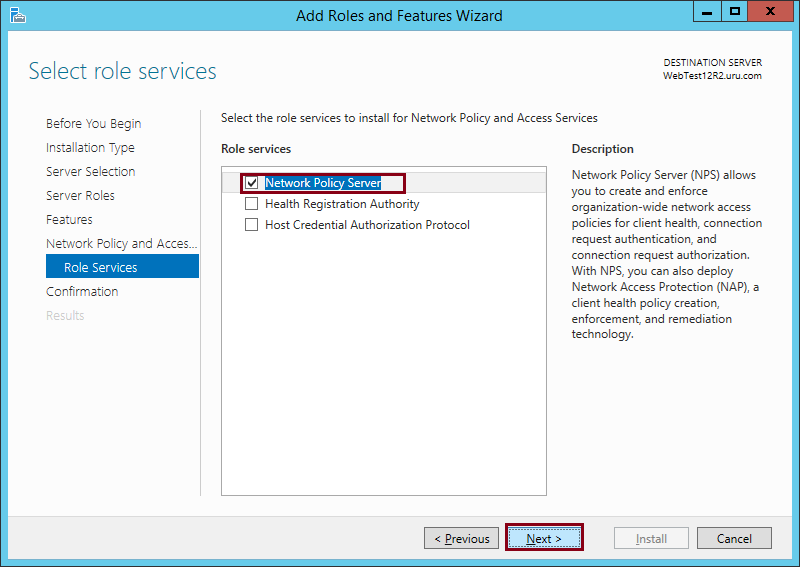
On the Select role services page, Network Policy Server should be automatically selected. Click Next.
-
On the Confirm Installation Selections page, click Install.
-
On the Installation Results page, review your installation results, and then click Close.
Configure Network Policy Server (NPS)
-
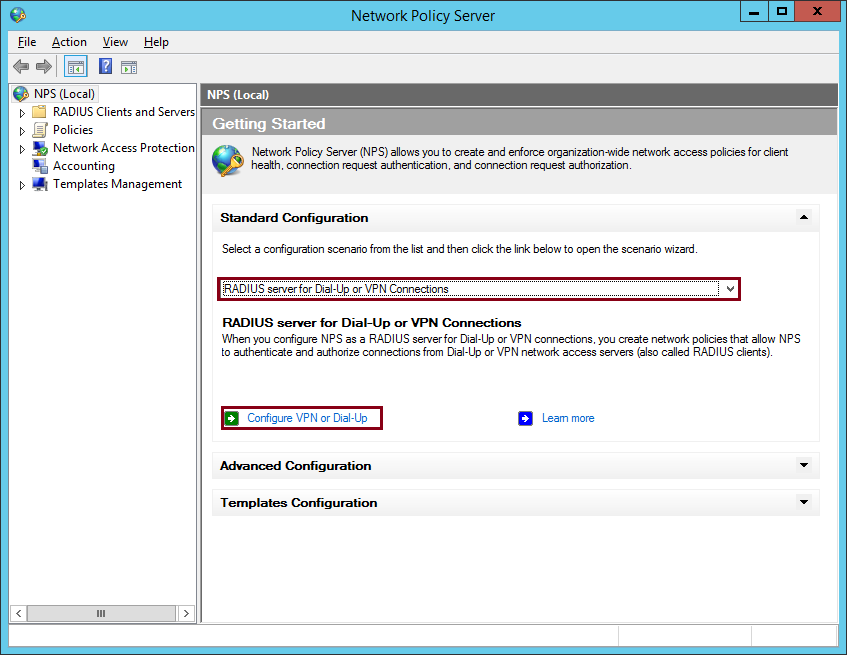
Open the NPS console from the Administrative Tools menu on the server.
-
On the Getting Started page, select RADIUS server for Dial-Up or VPN Connections from the drop-down menu and then click Configure VPN or Dial-Up.
-
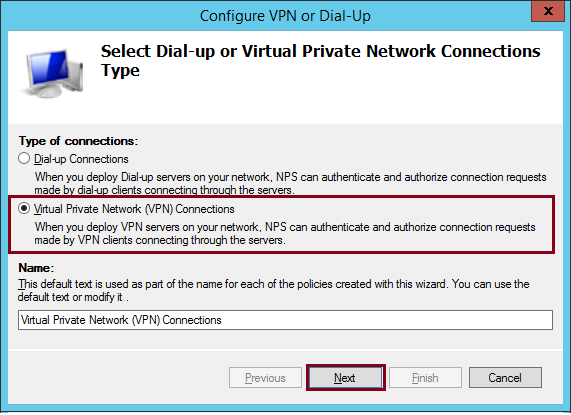
On the first page of the Configure VPN or Dial-Up wizard, select Virtual Private Network (VPN) Connections.
Use the default Name for the policies to be created or modify it as required and then click Next.
-
On the Specify Dial-Up or VPN Server page, click Add.
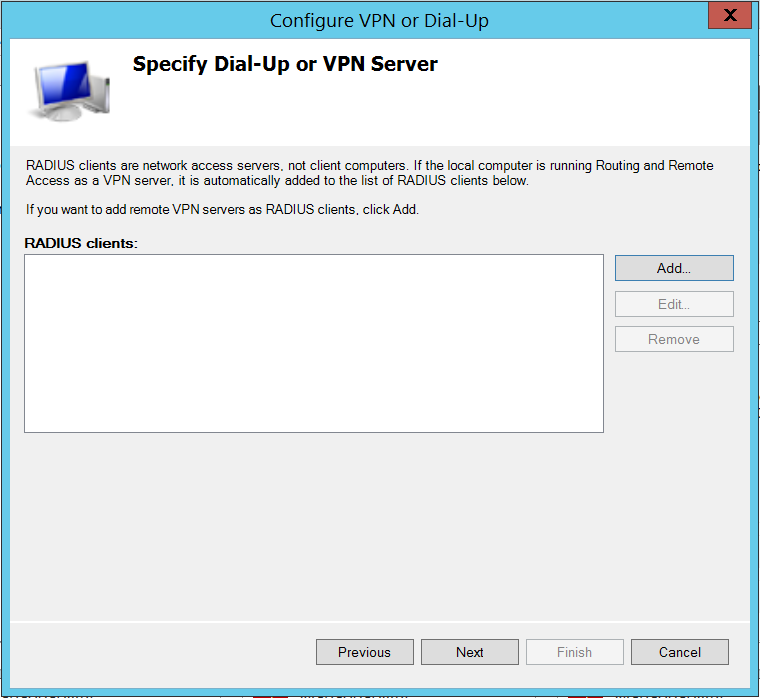
-
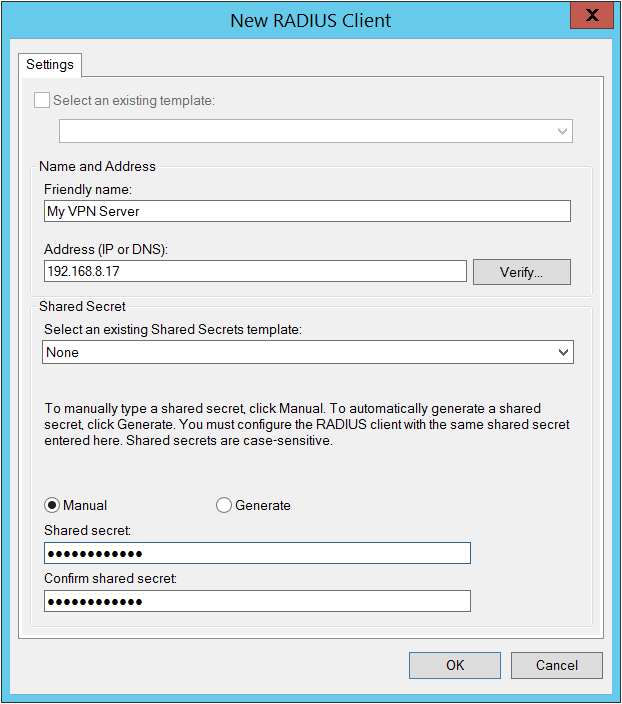
On the New RADIUS Client page, enter a Friendly name for the new RADIUS client and then enter the IP or DNS address of the VPN Server.
Note: A RADIUS client is a network access server (VPN server), not a client computer. If the local computer is running Routing and Remote Access as a VPN server, it is automatically added to the list of RADIUS clients in the page’s list of clients. -
Click Verify to ensure that a connection can be made to the DNS server you specified.
-
Select Manual, then enter and confirm the Shared secret (password) you want to use for the connection and click OK.
-
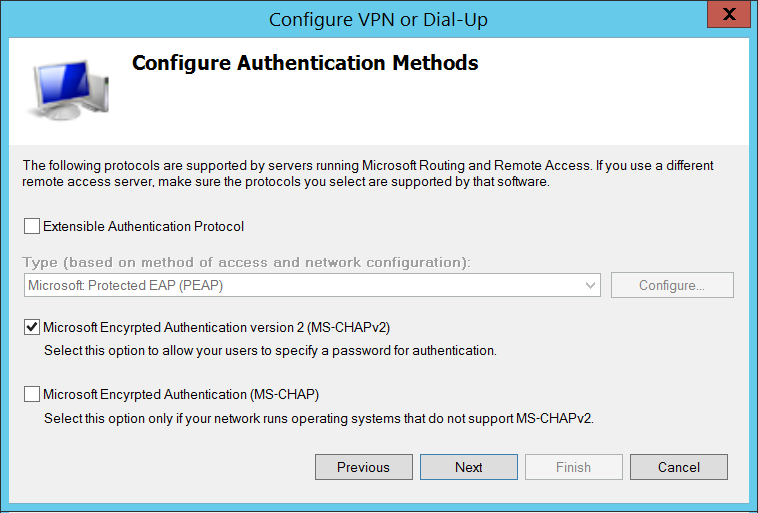
On the Configure Authentication Methods page, select Microsoft Encrypted Authentication version 2 ( MS-CHAPv2) and click Next.
-
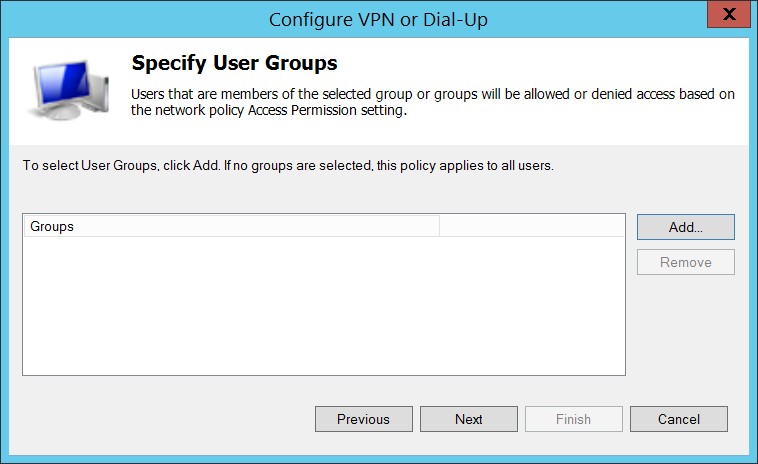
On the Specify User Groups page, accept the default to allow all users to access this VPN connection, or click Add to select groups that may be allowed or denied access based on the network policy Access Permission setting. Then click Next.
-
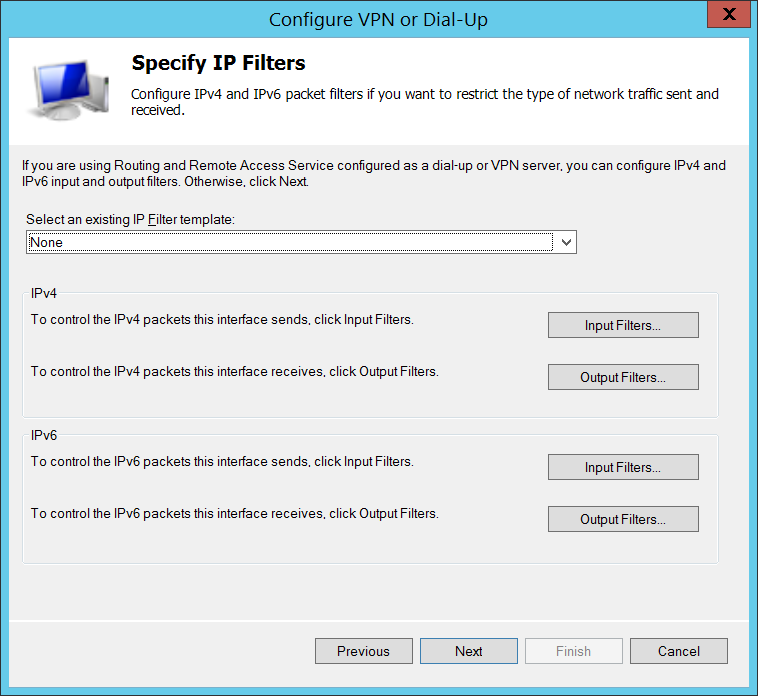
On the Specify IP Filters page, you can configure IPv4 and IPv6 packet filters to restrict the type of network traffic sent and received.
If you are using Routing and Remote Access Service as a dial-up or VPN server, you can configure IPv4 and IPv6 input and output filters to restrict the type of network traffic sent and received. Otherwise, click Next.
-
On the Specify Encryption Settings page, you should specify the allowed encryption strengths used for traffic between access clients and the network access server, and then click Next.
-
If you are using Routing and Remote Access Service configured as a dial-up or VPN server, you can select any (or all) of the listed encryption strengths on the page.
-
If you use different network access servers for dial-up or VPN connection, ensure that the encryption settings that you select are supported by your servers.
Note: Unencrypted communication from access clients to the network access server is not recommended.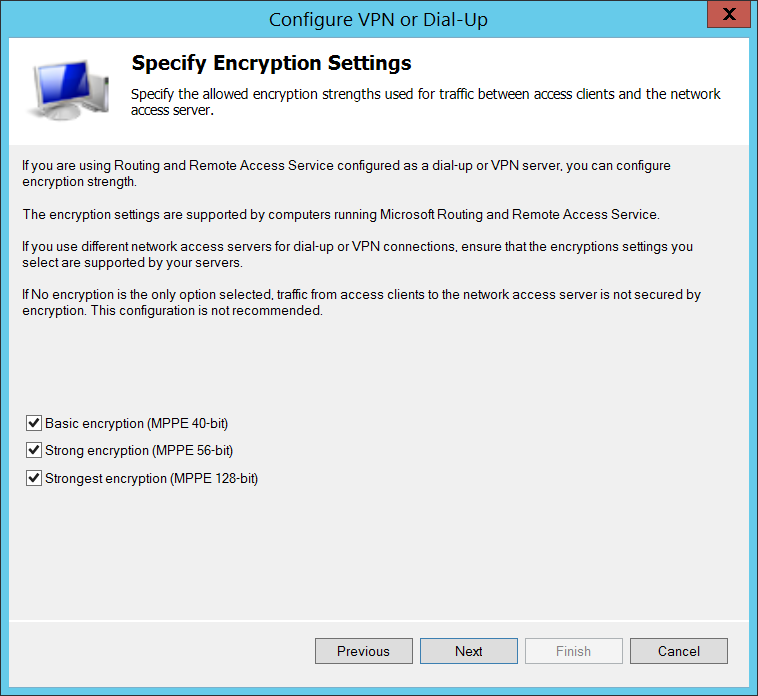
-
-
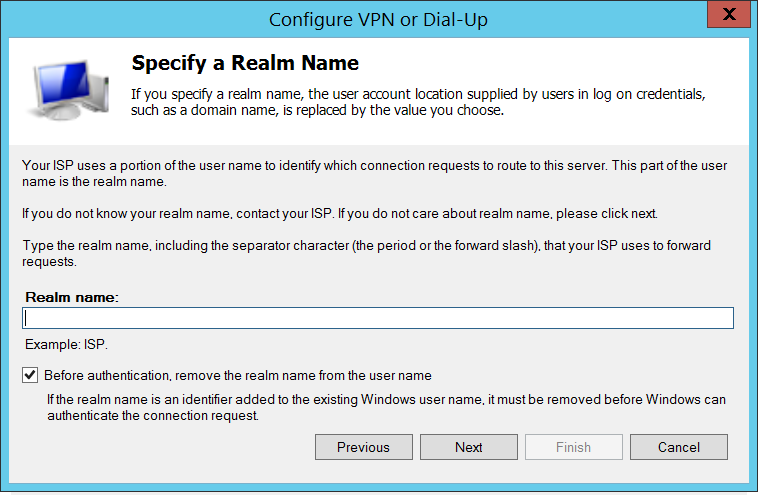
On the Specify a Realm Name page, optionally specify a Realm name.
If you specify a realm name, the user account location supplied by users in logon credentials (such as a domain name) is replaced by the value you specify. Click Next.
-
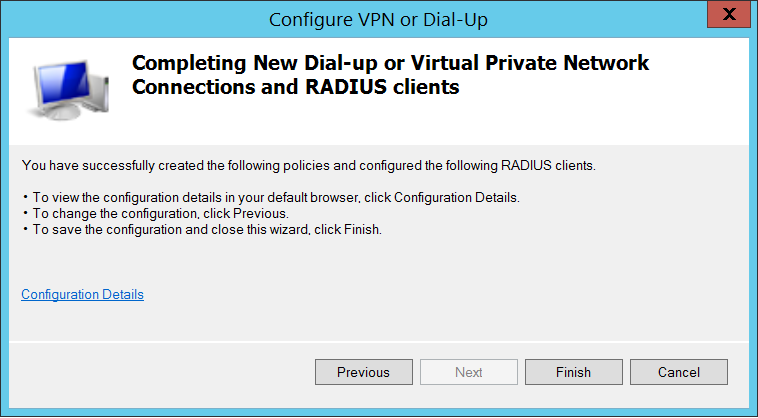
On the Completing … page, click Finish.
-
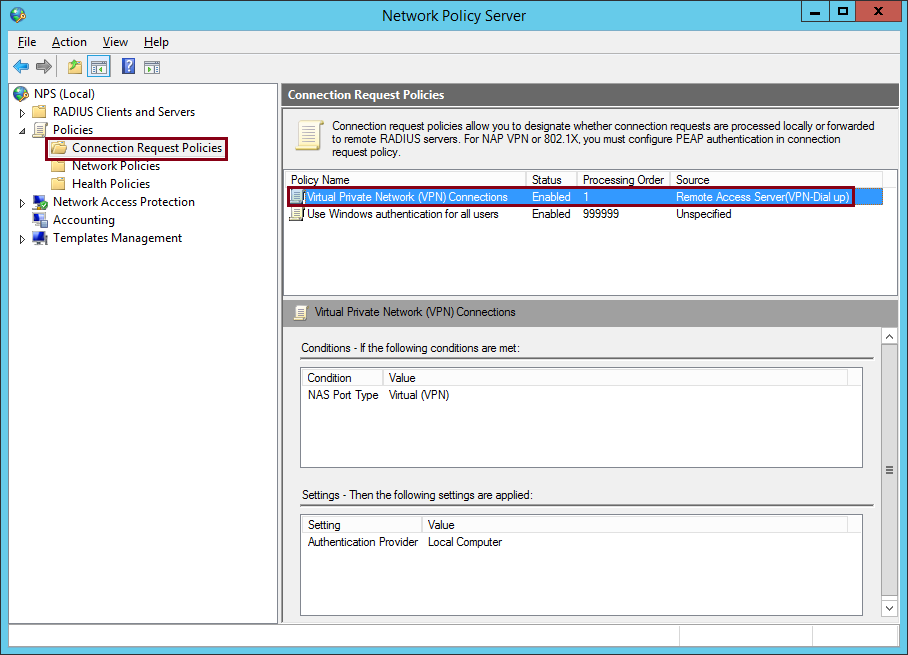
Once the installation is complete, return to the NPS console. In the left panel, under Policies, select Connection Request Policies.
Then, in the main panel, double-click Virtual Private Network (VPN) Connections to display its Properties page.
-
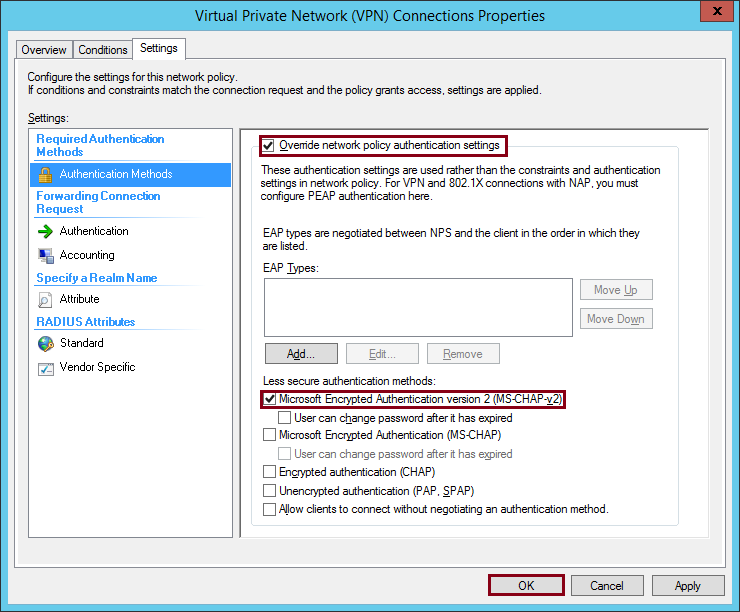
On the Properties page, click the Settings tab and in the left panel, select Authentication Methods.
-
In the main panel, select the following items:
-
Override network policy authentication settings
-
Select one of the following options:
-
Microsoft Encrypted Authentication version 2 (MS-CHAP v2)
-
Unencrypted authentication (PAP, SPAP)
-
-
-
Click OK. This completes installation and configuration of your NPS RADIUS server.
Configure your VPN Server to use the NPS RADIUS Server
You need to configure your VPN Server to use RADIUS Authentication.
The actual configuration steps will depend on the specific VPN server you are using and is beyond the scope of this section. Review the configuration instructions for RADIUS Authentication in the documentation for your VPN server.
The IP or DNS address of the VPN server must specify the NPS server you configured in the previous section.
The Shared secret must be the same as that specified.
You must use the Microsoft Encrypted Authentication version 2 (MS-CHAP v2) authentication methods in your VPN server.
Deploy the DigitalPersona NPS Plugin
Install the DigitalPersona NPS Plugin on the same server as the NPS server and restart the machine.
-
Make sure that the NPS service is running.
-
Launch the DigitalPersona NPS Plugin installer by double-clicking the Setup.exe file.
-
Accept the End User License Agreement.
-
Follow the onscreen instructions.
Configure the Microsoft VPN Client
-
Open the Network and Sharing Center.
-
Under Change your network settings, select Setup a new connection or network.
-
On the Choose a connection page, select Connect to a workplace and click Next.
-
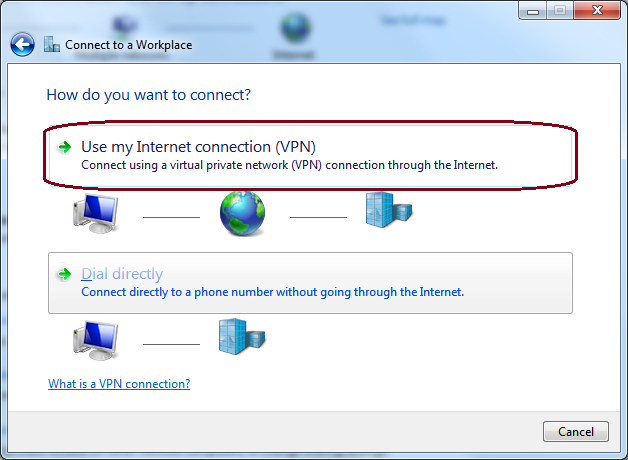
On the How do you want to connect page, select Use my Internet connection (VPN).
-
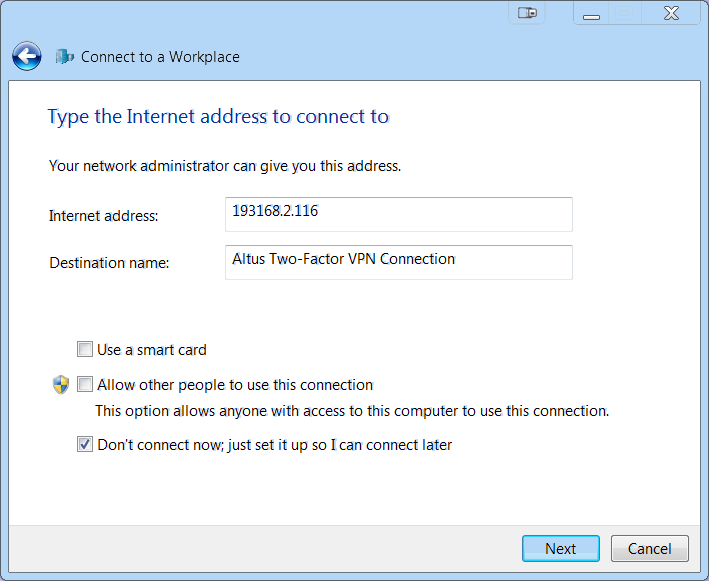
On the Type the Internet address to connect to page, perform the following:
-
Internet Address - enter the IP address or URL to your RRAS server.
-
Destination Name - enter a name for the new VPN connection.
-
Select Don't connect now, just set it up so I can connect later.
-
-
Click Next.
-
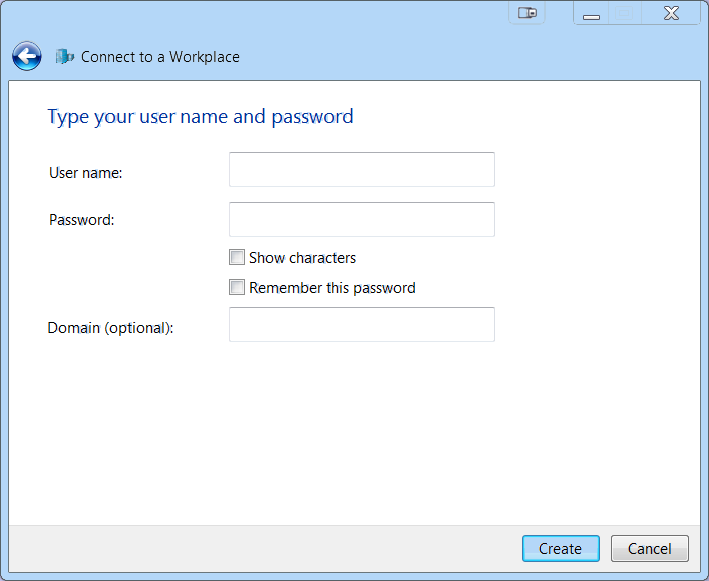
On the following page, do not fill in any fields, simply click Create.
-
Once the VPN connection has been created, it needs to be configured.
Configure the VPN Connection
-
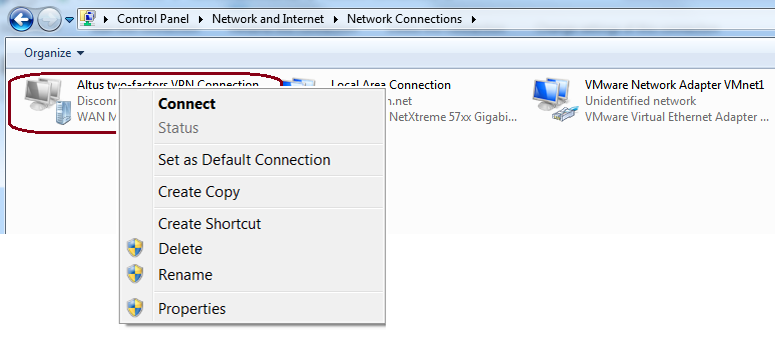
In the Control Panel, select Network Connections.
Right-click the connection and select Properties.
-
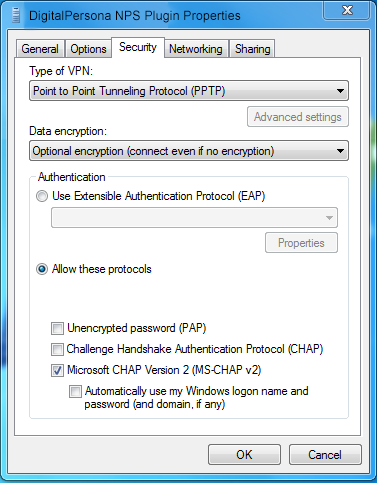
On the Properties dialog, select the Security tab and, from the Type of VPN drop-down menu, select the VPN type.
The following VPN types are supported:
-
Point to Point Tunneling Protocol (PPTP)
-
Layer 2 Tunneling Protocol with IPSEC (L2TP/IPSEC)
-
Secure Socket Tunneling Protocol (SSTP)
-
-
From the Data encryption drop-down menu, select Optional encryption (connect even if no encryption).
-
Under Allow these protocols, select only one of the following protocols.
-
Unencrypted password (PAP) - If PAP is selected, using PPTP as the VPN type is not recommended.
Although PAP is a simple, fast and quite reliable method, it does have a security drawback. PAP sends the user password to the VPN server in clear text and has no ability to encrypt the VPN communication channel after successful authentication.
Therefore it should only be used on top of VPN types that can pre-encrypt the communication channel, such as L2TP/IPsec (better) or SSTP (best).
-
Microsoft CHAP Version 2 (MS-CHAP v2)
-
-
Click OK to finish the configuration.
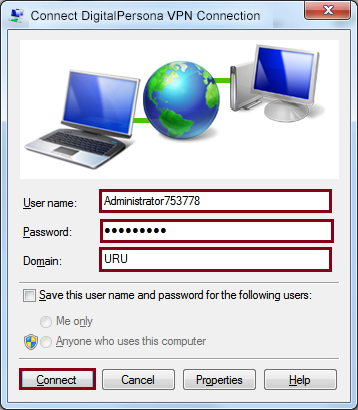
Test the VPN Connection using the PAP Protocol
-
In the Control Panel, select Network Connections.
Right-click on the VPN connection and select Connect.
-
Fill in the Connect dialog as explained below.
-
User name:
-
For AD users, enter the Windows user account name or the user UPN name.
-
-
Password: Enter the user password and the OTP code, separated by a comma.
For example, if the user password is aaaAAA123 and the OTP code is 753778, enter aaaAAA123,753778.
-
Domain:
-
For AD users, enter the AD Domain name in the NETBIOS form.
-
-
-
Click Connect.
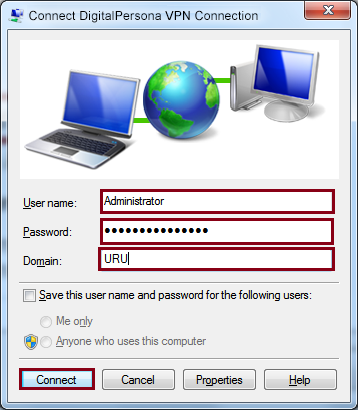
Test the VPN Connection using the MS-CHAPv2 Protocol
-
In the Control Panel, select Network Connections.
Right-click on the VPN connection and select Connect.
-
Fill in the Connect dialog as explained below:
-
User name: (AD users only) Enter the Windows user account name and the OTP code, separated by a comma.
For example, if the Windows user name is Administrator and the OTP code is 753778, enter Administrator,753778.
UPN names are not supported.
-
Password: Enter the Windows password for the account.
-
Domain: Enter the AD Domain name in the NETBIOS format.
-
-
Click Connect.
Using OTP Push Notification (v3.1+)
OTP Push notification, in version 3.1 and above, is implemented to automatically recognize a One-Time Password (OTP) appended to your VPN password when delimited by a comma. For example, MyP@ssw0rd,34875.
When a password is submitted without an appended OTP, the DigitalPersona Server will initiate push notification automatically, sending a notification to your enrolled device requesting authorization.
This feature may be referred to as “Auto-Push OTP”.
Using OTP Push Notification with PAP (v3.0.2-)
To use OTP Push Notification over PAP with DigitalPersona products prior to v3.1:
-
In the Control Panel, select Network Connections.
Right-click on the VPN connection and select Connect.
-
Fill in the Connect dialog as follows:
-
User name:
-
AD users - Enter the Windows user account name or UPN name.
-
-
Password: Enter the user password, comma, and the word push.
Example - MyPassword#123,push
-
Domain:
-
AD users - Enter the AD Domain name in the NETBIOS form.
-
-
-
Click Connect.
Using OTP Push Notification with MS-CHAPv2 (v3.0.2-)
To use OTP Push Notification over MS-CHAPv2 with DigitalPersona products prior to v3.1:
-
In the Control Panel, select Network Connections.
Right-click on the VPN connection and select Connect.
-
Fill in the Connect dialog as follows:
-
User name:
-
AD users - Enter the Windows user account name,comma,push. Example: MyUserName,push
-
UPN names are not supported for this protocol.
-
-
Password: Enter the user’s Windows password.
-
Domain: Enter the AD Domain name in the NETBIOS form.
-
-
Click Connect.
Authenticating with OTP Only
To authenticate to your VPN connection through OTP (One-Touch Password) only:
-
On the machine where NPS (Network Policy Server) is installed, launch regedit.
-
Navigate to the following registry key:
HKEY_LOCAL_MACHINE\SOFTWARE\DigitalPersona\Policies\Default\TOTP
-
Create a new DWORD Value named VPNAllowOTPOnly with a value of 1.
Configuring DigitalPersona NPS plugin for VPN Access-Challenge
The following settings must be configured to use Access-Challenge with the DigitalPersona NPS Extension package:
-
The protocol must be configured as PAP. Only PAP protocol ac support Access-Challenge, MS-CHAPv2 and other protocols do not support Access-Challenge.
-
The following registry setting must be modified on the DigitalPersona NPS Extension machine (RADIUS server):
HKEY_LOCAL_MACHINE\SOFTWARE\DigitalPersona\Policies\TOTP
Create the key if it does not already exist.
In the above setting, create a VPNAccessChallenge DWORD value and set it to 1.
To use Access-Challenge on your VPN Client:
-
Type your Username and Password (do not enter an OTP code yet).
A dialog will display asking for your OTP Code.
-
Enter it in the dialog.
Configuration Required when using CHAP
Enable Reversible Encryption for Storing Passwords
To use the CHAP protocol with the DigitalPersona NPS Plugin, the Store password using reversible encryption Password Policy must be enabled.
To allow reversible encryption:
-
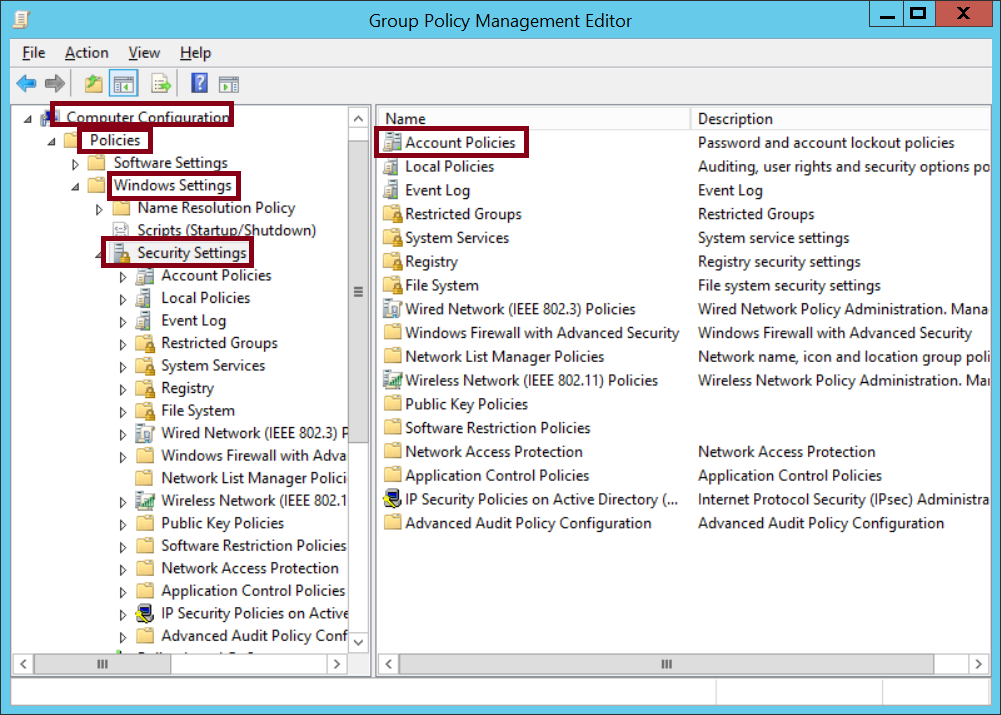
Open the Group Policy Management Editor.
-
Open the Default Domain Policy for editing.
-
Navigate to Computer Configuration | Policies | Windows Settings | Security Settings | Account Policies.
-
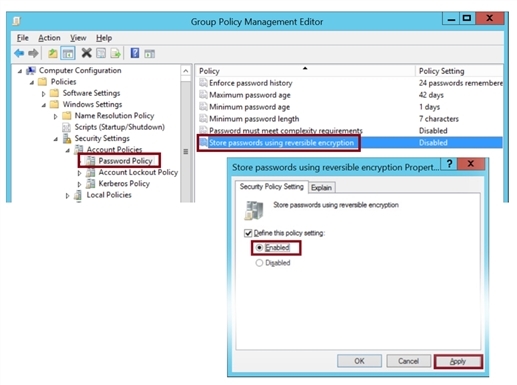
Open Password Policy and double-click Store password using reversible encryption.
-
Enable the policy and click Apply.
Now storing passwords using reversible encryption is allowed, but all current user’s passwords stored in AD are still stored using irreversible encryption so CHAP will not work yet.
To make it work, all currently enrolled users MUST change their passwords.
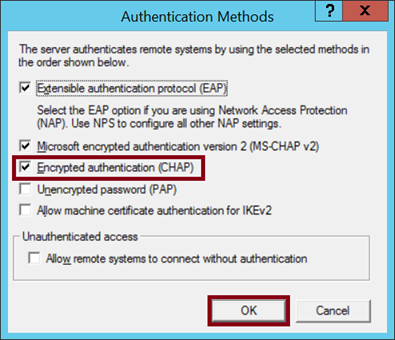
Configuring Microsoft RRAS to Support CHAP
-
In RRAS configuration choose the Security tab and click on Authentication Methods…
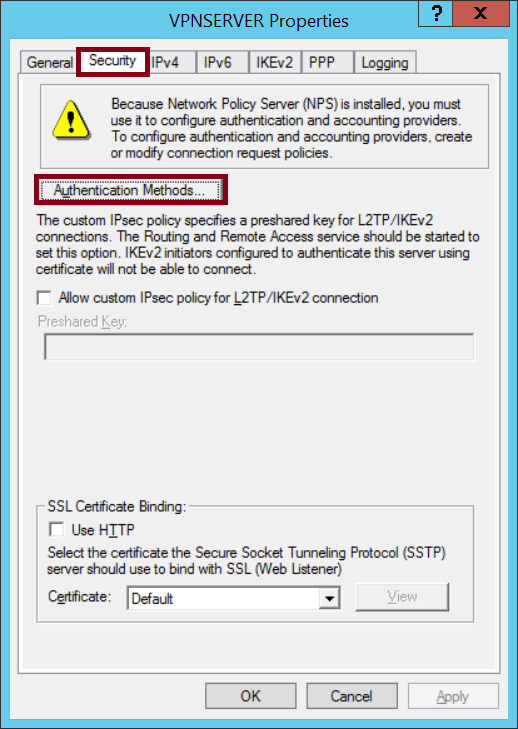
-
Make sure Encrypted authentication (CHAP) is selected and click OK.
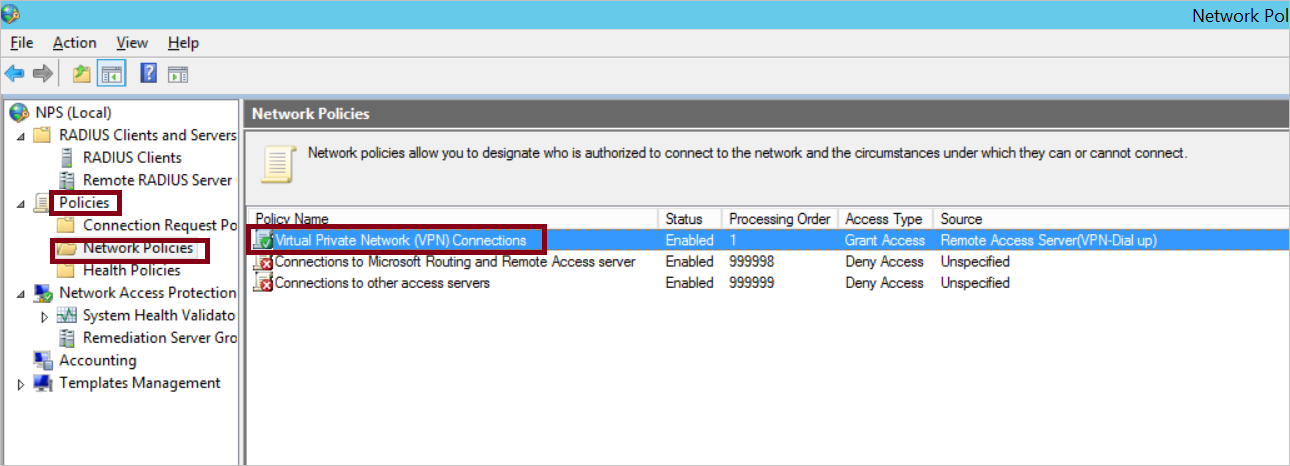
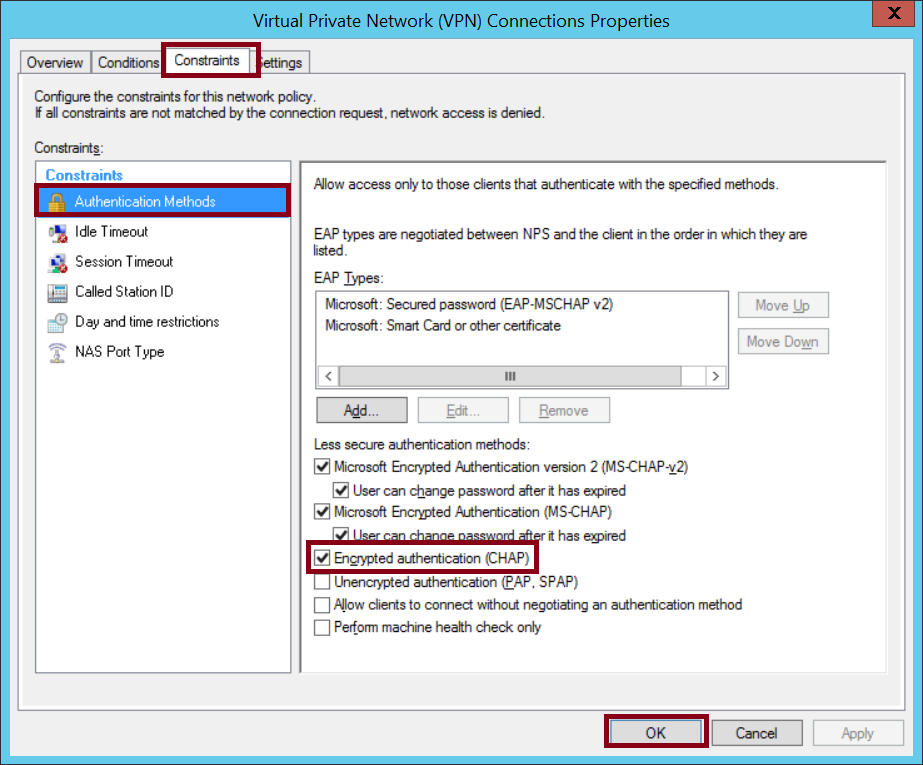
Configuring Microsoft NPS to Support CHAP
-
Open NPS Configuration.
-
Go to Policies | Network Policies | Virtual Private Network (VPN) Connections.
-
Click the Constraints tab, then select Authentication Methods.
Make sure that Encrypted Authentication (CHAP) is selected and click OK.
Configuring Microsoft VPN Client to Support CHAP
-
Enter your User name - enter in the following format: user account name,OTP code.
For example, if user name is domain\user and the OTP code is 654678, enter domain\user,654678.
UPN names are not supported.
-
Enter your Password - enter your Windows password.
-
Then click OK.


