Managing Your Users
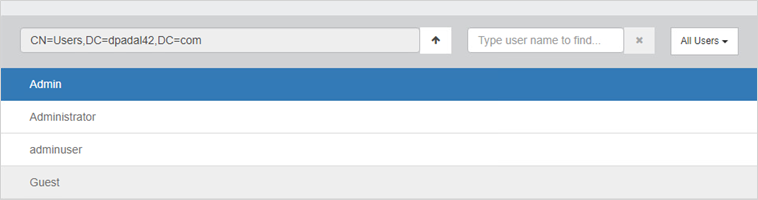
Search For and Filter Users
Use the Search field and Users drop down menu to search for and filter users by their status (that is, All Users, Disabled Users or Locked Users).
Click on an OU to display users within that Organizational Unit or the Up arrow to view a parent OU.
Display User Details
Most of the user properties and settings are accessed from the Details panel, which by default is hidden when first logging into the console. This panel displays user details, properties, credentials and task buttons. It also indicates whether any credentials required during Attended Enrollment were omitted and shows the reason the administrator provided for their omission.
To open the Details panel, select a user and click Show details. When details are being displayed, Show details changes to Hide details.


Manage Credentials
To manage the credentials of a selected user:
-
If user details are not shown, click Show Details.
-
Click the Manage Credentials button.
The HID DigitalPersona Enrollment application is displayed, where you can enroll and manage the user’s credentials.
See Enrolling Users and their Credentials for further details.
Remove a User's Credential
To remove one or more of a user’s enrolled credentials:
-
Select a user.
-
If user details are not shown, click Show Details.
-
Under Credentials, click the X next to the credential that you want to unenroll.
-
Confirm the removal by clicking OK.
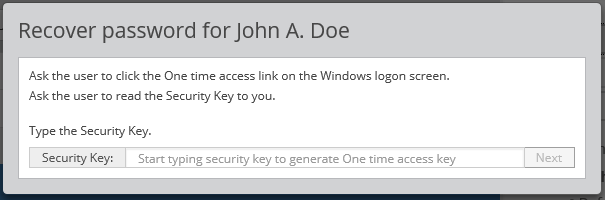
Recover Password (User Recovery)
The HID DigitalPersona Administration Console provides assisted access to
To recover a user’s Windows access:
-
On the Users tab of the DigitalPersona Administration Console, select the user and click Recover password to display the following dialog.
-
Ask the user to click the Options/One-time access code button on the Windows logon screen.
-
The user will read the Security Key displayed on the screen.
-
A DigitalPersona administrator or designated person types the Security Key into the User recovery window and clicks Next.
Unlock the Account
The Unlock the account button is used to unlock the account of a user whose account has been locked because of too many failed authentication attempts using DigitalPersona credentials.
This button is not active (is grayed out) unless the account is locked.
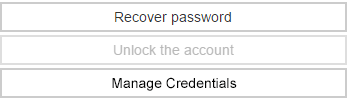
Once the account is locked, the button becomes active, and pressing it will unlock the specified user’s account.
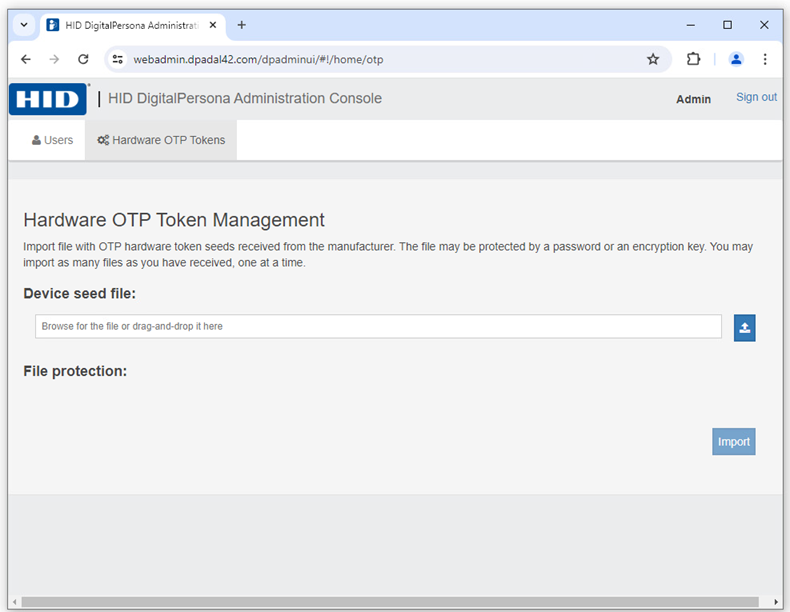
Manage Hardware OTP Tokens
To use hardware-based OTP tokens, you must import seed files provided by the hardware vendor to the DigitalPersona Server.
-
Select the Hardware OTP Tokens tab.
-
Drag-and-drop the OTP hardware token seed file(s) received from the manufacturer for your tokens into the Device seed file text box, or click Browse to navigate to the file.
The file format must be PKSC, although the actual file extension may be PKSC, xml or there may be no extension.
Additional file formats may be supported, see your channel partner for updated information.
Files may also be protected by a password or an encryption key.
-
If the file is protected by an encryption key or a password, select the appropriate radio button and enter the encryption key or password provided by the token vendor.
-
Click Import.


