Adding and Managing Logons
There are two ways to add a logon for a website or program to Password Manager.
Remember Your Credentials
Simply log in to a website or program as usual and Password Manager will offer to remember your account information.
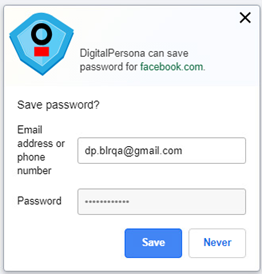
Click Remember and your logon information is saved. Next time you can log in with any enrolled credential.
Using the Login Credentials Dialog
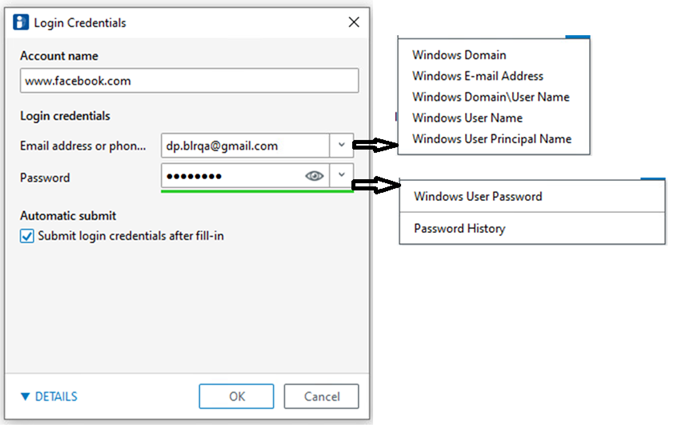
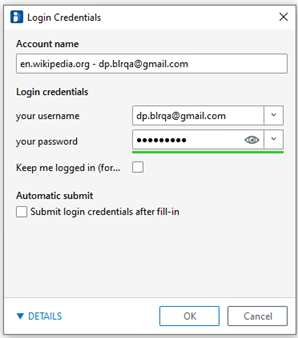
Password Manager logons are created by entering relevant information in the Login Credentials dialog.
Add or edit your personal logons from the Login Credentials dialog,
-
From any logon screen - With a website or program logon screen displayed in your browser, scan an enrolled fingerprint or present an enrolled card to display the Login Credentials dialog.
-
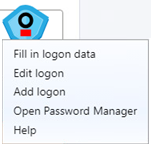 From a previously trained logon screen - Click the Password Manager icon and select Add logon or Edit logon.
 -
From Password Manager - On the Password Manager page, click the Manage menu next to any current logon and select Add Logon or Edit Logon to display the Logon Credentials dialog.
Once the logon information is saved by Password Manager, from then on, your logon information can be automatically filled in and optionally submitted as well.
You can use these logons in several ways:
-
Browse to the website or program and have Password Manager fill-in and optionally submit, you credentials.
-
Launch the resource from the Password Manager page in the DigitalPersona Console.
-
Click a logon from the Logons menu to have Password Manager open the website or program and log you on.
To create a logon:
-
Display the Login Credentials dialog as described on the previous page.
-
Enter your logon data:
-
To populate the User name field with a preformatted Windows credential, click the arrow to the right of the field and select one of the displayed options:
-
Windows Domain
-
Windows E-mail Address
-
Windows Domain\User Name
-
Windows User Name
-
Windows User Principal Name
-
-
To populate the Password field with a preformatted credential, click the arrow to the right of the field and select one of the displayed options:
-
Windows User Password
-
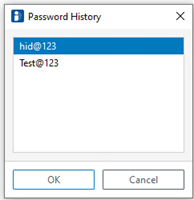 Use previous password ... - Sometimes, you may modify a password in Password Manager, but this password is rejected by the application. In this case, the software allows you to use a previous password (i.e. a password previously entered for this logon page) instead of the most recent one.
 If you select Use previous Password, after authentication you will be prompted to choose a previous password in the Password History dialog (as illustrated). The list includes up to seven previously used passwords.
-
-
To view the password for this logon, click the Eye icon.
 Note: The colored line under the Password field. This indicates password strength from red, through yellow to green for optimum strength.
-
-
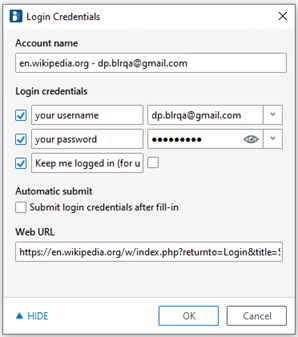
To have the logon fields filled in, but not submitted, clear the Submit login credentials after fill-in option.
-
If Password Manager does not display the required logon fields, click DETAILS.
Then select the check box for each field that is required for logon, or you can clear the check box for any fields that are not required for logon.
-
If Password Manager cannot detect all of the required logon fields, a message is displayed asking if you want to continue. Click Yes to enter Manual Mode.
Each time that you access the now “trained” website, program or network resource, the Password Manager icon shown below is displayed on the screen (Internet Explorer) or to the right of the first recognized entry field (in Chrome, Firefox or Edge) indicating that you can use any of your enrolled credentials to log on:
|
|
Password Manager Icon for Internet Explorer web browser and Windows applications |
|
|
Password Manager Icon for Internet Explorer web browser and Windows applications indicating a recognized Change Password screen |
|
|
Password Manager Icon for Chrome, Firefox, and Edge web browsers
|
|
|
Password Manager Icon for Chrome Firefox, and Edge web browsers indicating a recognized Change Password screen |


Manual Mode
A dialog is displayed with your logon fields filled in.
Click the icon for each field and drag it to the appropriate logon field, and then click the button to sign into the website.
Once you use the manual mode of entering the logon data for a site, you must continue to use this method to log on to the same website in the future.
Managing Your Logons
Password Manager makes it easy to manage your logon information for user names, passwords, and multiple logon accounts, from one central location.
Your logons are listed on the Password Manager page in the DigitalPersona User Console. Each logon includes an entry for the website, program or other resource, and an indented entry for each set of account data created for the resource.
Manage your logons from the Manage menu next to each logon:
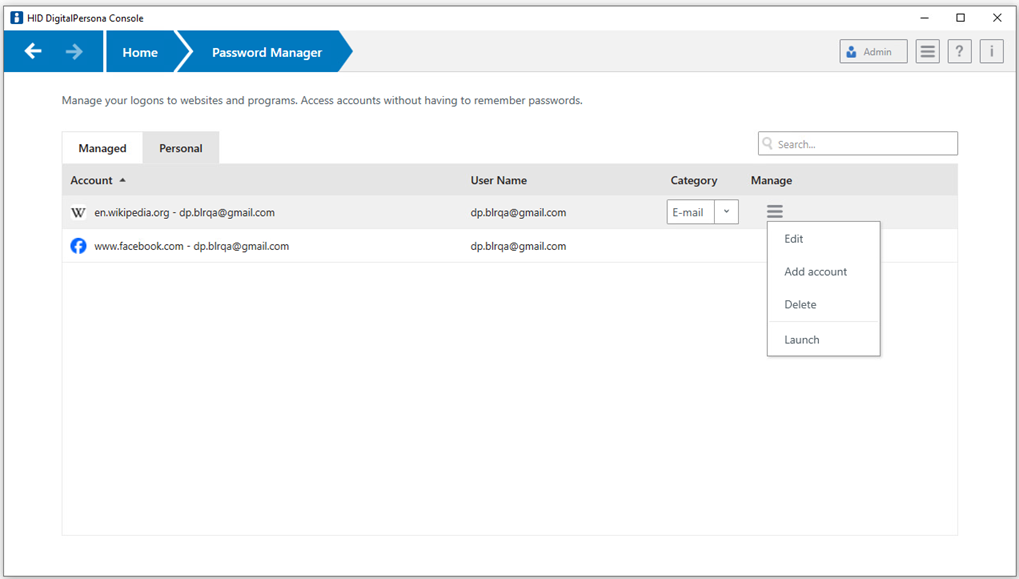
Edit a Logon
You edit your personal logons through the Login Credentials dialog.
Changing Passwords
After creating logons, managed password screens display the Change Password icon on the screen.
After verifying your identity, you are prompted to provide an old password, a new password and to confirm the new password.
Depending on the logon attributes, the change password process may vary.
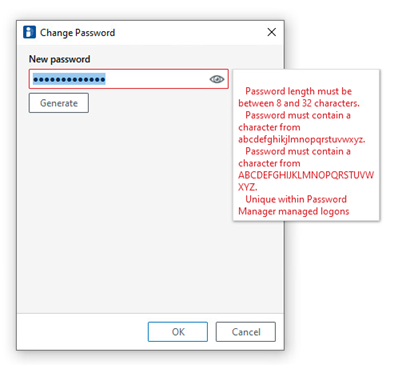
You can choose a new password with or without constraints on the password content depending on the configuration set by your administrator:
-
If an administrator has configured password policies or rules for new passwords, you must type a new password that conforms to those policies or rules. Otherwise, an error message will pop up with a description of the applicable password policy requirements.
-
If an administrator has configured automatic generation of a new password, you will not be able to specify a new password manually, but rather will need to generate a new random password by clicking on Generate.
Once the new password is generated automatically for a logon screen, you must log on with alternate credentials to this website or application.


