Integrating the DigitalPersona Identity Server
The DigitalPersona Identity Server is used to identify and authenticate users logging in to DigitalPersona web applications such as the HID DigitalPersona Administration Console and HID DigitalPersona Enrollment.
It is also used for user authentication to configured relying parties, including Microsoft Office 365, as described in Integrating the DigitalPersona IDP into your Applications.
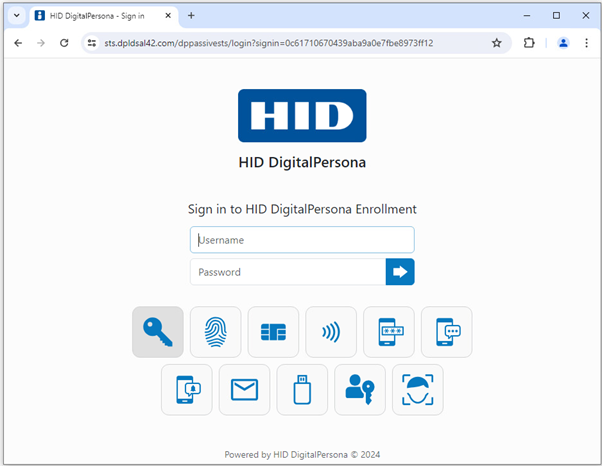
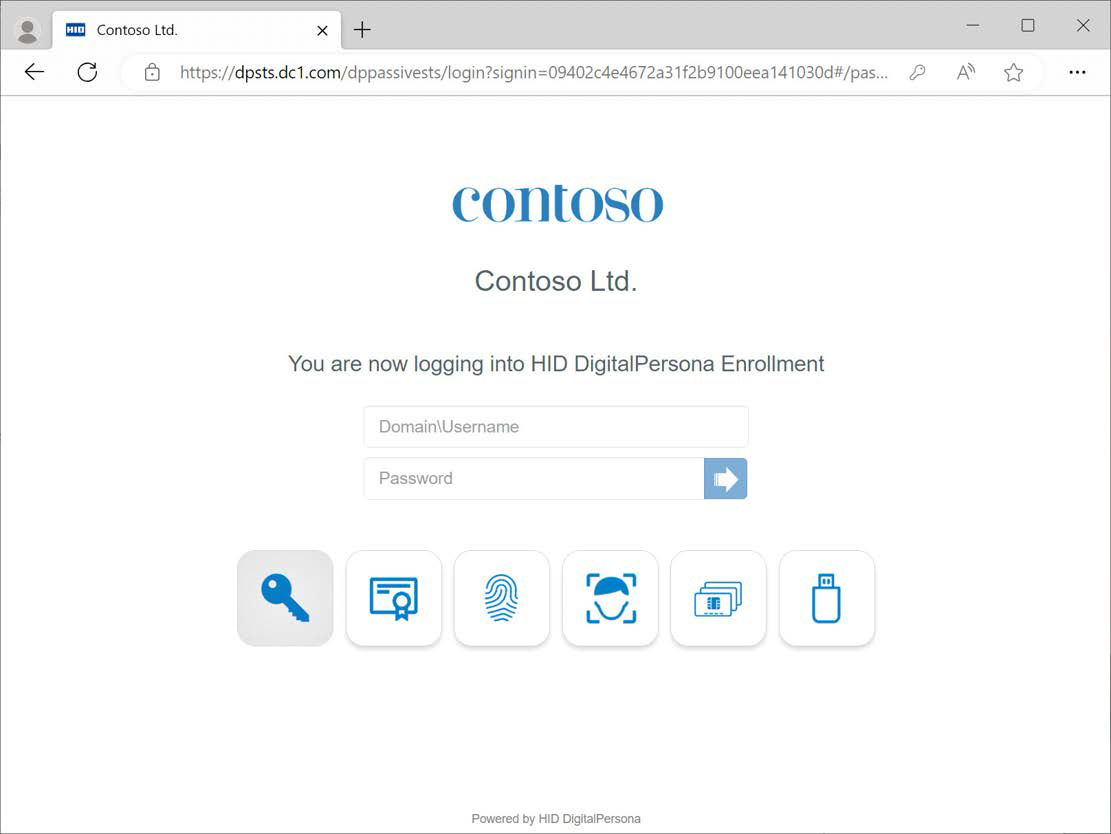
When presented with this webpage for the first time, if no other credentials have been enrolled yet, the user enters their domain and user name in the format Domain\Username or username@domain and clicks the arrow to the right of the password field.
-
Once credentials are enrolled, users can select which credential to use by clicking one of the credential tiles and submitting the specified credential.
-
The system will remember the last used credential and automatically select that credential the next time the user visits the page. If a combination of credentials is required, any additional credentials will be requested automatically after authentication with a previous credential.
-
When an Enhanced Logon Policy is triggered, the user will first see tiles for any credentials required by the standard Logon Policy. Once a credential is authenticated, tiles for any additional credentials required by the Enhanced Logon Policy will be displayed.
User Onboarding
For example, with a Logon Policy of Password plus PIN in effect, and without a previously assigned DigitalPersona license, a new AD user attempts to log on to their Windows computer.
-
The user attempts to log on using their password.
-
The HID DigitalPersona Console displays.
-
The user enters their password and clicks Create in order to establish their HID DigitalPersona account.
-
They close the Console by clicking on the Close (X) button in the upper right portion of the window.
-
The Windows Logon screen redisplays, with a new link - First time using HID DigitalPersona?
-
The user clicks the link to redisplay the HID DigitalPersona Console.
-
They authenticate with their password and then click the PIN tile to enroll their personal PIN.
-
They close the Console by clicking on the Close (X) button in the upper right portion of the window.
-
A message displays that the user can now use their credentials for authentication.
-
The Windows Logon screen redisplays.
-
The user enters their password, the system requests their PIN, they enter it and are logged on to Windows.
See User Onboarding through the Identity Provider.
Identity Server Features
Integrated Windows Authentication (IWA)
When Integrated Windows Authentication is selected as the single credential for logon to the DigitalPersona Identity Server and a user launches any federated application accessed through the DigitalPersona Identity Server (from a domain-joined computer where a DigitalPersona Workstation or DigitalPersona Lite Client is installed), and if no additional credentials are specified in an authentication policy, they will be automatically logged on without the need for further authentication.
Additionally, any federated applications accessed through the internal network will not need further authentication.
If there are additional credentials specified for authentication to the Identity Server, the user will automatically be authenticated with their Windows credentials and will only need to submit the additional credential, For example, if the authentication policy for the Identity Server is set to require Windows Authentication and Fingerprint credentials, the user will simply need to scan their fingerprint.
Multi-Factor Authentication (MFA)
One of the primary benefits of the DigitalPersona solution is the easy implementation of multi-factor authentication (MFA), (that is, requiring more than one credential in order to log on to web-based services protected by the DigitalPersona Identity Server).
When DigitalPersona MFA is enabled and you have logged on for the first time, the system will remember which credentials you have used to log on with, and the sequence they were used in. For example, if you used your Windows Password first and your fingerprints second, the next time you go to log on, you will not have to select these, but will automatically be presented with the UI necessary to authenticate with those credentials in that order.
Enhanced Logon Policy
If an Enhanced Logon Policy has been enabled, additional credentials may be specified by the administrator to be required for authentication depending on various risk factors including:
-
IP Address - access from a new IP Address
-
Originating device - User Agent String of the web browser being used for access
Supported Credentials
| Credential | IE | Edge | Chrome | Firefox | Safari | iOS | Android | Comments |
|---|---|---|---|---|---|---|---|---|
|
Password |
Y |
Y |
Y |
Y |
Y |
Y |
Y |
None |
|
Fingerprint |
Y |
Y |
Y |
Y |
N |
N |
N |
None |
|
Cards |
Y |
Y |
Y |
Y |
Y |
Y |
Y |
PKI Smart card*, Contactless Writable card and Contactless ID card |
|
Certificates* |
Y |
Y |
Y |
Y |
N |
N |
N |
See topic Using a Certificate credential below. |
|
OTP |
Y |
Y |
Y |
Y |
Y |
Y |
Y |
SMS, Email and Push Notification |
|
PIN |
Y |
Y |
Y |
Y |
Y |
Y |
Y |
None |
|
Passkey |
N |
Y |
Y |
Y |
Y |
Y |
Y |
None |
|
Face |
N |
Y |
Y |
Y |
Y |
Y* |
Y** |
|
|
Recovery Questions |
Y |
Y |
Y |
Y |
Y |
Y |
Y |
None |
|
Integrated Windows Authentication |
Y |
Y |
Y |
Y |
Y |
N |
N |
The device must be domain-joined. |
* If a certificate-based PKI Smart Card has been enrolled for a user, they will not see a tile labeled PKI Smart Card, but will see a tile labeled Certificates.
Your browser or device does not support the required credentials, or they are not configured. Please contact your administrator.
Using a Certificate Credential
If a Certificate credential is specified as part of the enforced Logon Policy, a Certificate tile will be displayed on the Identity Provider Logon page. Upon clicking the tile, the user is asked to present their certificate as shown in the following image.
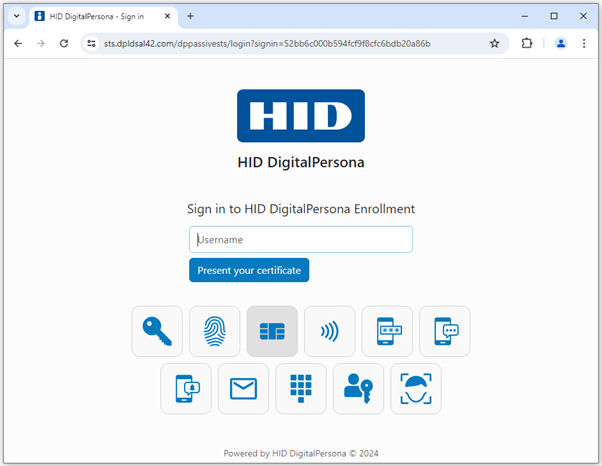
If multiple Windows Security certificates exist on the device, the user will need to select the appropriate certificate. The selection process will differ slightly for various web browsers.
If the certificate is located on a PKI Smart Card, the user will also be asked to enter their PKI Smart card PIN.
The authentication will be effective for the browser session and no longer effective once the browser closes.
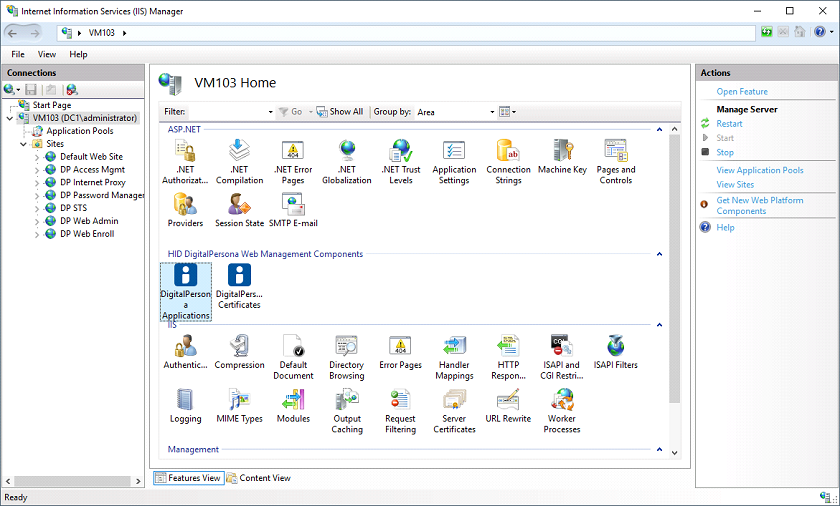
Configuring the Identity Server (DigitalPersona IIS Plugin)
You can configure the DigitalPersona Identity Server through the DigitalPersona Configuration IIS Plugin, a DigitalPersona component that provides configuration of the DigitalPersona Web Management Components through the Microsoft Information Services (IIS) Manager.
Once installed, its icons will be displayed under the HID DigitalPersona Web Management Components area for the Server.
Configure the DigitalPersona Applications
The DigitalPersona Clients page lists all the web applications that are currently registered with the STS.

Here you can add a new WS-Federation, Open-ID Connect, or SAML2P application or edit the existing one, and edit the authentication policy for each of them.
After making any changes, you need to click Apply in the Actions area on the right side of the window.
Policy Type
By default, all applications will have the same Logon Policy as the Default Logon and Enhanced Policies item, and their Policy Type will be Default.
An application whose Logon Policy has been edited to be different from the default will have a Policy Type of Custom.
Adding, Editing and Deleting Relying Parties
In the Actions panel, the Add WS-Fed RP, Add OIDC client and Add SAML2P Client actions will display dialogs for adding a new application of the corresponding protocol.
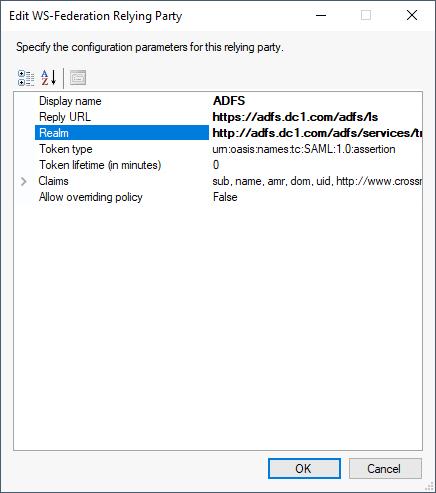
WS-Federation Relying Party
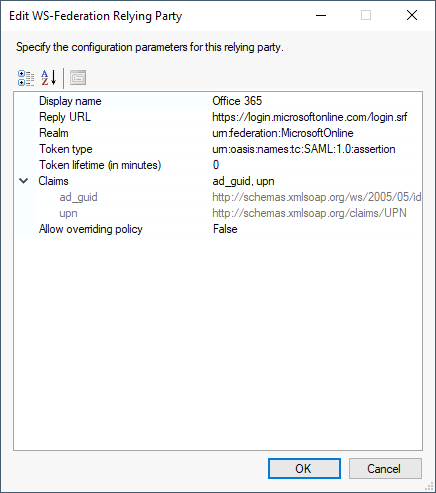
For built-in relying parties, you must specify the application realm ID, reply URL and the list of claims required for the application.
Built-in relying parties, such as DigitalPersona Enrollment or DigitalPersona Administration Console, are shown as read-only and are not allowed for modification.
OpenID-Connect Client
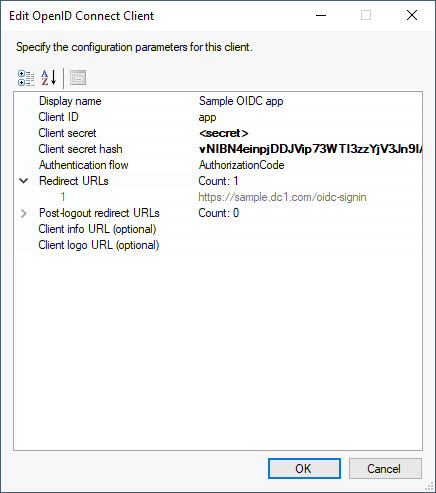
For an OpenID-Connect client, you must specify the client ID and secret, the type of authentication flow, and the list of redirection URLs.
SAML2P Client
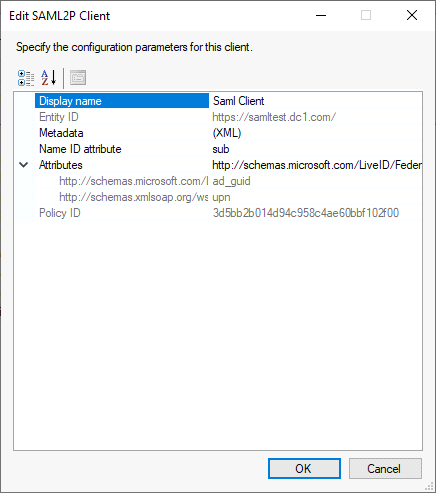
For a SAML2P client, you must select the client's metadata file and specify the list of attributes required for the client.
Once all the required parameters are configured and changes are applied, the web application becomes registered with DigitalPersona STS.
The Delete action allows you to remove a web application from the list of registered applications.
Editing Authentication Policies
When a registered application is currently selected in the list, click the Edit policies... action to display the Authentication Policy dialog for that item. This dialog allows you to specify authentication policies for the selected application.
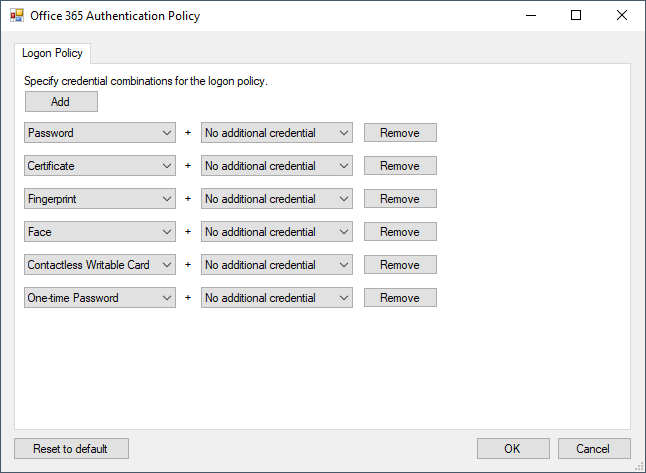
Select additional credentials or combinations from the available drop-down menus.
Click Add to insert an additional line or click Remove to delete a line.
Enhanced Logon Policy
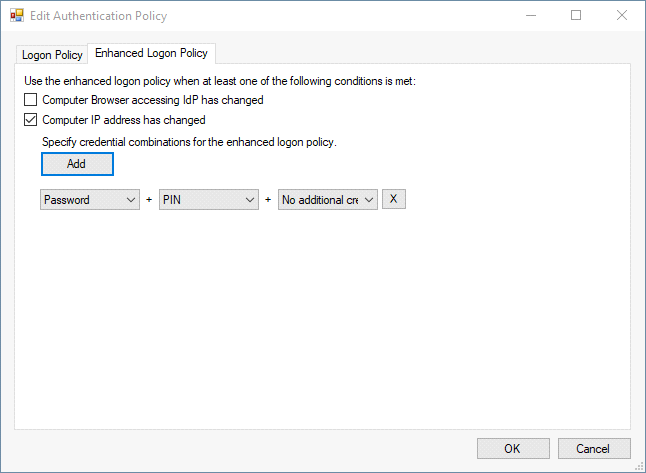
On the Enhanced Logon Policy tab, you can specify an enhanced logon (step-up) policy. Specify up to three credentials that will be required for authentication when enabled step-up conditions occur. To add additional credential combinations, click Add.
Browser Accessing IdP has Changed
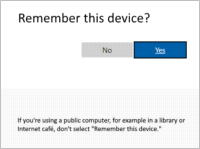
Whenever the user accesses the Identity Server from a new browser, step-up authentication is enforced.
Users will be prompted to Remember this device, immediately after authentication of their credentials. The prompt will be similar to the following image.
Computer IP address has Changed
Whenever a user accesses the Identity Server from an untrusted or unknown IP address, step-up authentication will be enforced.
The system will first check whether the IP address is within a specified trusted range:
-
If it is, no step-up authentication is needed.
-
If the IP address is not within the trusted range, the system will check the last five IP addresses that the user accessed the Identity Server from:
-
If the current IP address matches one of them, no step-up authentication is required.
-
If not, step-up authentication is enforced.
-
The trusted IP address range is specified by the administrator in the C:\Program Files\DigitalPersona\Web Management Components\DP STS\DPPassiveSTS\web.config file.
The information should be added to the <AltusConfirm> node in the following format:
<TrustedIPs>
    <add StartAddress="192.168.56.102" EndAddress="192.168.56.199" />
<TrustedIPs>
Multiple ranges can be specified. To limit access to a single IP address, make the StartAddress and EndAddress the same.
Configure STS to work with ADFS
To add DigitalPersona Identity Server (STS) features to ADFS, you need to establish a Claim provider trust. This is accomplished through the following procedure.
- Add ADFS Relying Party to STS:
Navigate to the Applications tab.
In the Actions panel, click Add WS Fed RP.
In the Edit WS-Federation Relying Party dialog, specify the following values:
Display name: ADFS
Reply URL: https://<your-adfs-domain-name>/adfs/ls
Realm: http://<your-adfs-domain-name>/adfs/services/trust
Click OK to apply the changes you made.
-
Create an ADFS Claim Provider trust - locate the ADFS - Add Claims Provider.ps1 PowerShell script and run it on your ADFS server.
You can find it at the following location on your DigitalPersona Server after installation of the Web Management Components:
C:\Program Files\DigitalPersona\Web Management Components\DP STS\DPPassiveSTS\Integration\ADFS - Add Claims Provider.ps1
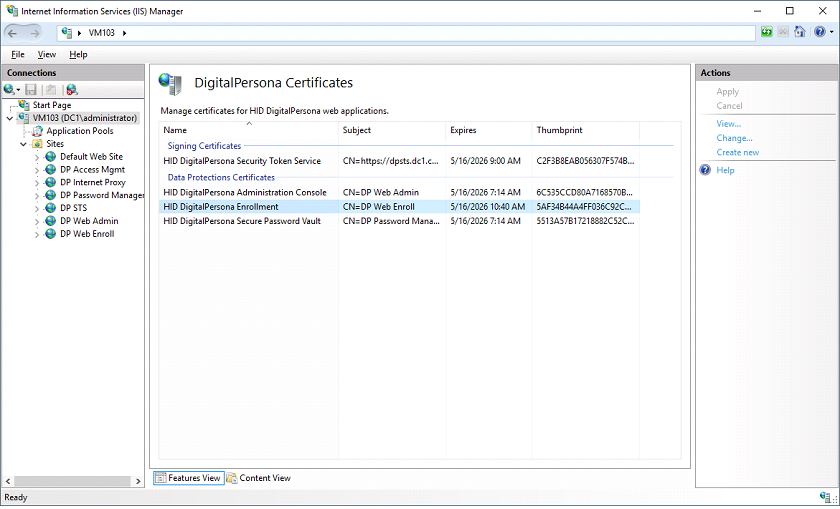
Configure the DigitalPersona Certificates
On the DigitalPersona Certificates page, you can change the certificates used for token signing and data protection.
-
Token Signing Certificates
When DigitalPersona Web Management Components are installed, the Configuration Wizard, by default creates a self-signed token signing certificate that is valid for three years. To ensure business continuity, you should make sure to renew the certificate before it expires.
-
Data Protection Certificates
The same certificate renewal process applies to the data protection SSL certificates used in the DigitalPersona Web Administration and Web Enrollment applications.
Check for Certificate Renewal
The list of certificates in the DigitalPersona Certificates page contains the Expires column.
Check the expiration date for each certificate and if it is less than 30 days away, it's a good idea to take action now.
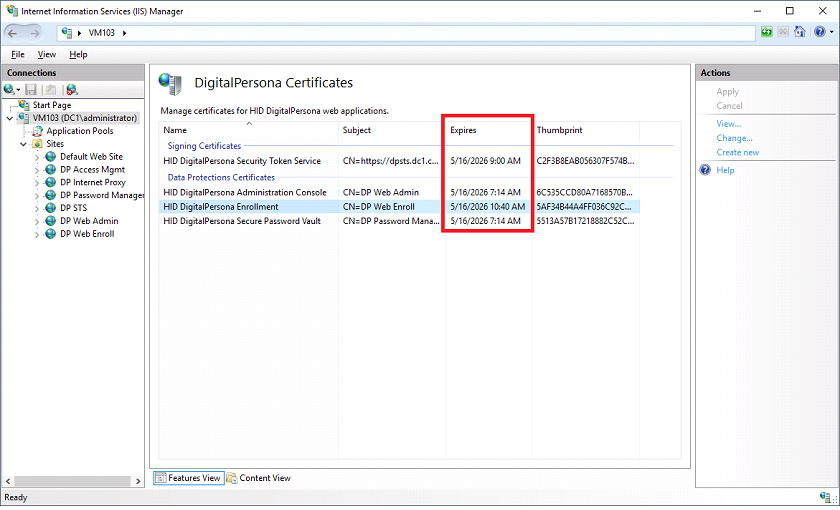
Renew a Certificate
-
Select the expiring certificate and click the Create new... link in the Actions area on the right side of the window.
The process may take up to a minute and you will see a new thumbprint and expiration date once the new certificate is created.
-
Click Apply to save the changes.
Renew an SSL Certificate
The process of renewing the SSL certificates used by your DigitalPersona product(s) is not accomplished through the DigitalPersona software.
SSL certificates can be renewed through any Certificate Authority and then need to be bound to the relevant website through IIS. Most Certificate Authorities provide instructions on how to do so. For example, see GoDaddy's instructions at iis-7-renew-a-certificate-4802
Additional Configuration via .config Files
Bypassing MFA for Designated AD Groups (policyBypassGroups)
The purpose of the policyBypassGroups setting is to provide a whitelist of active logons (service accounts with no UI) AD groups that can bypass the MFA policy currently in force when accessing various federated third-party applications (such as Office 365) that would otherwise require Multi-Factor Authentication. Passive logons (users that are presented with the Identity Server UI) will still be under enforcement of the authentication policy in force.
To create a BypassGroups policy:
-
Open the web.config file from the following default location.
C:\Program Files\DigitalPersona\Web Management Components\DP STS\DPActiveSTS
-
Create a new key/value pair in the appSettings section using the following format, where the value consists of the desired comma-delimited AD groups:
Copy<appSettings>
...
<add key="policyBypassGroups" value="SomeADGroup1, SomeADGroup2" />
</appSettings>
Add Authentication Policies per AD Group
After adding relying parties, an administrator can modify the generated configuration file to enable authentication policies associated with specific groups of users in the Active Directory.
The optional attribute group can be added to the dpWebRPPolicies element in the following file:
%Program Files%\DigitalPersona\Web Management Components\DP Access Mgmt\DPWebPolicies\DPWebPolicyConfig.config
If added, the policy will apply to the designated Active Directory group only.
For example:
<dpWebRPPolicies relyingParty="*" group="Domain Admins">
This element sets the default authentication policy for any relying party and applies only to users who belong to the Domain Admins group in the Active Directory.
It is recommended to configure authentication policies for relying parties via the DigitalPersona Configuration UI in the Microsoft IIS Manager, and then to configure per AD group manually as needed.
When configuring authentication policies for AD groups, make sure that these policies are fully included into authentication policies per Relying Parties. Initially, the authentication UI offers credentials based on the Relying Party policy. Once the username becomes known after authenticating a user with any credential, the user can proceed with authentication.
Example of the policies
Here is sample of a policy configured in Web.config
<?xml version="1.0"?>
<dpWebAuthenticationPolicies>
  <dpWebRPPolicies relyingParty="*">
    <dpWebPolicies>
      <dpWebPolicy name="Password" tokens="D1A1F561-E14A-4699-9138-2EB523E132CC" />
      <dpWebPolicy name="Certificate" tokens="CD22C636-812F-4C87-BB65-4F18208F29F6" />
      <dpWebPolicy name="Fingerprint" tokens="AC184A13-60AB-40E5-A514-E10F777EC2F9" />
      <dpWebPolicy name="Face" tokens="85AEAA44-413B-4DC1-AF09-ADE15892730A" />
      <dpWebPolicy name="Contactless Writable Card" tokens="F674862D-AC70-48CA-B73E-64A22F3BAC44" />
      <dpWebPolicy name="One-time Password" tokens="324C38BD-0B51-4E4D-BD75-200DA0C8177F" />
      <dpWebPolicy name="FIDO Key" tokens="5D5F73AF-BCE5-4161-9584-42A61AED0E48" />
      <dpWebPolicy name="Passkey" tokens="62BB38A2-63EA-43C9-BADB-E0D186C590E9" />
    </dpWebPolicies>
    <dpWebStepUpPolicies>
      <dpWebPolicy name="Password plus PIN" tokens="D1A1F561-E14A-4699-9138-2EB523E132CC;8A6FCEC3-3C8A-40C2-8AC0-A039EC01BA05" />
    </dpWebStepUpPolicies>
    <dpWebStepUpTriggers>
      <dpWebStepUpTrigger name="device" />
      <dpWebStepUpTrigger name="ip" />
    </dpWebStepUpTriggers>
  </dpWebRPPolicies>
  <dpWebRPPolicies relyingParty="urn:webadmin">
    <dpWebPolicies>
      <dpWebPolicy name="Certificate" tokens="CD22C636-812F-4C87-BB65-4F18208F29F6" />
      <dpWebPolicy name="Face plus Password" tokens="85AEAA44-413B-4DC1-AF09-ADE15892730A;D1A1F561-E14A-4699-9138-2EB523E132CC" />
      <dpWebPolicy name="Contactless Writable Card" tokens="F674862D-AC70-48CA-B73E-64A22F3BAC44" />
      <dpWebPolicy name="One-time Password plus Fingerprint" tokens="324C38BD-0B51-4E4D-BD75-200DA0C8177F;AC184A13-60AB-40E5-A514-E10F777EC2F9" />
      <dpWebPolicy name="FIDO Key" tokens="5D5F73AF-BCE5-4161-9584-42A61AED0E48" />
      <dpWebPolicy name="Passkey" tokens="62BB38A2-63EA-43C9-BADB-E0D186C590E9" />
    </dpWebPolicies>
    <dpWebStepUpPolicies>
      <dpWebPolicy name="Password plus PIN" tokens="D1A1F561-E14A-4699-9138-2EB523E132CC;8A6FCEC3-3C8A-40C2-8AC0-A039EC01BA05" />
    </dpWebStepUpPolicies>
    <dpWebStepUpTriggers>
      <dpWebStepUpTrigger name="device" />
      <dpWebStepUpTrigger name="ip" />
    </dpWebStepUpTriggers>
  </dpWebRPPolicies>
  <dpWebRPPolicies relyingParty="urn:webenrollment">
    <dpWebPolicies>
      <dpWebPolicy name="Password plus Contactless ID Card" tokens="D1A1F561-E14A-4699-9138-2EB523E132CC;1F31360C-81C0-4EE0-9ACD-5A4400F66CC2" />
      <dpWebPolicy name="Certificate plus Fingerprint" tokens="CD22C636-812F-4C87-BB65-4F18208F29F6;AC184A13-60AB-40E5-A514-E10F777EC2F9" />
      <dpWebPolicy name="Fingerprint plus PIN" tokens="AC184A13-60AB-40E5-A514-E10F777EC2F9;8A6FCEC3-3C8A-40C2-8AC0-A039EC01BA05" />
      <dpWebPolicy name="Face" tokens="85AEAA44-413B-4DC1-AF09-ADE15892730A" />
      <dpWebPolicy name="Contactless Writable Card plus Password" tokens="F674862D-AC70-48CA-B73E-64A22F3BAC44;D1A1F561-E14A-4699-9138-2EB523E132CC" />
      <dpWebPolicy name="One-time Password" tokens="324C38BD-0B51-4E4D-BD75-200DA0C8177F" />
      <dpWebPolicy name="FIDO Key" tokens="5D5F73AF-BCE5-4161-9584-42A61AED0E48" />
      <dpWebPolicy name="Passkey" tokens="62BB38A2-63EA-43C9-BADB-E0D186C590E9" />
    </dpWebPolicies>
    <dpWebStepUpPolicies>
      <dpWebPolicy name="Password plus PIN" tokens="D1A1F561-E14A-4699-9138-2EB523E132CC;8A6FCEC3-3C8A-40C2-8AC0-A039EC01BA05" />
    </dpWebStepUpPolicies>
    <dpWebStepUpTriggers>
      <dpWebStepUpTrigger name="device" />
      <dpWebStepUpTrigger name="ip" />
    </dpWebStepUpTriggers>
  </dpWebRPPolicies>
  <dpWebRPPolicies relyingParty="urn:dpvault">
    <dpWebPolicies>
      <dpWebPolicy name="Password" tokens="D1A1F561-E14A-4699-9138-2EB523E132CC" />
      <dpWebPolicy name="Certificate" tokens="CD22C636-812F-4C87-BB65-4F18208F29F6" />
      <dpWebPolicy name="Fingerprint plus PIN" tokens="AC184A13-60AB-40E5-A514-E10F777EC2F9;8A6FCEC3-3C8A-40C2-8AC0-A039EC01BA05" />
      <dpWebPolicy name="Face" tokens="85AEAA44-413B-4DC1-AF09-ADE15892730A" />
      <dpWebPolicy name="Contactless Writable Card" tokens="F674862D-AC70-48CA-B73E-64A22F3BAC44" />
      <dpWebPolicy name="One-time Password" tokens="324C38BD-0B51-4E4D-BD75-200DA0C8177F" />
      <dpWebPolicy name="FIDO Key" tokens="5D5F73AF-BCE5-4161-9584-42A61AED0E48" />
      <dpWebPolicy name="Passkey" tokens="62BB38A2-63EA-43C9-BADB-E0D186C590E9" />
    </dpWebPolicies>
    <dpWebStepUpPolicies>
      <dpWebPolicy name="Password plus PIN" tokens="D1A1F561-E14A-4699-9138-2EB523E132CC;8A6FCEC3-3C8A-40C2-8AC0-A039EC01BA05" />
    </dpWebStepUpPolicies>
    <dpWebStepUpTriggers>
      <dpWebStepUpTrigger name="device" />
      <dpWebStepUpTrigger name="ip" />
    </dpWebStepUpTriggers>
  </dpWebRPPolicies>
</dpWebAuthenticationPolicies>
Policy resolution ambiguity
Because users can belong to multiple groups in Active Directory, theoretically there could be ambiguity in resolving the policy provided above. The first encountered policy will be enforced. It is up to the administrator to ensure that appropriate policies are put in place to avoid any resulting ambiguity.
Customize the STS Logon Page UI
You can customize the UI for the Identity Provider Login page (aka STS Logon page) by specifying a title, (pointing, for example, to a company, department, etc.), and a logo image.
Here is an example of the customizable fields shown on the DigitalPersona STS logon page, as illustrated by the use of the “Contoso” logo and page title.
The title and the logo image can be specified by editing their respective configuration files.
To modify the Title:
-
In a text editor, open the C:\Program Files\DigitalPersona\Web Management Components\DP STS\DPPassiveSTS\IdServer.config file.
-
In the displayed XML, find the IdServer\IdentityProvider element and change the value of the DisplayName attribute.
-
Save the changes.
To modify the Logo image:
-
Copy your desired logo image to C:\Program Files\DigitalPersona\Web Management Components\DP STS\DPPassiveSTS\Content\assets\logo_custom.png.
The image must be in the PNG format and its width must be less than 200px.
-
Restart IIS.


