Salesforce Integration
The following sections describe how to implement identity federation from DigitalPersona Identity Provider (STS) to Salesforce.
The following software applications and components must be installed and properly configured prior to beginning integration:
HID DigitalPersona Server and HID DigitalPersona Web Management Components version 2.2 or higher
DigitalPersona STS needs to be publicly available so that Salesforce can connect to it directly via the Internet
A Salesforce Organization (not a trial)
Create an Authentication Provider in Salesforce
-
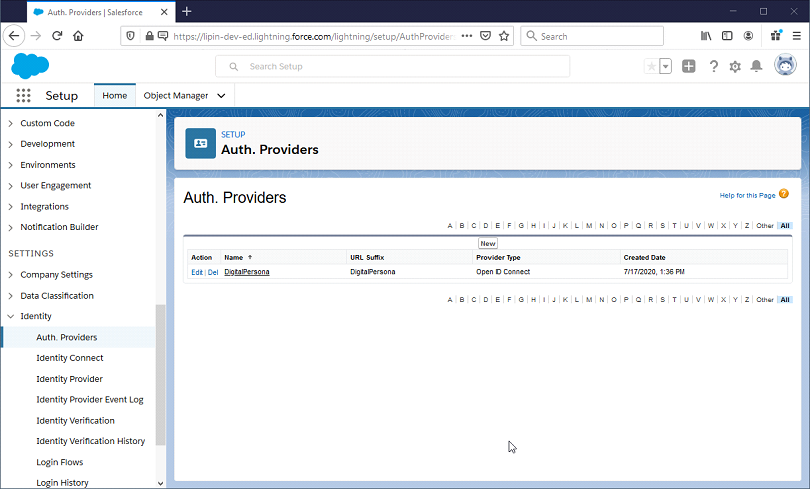
In Salesforce, go to Setup, Settings, Identity and Auth.Providers.
-
Click New and then select OpenID Connect as the Provider Type.
-
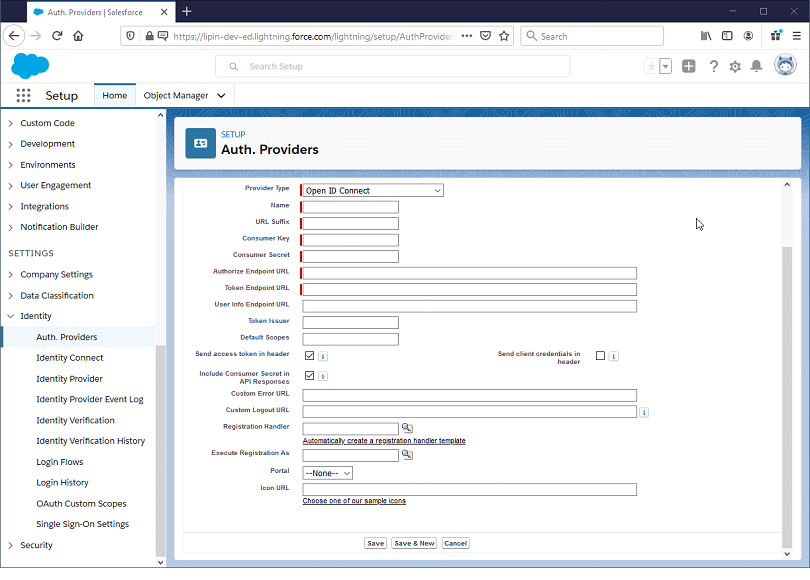
Enter the required configuration:
-
Name - for example, DigitalPersona.
-
URL Suffix or leave the default that equals the name
-
Consumer Key - the CLIENT ID (for example, "urn:salesforce:oidc")
-
Consumer Secret - the CLIENT SECRET
-
Authorize Endpoint URL - https://www.idp.com/dppassivests/connect/authorize as the (here and in the steps below, replace www.idp.com with the public host name of your DigitalPersona STS)
-
Token Endpoint URL - https://www.idp.com/dppassivests/connect/token
-
User Info Endpoint URL - https://www.idp.com/dppassivests/connect/userinfo
-
Token Issuer - https://www.idp.com/dpsts
-
Default Scopes - "profile email openid dp"
-
Leave the Send access token in header, Send client credentials in header and Include Consumer Secret... options with their default states.
-
Custom Logout URL - https://www.idp.com/dppassivests/connect/endsession
-
Registration Handler - select as auto generated.
-
Execute Registration As - set a System Admin as the account.
-
-
Click Save.
-
Make a note of the Single Sign-On Initialization URL and the Callback URL in the Client Configuration section (at the bottom of the newly created Authentication Provider information screen).
Modify the Registration Handler
-
In Salesforce, go to Setup, Platform Tools, Custom Code and Apex Classes.
-
Select the auto-generated registration handler class created for your Authentication Provider and edit to your requirements.
A sample class that allows your organization users to log into Salesforce is provided below.
Copy//TODO: This autogenerated class includes the basics for a Registration
//Handler class. You will need to customize it to ensure it meets your needs and
//the data provided by the third party.
global class AutocreatedRegHandlerXXXXXXXXXXXXX implements Auth.RegistrationHandler{
public static String ORG_SUFFIX = '@myorg.com';
global boolean canCreateUser(Auth.UserData data) {
//TODO: Check whether we want to allow creation of a user with this data
return true;
}
global User createUser(Id portalId, Auth.UserData data){
if(!canCreateUser(data)) {
//Returning null or throwing an exception fails the SSO flow
return null;
}
//The user is authorized, so create their Salesforce user
User u = new User();
Profile p = [SELECT Id FROM profile WHERE name='Standard User'];
//TODO: Customize the username. Also check that the username doesn't
//already exist and possibly ensure there are enough org licenses
//to create a user. Must be 80 characters or less.
u.username = data.identifier + ORG_SUFFIX;
// handle email
String email = 'change@me.com';
if(data.email != null && data.email != '')
email = data.email;
u.email = email;
// handle name
String firstName = 'change-me';
String lastName = 'change-me';
if(data.firstName != null && data.firstName != '')
firstName = data.firstName;
if(data.LastName != null && data.lastName != '')
lastName = data.lastName;
if(firstName == 'change-me' && data.fullName != null && data.fullName != '')
firstName = data.fullName.substringBefore(' ');
if(lastName == 'change-me' && data.fullName != null && data.fullName.substringAfter(' ') != '')
lastName = data.fullName.substringAfter(' ');
u.firstName = firstName;
u.lastName = lastName;
// handle alias
String alias = data.identifier;
//Alias must be 8 characters or less
if(alias.length() > 8) {
alias = alias.substring(0, 8);
}
u.alias = alias;
u.languagelocalekey = UserInfo.getLocale();
u.localesidkey = UserInfo.getLocale();
u.emailEncodingKey = 'UTF-8';
u.timeZoneSidKey = 'America/Los_Angeles';
u.profileId = p.Id;
return u;
}
global void updateUser(Id userId, Id portalId, Auth.UserData data){
User u = new User(id=userId);
//TODO: Customize the username. Must be 80 characters or less.
//u.username = data.identifier + ORG_SUFFIX;
// handle email
if(data.email != null && data.email != '')
u.email = data.email;
// handle name
String firstName = 'change-me';
String lastName = 'change-me';
if(data.firstName != null && data.firstName != '')
firstName = data.firstName;
if(data.LastName != null && data.lastName != '')
lastName = data.lastName;
if(firstName == 'change-me' && data.fullName != null && data.fullName != '')
firstName = data.fullName.substringBefore(' ');
if(lastName == 'change-me' && data.fullName != null && data.fullName.substringAfter(' ') != '')
lastName = data.fullName.substringAfter(' ');
if(firstName != 'change-me')
u.firstName = firstName;
if(lastName != 'change-me')
u.lastName = lastName;
update(u);
}
}
-
Replace "@myorg.com" (shown in red) with the desired username suffix.
Configure the Salesforce Client in DigitalPersona STS
-
Open the IIS Plugin configuration tool and navigate to the Applications tab.
-
Click the Add OIDC Client link.
-
In the Edit OpenID Connect Client dialog box, specify the following values:
-
Display name: "Salesforce"
-
Client ID: "urn:salesforce:oidc"
If necessary, update the ClientID attribute to match the Consumer Key parameter of the Authentication Provider created above.
-
Client secret hash: "fbHB9d8e6mSxhQvCcG1BBa+biWLvxNg2vAjTI60YKbU="
It must be a Base64-encoded SHA256 hash of the Consumer Secret parameter of the Authentication Provider.
-
Redirect URLs:
https://login.salesforce.com/services/authcallback/XXXXXXXXXXXXXXXXXX/DigitalPersona
It must be the Callback URL generated by Salesforce for the Authentication Provider.
-
Post logout redirects URLs: https://xxxxxxxxxxxx.lightning.force.com/
It must be the URL of our organization subdomain in Salesforce.
-
-
Apply the changes.
Add the Authentication Provider to the Salesforce Login Page
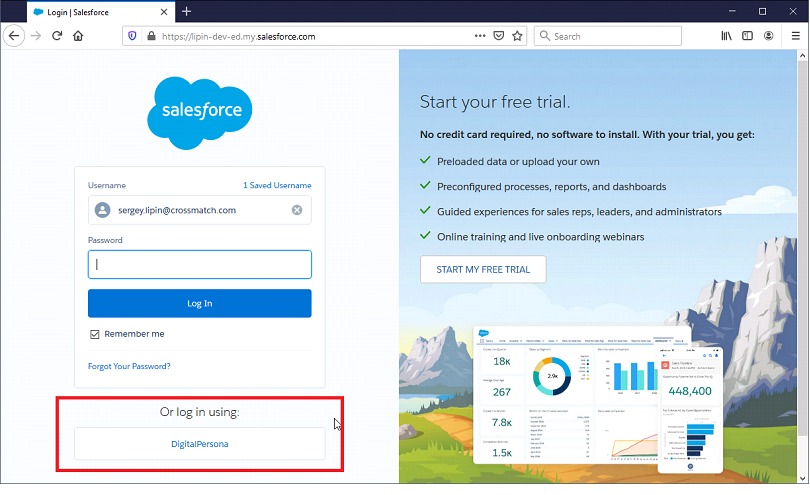
If your Salesforce organization is using a custom subdomain, you can add a button that invokes the DigitalPersona authentication provider from the login page for your organization.
-
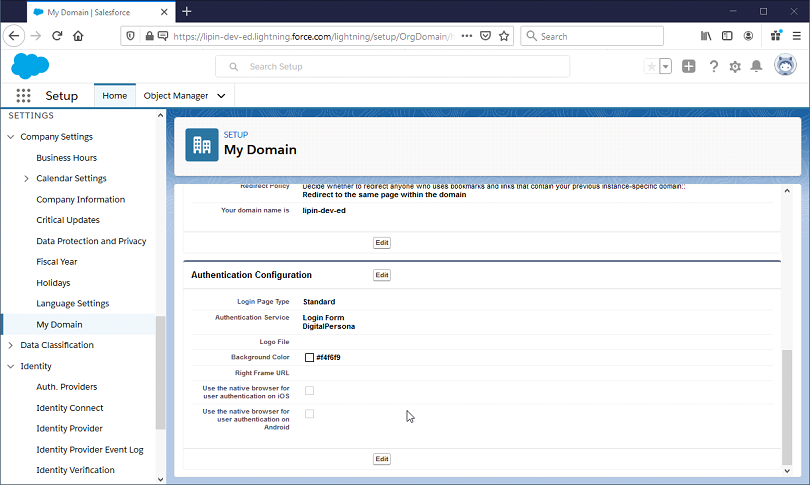
In Salesforce, go to Setup, Settings, Company Settings and My Domain.
-
Click Edit in the Authentication Configuration section.
-
Mark your OpenID Connect provider check box as Authentication Service, then click Save.
The DigitalPersona login option then will be added to your organization login page.
<add
      name="salesforce"
      url="https://XXXXXXXXXXXX.my.salesforce.com/services/auth/sso/DigitalPersona"
      description="Salesforce" />


