Managing Your Password Manager Data
The DigitalPersona Password Manager allowing you to log on to Microsoft Windows, websites, and applications easily and more securely.
You can use it to create stronger passwords that you don't have to write down or remember, and then log on easily and quickly with DigitalPersona enrolled credentials such as a fingerprint, PKI Smart Cards, Contactless Cards, or your Windows password. Additional auxiliary credentials can also be used in composite authentication.
It is an optional feature of the DigitalPersona Workstation and Kiosk clients.
 The Password Manager allows you to:
-
Add, edit or delete logon account data for Managed logons provided by your administrator.
In most cases, the first time a Managed logon is used, you will be asked for your personal account logon data for a resource. Whether account data is requested, and what type of data is required is determined by your administrator.
If account data is required, it is only entered once. On subsequent use of the logon, account data will be filled in automatically.
This feature may optionally be disabled by the administrator.
-
Add, edit, or delete your own Personal logons and logon account data.
Account data is entered during the creation of the logon, and filled in automatically during subsequent use of the logon.
-
Use Personal or Managed logons to launch your default browser and log on to any website or program.
-
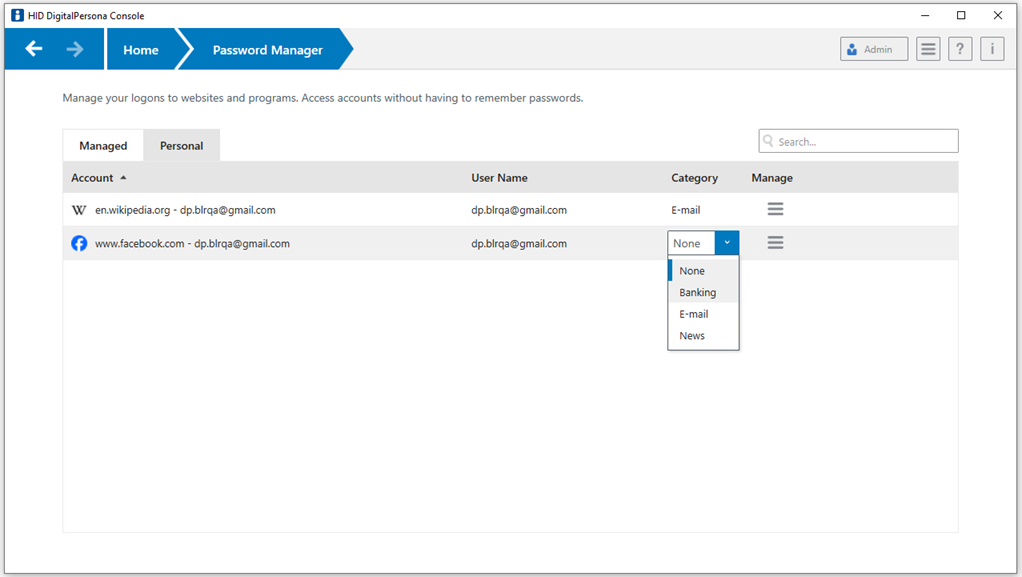
Organize your logons into categories.
The use of Password Manager logons does not require a live connection to the DigitalPersona Server. However, logons cannot be created or modified unless your DigitalPersona client can connect to the DigitalPersona Server.
The following sections primarily address the use of Personal logons, although much of the information also applies to the use of Managed logons.
Using the Logons Menu
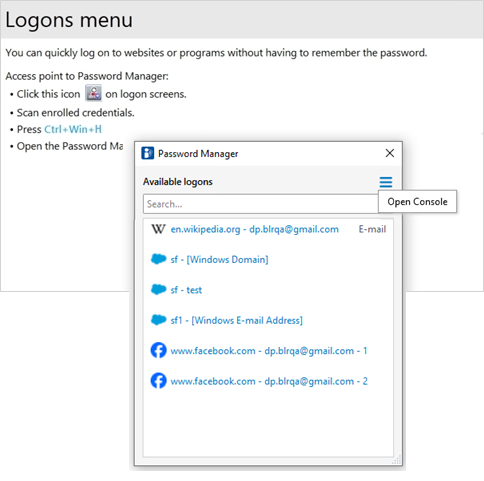
Password Manager provides a fast, easy way to launch the websites and programs for which you have created Personal logons.
-
Double-click a program or website logon from the Logons Menu to open the logon screen and automatically fill in your logon data.
-
Managed logons may also be created by your administrator, and may display on the Logons menu.
-
When you create a logon, it is automatically added to your Password Manager Logons Menu.
-
To display the Logons Menu, do one of the following:
-
Press the Password Manager hot key combination (by default, Ctrl+Win+H)
You can change the Hot Key combination from the Quick Actions page, accessed by clicking the Quick Actions tile in the DigitalPersona Console.
-
Scan your fingerprint (on computers with a built-in or connected fingerprint reader).
Logging On with a Managed Logon
After your administrator has created and deployed Managed logons, you will be able to launch a logon screen and verify your identity with the specified credentials.
Logon screens that have a logon created for them display the Password Manager icon on the screen.
|
|
Password Manager Icon for Internet Explorer web Browser and Windows applications |
|
|
Password Manager Icon for Chrome, Firefox and Edge
|

Depending on the attributes defined by the logon administrator, the logon process may vary:
-
You can be automatically logged on, with all fields populated and submitted, simply by verifying your identity.
-
You may need to supply information for required fields the first time you use the logon, but be automatically logged on subsequently.
-
If you have multiple sets of account data, you will be prompted to select the account you wish to log on to in the Choose Logon Account dialog box.
Managing Your Logons
Password Manager makes it easy to manage your logon information for user names, passwords, and multiple logon accounts, from one central location.
Your logons are listed on the Password Manager page in the DigitalPersona User Console. Each logon includes an entry for the website, program or other resource, and an indented entry for each set of account data created for the resource.
Manage your logons from the Manage menu next to each logon:
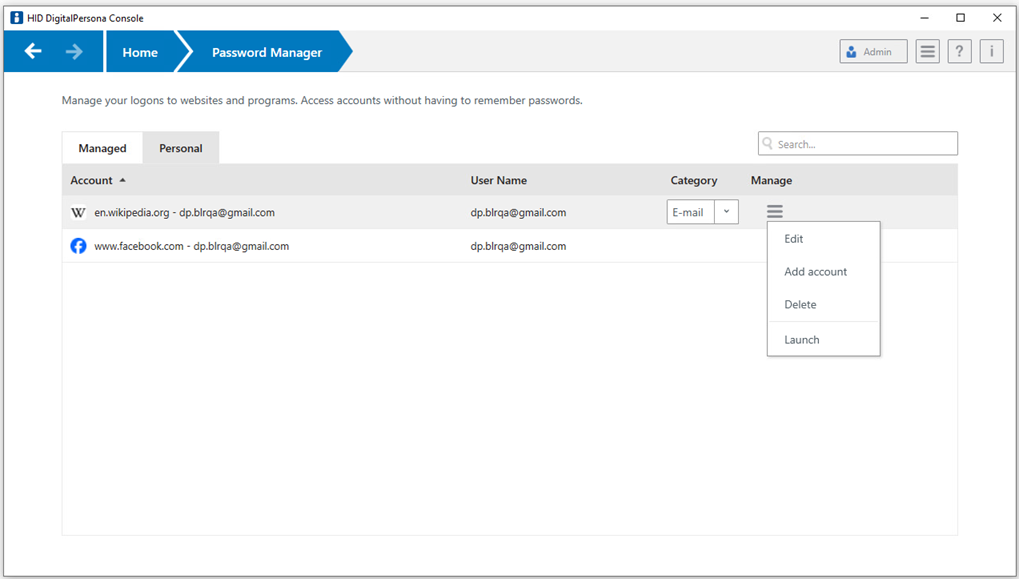
Edit a Logon
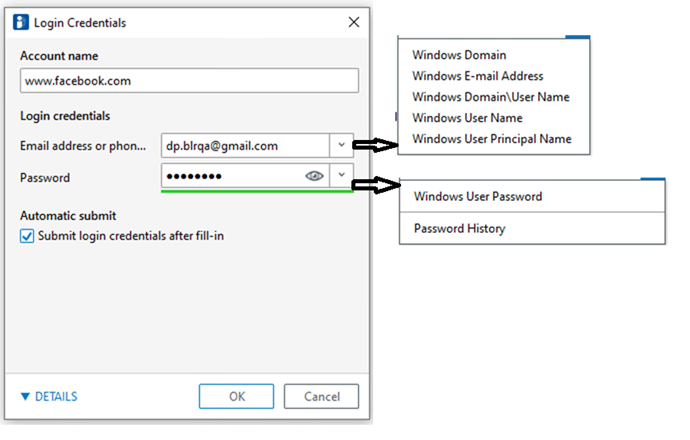
You edit your personal logons through the Login Credentials dialog.
Changing Passwords
After creating logons, managed password screens display the Change Password icon on the screen.
After verifying your identity, you are prompted to provide an old password, a new password and to confirm the new password.
Depending on the logon attributes, the change password process may vary.
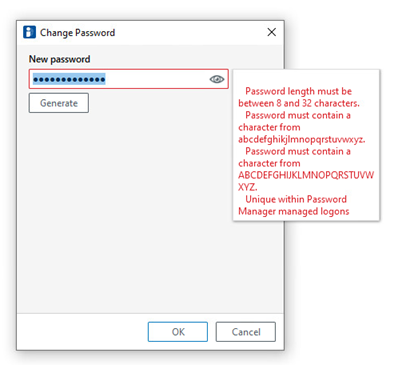
You can choose a new password with or without constraints on the password content depending on the configuration set by your administrator:
-
If an administrator has configured password policies or rules for new passwords, you must type a new password that conforms to those policies or rules. Otherwise, an error message will pop up with a description of the applicable password policy requirements.
-
If an administrator has configured automatic generation of a new password, you will not be able to specify a new password manually, but rather will need to generate a new random password by clicking on Generate.
Once the new password is generated automatically for a logon screen, you must log on with alternate credentials to this website or application.
Topics in this section:


