Integrating with Microsoft Exchange
The following sections describe how to integrate and configure the DigitalPersona Identity Provider (IdP) with an on-premise instance of Microsoft® Exchange®, and connection to an on-premise DigitalPersona Server.
DigitalPersona Server - A DigitalPersona LDS Server must be installed and licensed
DigitalPersona LDS Web Management Components and Secure Token Service (STS)
Microsoft Exchange Server 2016 or 2019
Microsoft AD FS
DigitalPersona STS and AD FS must be connected
Configure Microsoft Exchange
-
Export the signing certificate:
-
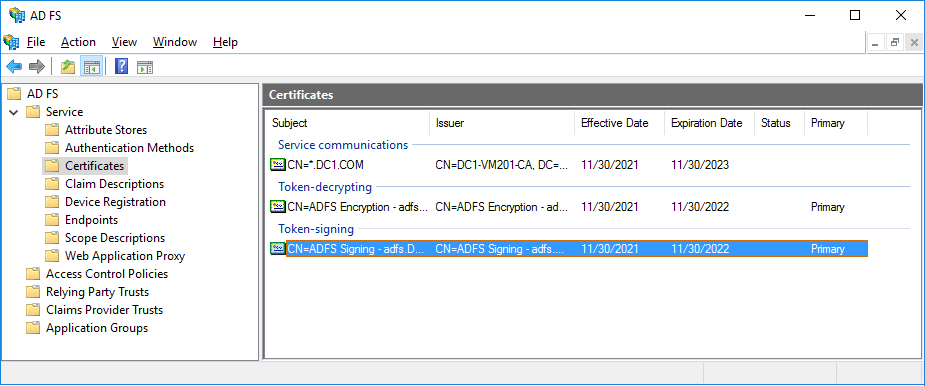
Open the AD FS management console and navigate to AD FS, Service and Certificates.
-
Find and select the CN=ADFS Signing certificate.
-
In the context menu, select View Certificate.
-
Open the Details tab and click Copy to file.
-
Copy the ADFS signing certificate to the Exchange server and import it to Local Computer \ Trusted Root certification authorities.
-
-
Open the Exchange Management Shell and perform the following tasks:
-
Configure the Exchange organization to use AD FS authentication:
CopySyntax
Set-OrganizationConfig -Adfslssuer https://<FederationServiceName>/adfs/ls/ -AdfsAudienceUris "<OwaUrl>","<EacUrl>" -AdfsSignCertificateThumbprint "<ADFS-Signing- Cert-Thumbprint>"CopyExample
Set-OrganizationConfig -Adfslssuer https://adfs.contoso.com/adfs/ls/ -AdfsAudienceUris "https://mail.contoso.com/owa/","https://mail.contoso.com/ecp/" -AdfsSignCertificateThumbprint "88970C64278A15D642934DC2961D9CCA5E28DA6B" -
Configure virtual directories for EAC and Outlook on the web for each Exchange Server in your organization:
CopySyntax
Set-EcpVirtualDirectory -ldentity <VirtualDirectoryldentity> -AdfsAuthentication $true -BasicAuthentication $false -DigestAuthentication $false -FormsAuthentication $false -OAuthAuthentication $false -WindowsAuthentication $false
Set-OwaVirtualDirectory -ldentity <VirtualDirectoryldentity> -AdfsAuthentication $true -BasicAuthentication $false -DigestAuthentication $false -FormsAuthentication $false -OAuthAuthentication $false -WindowsAuthentication $falseCopyExample
Get-EcpVirtualDirectory I Set-EcpVirtualDirectory -AdfsAuthentication $true - BasicAuthentication $false -DigestAuthentication $false -FormsAuthentication $false -OAuthAuthentication $false -WindowsAuthentication $false
Get-OwaVirtualDirectory I Set-OwaVirtualDirectory -AdfsAuthentication $true - BasicAuthentication $false -DigestAuthentication $false -FormsAuthentication $false -OAuthAuthentication $false -WindowsAuthentication $false
-
-
Restart IIS.
Configuring AD FS
Create Relying Party Trusts for OWA and EAC
-
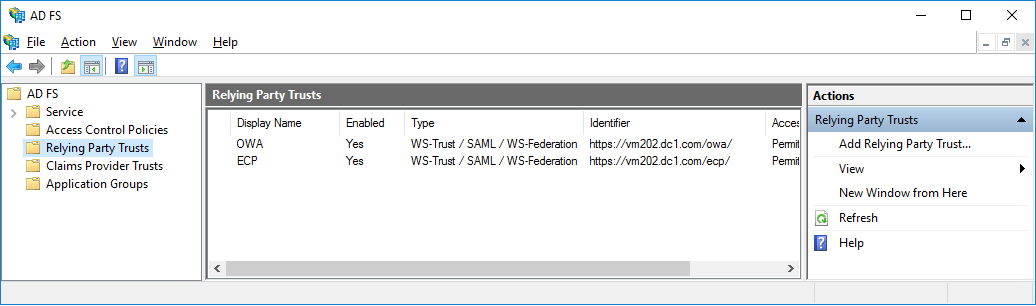
Open the AD FS management console and navigate to AD FS and Relying Party Trusts.
-
In the Actions panel, select Add Relying Party Trust.
-
Select Claims aware and then enter data about relying party manually.
-
Enter the following data for OWA:
-
Display name: OWA
-
Enable support for the WS-Federation Passive protocol: check
-
Relying party WS-Federation Passive protocol URL: https://mail.contoso.com/owa/
-
Relying party trust identifiers: https://mail.contoso.com/owa/
-
-
Enter the following data for EAC:
-
Display name: ECP
-
Enable support for the WS-Federation Passive protocol: check
-
Relying party WS-Federation Passive protocol URL: https://mail.contoso.com/ecp/
-
Relying party trust identifiers: https://mail.contoso.com/ecp/
-
Create Claim Issuance Rules
-
Select a Relying party Trust.
-
Click Edit Claim Issuance Policy, then click Add Rule.
-
Select Send Claims Using a Custom Rule and click Next.
-
Enter data defining the custom rule as follows:
-
SID:
Copyc:[Type == "http://schemas.microsoft.com/ws/2008/06/identity/claims/windowsaccountname"]
=> issue(store = "Active Directory", types = ("http://schemas.microsoft.com/ws/2008/06/identity/claims/primarysid"), query = ";objectSlD;{0}", param = c.Value);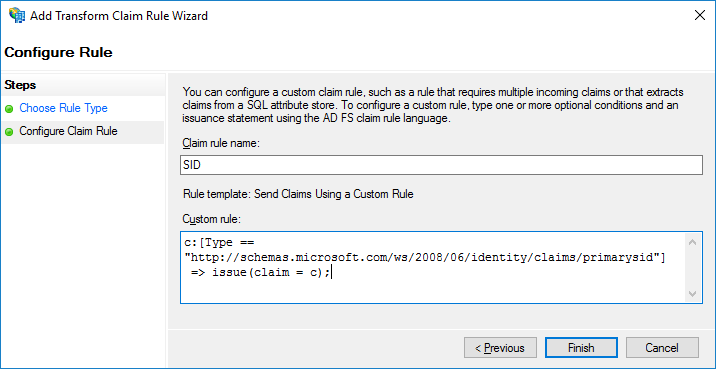
-
UPN:
Copyc:[Type == "http://schemas.microsoft.com/ws/2008/06/identity/claims/windowsaccountname"]
=> issue(store = "Active Directory", types = ("http://schemas.xmlsoap.org/ws/2005/05/identity/claims/upn"), query = ";userPrincipalName;{0}", param = c.Value);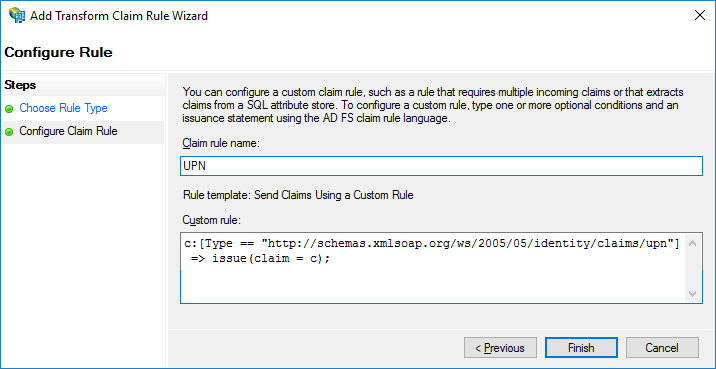
-
-
(Optional) Set up DigitalPersona STS as the default claim provider for OWA and EAC by executing the following PS commands:
CopySet-AdfsRelyingPartyTrust -TargetName "OWA" -ClaimsProviderName @("DigitalPersona STS") Set-AdfsRelyingPartyTrust -TargetName "ECP" -ClaimsProviderName @("DigitalPersona STS") -
Click Finish.
Testing
Navigate to the OWA and EAC websites. When attempting to log in a user, you should be redirected to DigitalPersona STS for authentication and then back to the requested website:
-
https://mail.contoso.com/owa/
-
https://mail.contoso.com/ecp/


