Getting Started
Prerequisites
- A Temenos Kony Account
- Kony Visualizer V9 SP1 (or later)
- Kony Fabric V9.1 (or later)
- An HID Authentication Service tenant with Organization Administrator permission.
HID Cloud Services Configuration
| Variable | Type | Description |
|---|---|---|
| ATR_CIBACB | Attribute | Attribute containing the CIBA Callback URL (<URL>/httplistener/cb/register) |
| AT_SYSLOG | Authentication Policy | Password authentication policy for system users and client IDs |
| AT_PASA | Authentication Policy | Authentication policy for push authentication only (allowed credentials - CT_PASAV4) |
|
AT_OOBSMS |
Authentication Policy |
Authentication policy for the OOB OTP via SMS authenticator |
|
AT_OOBEML |
Authentication Policy |
Authentication policy for the OOB OTP via Email authenticator |
|
AT_EMPOTP |
Authentication Policy |
Authentication policy for the HID Approve OTP (Secure Code) authenticator |
|
AT_OTP |
Authentication Policy |
Authentication policy for the Hardware Token OTP authenticator |
| CH_CSTPORT | Channel | Authentication channel |
| CH_DIRECT | Channel | Channel to be used with the APIs (SDK, OpenID, SCIM) |
| CH_PASA | Channel | Channel for push authentication |
| DT_TDSV4 | Device Type | Device type corresponding to a container on a mobile app. A device of this type can hold the function's authenticator credentials. |
| UG_ROOT | User Group | Root user group for customers |
Further reading:
HID Authentication Service Concepts
Authentication workflow with HID Approve
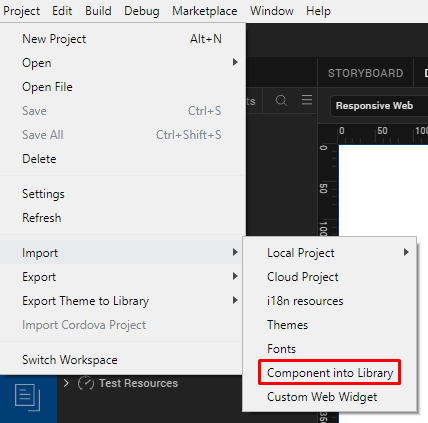
Import the Component
- Log on to Kony Visualizer and, from the left pane, select Marketplace.
- Search for HID Global and then select HID Global MFA Integration.
- In the component detail page, select Import To Collection Library.


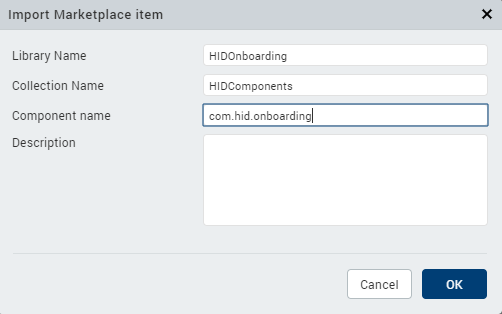
- Enter the following information:
- Library Name - A Library contains component collections and skins and the Name specifies the library into which you want to import the component. If the library does not exist, Visualizer creates a new one.
For example, the Library could be called HIDOnboarding. - Collection Name - A Collection contains multiple components and the Name specifies the collection into which you want to import the component. If the collection does not exist in the specified library, Visualizer creates a new collection.
For example, the Collection could be called HIDComponents. - Component Name - This name specifies the name you want to use for the component in Visualizer.
By default, the component name is com.hid.onboarding. - Description - Optional
- Library Name - A Library contains component collections and skins and the Name specifies the library into which you want to import the component. If the library does not exist, Visualizer creates a new one.
- Click OK.
- After importing the component, you can drag and drop it from the Collection Library onto your form.
- After adding the component to the form, verify that the fabric application is set up and the component is added in Templates > Components.
After Visualizer downloads the component, you are prompted to enter the metadata for the component.
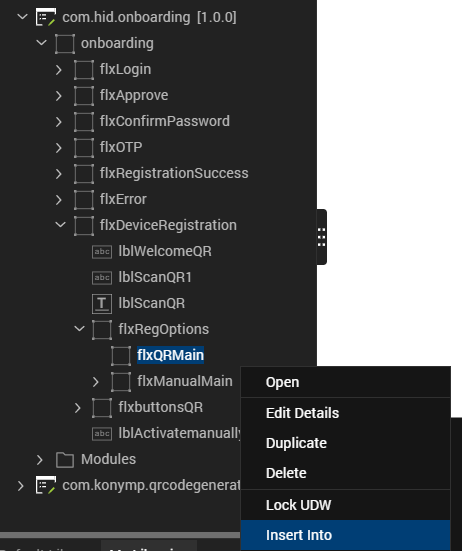
- Go to Templates > Components > com.hid.onboarding component.
- Navigate to onboarding > flxDeviceRegistration > flxRegOptions and select flxQRMain.
- Right-click on com.konymp.qrcodegenerator and select Insert Into.
- Save the component.

Set Up the Component
After importing the component in to your Kony Fabric app, you need to provide your HID Authentication Service tenant details to the HID Onboarding component.
Configure the identity and integration endpoints to your respective HID Authentication Service Endpoint.
Identity Service
| Services | Token Endpoint value | Client ID value | Secret value |
|---|---|---|---|
| ClientIdentity | https://test.aaas.hidcloud.com/idp/testtenant/authn/token | openidclientid | <your secret> |
| CustomOrgIdentity |
Integration Service
| Services | Base URL value |
|---|---|
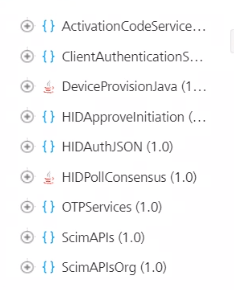
| ActivationCodeService | For example, https://test.aaas.hidcloud.com/idp/testtenant/authn/token |
| OTPServices | |
| ScimAPIs | |
| ScimAPIsOrg | |
|
ClientAuthenticationScim |
This is the Client SCIM Identity service link |
For example:
Add Functions to the Component
By default, the Onboarding and UserManagement components use the com.konymp.qrcodegenerator component to generate the QR code. You can replace it by any other widget/component to generate the QR code.
The key functions are:
Running your Application
You can now build your app and run it on your device.
For further information, refer to the Kony Visualizer User Guide.
Contact Technical Support
For technical support or further information, contact HID Global.


