Deep Dive into Mobile and Web Banking Workflows for Enrollment and Payment Processes
HID Temenos Infinity Component provides comprehensive insights into the workflows of both mobile and web banking platforms, which effectively guide users through the enrollment and payment processes. These workflows guarantee that users gain the necessary knowledge and understanding of these procedures.
Web Journey: Digital Banking Enrollment
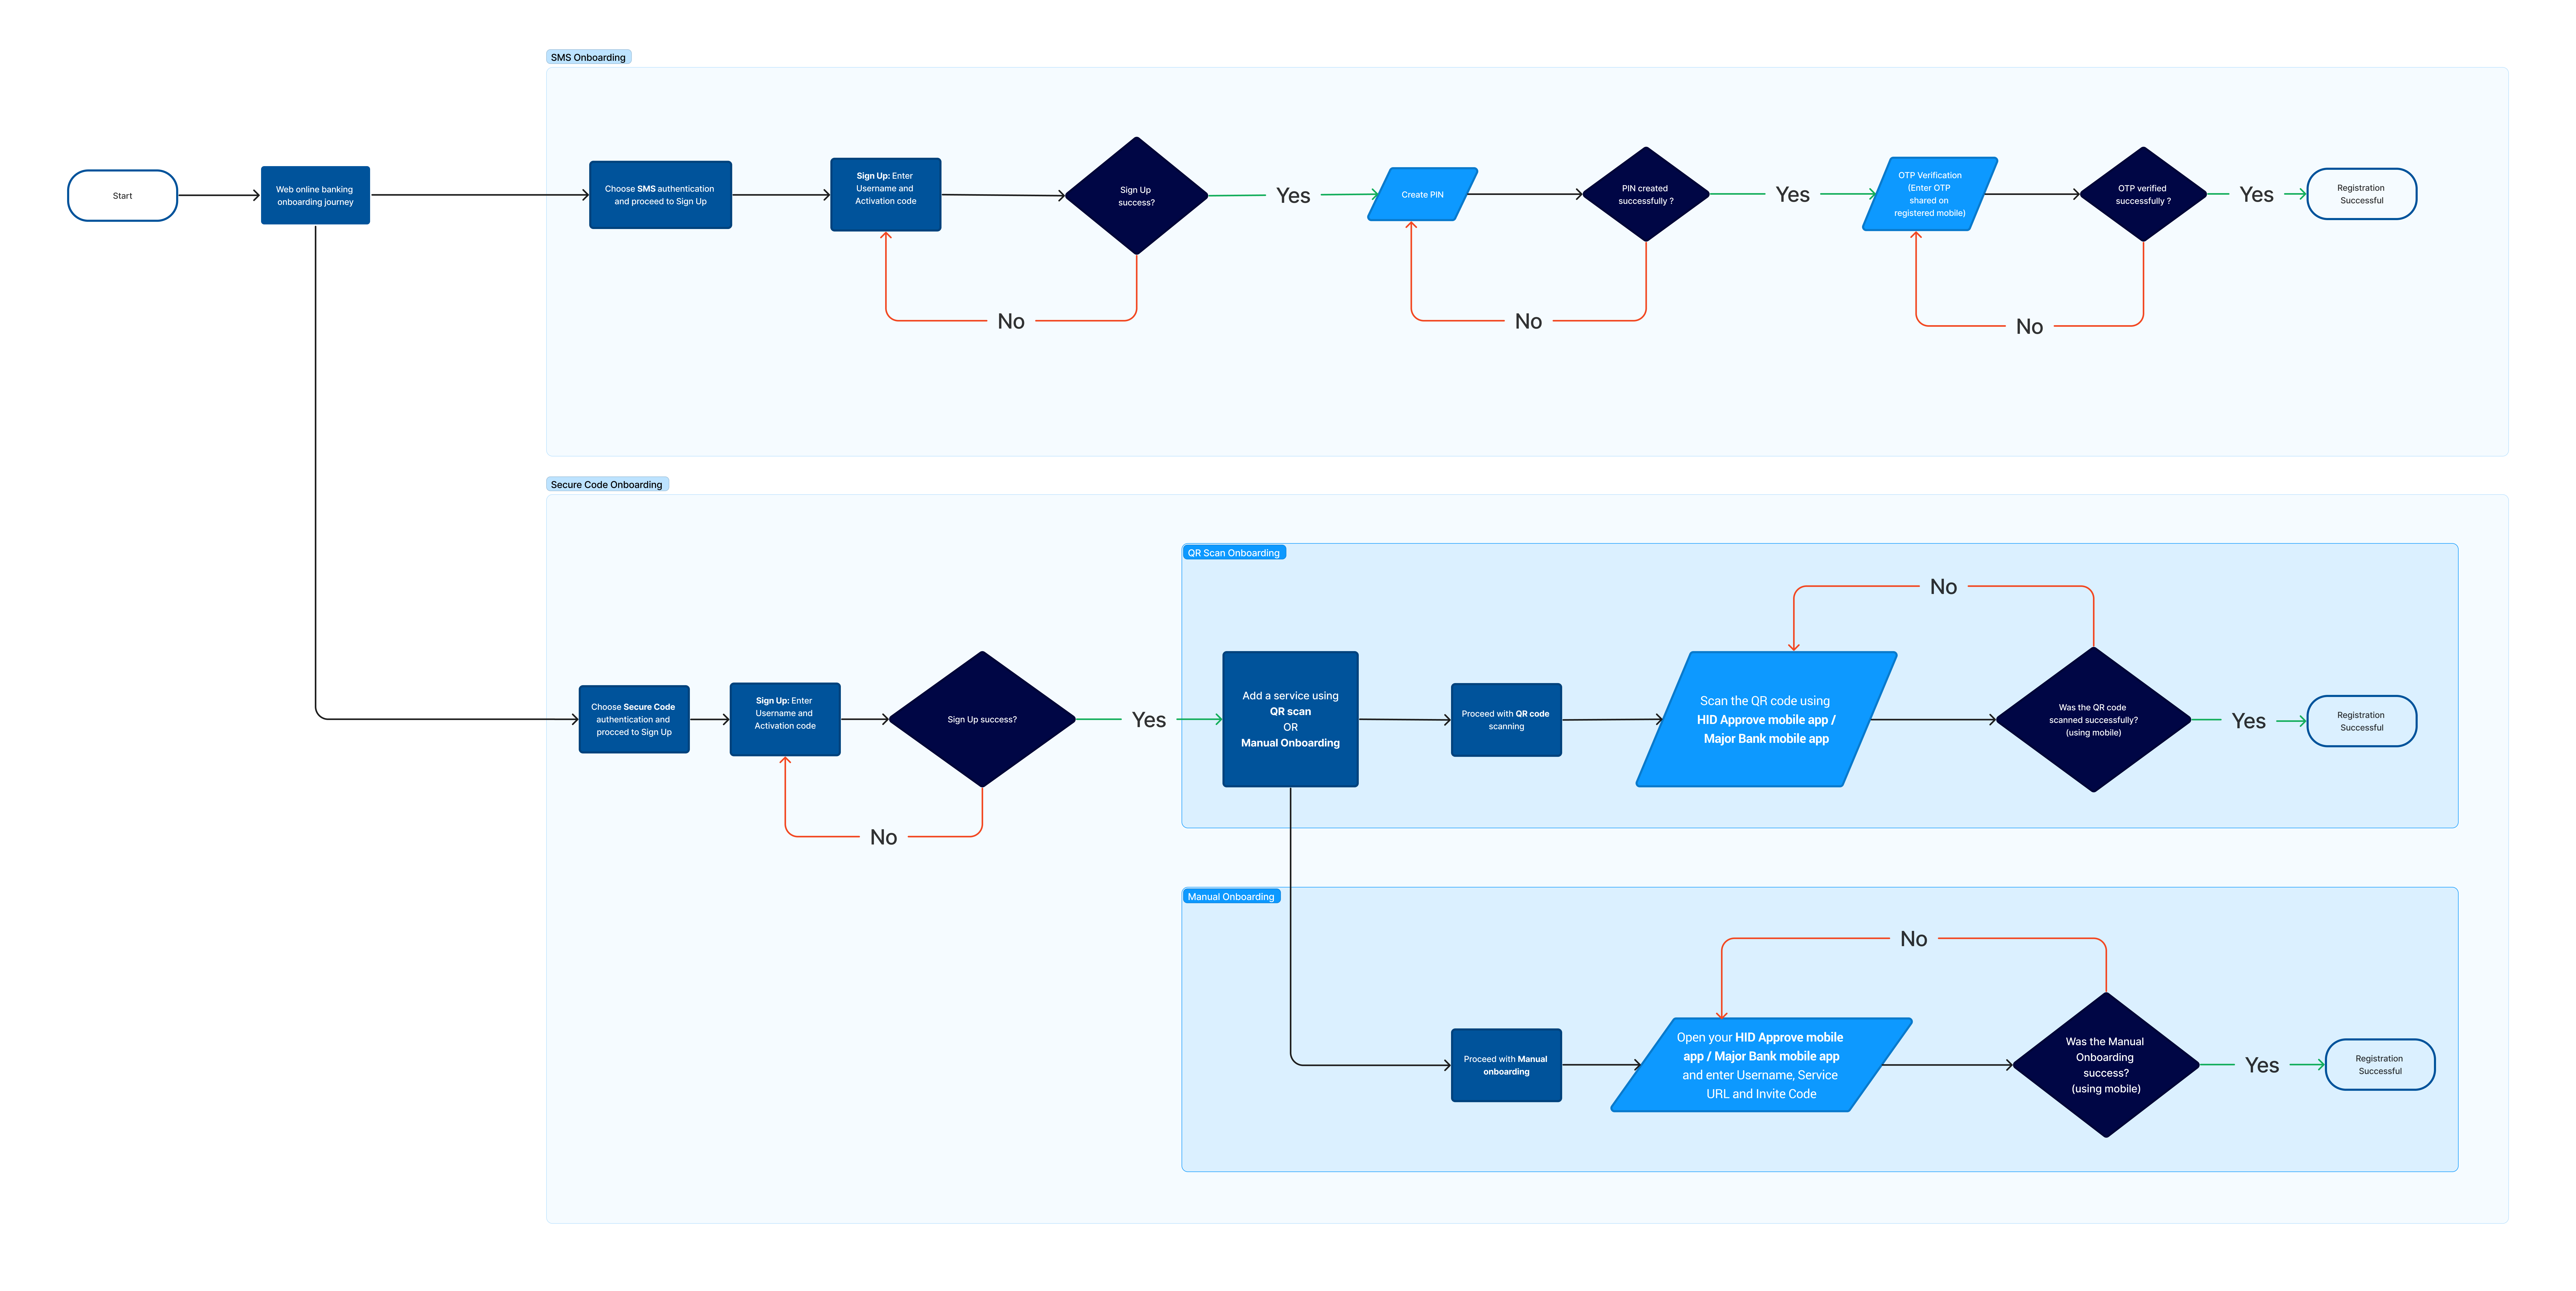
The web digital banking enrollment journey provides users with two enrollment methods: SMS OTP and Secure Code with HID Approve.

-
SMS Enrollment Process Flow:
In this method, users can choose SMS authentication to begin the enrollment process. They are required to enter their username and activation code. If the sign-up is successful, users can create a PIN for added security. Upon successful PIN creation, they proceed to OTP verification. Once the OTP is verified, users receive a message confirming their successful registration.
-
Secure Code Enrollment with HID Approve Process Flow:
In this method, users can choose Secure Code authentication to begin the enrollment process. Similar to SMS enrollment, they enter their username and activation code, but the difference lies in a better user experience and a more secure journey.
If the enrollment process is successful, users are provided with two options:
-
QR Code Scanning Enrollment:
If users choose to add the service using QR scan, they can utilize the HID Approve mobile app to scan the QR code. Upon successful QR code scanning, they receive a message confirming their registration.
-
Manual Enrollment:
If users choose to add the service using the manual method, they can utilize the HID Approve mobile app to enter their Username, Service URL, and Invite Code. Upon successful manual enrollment, they receive a message confirming their registration.
-
Mobile Journey: Digital Banking Enrollment
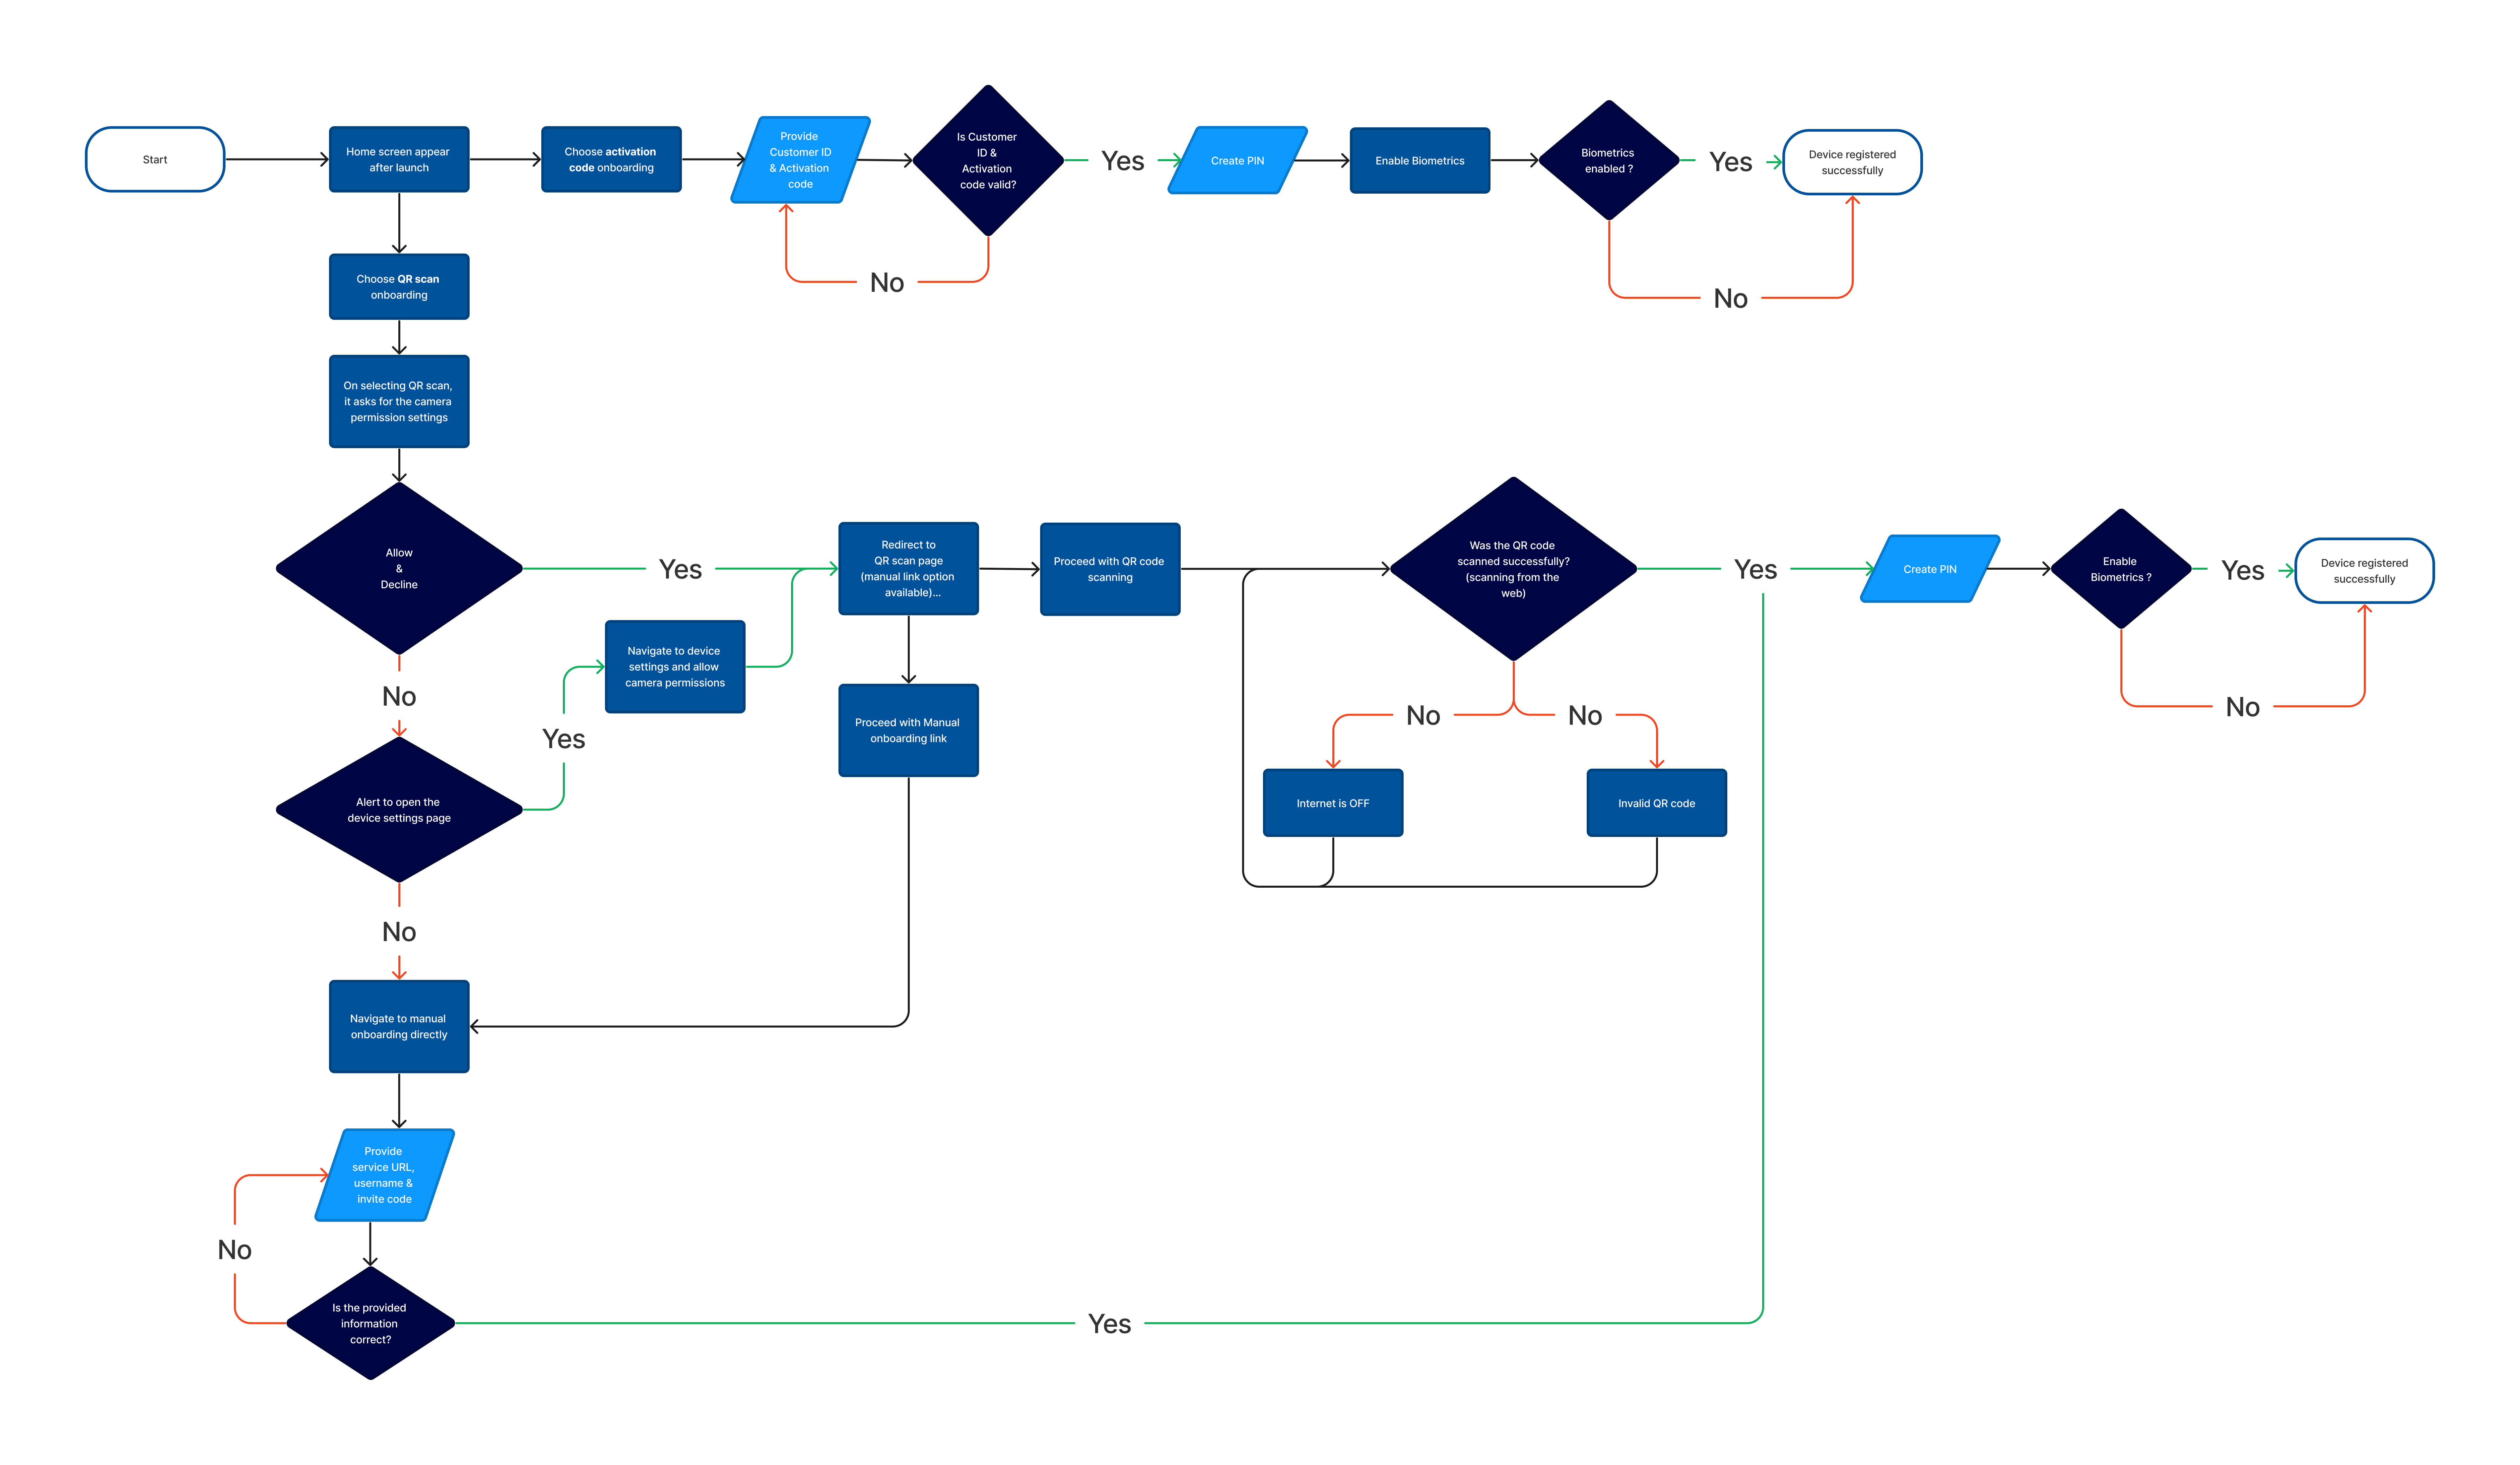
The mobile digital banking enrollment journey provides users with two enrollment methods: Activation Code and QR Scan.

-
Activation Code Onboarding Process Flow:.
-
Select the Activation Code option.
-
Provide the Customer ID and Activation Code. You must enter a valid Customer ID and Activation code to proceed.
-
If the Customer ID and Activation code are valid, the page will be prompted to create a PIN.
-
You can create a PIN and decide whether to enable biometrics.
Upon completing these steps, you will receive a message confirming your device registration.
-
-
Select the QR scan onboarding option. The app will prompt you to grant camera permission.
-
If you allow camera permission:
-
Proceeds to the QR scan page, where you have the option to manually enter a link if needed.
-
If the scan fails, it may be due to connectivity issues or an invalid code.
-
If the scan succeeds, you can create a PIN and decide whether to enable biometrics.
Upon completing these steps, you will receive a message confirming your device registration.
-
-
If you decline camera permission (Manual Onboarding):
-
The app will notify you to access the device settings page and enable camera permission.
-
If you grant camera permission in the device settings page, you will be redirected to the QR scan page, continuing the process as described in the If you allow camera permission section.
-
If camera permission is still not allowed in the device settings page, you will be redirected to the Manual enrollment page.
-
In the Manual enrollment page, enter your Username, Service URL, and Invite Code.
-
If the provided information is correct, you can create a PIN and choose whether to enable biometrics.
Upon completing these steps, you will receive a message confirming your device registration.
-
-
Web Journey: Digital Payment Flow
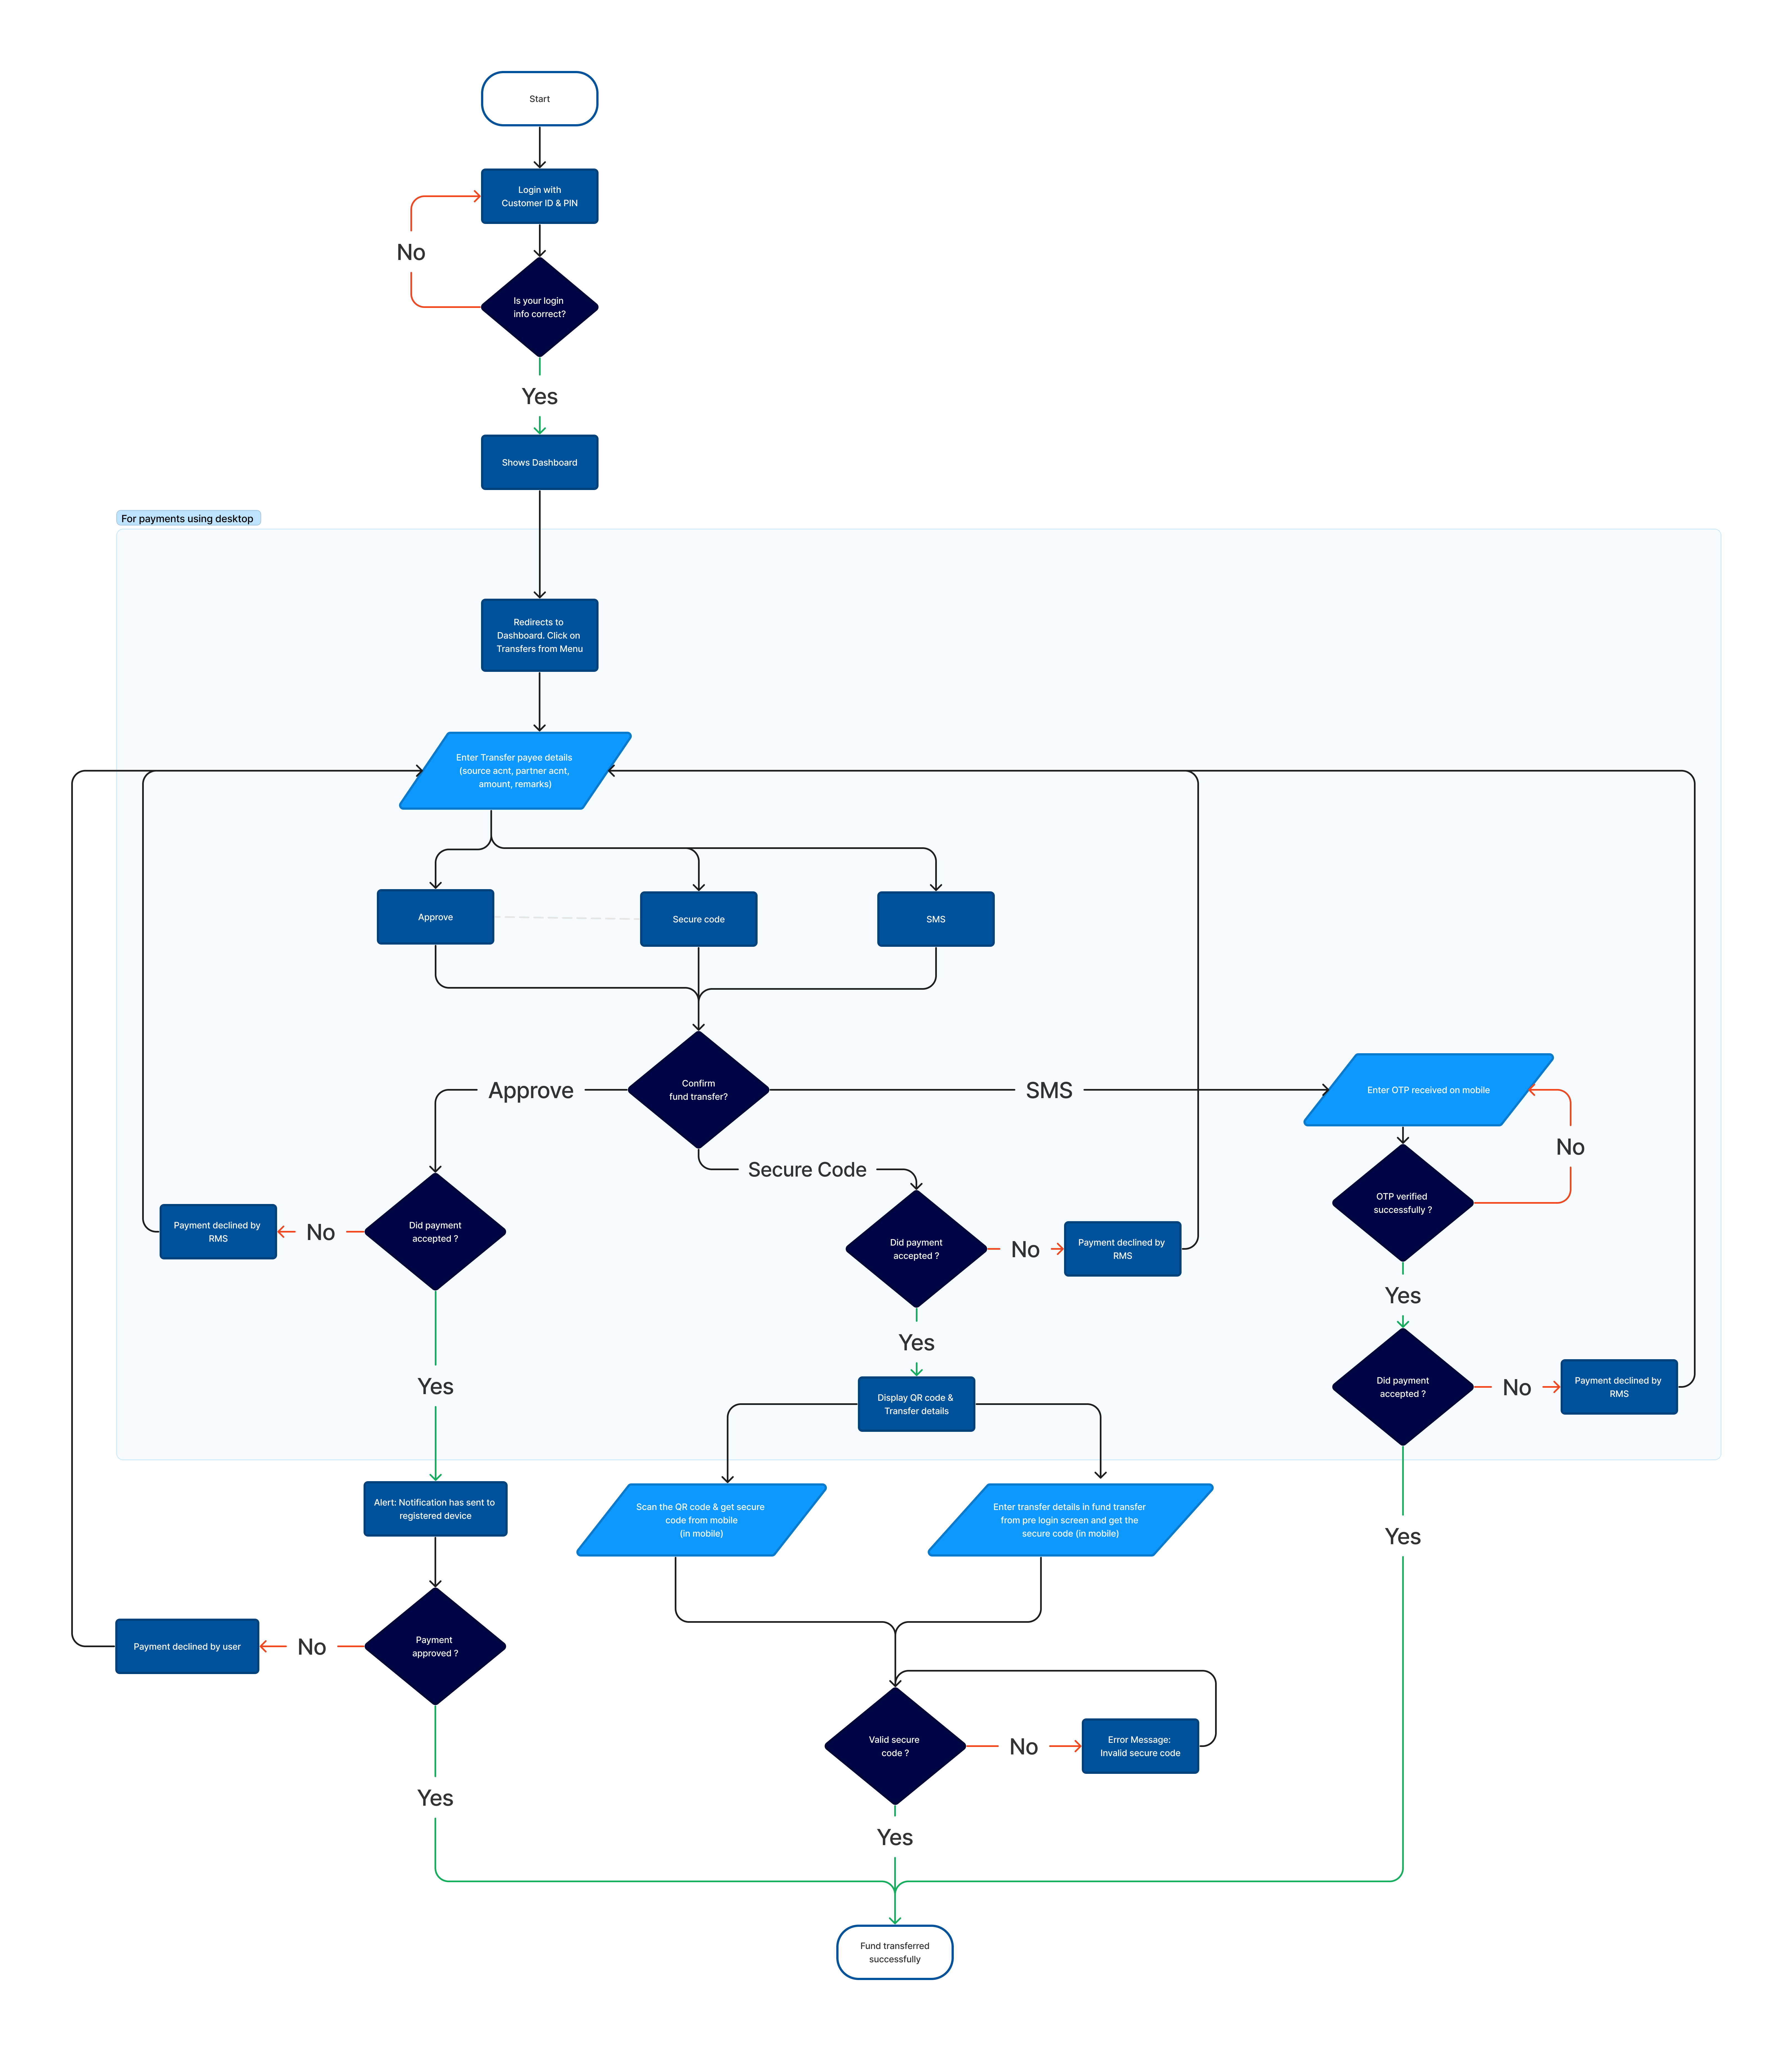
The Web Digital Payment Flow provides a step-by-step process for conducting transaction through various authentication methods.

-
Log in by providing your Customer ID and PIN.
-
Upon successful login, a dashboard will appear. Click on the Transfer option in the menu.
-
Fill in the transfer payee details, including the Source Account, Partner Account, Amount, and Remarks.
-
After entering the transfer payee details, the dashboard will display various authentication options:
-
To perform a fund transfer using the Approve method:
-
If the payment is accepted by RMS, a notification message will be sent to your registered device. Once you approve the payment, the fund transfer will be successfully completed.
-
If the RMS declines your payment, you will be redirected back to the page to enter the transfer payee details.
-
-
To perform a fund transfer using the Secure Code method:
If the RMS accepts the payment, two options will be displayed: scan a QR code or manually enter the transfer details.
-
Scan QR code:
-
If the QR code is successfully scanned, the fund transfer will be completed successfully.
-
-
Manually enter transfer details:
-
Enter the transfer details on the pre-login fund transfer screen and obtain the secure code. If the received secure code is valid, the fund transfer will be completed successfully.
-
-
-
To perform a fund transfer using the SMS OTP method:
-
Enter the OTP received on your mobile device.
-
If the OTP is verified successfully and the payment is also accepted by the RMS, the fund transfer will be completed successfully.
-
-
Mobile Journey: Digital Payment Flow
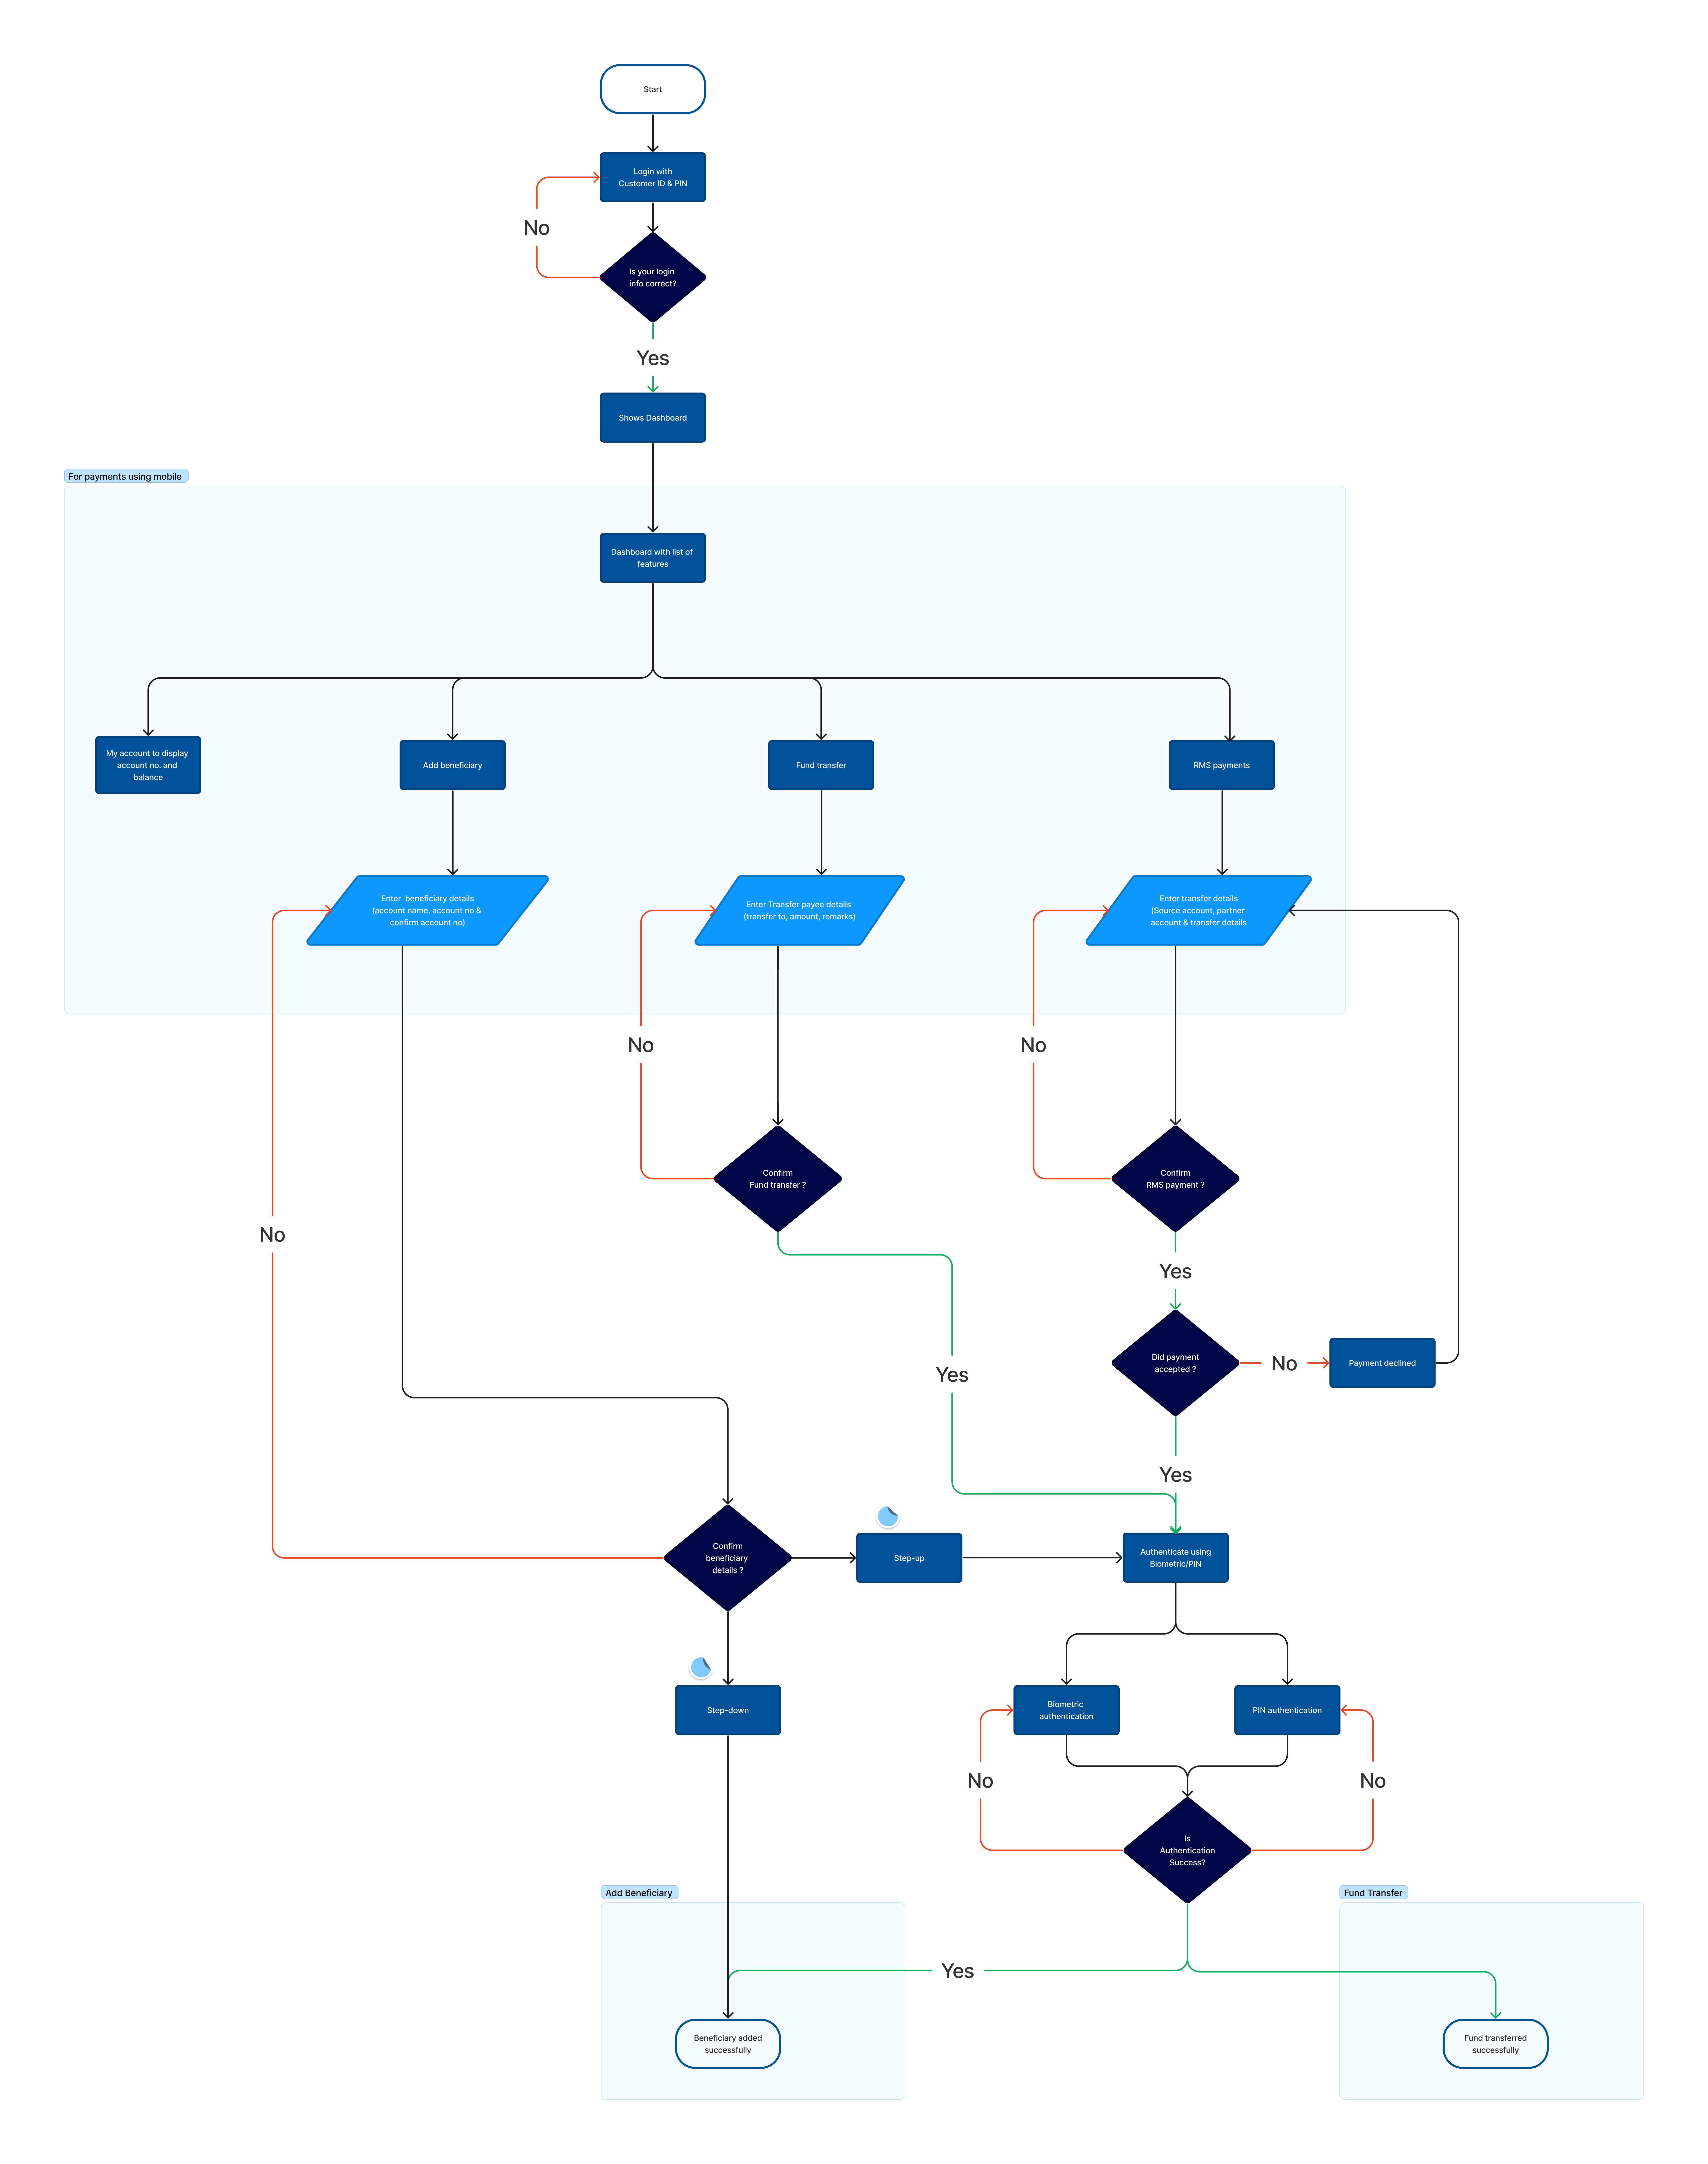
The Mobile Digital Payment Flow provides a step-by-step process for conducting various transactions using a mobile platform.

-
Log in using your Customer ID and PIN.
-
If your login information is correct, a dashboard will be displayed, showing a list of features and options.
-
Select My Account to view your account number and balance.
-
To add a beneficiary:
-
Provide their Account Name, Account Number, and confirm the Account Number.
-
Then, you will be prompted to confirm the beneficiary details using either the step-up or step-down process.
-
If you select the step-up option, you will be required to authenticate using either biometric verification or a PIN.
-
Authenticate yourself using either biometric verification or a PIN.
-
If the authentication is successful, the beneficiary details will be added successfully.
-
-
Choosing the step-down option allows you to add the beneficiary details successfully without the need for any additional authentication methods.
-
-
To perform fund transfers.
-
Provide the transfer payee details, including the Transfer To (recipient), Amount, and Remarks.
-
If you decide to proceed with the fund transfer, you will be required to authenticate using either biometric verification or a PIN.
-
Authenticate yourself using either biometric verification or a PIN.
-
If the authentication is successful, the fund transfer will be completed successfully.
-
-
To perform RMS Payments:
-
Enter the transfer payee details, including the Source Account, Partner Account, and Transfer Details.
-
Confirm the RMS payment and indicate whether the payment is accepted.
-
If the payment is accepted, you will need to authenticate yourself using either biometric verification or a PIN. If the authentication is successful, the RMS payment will be successfully processed.
-
If the payment is declined, you will be redirected to the RMS payment start page.
-
-


