Install Document Scan SDK for iOS
There are multiple steps to complete in order to install the Document Scan SDK.
Add the XCFramework
The Document Scan SDK is distributed as an XCFramework with support for iOS and any iOS Simulator. While document capture is not supported on a Simulator, this allows you to run and test the rest of your application without the need for a physical device.
-
Move the provided CFDocumentScanSDK.xcframework into your project directory or a subdirectory.
-
Add the framework to your application target:
-
Under Frameworks, Libraries, and Embedded Content, click the + icon

-
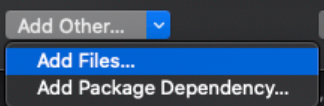
In the dialog, click Add Other > Add Files....
-
Navigate to where you saved CFDocumentScanSDK.xcframework. Select it, then click Open
-
-
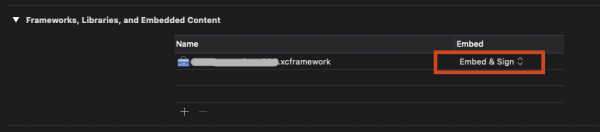
Ensure the framework is set to Embed & Sign.
Add License Key
The SDK will not run without a valid license key. This is provided by HID. You can assign this key in one of two ways:
-
Add the following to your Info.plist:
Copy<key>DocumentScanLicenseKey</key>
<string>YOUR_LICENSE_KEY</string> -
Add the following to DSCapture:
Copy// Swift
DSCapture.setLicense(key: "Provided SDK License Key")
// Objective-C
[DSCapture setLicenseKey:@"Provided SDK License Key"]
Configure Required Permissions
The end-user must grant permission to use the camera before beginning a document capture session. The SDK may also optionally collect user location data, which requires granted location permissions.
Camera Permission
Requesting permission to the device camera requires that you set a usage description in the Info.plist:
<key>NSCameraUsageDescription</key>
<string>The camera is needed to scan documents.</string>
The description is displayed to the user when your application first asks for access to the camera. If you support multiple languages, this description can be localized. For more information, see Apple’s official documentation on Information Property Lists.
You can then request camera permissions from the end-user via AVFoundation:
if AVCaptureDevice.authorizationStatus(for: .video) == .authorized {
// Already Authorized
}
else {
    AVCaptureDevice.requestAccess(for: .video) { granted in
        if granted == true {
            // User granted access. Let th e app continue.
        }
        else {
            // User denied access. Th e SDK may not continue.
        }
    }
}
Location Permission
Requesting access to the end-user’s geolocation requires you set one or two usage descriptions in your Info.plist, depending on which type of access is needed:
<key>NSLocationWhenInUseUsageDescription</key>
<string>Location data is used to increase document fidelity.</string>

<!--You must also add an NSLocationAlwaysAndWhenInUseUsageDescription if
˓→"always" permission is required-->
The description is displayed to the user when your application first requests for each level of permissions. If you support multiple languages, this description can be localized. For more information, see Apple’s offical documentation on Information Property Lists.
You can then request location permissions from the end-user via CoreLocation:
import UIKit
import CoreLocation

class ViewController: UIViewController, CLLocationManagerDelegate {

    let locationManager = CLLocationManager()

    override func viewDidLoad() {
        super.viewDidLoad()

        // Handle authorization changes
        locationManager.delegate = self

        // Get the current permission
        let status = CLLocationManager.authorizationStatus()

        handle(authorizationStatus: status)
    }

    private func handle(authorizationStatus: CLAuthorizationStatus) {
        switch authorizationStatus {
        case .notDetermined:
            // We have not yet requested permission
            locationManager.requestWhenInUseAuthorization()
            return
        case .authorizedAlways, .authorizedWhenInUse:
            // We already have permission and can proceed
            break
        default:
            // User has denied permission, or parental / MDM settings
            // disallow it. Th e SDK will still f unction.
        }
    }

    // MARK: - CLLocationManagerDelegate

    func locationManagerDidChangeAuthorization(
        _manager: CLLocationManager)
    {
        let status = CLLocationManager.authorizationStatus()
        handle(authorizationStatus: status)
    }
}


