Configuring PKI Authentication Policies
A Public Key Infrastructure (PKI) authentication policy is a template containing predefined parameters enforced during authentication to comply with internal security policies.
PKI authentication policies have several setting parameters that includes Policy Constraints and Authentication Validity.
To learn more about PKI authentication policies, see Authentication Policies in the HID Authentication Service.
Creating New PKI Authentication Policy
To create a new PKI authentication policy, follow the steps below:
-
Click Settings
 icon in the left navigation bar to open the Settings page.
 -
Click Authentication Polices on the Settings page, then you can see list of authentication policies.

-
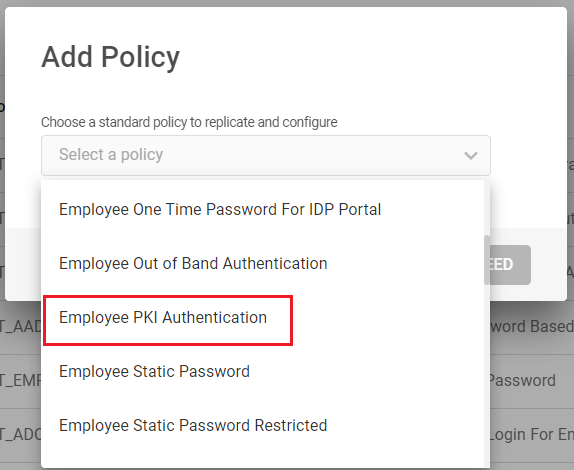
Click ADD POLICY, then Add Policy pop-up window appears.
-
From the drop-down menu, choose a standard PKI authentication policy to replicate for the newly created authentication policy, and then click PROCEED.
See Authentication Policies in the HID Authentication Service for more information.
-
Authentication Policy Details page opens.

Edit the main information for your PKI Authentication policy based on your requirement:
Policy name – should be unique for ease of administration.
Policy description - a description for your PKI authentication policy. Content is free-format
-
Then proceed to define Policy Constraints and Authentication Validity settings.
Define Policy Constraints Settings
This section describes the Policy Constraints tab parameters, which are related to number of challenges and its validity for this PKI authentication policy.

| Parameters | Description |
|---|---|
| Challenge timeout |
The timeout period (in seconds) for the PKI authenticator. By default, a transaction (Logon or Action) can be retrieved, then approved or denied on Push enabled device app up to 1 hour (3600 seconds) after the transaction operation has been initiated. After timeout, the transaction will no longer be retrieved by the app, or if it has already been retrieved, the approval/decline operation will fail. If you do not want expiration of the challenge timeout period, then disable the toggle switch. |
| Threshold for maximum number of challenges |
The maximum number of challenges that can be issued for validation without submission of a valid response from the Push enabled device. Once this threshold is crossed, the count must be reset before a challenge (push request) will be issued. If you do not want threshold, then disable the toggle switch. |
Define Authentication Validity Settings
This section describes the Authentication Validity tab parameters, which are related to the validity of the authentication records created for this PKI authentication policy.

| Parameters | Description |
|---|---|
| Valid days after creation |
The expiration period of an authentication record, as a number of days, starting from the date of creation of the authentication record. To apply the new expiration period to the new authentication records, edit this field. |
| Valid days after update |
The expiration period of an authentication record when the authenticator is changed, starting from the date the authenticator is changed. |
| Session invalidity timeout (sec) |
Time (in seconds) after which an idle session is automatically terminated. The value should be lower than that set for the global Session Timeout parameter. |
| Session timeout (sec) |
The maximum period (in seconds) that a user authenticated via this authentication policy can sustain their session before being prompted to re-authenticate by logging on again. |
| Disable authenticator after failed attempts |
The maximum number of successive failed attempts by a user to log on using an incorrect authenticator before the authenticator is disabled. |
| Authenticator expiration |
If enabled, then you can define the maximum number of times a user can authenticate successfully using an authenticator before it expires. It corresponds to the maximum number of successful authentications allowed. |
Click SAVE to save the settings. After saving, the newly created PKI authentication policy is added into the authentication policies list.
Viewing PKI Authentication Policy
You can view a PKI authentication policy by following the below steps:
-
Click Settings
in the left navigation bar to open the Settings page. -
Click Authentication Polices on the Settings page, then you can see list of Authentication policies.
All existing authentication policies are listed in a paged table. The total number of authentication policies is given in the lower left corner.
-
From the list of authentication policies, choose and click on the row of a PKI authentication policy you want to view.
(or) you can also click on "View Authentication Policy" shown in the action menu (
 ) of a PKI authentication policy.
-
Authentication Policy Details page opens and details are as shown below.

Fields Description Policy name The name of the PKI authentication policy.
Policy description The description for the PKI authentication policy. Policy ID An identifier or code for the PKI authentication policy.
-
You can also view other settings of your PKI authentication policy by clicking on Policy Constraints, and Authentication Validity.
-
Click RETURN to return to the list of authentication policies page.
Note:If required,
-
Click EDIT to edit a PKI authentication policy. Refer to Editing PKI Authentication Policy
-
Click DELETE to delete a PKI authentication policy. Refer to Deleting PKI Authentication Policy.
-
Editing PKI Authentication Policy
When required, you can edit a PKI authentication policy by following the below steps:
-
Click Settings
in the left navigation bar to open the Settings page. -
Click Authentication Polices on the Settings page, then you can see list of authentication policies.
-
From the list of authentication policies, choose a PKI authentication policy you want to edit.
Click on "Edit Authentication Policy" shown in the action menu (
) or click EDIT on the view page of that policy.
-
Authentication Policy Details page opens, do the required changes for policy name, policy description and parameters of Policy Constraints and Authentication Validity tabs.

-
Click SAVE to update the changes.
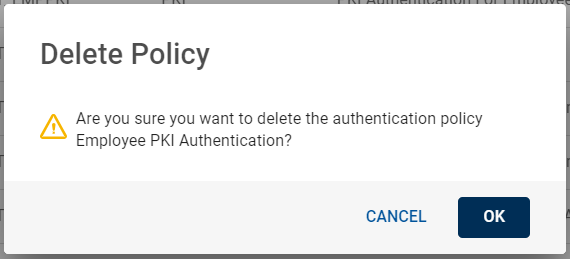
Deleting PKI Authentication Policy
To delete a PKI authentication policy, follow the below steps:
-
Click Settings
in the left navigation bar to open the Settings page. -
Click Authentication Polices on the Settings page, then you can see list of Authentication policies.
-
From the list of authentication policies, choose a PKI authentication policy you want to delete.
Click on "Delete Authentication Policy" shown in the action menu (
) or click DELETE on the view page of that policy.
-
A Delete Policy confirmation dialog box appears, click OK to confirm the deletion.