Configuring One Time Password (OTP) Device Types
This section describes the configuration of your OTP device type using HID Authentication Service-Administration portal.
A OTP device type is a template containing predefined parameters enforced during authentication. This settings allows you to configure a OTP device type using default OTP device types.
The OTP device type configuration includes Import, Soft PIN, and Advanced settings.
| Code | Name |
|---|---|
| DT_DSPCD | ActivID Display Card OE |
| DT_AD_OT | ActivID Display Card OT |
| DT_SMTCARD | ActivID Java Cards |
| DT_JCARD | Java Card OTP (No PIN Unlock) |
| DT_AD_AT | ActivKey Display AI AT |
| DT_BTT_OE | Blue Trust Token (OE) |
| DT_BTT_OT | Blue Trust Token (OT) |
| DT_NANO_OA | Crescendo Key OA |
| DT_NANO_OE | Crescendo Key OE |
| DT_NANO_OT | Crescendo Key OT |
| DT_DESKTOP | Desktop Token |
| DT_DKTO_OA | Desktop Token OA |
| DT_DKTO_OE | Desktop Token OE |
| DT_DKTO_OT | Desktop Token OT |
| DT_FXT_AI | Flexi Token AI |
| DT_FXT_OA | Flexi Token OA |
| DT_FXT_OE | Flexi Token OE |
| DT_FXT_OT | Flexi Token OT |
| DT_KEY_AT | Keychain V2 AT |
| DT_KEY_OA | Keychain V2 OA |
| DT_KEY_OE | Keychain V2 OE |
| DT_KEY_OT | Keychain V2 OT |
| DT_MIN_AE | Mini Token (AE) - NO PIN |
| DT_MIN_AEP | Mini Token (AE) + PIN |
| DT_MIN_AT | Mini Token (AT) - NO PIN |
| DT_MIN_ATP | Mini Token (AT) + PIN |
| DT_MIN_OE | Mini Token (OE) - NO PIN |
| DT_MIN_OEP | Mini Token (OE) + PIN |
| DT_MIN_OT | Mini Token (OT) - NO PIN |
| DT_MIN_OTP | Mini Token (OT) + PIN |
| DT_POCK_AT | Pocket Token AT |
| DT_POCK_OA | Pocket Token OA |
| DT_POCK_OE | Pocket Token OE |
| DT_POCK_OT | Pocket Token OT |
| DT_TK1V2 | Token One V2 |
| DT_T2_OA | Token One V2 OA |
| DT_T2_OE | Token One V2 OE |
| DT_T2_OT | Token One V2 OT |
Creating a OTP Device Type
You can clone a default OTP device type in the following ways:
-
Click Settings
 in the left navigation bar to open the Settings page.
 -
Click Device Types on the Settings page, then you can see list of device types.

-
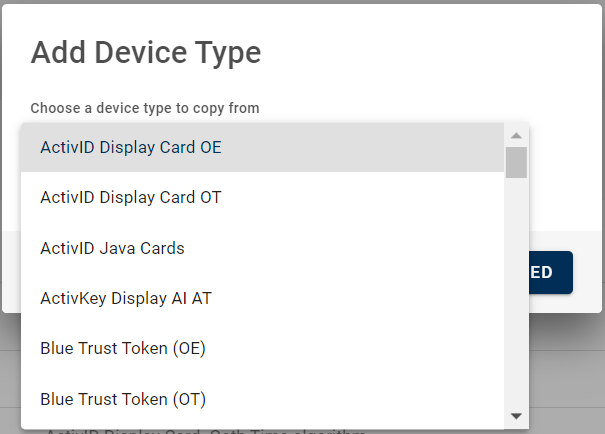
Click ADD DEVICE TYPE, then Add Device Type pop-up window appears.
-
Select a default OTP device type from the drop-down menu and click PROCEED.
See Default OTP Device Types table for more information.
-
Add Device Type page opens.

Enter the below information for your device type:
Device type name – should be unique for ease of administration.
Device type description - a description for your OTP device type. Content is free-format
-
Then proceed to Import settings.
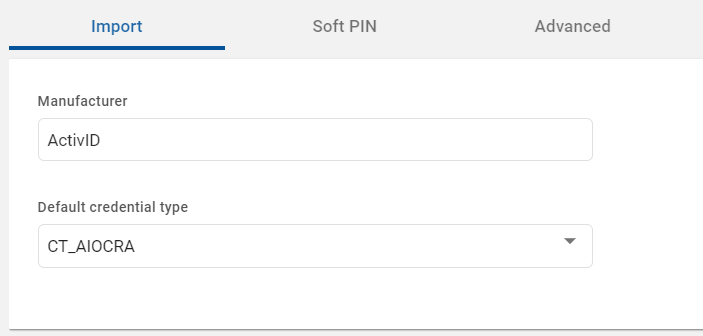
Define Import Settings
This section describes the Import parameters.
| Parameters | Description |
|---|---|
| Manufacturer | (Optional) The device type manufacturer. Content is free-format |
| Default credential type |
When importing a device through the device import framework, this attribute sets what is the default credential type to create for the device, if none is specified in the import process. |
Now proceed to Soft PIN settings.
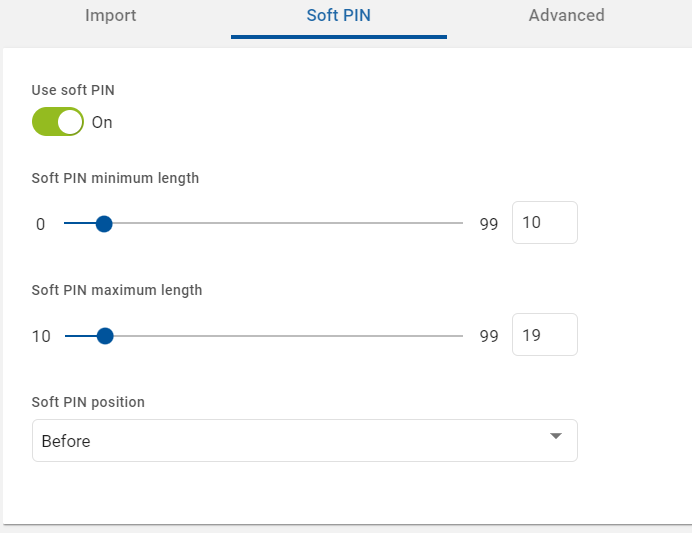
Define Soft PIN settings
This section describes the Soft PIN parameters.
| Parameters | Description |
|---|---|
| Use soft PIN |
Defines if a device can use a server soft PIN (a PIN that is managed and verified by HID Authentication Service, not by the device itself). Click on the toggle button to change:
|
| Soft PIN minimum length |
Defines the minimum length of characters for the server soft PIN. Set the value according to the soft PIN policy of the device. |
| Soft PIN maximum length | Defines the maximum length of characters for the server soft PIN. Set the value according to the soft PIN policy of the device. |
| Soft PIN position |
Defines how the user should enter the server soft PIN during authentication. Options are:
|
Now proceed to Advanced settings.
Define Advanced Settings
This section describes the Advanced parameters.

| Parameters | Description |
|---|---|
| Supported authentication methods |
Determines the options displayed in the Device Type : OTP Device page. Select from the drop-down menu:
|
| Synchronous authentication code length |
Maximum valid length of a synchronous OTP. This parameter is used to validate the submitted OTP. |
| Asynchronous authentication code length | Maximum valid length of an asynchronous OTP, generated in response to a challenge. This parameter is used to validate the submitted OTP. |
| Challenge length |
Applies to devices that support asynchronous authentication. Defines the length of the challenge provided to a user to generate an OTP on the device (in the challenge response mode). This parameter is used to validate the submitted challenge. |
| Device unlock |
A device might be locked if the user enters the PIN incorrectly a specified number of times. This parameter determines whether the unlock option appears in the User Account page for devices of this type. Click on the toggle button to change:
Note: The specified number of times is set on the device.
|
| Unlock challenge length |
Length of the challenge provided to a user to unlock the device, when the user has locked it by incorrect entry of their PIN a specified number of times. This parameter is used to validate the submitted unlock challenge. |
| Synchronization mode |
Determines whether the resync option appears in the View Device page. Select from the drop-down list:
|
| Base synchronization mode |
Determines fields displayed in the View Device page. For devices that support synchronous authentication, this parameter defines the variables that are stored locally on the device and therefore might require resynchronization with the server. Select from the drop-down list:
Note:
|
| Counter range |
Maximum number of increments by which the host system will increment the counter it is holding for an individual device of this type to resynchronize with that device when attempting an automatic resynchronization. The auto resync process will try to increment rather than decrement the counter value. |
| Time offset start (seconds) |
Lower limit of the time window for which the host system will test its internal system clock values against the OTP received from a device of this type to try to resynchronize with that device. Applicable only to device types supporting synchronous authentication and automatic resynchronization. The default is -3600 seconds. This sets the start of the time period as 3600 seconds before the actual internal system clock time. |
| Time offset end (seconds) |
Upper limit of the time window for which the host system will test its internal system clock values against the OTP received from a device of this type to try to resynchronize with that device. Applicable only to device types supporting synchronous authentication and automatic resynchronization. The default is 3600 seconds. This sets the end of the time period as 3600 seconds after the actual internal system clock time. |
| Transaction signing |
Defines if a device can be used to digitally sign transactions. Click on the toggle button to change:
|
Viewing a Device Type
You can view device types by following the below steps:
-
Click Settings
in the left navigation bar to open the Settings page. -
Click Device Types on the Settings page, then you can see list of OTP device types.
-
From the list of device types, choose and click on a OTP device type you want to view.
(or) you can also click on "View Device Type" shown in the action menu (
 ) of the device type.
-
Device type page opens as shown below. You can view your device type code and all other created entries as shown below.

Fields Description Device type code The unique code identifying the device type.
Device type name The name of the device type.
Device type description The description for the device type. -
You can also view other settings of your OTP device types by clicking on Import, Soft PIN, and Advanced tabs.
-
Click RETURN to return to the list device types page.
Note:If required,
-
Click EDIT to edit a device type. Refer to Editing a Device Type.
-
Click DELETE to delete a device type. Refer to Deleting a Device Type.
-
Editing a Device Type
When required, you can edit the device type details by following the below steps:
-
Click Settings
in the left navigation bar to open the Settings page. -
Click Device Types on the Settings page, then you can see list of device types.
-
From the list of device types, choose a OTP device type you want to edit.
Click on "Edit Device Type" shown in the action menu (
) or click EDIT on the view page of that device type.
-
Now, all the required fields are unlocked and you can make the necessary changes.
Note: You cannot edit Device Type Code as it is auto-generated.
-
Click SAVE to update your changes.
Deleting a Device Type
-
You cannot delete the default OTP device type. For those default device types, it will show an error message.
-
You cannot delete device types which are assigned to the users.
To delete a device type, follow the below steps:
-
Click Settings
in the left navigation bar to open the Settings page. -
Click Device Types on the Settings page, then you can see list of device types.
-
From the list of device types, choose a OTP device type you want to delete.
Click on "Delete Device Type" shown in the action menu (
) or click DELETE on the view page of that device type.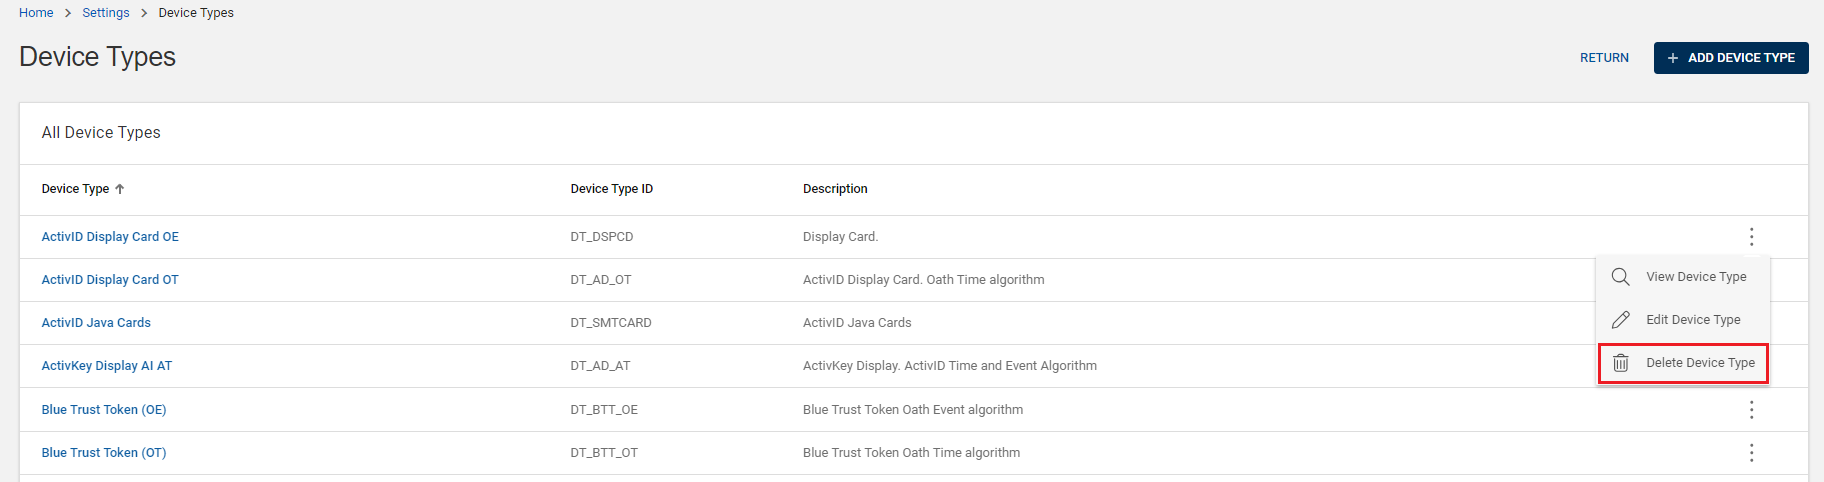
-
A Delete Device Type confirmation dialog box appears, click OK to confirm deleting the device type.
Note: If you want to cancel the operation, click CANCEL.


