Integration with Azure AD for Authentication
Introduction
The Azure AD integration documentation aims to provide information and instructions on how HID Visitor Manager customers can add Azure AD authentication for existing identities in HID Visitor Manager Visitor Manager. The document aims to provide the minimal configuration that is required on Azure AD to make the authentication work.
Prerequisites
-
An add-on is needed Azure AD integration for the tenant. This enables the right areas in the product under Settings > General where Azure AD based authentication can be configured.
-
Azure AD tenant is available.
-
All users and user groups are in place in Azure AD.
-
Admins are able to create applications in Azure AD.
Register an application in Azure AD and get the Tenant ID and Client ID
-
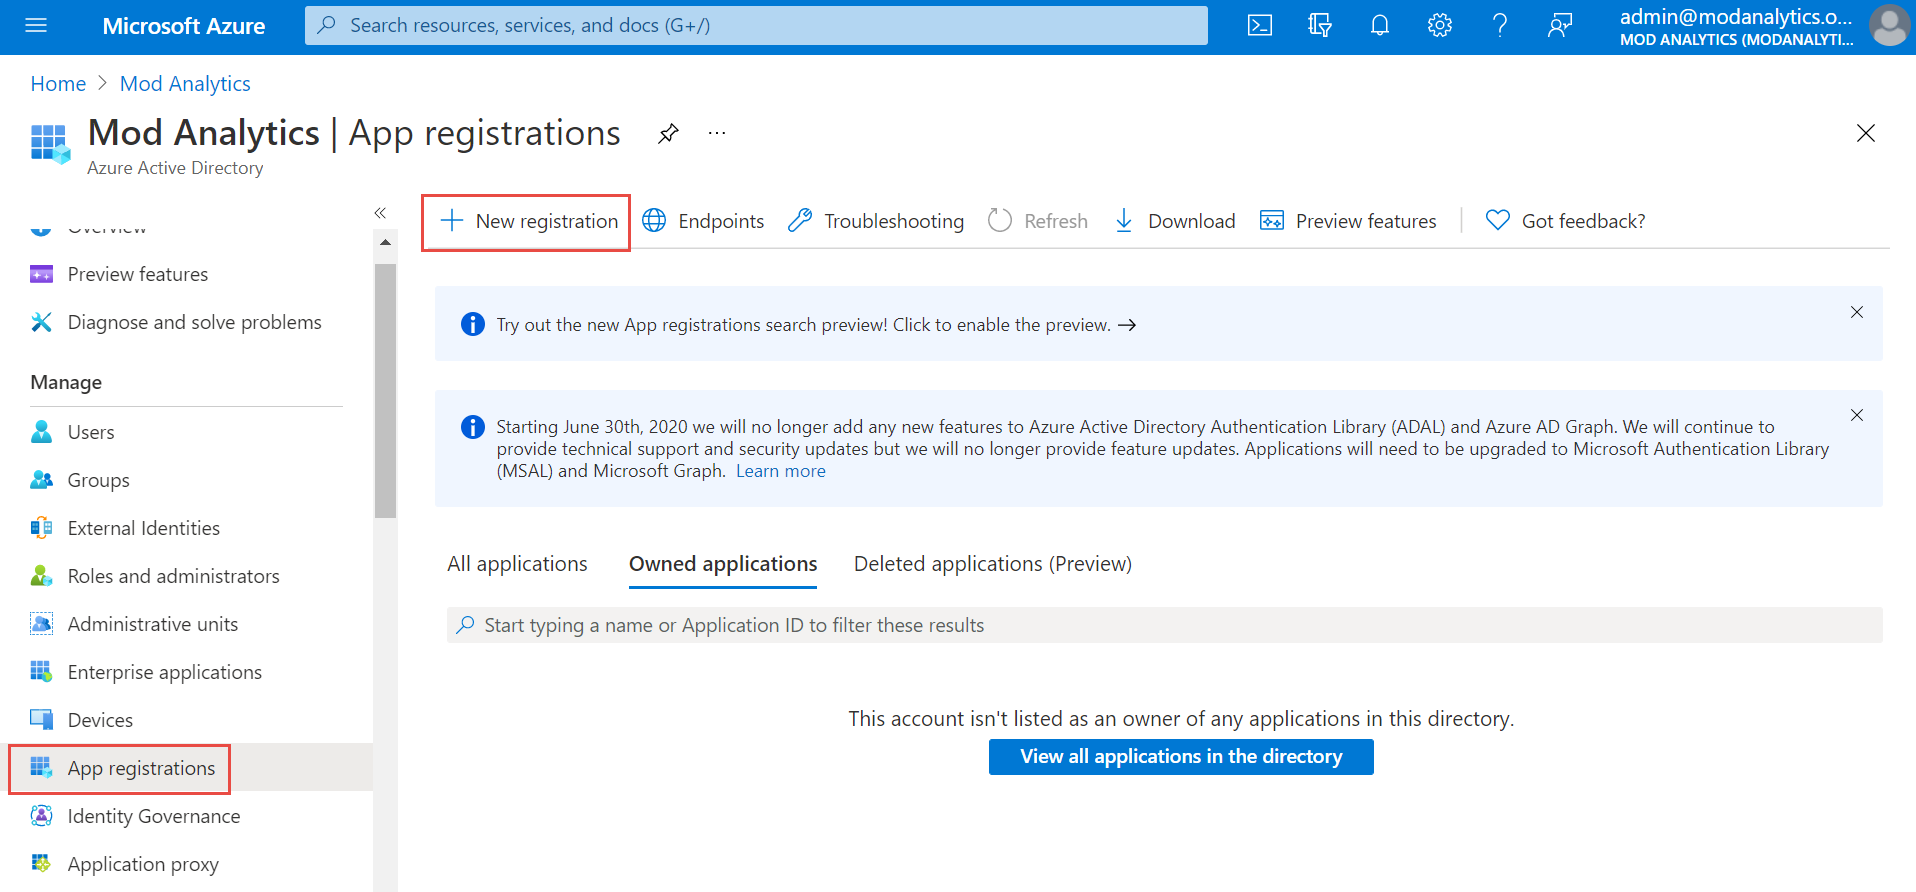
Click App registration on the left navigation menu and click + New Registration on the top menu to register the application.
-
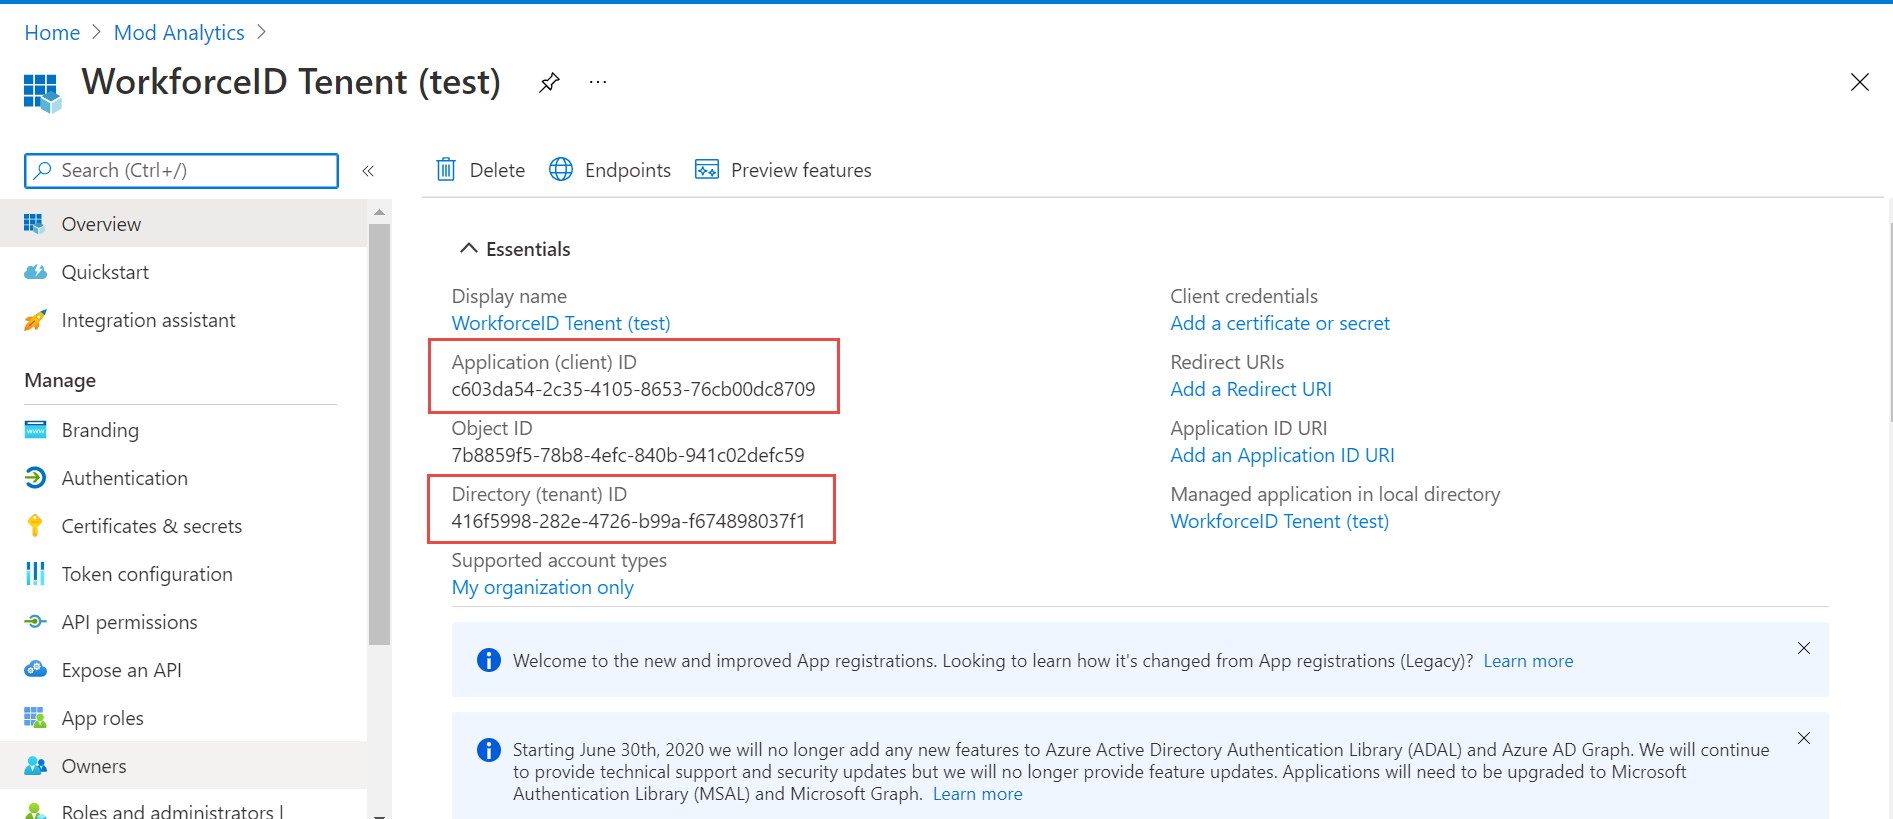
Provide the user-facing display name for this application, for example: HID Visitor Manager <Tenant Name> Authentication. Keep all default settings and click Register.

-
Note and save Application (client) ID and Directory (tenant) ID for future use.
-
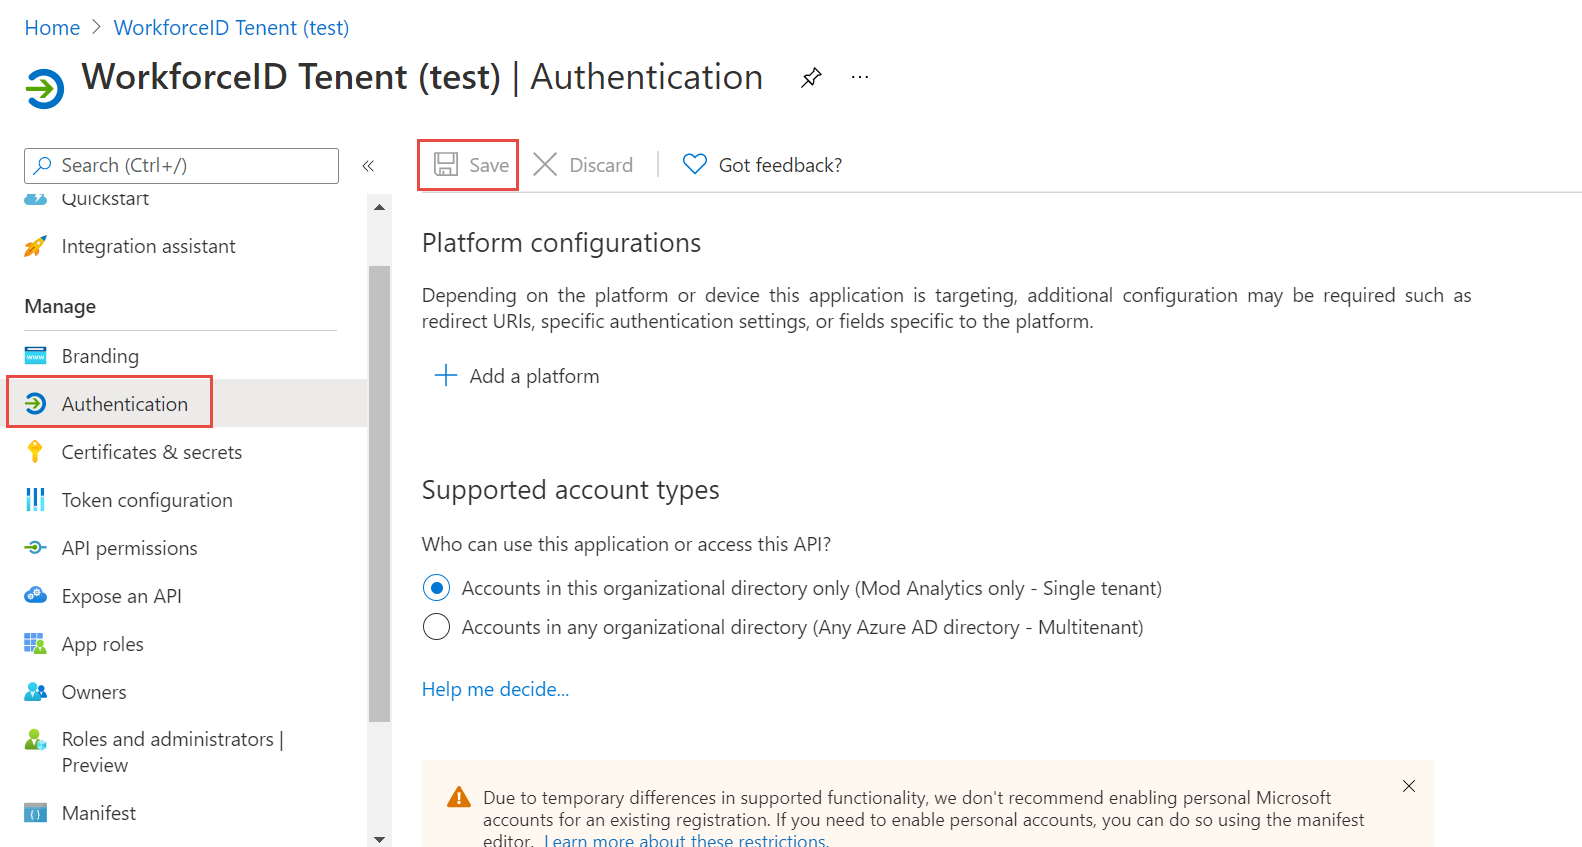
Click Authentication on the left navigation menu under Manage Toggle Enable the following mobile and desktop flow to Yes. Click the Save button.
-
Click API Permission on the left navigation menu. Click Grant admin consent for AzureTestSetup Click Yes on the pop-up prompt. “Successfully granted admin consent for the requested permissions.” message is displayed.
Enable Azure AD Authentication in WFID tenant
-
Log in to the WFID tenant and navigate to Settings>General>Authentication tab. Select the check box Enable Azure AD based Authentication.
-
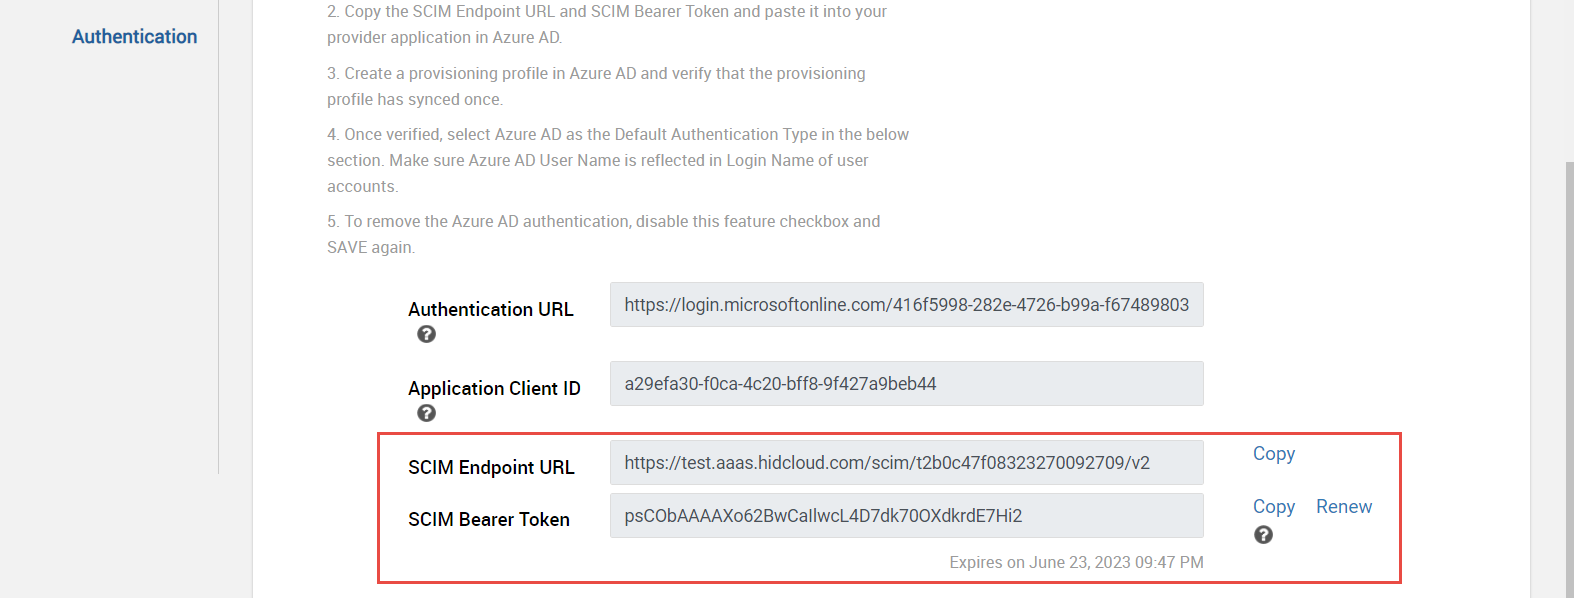
Provide the Authentication URL as https://login.microsoftonline.com/<tenant ID>/v2.0 and Application Client ID saved earlier in step 3 of the previous section.

-
Click Save button. SCIM Endpoint URL and SCIM Bearer Token fields are displayed and populated. Copy and save both for future use.
Create a new Azure AD Provisioning Application
-
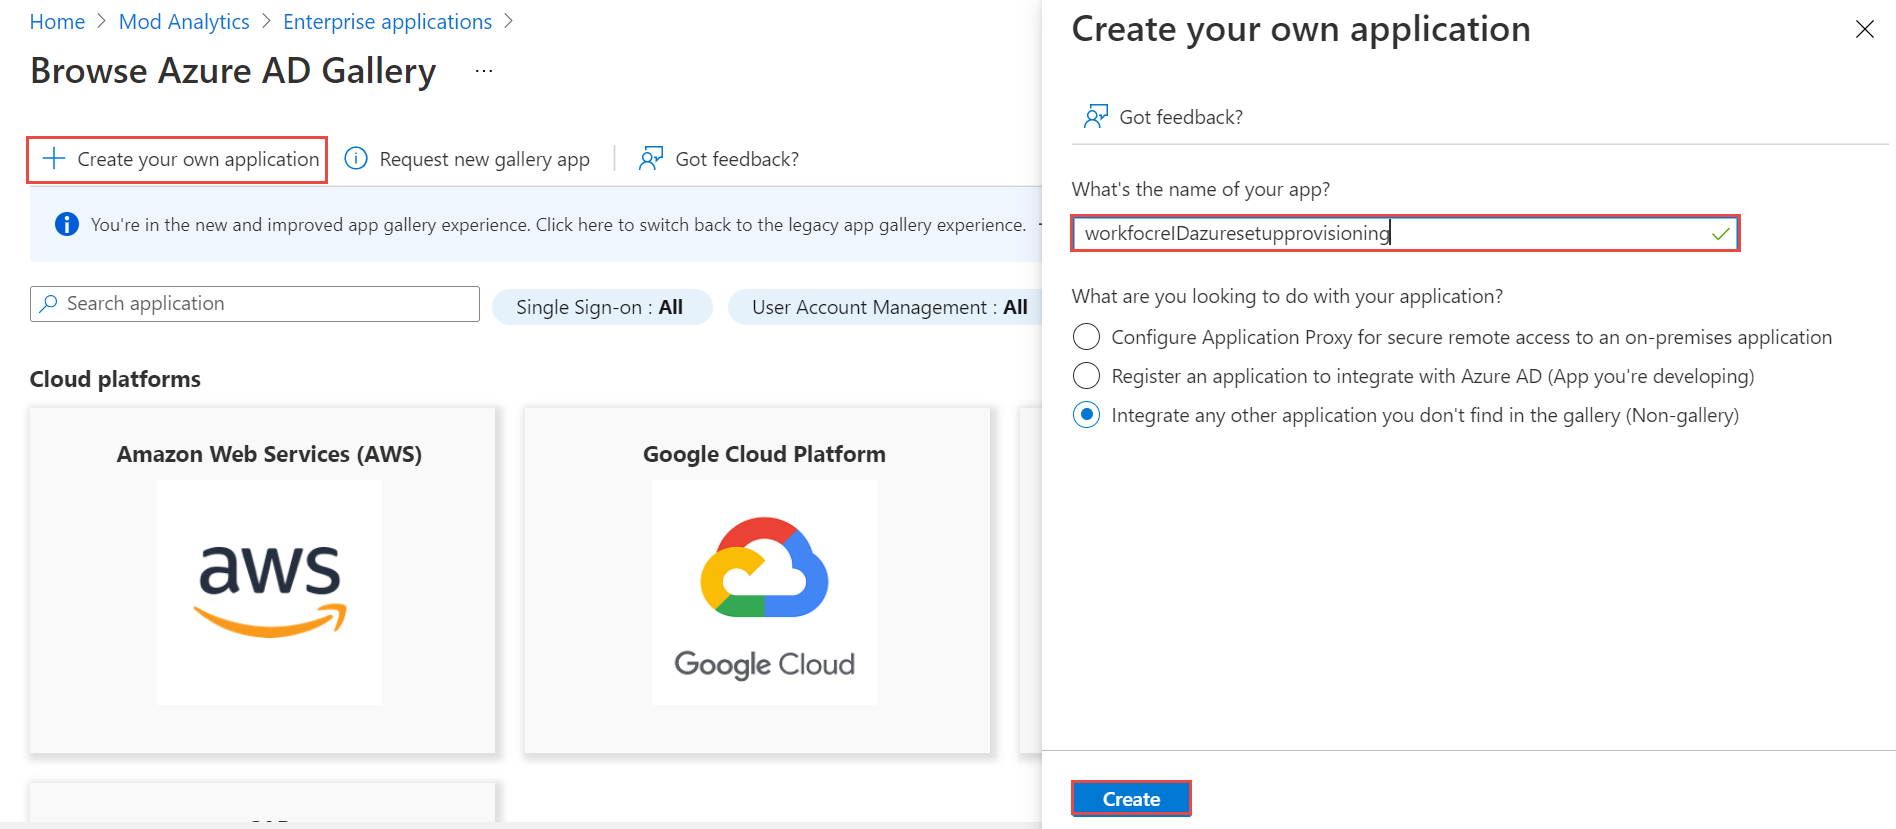
Click Enterprise Applications on the left navigation menu and click +New Application button.
-
Click +Create your own application on the top menu. Provide the name of the application, e.g. tenant name appended with the word “provisioning”. Click Create button. A confirmation message is displayed once the process is completed successfully.
-
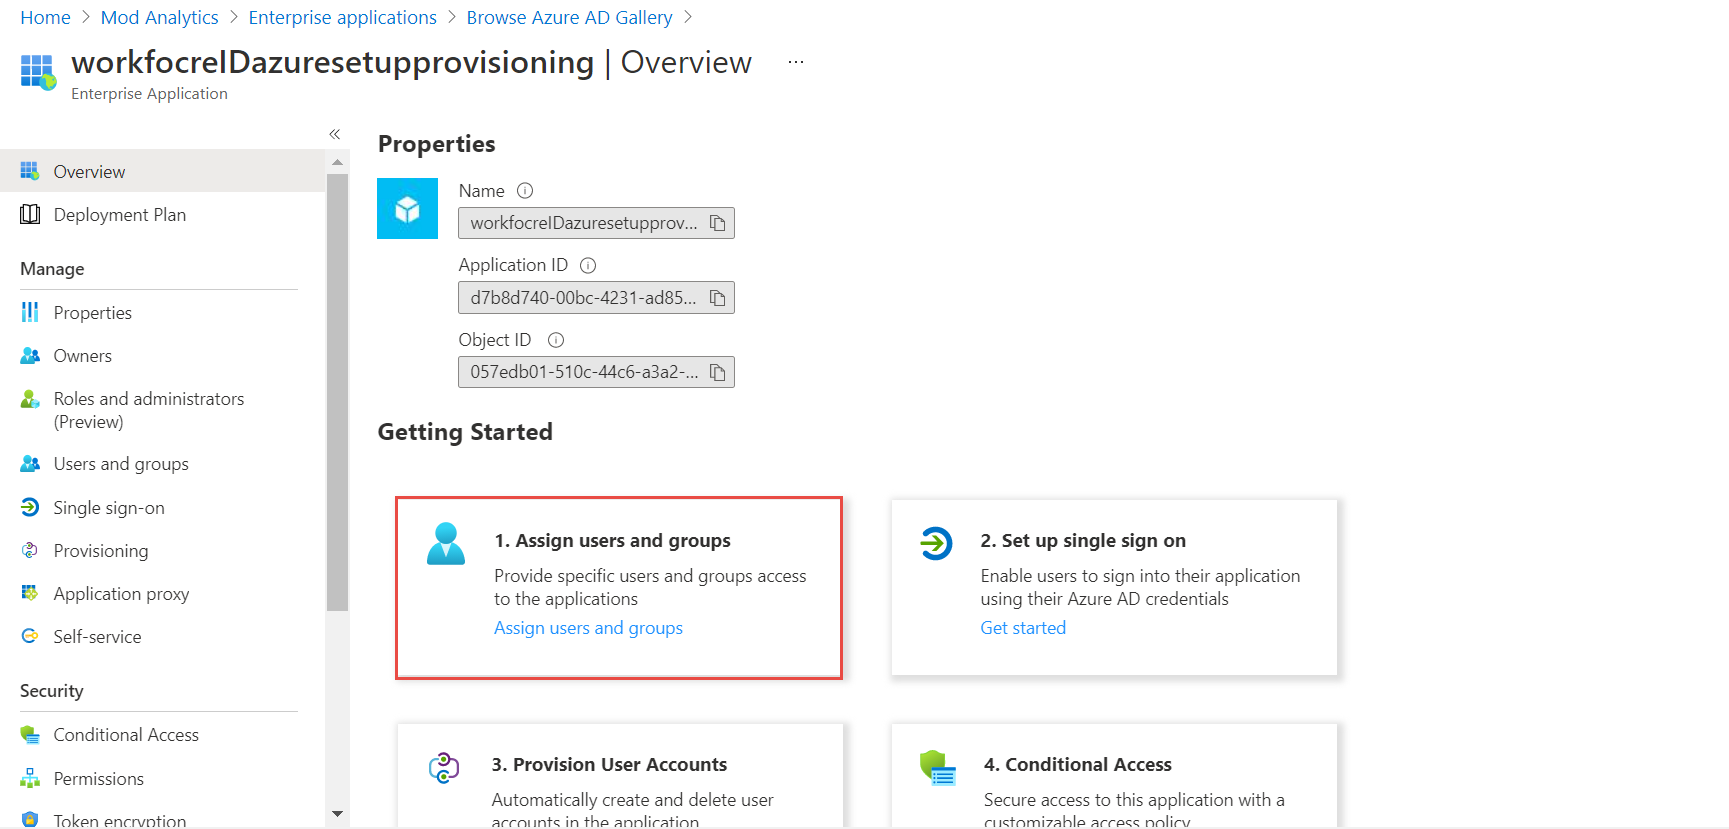
Click the Assign users and groups button.
-
Select users/groups that need to be provisioning to WorkforceId by clicking on each item. Click Select button on the bottom. Click Assign button when done. A confirmation message is displayed once the users are successfully assigned.

-
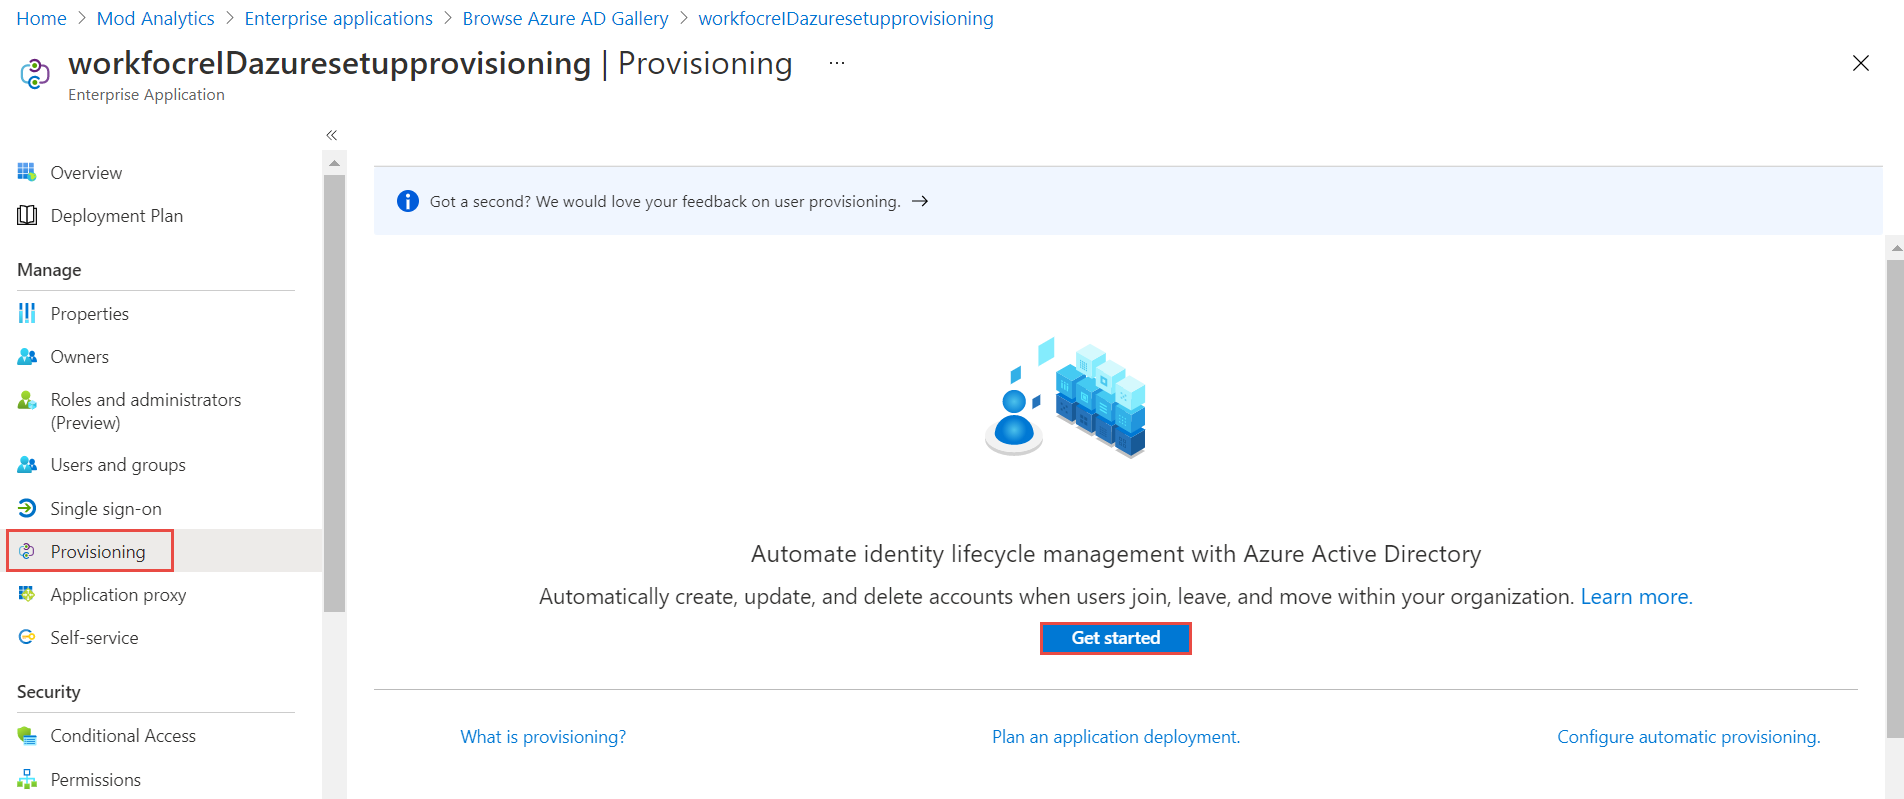
Click the Provisioning button on the left navigation menu. Click Get Started button.
-
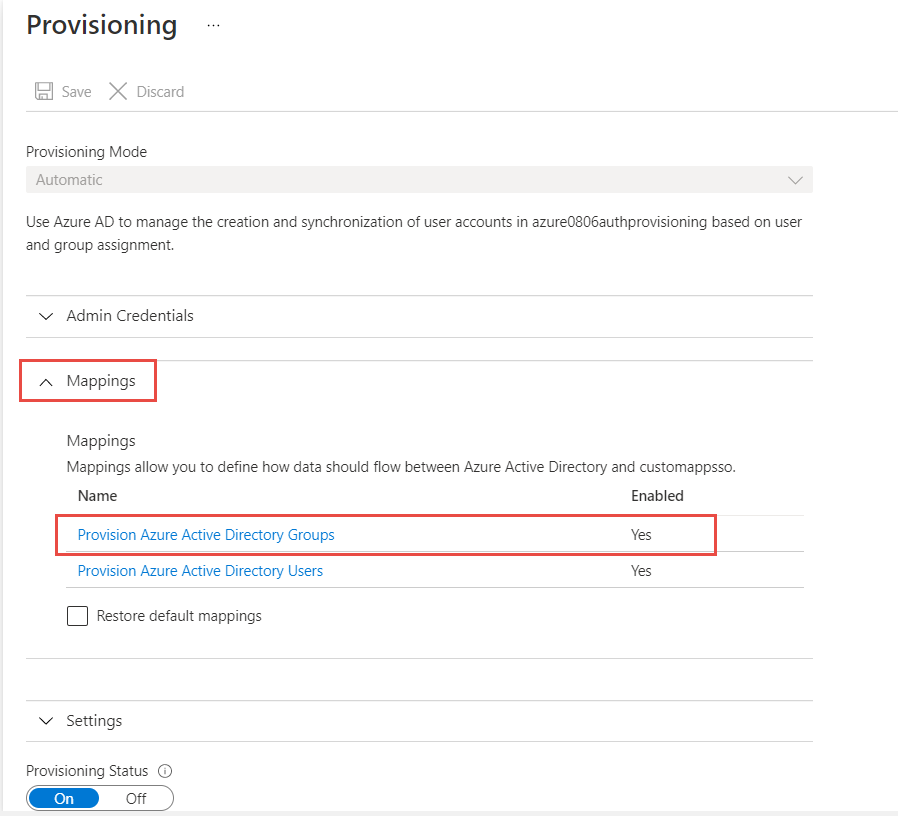
Select Automatic from the Provisioning Mode drop-down menu. Populate Tenant URL and Secret Token with SCIM data saved earlier in Step 3 of Enable Azure AD Authentication in WFID tenant Click Test Connection. Click Save button.

-
Click Enterprise Applications on the breadcrumb string. Refresh the browser window – F5. Now the provisioning application is displayed on the list.

-
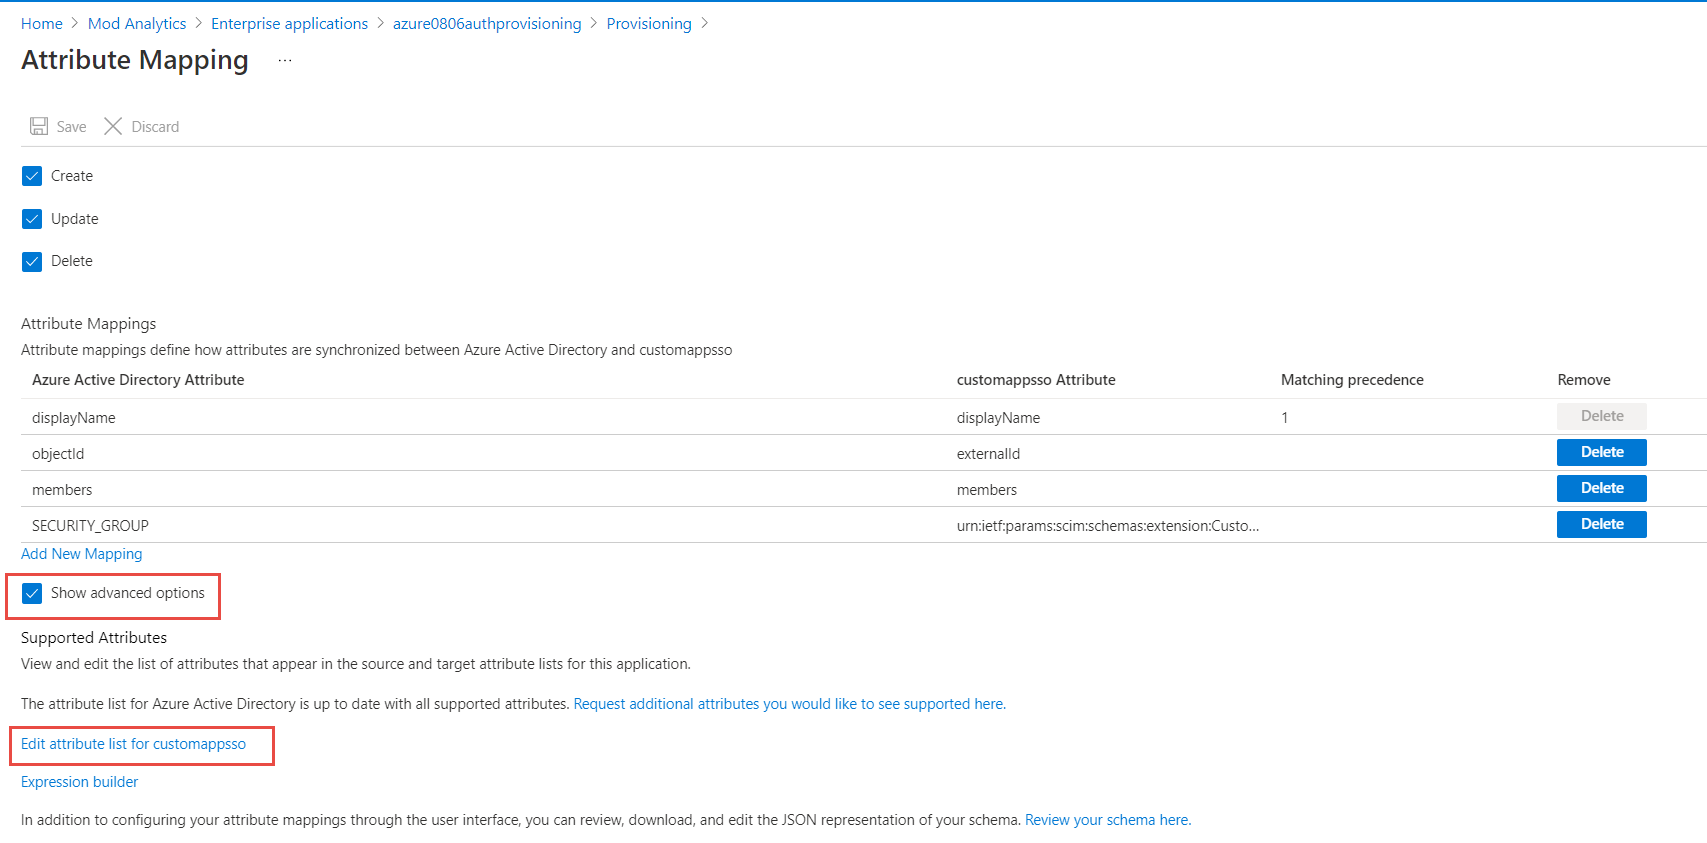
Click Provisioning on the left navigation menu, expand the Mappings section, and click Provision Azure Active Directory Users.

-
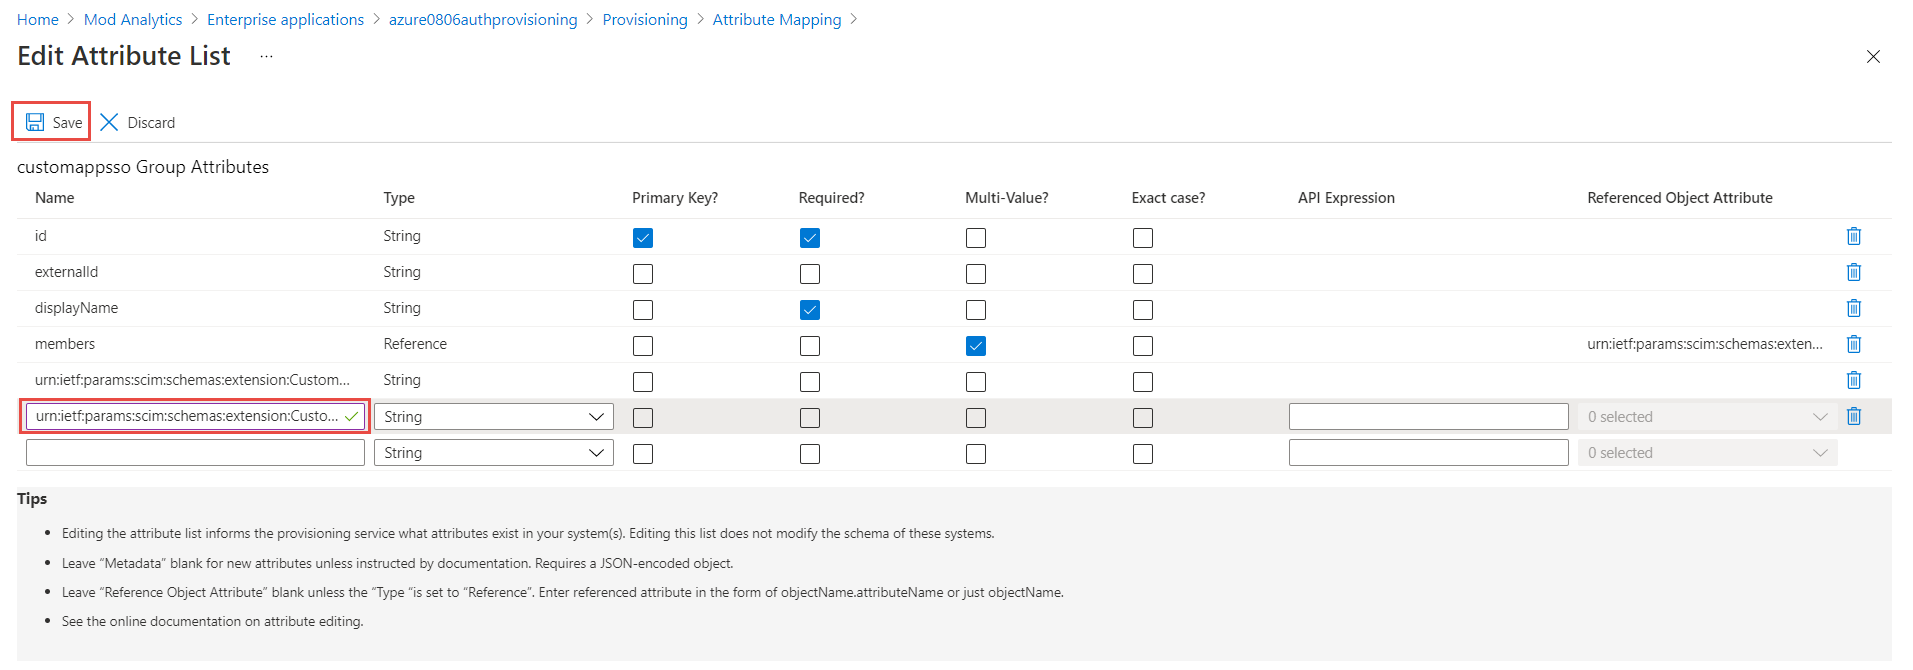
Add a custom attribute urn:ietf:params:scim:schemas:extension:CustomExtensionName:2.0:Group:groupType and click Save, and then Yes to confirm.
-
Check Show advanced options checkbox and then click Edit attribute list for customappsso link.
-
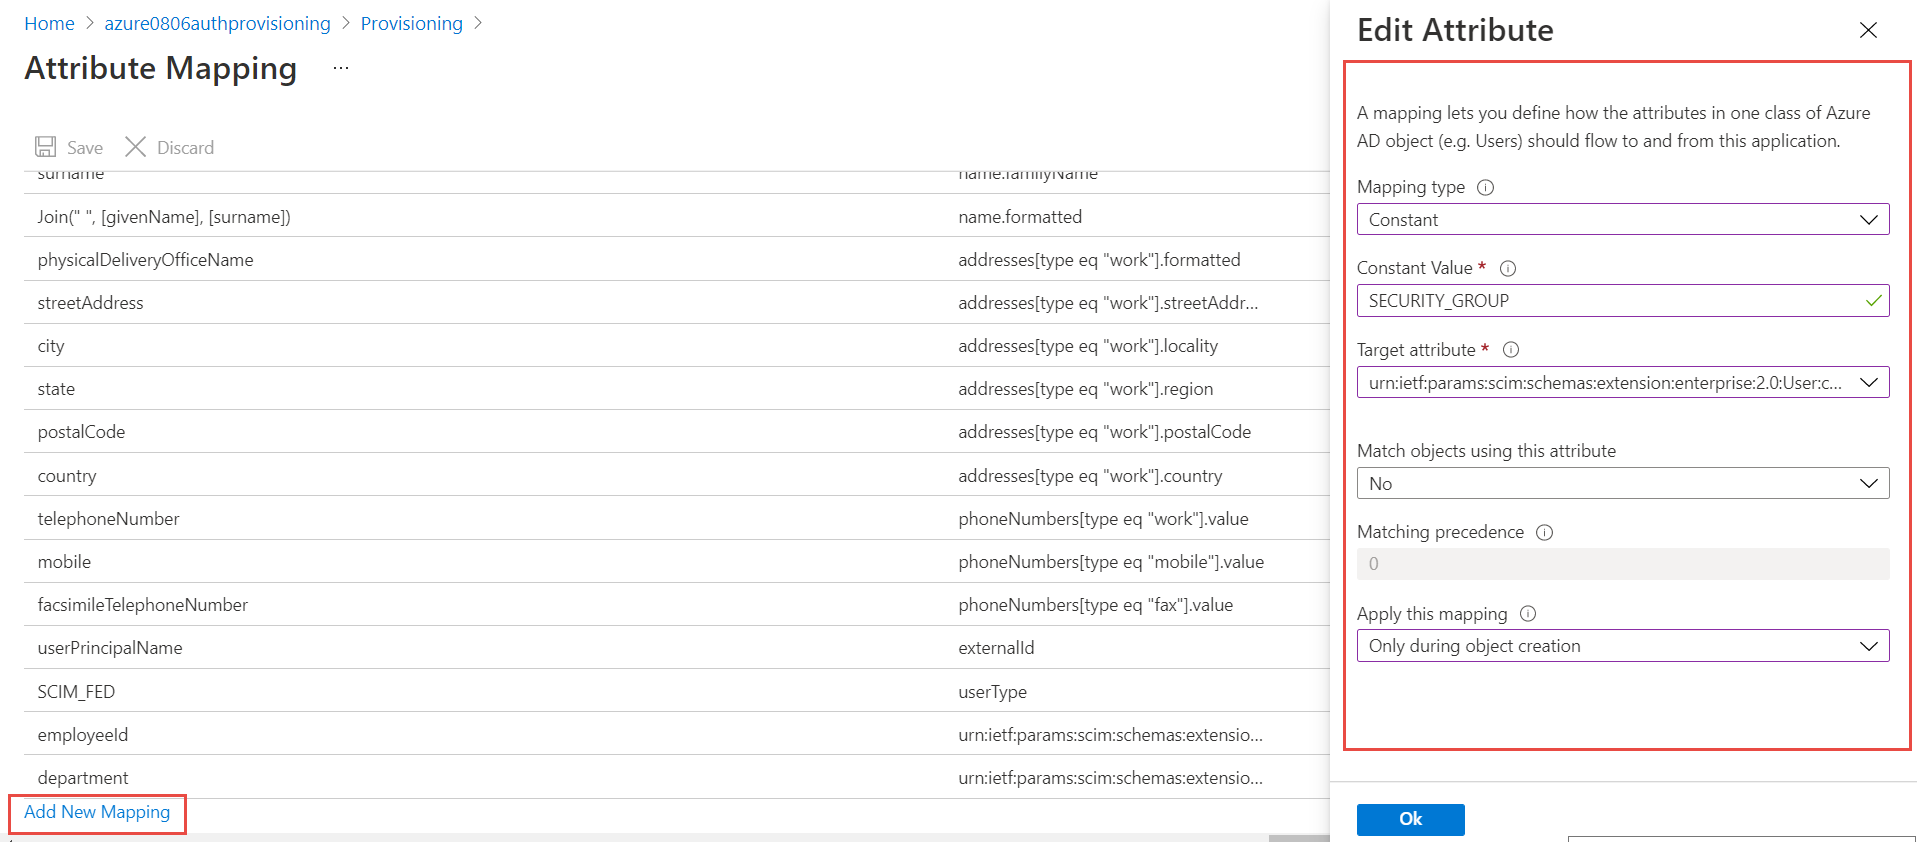
Click Add New Mapping. Choose Constant mapping. Type in SECURITY_GROUP in Constant Value, select the Target attribute (added in the previous step 10), choose Only during tenant creation from the Apply the mapping drop-down menu. Click OK. Click the Save button.
-
Click X in the right top corner to close current tab. Click Provision Azure Active Directory Users from expanded Mapping section.
-
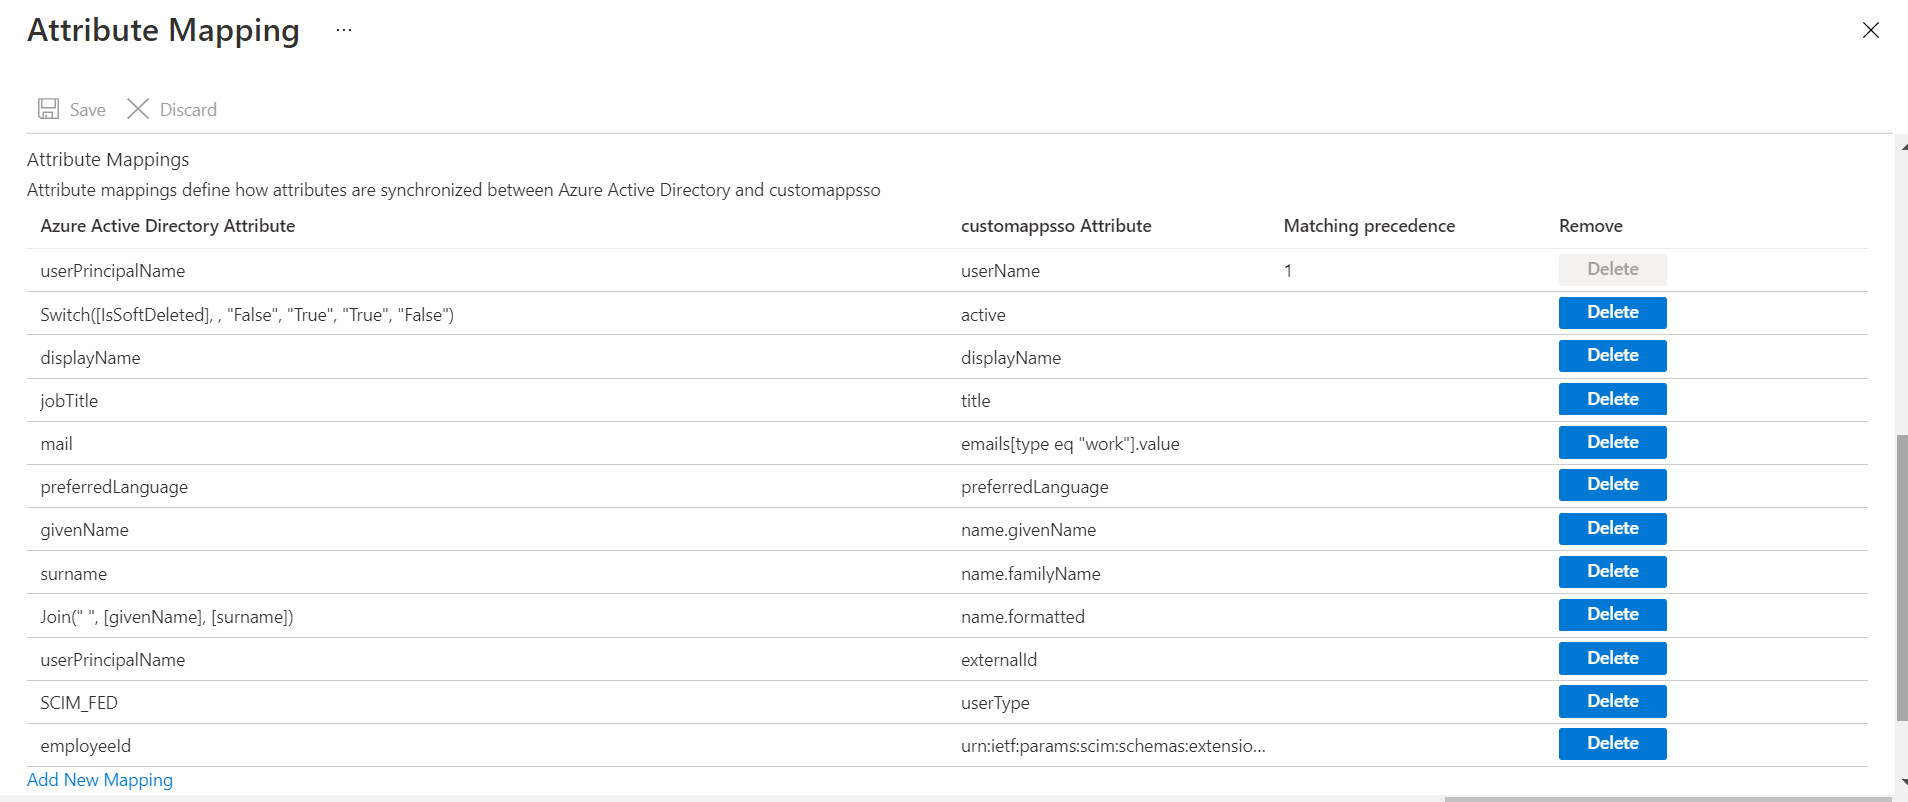
Below are the fields required for proper mapping. Note: Delete other fields from the initial list if needed.
-
Click mailnickname. Change Source Attribute from mailnickname to userPrincipalName. Click OK .
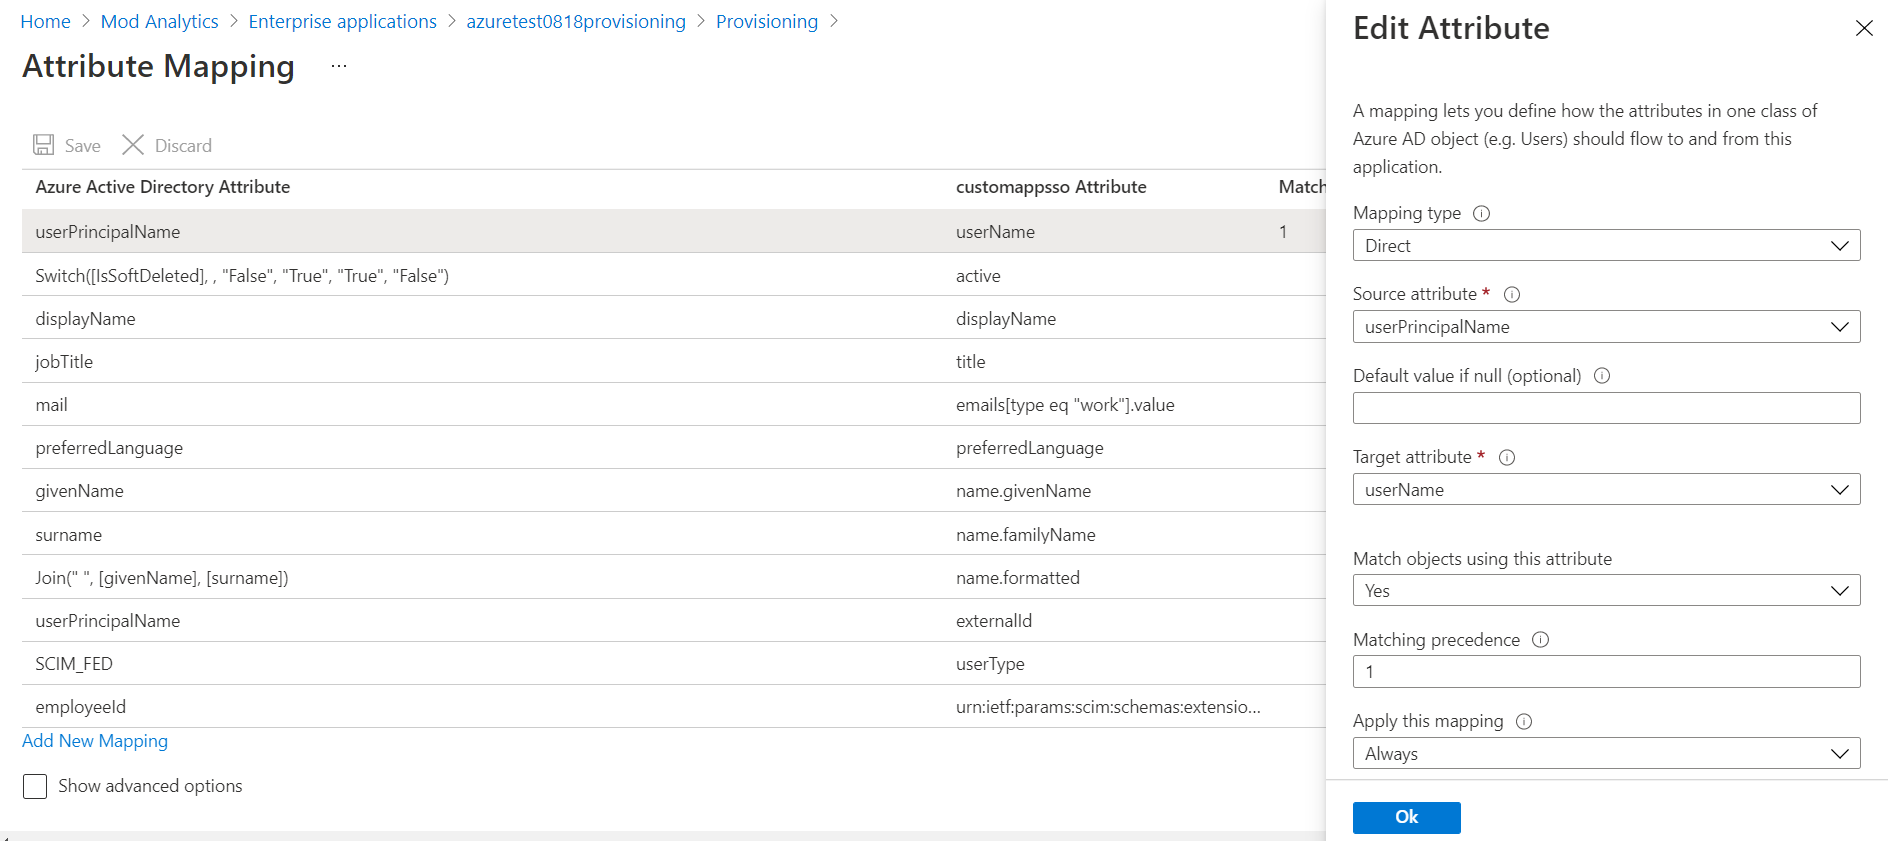
-
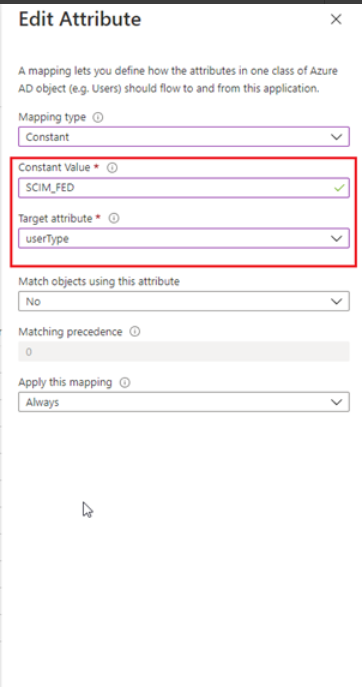
Click Add New Mapping. Select Constant from Mapping Type in SCIM_FED in Constant Value field. Select userType from Target attribute drop-down menu. Click OK. Click Save.
-
Click Provisioning Status toggle to On and click Save. Click X in the top right corner to close the tab.

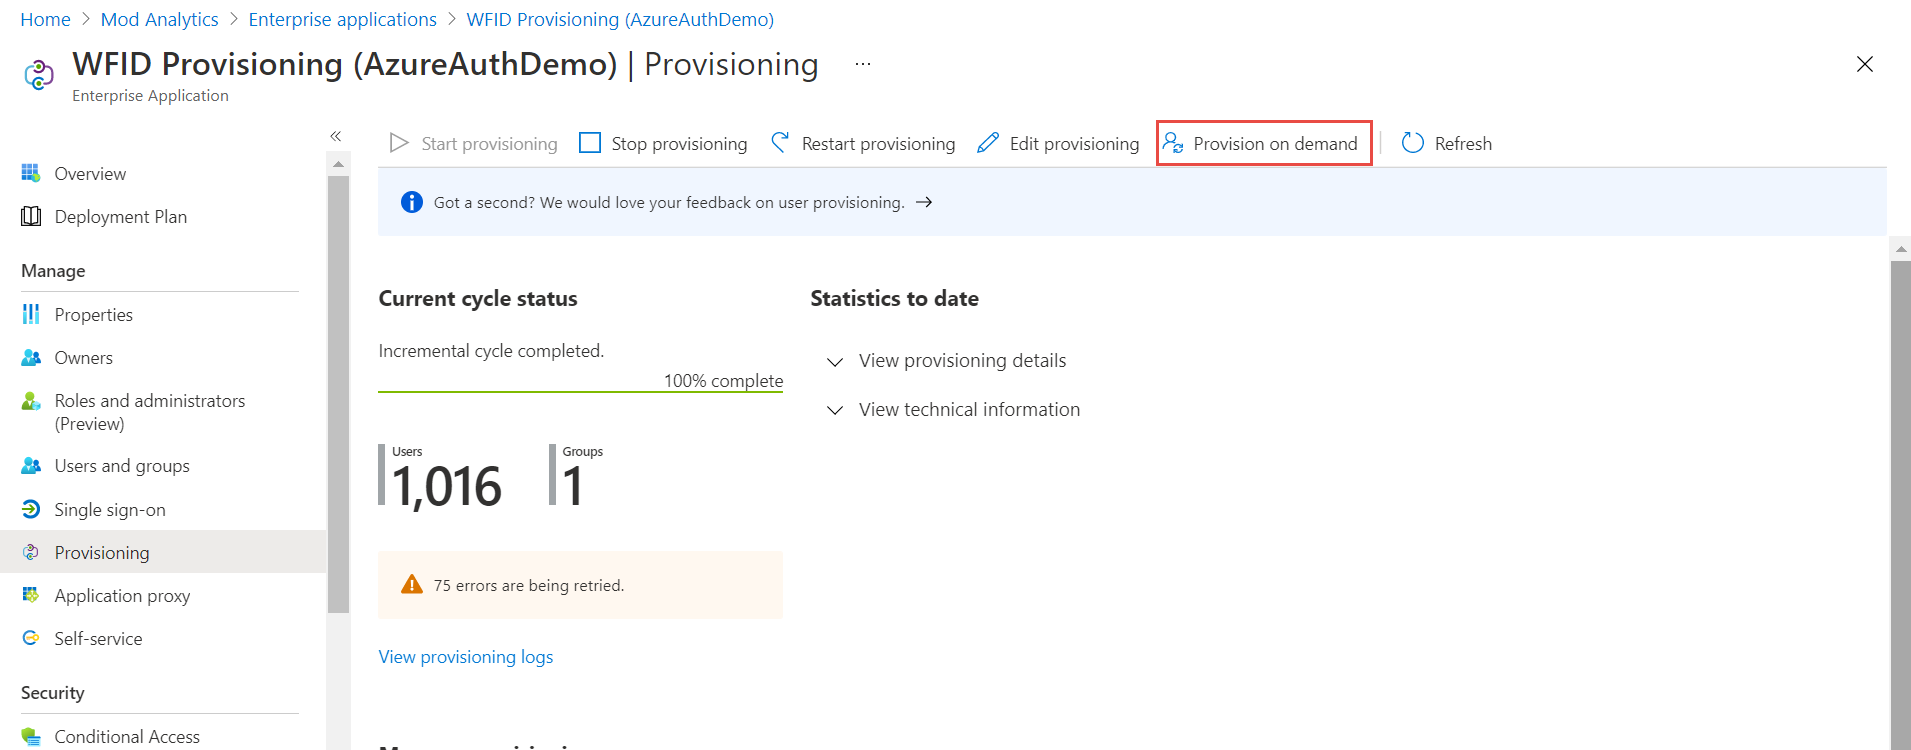
Verification of Identity Provisioning (using on-demand provisioning feature)
-
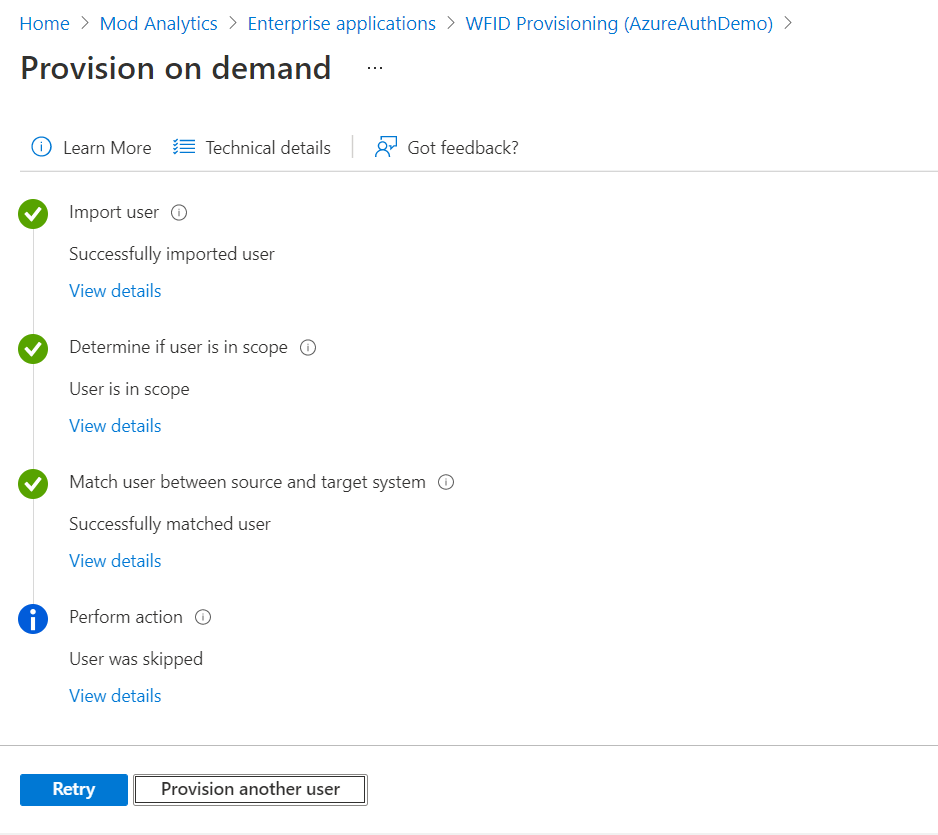
Click Provision on demand on the top menu to verify that user provisioning is configured correctly.
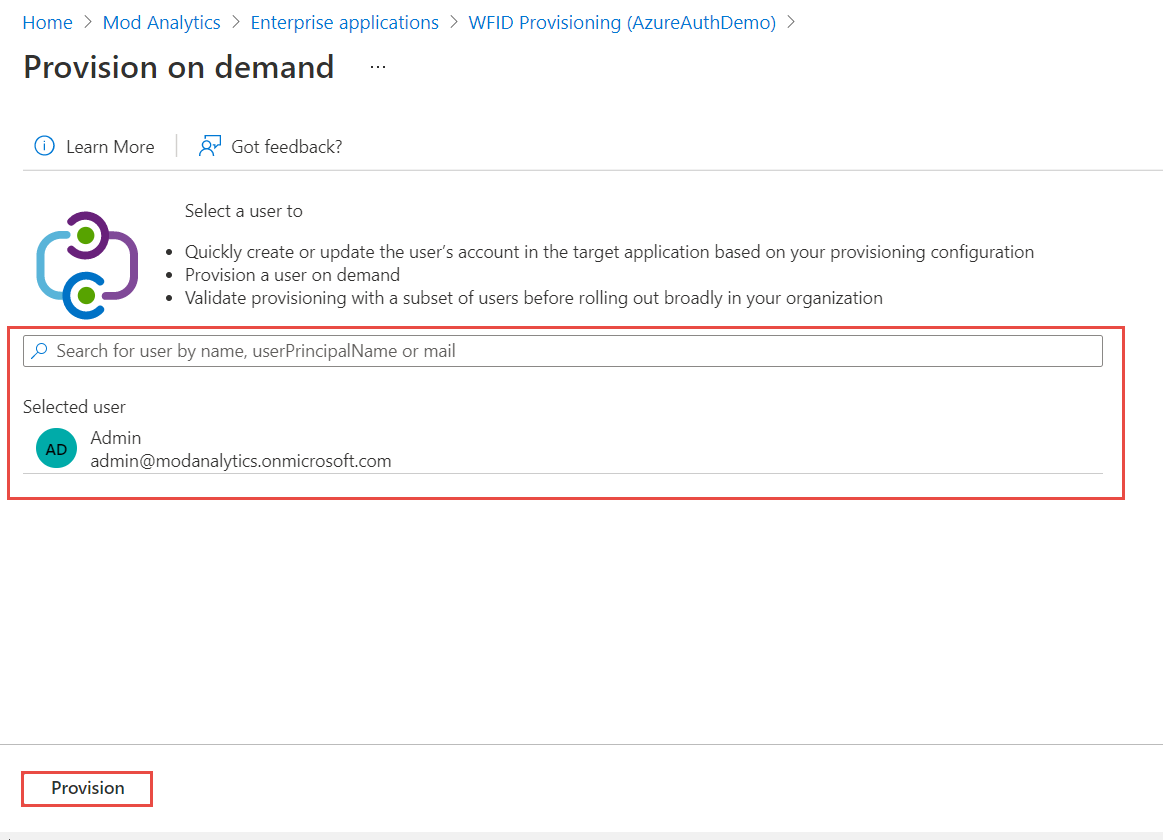
-
Search for the user and select it. Click Provision button.
-
After a successful provisioning click Provision another user if needed. When done, click X to close side window and click X again to close the tab.
-
This step is not required after initial verification. Provisioning shall happen at a pre-defined cycle (usually 40 mins).
Bulk Import Identities to WFID application
This is an optional step is identities are not already in HID Visitor Manager.
-
Log in to WFID application
-
From the App Launcher, select the Identities application and click on the Bulk Action tab.
-
Click on IMPORT IDENTITIES.
-
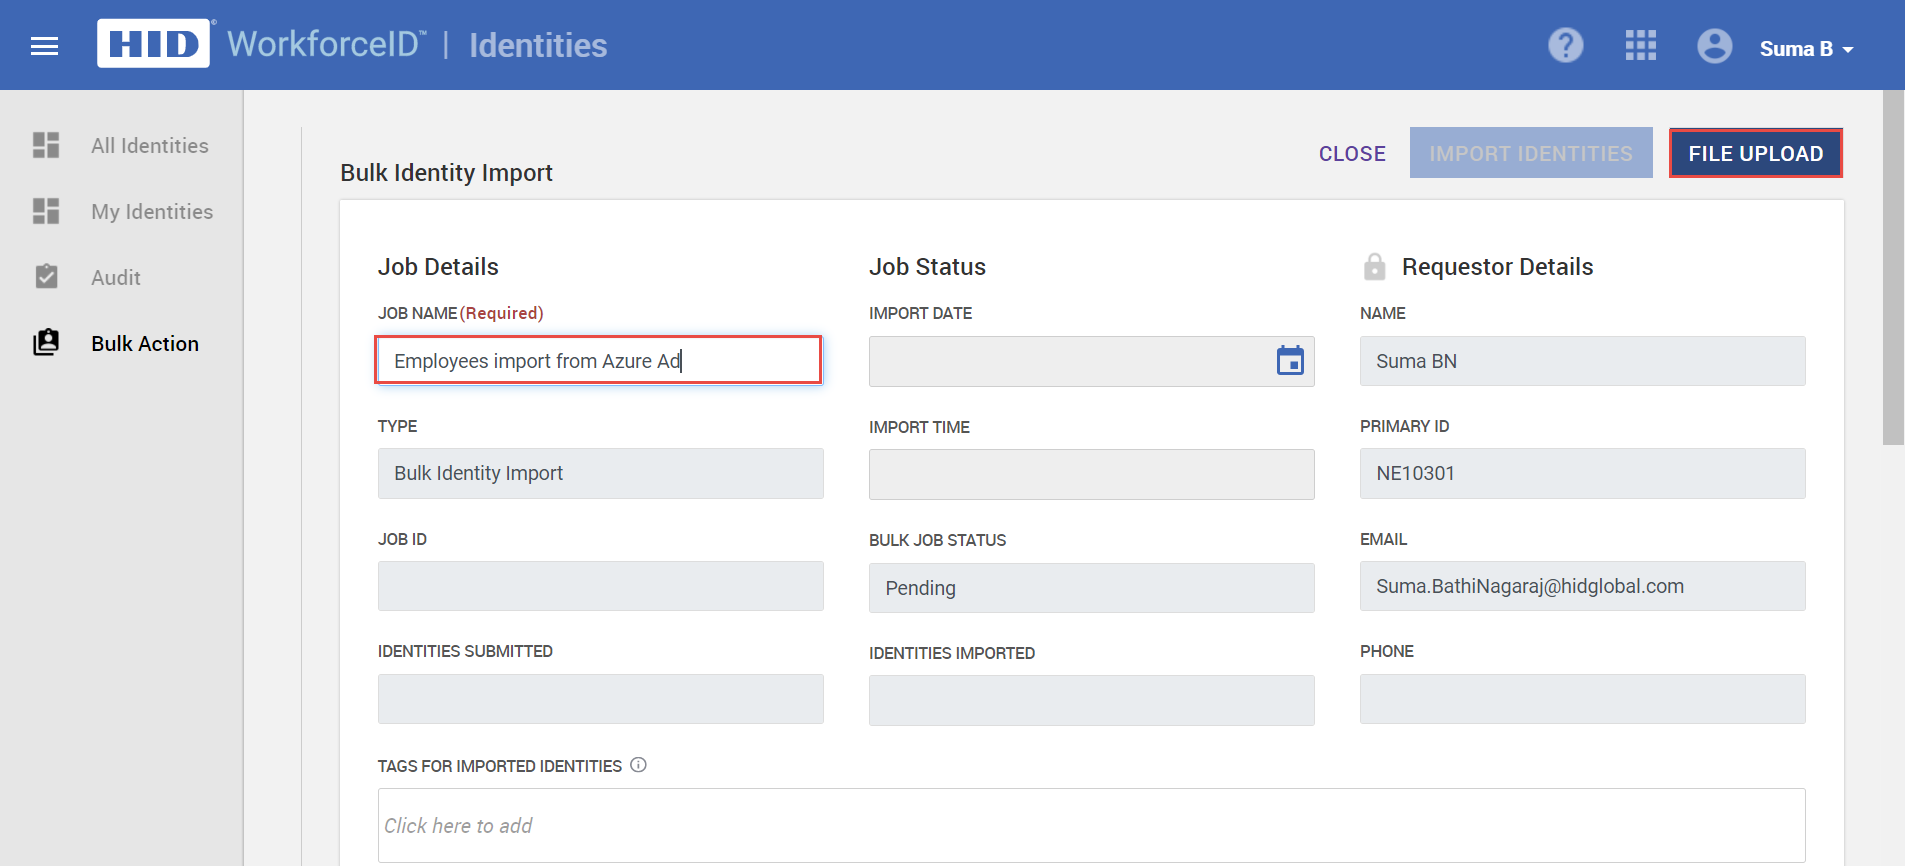
In the Bulk Identity Import page, add the Job Name.
-
Click on the FILE UPLOAD button. Download the sample file and add the details of the identities to be on-boarded such as first name, last name, DOB, Email, Phone, Employer and Employee Type.
-
Provide Job Name, e.g. Employees import from Azure AD.
-
Browse and upload the file with the identity details. Click OK to upload the file..
Imp Note: it is important to make sure that the login name of identities matches the Azure AD login name.
-
Based on the information added, the system will import the valid identities. For the identities with invalid information, an error notification will get displayed in the Invalid Identities Review section. Once the error has been rectified in the file, you can upload it again.
-
Once the identities have been uploaded, click IMPORT IDENTITIES to complete the import.
-
Once the job is completed, navigate to All Identities tab on the left navigation menu and verify that all imported identities are displayed.
-
Assign correct roles and groups to the identities as needed by going to Identities record > Roles and Group sub-tab.
Final steps before enabling Azure AD configuration in HID Visitor Manager
Before executing the below steps, It is essential for the admin to create their own account in HID Visitor Manager with AzureAD login name and assign admin privileges to it. Failure to do so before executing the below step will result in system lockout.
-
Go to the WFID tenant and Navigate to Settings>General>Authentication and Select Azure AD from the Available Authentication Types. Select Azure AD as Default Authentication Type.

-
At this point, you are all set for users to be able to log in with the new password to the WFID application.
- Users won't be able to change their passwords using HID Visitor Manager. Identities need to have working credentials to be able to use HID Visitor Manager.


