Configure the Connection to LDAP
Consider the following three options before you map the AAA Server to your LDAP directory schema:
- Option 1: Select a field that already exists in the LDAP schema that you are using, and match it to its counterpart in the AAA Server (same or similar field name).
- Option 2: Add a new LDAP field to accommodate an the AAA Server authentication attribute that does not exist in your current LDAP schema.
- Option 3: Assign an existing, available (yet differently named LDAP attribute) to a AAA Server field (for example, map the LDAP attribute "facsimiletelephonenumber" to the AAA Server attribute "Device Serial Number"). However, this option prevents you from modifying or extending your LDAP schema later.
-
Select Tools, then click Options. The AAA Server Administration Console Options window is displayed:
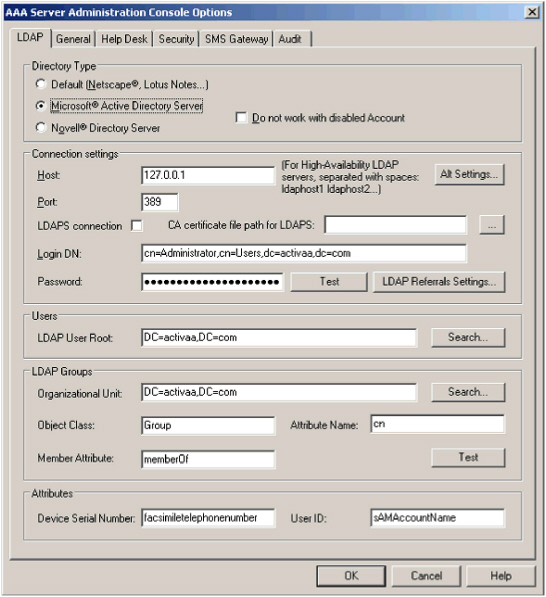
- In the Directory type section of the screen, specify the type of LDAP directory you are using.
-
If you select Microsoft Active Directory in the Directory type section of the screen, then the Do not work with disabled account option becomes available.
Note: The Do not work with disabled Account option is only available for Active Directory deployments. It is grayed out for all other directory types.Select this option to prevent users whose accounts you have disabled in LDAP from authenticating through the AAA Server.
- Use the Connections settings section to define your LDAP connection settings and test them.
| Setting | Description |
|---|---|
| Host | Enter the IP address or hostname of the server where your LDAP directory resides. If you are using multiple LDAPs, separate the server identifiers by a space. |
| Port | Enter the LDAP directory server’s listening port (default value is 389). |
| Alt Settings (Active Directory deployments only) |
Select a specific LDAP directory for "LDAP write operations" performed in the Administration Console. See Configure the LDAP Settings for Write Access. |
| LDAPS connection |
Select the option to connect to the LDAP via SSL. LDAPS with Multiple Domains: LDAPS will not work for multiple peer domains in the same forest, nor will it work for multiple domains in different forests. |
| CA certificate file path for LDAPS |
Browse to the exported root certificate (a .cer file in base64 format) of the certificate authority that issued the server certificate installed in your directory and used to access your LDAP. Note: The CN attribute in the certificate must match exactly the "Host" defined above. For example, if the host name CN in the certificate is "host.company.com", then the Host defined above must also be "host.company.com". Important:
|
| Login DN | Enter the connection name for AAA Server to use to authenticate to the LDAP directory (only if you have a protected directory). This user must have write permission to be able to store the device serial numbers in the directory. |
| Password |
Enter the password for the Login DN. Note: The maximum password length is 24 characters.
|
|
LDAP Referrals Settings (Active Directory deployments only) |
Select this option to configure referrals to other LDAP directories. See Configure LDAP Referrals. |
- In the Users section, in the LDAP user root field, enter the location, in standard LDAP syntax, for the existing LDAP users (for example, ou=employees). If you do not know the location, click Search to display your LDAP tree.
- Use the LDAP groups section to define LDAP groups and test them. You can accept the default values, or change them according to your company’s current LDAP directory and your company’s organizational structure. Use of this functionality assumes knowledge of the fundamentals of LDAP user management. Use the Attributes section to:
- Define which LDAP field you intend to use for entering authentication device serial numbers.
By default, this is the facsimiletelephonenumber field. -
Define which field you intend to use for entering user authentication login names (User IDs).
The value for this LDAP field must be unique for each directory user to ensure that each User ID is unique.Note: You can configure a different LDAP for write operations and for read operations (see Configure the LDAP Settings for Write Access).
If you intend to use the Active Directory Global Catalog for read operations, then you need to make sure that the attributes in which you choose to store the device serial number is also synchronized with the global catalog. For further information, see the product documentation provided with the Active Directory. - Click OK.


