Create and Manage Administration Users
You can enable the initial console Administrator to use an authentication device rather than a static password to log on. However, it is recommended that you keep the initial Administrator authenticating with a static password login. This eliminates the danger of a lost or broken device, which would prevent access by the initial console Administrator. Keep the initial Administrator’s ID and password in a safe place where nobody can access it unless there is an emergency.
- In the tree in the left pane of the Administration Console, select Company.
-
Click on the
 icon.
icon.
-
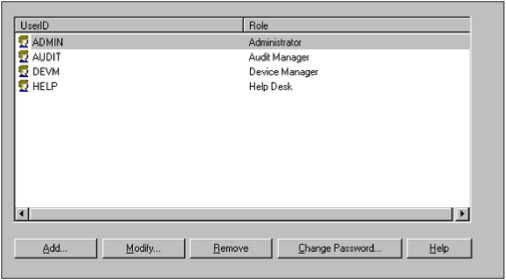
Click Add to "create" an Administration Console user.
If you have already created users, and you want to Modify a profile or Remove someone from the system, select a user from the list presented, then click on the button corresponding to the action you want to perform.
Note: You cannot modify or remove your own administrator UserID/role.
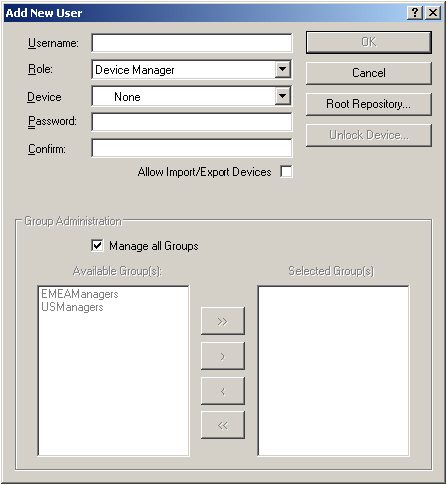
- In the Username field, enter a name for the user. (You cannot change an Administration Console user’s name after you have created the user.)
-
From the Role drop-down list, select the appropriate profile for the new user.
The available options on the Add New User screen vary depending on the profile you select.
For further information on the Administration Console user roles, see Console User Profiles.
-
For use with asynchronous authentication only, the user can authenticate to the Administration Console with an authentication device (recommended for greater security). Select the device to assign to the user from the Device drop-down list. Keep the default selection of None to have the user authenticate with a static password.
Devices are displayed in the Device drop-down list only when they are initialized. You can modify the user’s method of authentication later, if no devices are currently available to assign.
- If you selected None from the Device drop-down list, then in the Password and Confirm fields, enter and confirm a static password for the user.
-
Select Allow Import/Export Devices when you want to allow Device Managers to import or export devices. This option is not available for other users.
- By default, all new users can manage all available groups. In the Group Administration section of the screen, if you do NOT want the user to be able to manage all user groups, then clear Manage all groups and then select the appropriate group(s) in the Available group(s) list.
- Click > to move the selected group(s) to the Selected group(s) list.
-
Click Root Repository to limit the rights of a Device Manager to that of initializing devices and storing them in a particular Device Repository.
- Click OK to return to the Add New User screen.
- Click OK.


