Configuring ActivID Appliance Applications
You can configure the ActivID Appliance applications (such as the ActivID Management Console) by editing the application’s settings.
To modify a property, change the value in the relevant field.
If necessary, click Reset to revert the property to the default value.
Alternatively, you can select Reset All to reset all the properties to their default values.
It is recommended that you contact HID Global Technical Support before modifying these settings.
View the Applications
You can view the configuration of the various ActivID Appliance components in the Applications menu.
-
Log on to the ActivID Console and, under Configuration in the left-hand menu, select Applications.
-
To configure an application, click the Edit Settings for the application:
- ActivID Authentication Server – the core server that provides the authentication infrastructure to meet cross-channel requirements.
- ActivID Authentication Portal – the portal that provides the authentication services. This component is required for authentication to the ActivID Management Console.
- ActivID Management Console – the web-based interface to manage the authentication system.
- ActivID Self-Service Portal – the web-based interface that offers end users activation and management services for soft and hardware authentication devices.
- ActivID RADIUS Front End – enables OTP and static password authentication using the RADIUS protocol
-
To initiate a restart of all the deployed applications, Restart All Applications.
-
If you have made any changes to the RADIUS configuration, then click Restart RADIUS Front End to restart the RADIUS service.

Configure the ActivID Authentication Server Settings
- Log on to the ActivID Console and, under Configuration in the left-hand menu, select Applications.
-
Click Edit Settings for the ActivID Authentication Server in the Applications list.
-
For backward compatibility, legacy ActivID SOAP API based on AXIS 1.4 web service is still supported for client applications that cannot be migrated to the new JAX-WS web service.
- Edit the settings as required.
- The user “jdoe” can authenticate if you enter “JDOE” in the login page username field.
- The user “jdoe” is returned in a user search if you enter “JDOE” in the search field.
- You are unable to create simultaneously a “JDOE” and a “jdoe” user. A warning message appears reporting the user already exists.
- The user “jdoe” is unable to authenticate if you enter “JDOE” in the login page username field, they can only authenticate if they enter “jdoe”.
- The user “jdoe” is not returned in a user search if you enter “JDOE” in the search field, only if you enter “jdoe”.
- You are able to create simultaneously a “JDOE” and a “jdoe” user.
- true
- false (default)
- True (default)
- False
-
Always Succeeds check before
-
Always Fails check before
This mapping is shared by all security domains.
Setting FORCE_SERVER_GENERIC_RULE to true enables this mapping for generic dictionary attribute used in check before authorization profile rules when the comparison attribute selected in the check before rule is a static value. When the comparison attribute selected in the check before rule is dynamic (ActivID AS attribute), the check before attribute from generic dictionary is mapped to the attribute coming with the authentication request.
-
none – no audit verification will occur.
-
sequences – defines that only the sequential integrity of audit data will be verified.
-
allRows – defines that all audit data found within the search date range will be verified, regardless of other criteria.
-
sequencesAndMatchedRows – defines that the sequential integrity* of audit data will be verified, in addition to audit data that matches all the search criteria.
- When set to ALLOW, authentications will continue but they will not be audited.
- When set to DENY, authentications will fail.
- When set to ALLOW, all other operations will continue but they will not be audited.
- When set to DENY, all other operations will fail.
- ILLEGAL_ADAPTER_TYPE [1019] The adapter type is invalid.
- ILLEGAL_AUTHENTICATION_MODE [1017] Illegal authentication mode.
- ILLEGAL_AUTHENTICATOR_STATUS [1001] An authenticator status parameter is not one of the allowed values.
- ILLEGAL_DEVICE_ISSUANCE_REQUEST_STATUS [1015] A device issuance request status parameter is not one of the allowed values.
- ILLEGAL_EXTERNAL_CREDENTIAL_TYPE [1020] The external credential type is invalid.
- ILLEGAL_LDAP_MAPPING [1024] Illegal LDAP Mapping attribute.
- ILLEGAL_RESOURCE_TYPE [1028] Resource Type is invalid.
- ILLEGAL_SECURITY_DOMAIN [1018] The security domain is invalid.
- ILLEGAL_TRANSACTION_TYPE [1027] Transaction Type is invalid.
- ILLEGAL_USER_STATUS [1026] User status is invalid.
- INVALID_DATE_ORDER [1007] Date parameters are in an invalid order, for example start date after end date.
- INVALID_FORMAT [1006] A parameter was of an invalid format.
- NOT_A_NUMBER [1010] A parameter representing a numeric value is too large (positive or negative) to be converted into a number.
- PARAMETER_NOT_SUPPORTED [1009] A value has been specified for a parameter that is not supported.
- PARAMETER_NULL [1000] A parameter was null.
- PROFILE_INVALID [1021] Profile is invalid.
- STM_INVALID_PARAMETERS [1030] STM device activation failed due to invalid parameter.
- TOO_LONG [1008] A parameter is too long.
- USERCODE_OR_DEVICESEARCHCRITERIA_SHOULD_BE_SPECIFIED [1016] The device authentication request should have a usercode or device search criteria.
- SESSION_DOES_NOT_EXIST [1901] The session does not exist.
- SESSION_INVALID_USER [1904] The session has an invalid user associated with it.
- NO_FUNCTION_PRIVILEGE [1400] No function privilege to call this method
- INVALID_SIGNATURE [301] database Record is tainted
- STM_PUSH_ACTIVATION [951] Error has occurred while activating a push-based HID Approve™ device
-
true – allows permissive responses for direct authentications (not safe), then exceptions and reason codes are returned
-
false – does not allow permissive responses for direct authentications (recommended), only a Response code is returned
- true
- false
-
Click Save and Restart All Applications to apply your changes.

Select Enable ActivID Legacy API (backward compatibility with AXIS 1.4 clients) to activate the support.
The properties are organized into the following categories:
By default, user search and user authentication are not case-sensitive and the user case sensitivity is set to false. This means that:
If user case sensitivity is set to true:
|
Value |
false |
|---|---|
|
Description |
To enable user case sensitivity, set this property to true. Possible values: |
|
Value |
true |
|---|---|
|
Description |
It is possible to automatically resynchronize soft PIN-enabled devices by entering either OTP only, or soft PIN + OTP. This flag can be set to false if you want to define that entering both the soft PIN and the generated OTP is mandatory to resynchronize soft PIN-enabled devices. |
|
Value |
5 |
|---|---|
|
Description |
Defines a tempo (in milliseconds) to wait between the devices import inside a batch. This avoids overloading the CPU by device import background task. |
|
Value |
*,*,0/10 |
|---|---|
|
Description |
Configuration for scheduling Large Device Import timer using cron expressions. |
|
Value |
10000 |
|---|---|
|
Description |
Used by the LDAP adaptors. Defines the LDAP connection timeout in milliseconds. |
|
Value |
10000 |
|---|---|
|
Description |
Used by the LDAP adaptors. Defines the LDAP read timeout in milliseconds. |
|
Value |
none |
|---|---|
|
Description |
Adapter class to be invoked on UserManager calls. For example: com.hid.ai.interceptor.LoggingInterceptor |
|
Value |
true |
|---|---|
|
Description |
Defines if the audit log is tokenized (anonymized) to protect PII data. For further information about anonymization, see Protecting Personal Data with ActivID Appliance. Possible values: |
Disclaimer: If your organization requires audit log data to be detokenized for specific needs and usages, HID Global offers guidance in the form of APIs, sample code, and utilities, and it is recommended to adopt that approach while leaving the audit tokenization feature enabled.
Prior to disabling audit tokenization, it is recommended that you consult with your legal department to align with your organization’s policies with regard to the processing of personal data.
Searches performed in the ActivID Appliance portals can place a large load on the application. The number of records displayed should be limited to a reasonable size. The ActivID Authentication Server contains a method to limit the number of records that can be returned from the database. Returning larger result sets does place a strain on the server in terms of memory (need to keep the result set) and in terms of HSM load since ActivID Appliance verifies each records data signature.
If search performance is slow, very slowly, or there are 'out of memory' errors on ActivID Appliance nodes, you might need to adjust the search limits.
It is recommended that search limits (with a property name starting with SEARCH_) should be kept to a reasonable size (such as the default values).
For example, to configure User or Device search parameters, update the following:
|
Value |
100 |
|---|---|
|
Description |
Defines the maximum number of users returned in the search results. |
|
Value |
20 |
|---|---|
|
Description |
Defines the maximum number of assets returned in the search results. |
|
Value |
100 |
|---|---|
|
Description |
Defines the maximum number of audit log records returned in the search results. |
|
Value |
100 |
|---|---|
|
Description |
Defines the maximum number of tokens returned in the search results. |
|
Value |
100 |
|---|---|
|
Description |
Defines the maximum number of user asset transaction set privileges returned in the search results. |
|
Value |
150 |
|---|---|
|
Description |
Defines the maximum number of device issuance requests returned in the search results. |
|
Value |
100 |
|---|---|
|
Description |
Defines the maximum number of LDAP users returned in the search results. |
The user or device search performed in the ActivID Management Console will take into account the portal-specific limits.
The user attribute mapping is used in the context of the Authorization Profiles Selection Rules:
This is the default configuration.
When the setting is false, the check before attribute from generic dictionary is mapped to authentication request attribute.
|
Value |
true |
|---|---|
|
Description |
Defines if the attribute mapping defined below is used to force the mapping of generic attributes to ActivID Appliance attributes. |
The following entries define the mapping of attributes that applies when FORCE_SERVER_GENERIC_RULE is true.
| Property name | Property value |
|---|---|
|
Date-of-Birth |
DOB |
|
Title |
TITLE |
|
User-Type |
USER_TYPE |
|
Last-Success-Auth |
LAST_AUTH |
|
Type-Of-System |
ATR_SYSTYP |
|
E-Mail-Address |
ATR_EMAIL |
|
Mobile-Phone-Number |
ATR_MOBILE |
|
Address-Line-1 |
ADDRESS1 |
|
Address-Line-2 |
ADDRESS2 |
|
Address-Line-3 |
ADDRESS3 |
|
Address-Line-4 |
ADDRESS4 |
|
City |
CITY |
|
Post-Code |
POSTCODE |
|
First-Name |
FIRSTNAME |
|
Last-Name |
LASTNAME |
|
Custom-Attribute-1 |
|
|
Custom-Attribute-2 |
|
|
Custom-Attribute-3 |
|
|
Custom-Attribute-4 |
|
|
Custom-Attribute-5 |
|
|
Custom-Attribute-6 |
|
|
Custom-Attribute-7 |
|
|
Custom-Attribute-8 |
|
|
Custom-Attribute-9 |
|
|
Custom-Attribute-10 |
|
The following codes are the RFE forward reasons codes that are enabled by default. The complete list of reason codes can be found in the ActivID Appliance API Javadoc documentation.
To modify the settings, update the values in the following settings.
|
Value |
0 − Reason indicating that the authenticator could not be found 1 − Reason indicating that the authenticator is disabled 7 − Reason indicating that the authenticator is not yet valid 8 − Reason indicating that the authenticator is expired 15 − Reason indicating that the user was not found 19 − Reason indicating a password's maximum usages has been reached 20 − Reason indicating the device is not valid 23 − Reason indicating that no valid credentials were found 26 − Reason indicating that amount value for EMV CAP verification is invalid, It must not have decimal character and it should be a numeric value |
|---|---|
|
Description |
Defines the authentication RFE forward reason codes. |
|
Value |
1 − Reason indicating that challenge counter reached disable threshold |
|---|---|
|
Description |
Defines the challenge RFE forward reason codes. |
|
Value |
1200 − A user with the specified code (external reference) could not be found 1261 − A device with the specified ID could not be found 1270 − An authenticator could not be found 6058 − There was no active device on the authenticator 6200 − No active authenticator was found for dynamic authenticator selection get Challenge request 6201 − No active authenticator was found for dynamic authenticator selection Device Authentication request 6202 − No active authenticator was found for dynamic authenticator selection UP Authentication request |
|---|---|
|
Description |
Defines the error RFE forward reason codes. |
|
Value |
^get\\S*,^search\\S*,hasFunctionPrivilege,isRFEConfigurationStale |
|---|---|
|
Description |
Defines the audit events that should not be stored in the database (to avoid filling the database with unnecessary events). The value is a regular expression of EventID to exclude. |
|
Value |
sequencesAndMatchedRows |
|---|---|
|
Description |
Define the behavior for verifying the audit record during audit search (using the API or using the ActivID Management Console Reporting tab). Possible values: |
|
Value |
DENY |
|---|---|
|
Description |
Defines if ActivID Appliance will allow authentication to the domain when the audit log fails: For further information about log resilience, see Change the Audit Log Resilience Levels. |
|
Value |
DENY |
|---|---|
|
Description |
Defines if ActivID Appliance will allow other configuration processes for the domain when the audit log fails: For further information about log resilience, see Change the Audit Log Resilience Levels. |
|
Value |
1019,1017,1001,1015,1020,1024,1028,1018,1027,1026,1007,1006,1010,1009,1000,1021,1030,1008,1016,1901,1904,301,1200 |
|---|---|
|
Description |
ActivID Appliance also provides a system to send notifications of runtime errors generated by Web service API calls. This allows monitoring systems (listening JMX notifications) to detect systemic attacks (such as denial-of-service attacks) performed by external applications calling the ActivID public API. The error notifications enabled by default are: InvalidParameterException (Constants) ALSIInvalidException (Constants) |
|
Value |
1400,301,951 |
|---|---|
|
Description |
The default audit error codes. |
|
Value |
false |
|---|---|
|
Description |
Defines if responses for direct authentication failures should contain details of the exceptions. Possible values: |
When LOGIN_POLICY_SESSION_DUPLICATE_FAIL_<DOMAIN> is false (the default), then the ActivID Authentication Portal allows concurrent login.
The Concurrent Login Policy enables you to limit active sessions to a single session at a time for a single user account. Concurrent Login Policy is configured globally per domain.
When the concurrent login policy is enabled, only one login session is permitted per user. Within the same browser session, different service providers/channels can be accessed for the same user account using the same session.
When the same user tries to access a service provider (for example, the ActivID Management Console) from another browser session, the authentication is denied as long as the other session remains opened. The user must wait until the other session is closed or is timed-out.
If a user tries to launch a concurrent login session, the error message “Login is denied. You cannot log on as long as your previous session remains open. Log out from the previous session or wait for the session to time out and try again” is displayed.
|
Value |
false |
|---|---|
|
Description |
Defines how the ActivID Authentication Portal manages concurrent login for the same user account, where <DOMAIN> is the domain name. Possible values: |
You can define the settings to check the trust chain of client certificate on import and certificate revocation status for PKI C/R authentication.
|
Value |
15 |
|---|---|
|
Description |
TCP connection timeout in seconds. |
|
Value |
10 |
|---|---|
|
Description |
TCP read timeout in seconds. |
|
Value |
10 |
|---|---|
|
Description |
For performance reasons, certificate revocation lists (CRL) are cached. Defines the validity of cached CRL responses in hours. |
|
Value |
10 |
|---|---|
|
Description |
For performance reasons, Online Certificate Status Protocol (OCSP) responses concerning intermediate CA certificates are cached. Defines the validity of cached OCSP responses in hours. This setting only applies to responses for intermediate CA certificates. OCSP responses for end-user certificates are not cached. |
|
Value |
30 |
|---|---|
|
Description |
Defines the black list period for URLs of unreachable CDP or OCSP responders in seconds. During this period, the system will failover, if available, to the redundant URL. |
|
Value |
true |
|---|---|
|
Description |
Defines if certificate revocation check is performed at authentication time. If the certificate revocation status is already checked at the TLS termination, you do not need to perform this check at authentication. |
|
Value |
true |
|---|---|
|
Description |
Defines if certificate revocation check is performed when importing certificates. |
|
Value |
true |
|---|---|
|
Description |
Defines if the certificate path validation is disabled for any legacy certificates credentials that could not be validated (due to missing intermediate certificates). |
|
Value |
false |
|---|---|
|
Description |
As many OCSP responders do not use the nonce to create a different response for each request, you can disable the nonce verification. |
|
Value |
true |
|---|---|
|
Description |
OCSP and CRL can both be used to check the revocation status of a certificate. If both methods are available, defines if OCSP is the preferred method. |
|
Value |
true |
|---|---|
|
Description |
If a forward proxy is configured, web-based (not LDAP) CRL downloads and OCSP requests will use this proxy by default. To use a local OCSP responders or CRL Distribution Points, set this setting to false. |
|
Value |
true |
|---|---|
|
Description |
By default OCSP requests use SHA256-based certificate ID. In case of compatibility issues, you might have to use SHA1 certificate ID by setting this to false. |
|
Value |
none |
|---|---|
|
Description |
By default, there is no restriction on the OCSP response signature algorithms. Specifies a comma separated list of valid OCSP response signature algorithm OID (see RFC 2313). |
|
Value |
none |
|---|---|
|
Description |
Specifies a comma-separated list of redundant CDP URLs that will be used in place of the CDPs defined in the certificates. |
Configure the ActivID Authentication Portal Settings
- Log on to the ActivID Console and, under Configuration in the left-hand menu, select Applications.
-
Click Edit Settings for the ActivID Authentication Portal in the Applications list.
- Edit the settings as required.
-
Click Save and Restart All Applications to apply your changes.

|
Value |
60 |
|---|---|
|
Description |
Timeout (in seconds) for Push-based logon. |
|
Value |
false |
|---|---|
|
Description |
Constraint on Domain (required or optional in the authentication request). For further information, see Enforce the Domain Requirement in the Authentication Request. |
|
Value |
http:// |
|---|---|
|
Description |
Authorized URLs for VPN Push operations. |
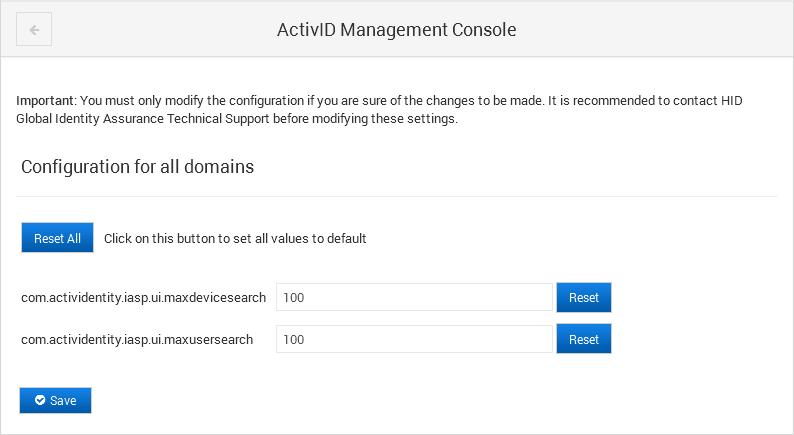
Configure the ActivID Management Console Settings
You can define user and device search limits that will override those set in the ActivID Authentication Server settings.
- Log on to the ActivID Console and, under Configuration in the left-hand menu, select Applications.
-
Click Edit Settings for the ActivID Management Console in the Applications list.
- Edit the settings as required.
-
Click Save and Restart All Applications to apply your changes.
|
Value |
100 |
|---|---|
|
Description |
Maximum numbers of devices displayed by the ActivID Management Console for a device search. |
|
Value |
100 |
|---|---|
|
Description |
Maximum numbers of users displayed by the ActivID Management Console for a user search. |
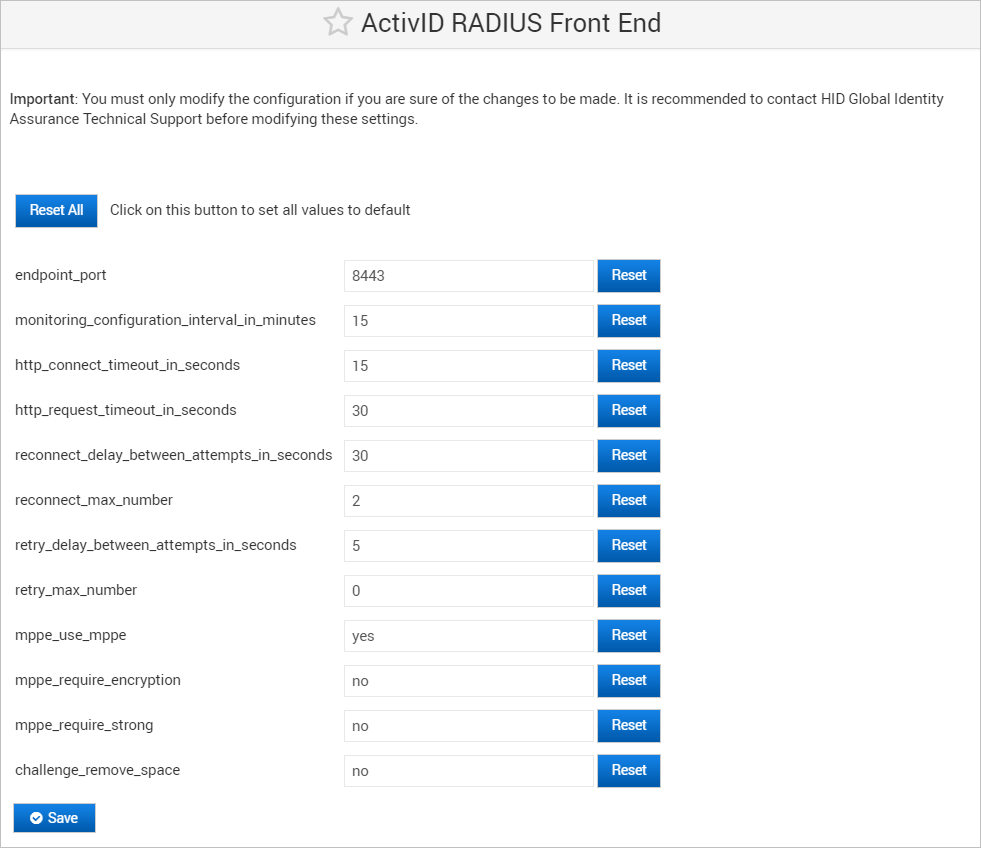
Configure ActivID RADIUS Front End Settings
- Log on to the ActivID Console and, under Configuration in the left-hand menu, select Applications.
-
Click Edit Settings for the ActivID RADIUS Front End in the Applications list.
-
Edit the settings as required.
- Minimum: 0 (disables monitoring)
- Maximum: 1440
- Minimum: 1
- Maximum: 30
- Minimum: 0
- Maximum: 60
- Minimum: 5
- Maximum: 600
- Minimum: 0
- Maximum: 10
- Minimum: 1
- Maximum: 600
- Minimum: 0
- Maximum: 10
- If no, value is set to 0x00000001
- If yes, value is set to 0x00000002
- If no, value is set to 0x00000006
- If yes, value is set to 0x00000004
-
Click Save to apply your changes.
-
Click Return to Applications, and, in the Applications page, click Restart RADIUS Front End.
-
When prompted to restart RADIUS Front End, click Ok.
-
When the success message appears, click Close.
|
Value |
8443 |
|---|---|
|
Description |
Port number to communicate with ActivID Appliance. The default port is for TLS with mutual authentication. |
|
Value |
15 |
|---|---|
|
Description |
RFE configuration monitoring interval in minutes. Defines the interval (in minutes) between each check of RFE configuration updates. The RFE configuration updates are retrieved by the RFE from the appliance. Values allowed: |
|
Value |
15 |
|---|---|
|
Description |
The timeout (in seconds) allowed for the http connection to the server. This only applies to connection phase and has no impact once the connection is established. Values allowed: |
|
Value |
30 |
|---|---|
|
Description |
The timeout (in seconds) allowed for the HTTP request operation. Values allowed: The value 0 means no timeout is applied. |
|
Value |
30 |
|---|---|
|
Description |
Number of seconds between each direct user reconnection attempt. Values allowed: |
|
Value |
2 |
|---|---|
|
Description |
Maximum number of direct user reconnection attempts before rejecting the current authentication request. The direct user reconnection attempt is typically used when a direct user session has expired and has to be renewed. Values allowed: |
|
Value |
5 |
|---|---|
|
Description |
Number of seconds between operation attempts (direct user authentication at RFE startup, indirect user authentication, reset authenticator counter, is RFE configuration stale). Values allowed: |
|
Value |
0 |
|---|---|
|
Description |
Maximum number of retries to perform the current operation (direct user authentication at RFE startup, indirect user authentication, reset authenticator counter, is RFE configuration stale). If the maximum number of retries is reached, the current operation is rejected. Values allowed: |
|
Value |
yes |
|---|---|
|
Description |
Indicates if MPPE attributes (“MS-MPPE-Encryption-Policy”, “MS-MPPE-Encryption-Types”) have to be sent to the NAS after a successful indirect user authentication using protocol MSCHAPv1 or MSCHAPv2. |
|
Value |
no |
|---|---|
|
Description |
Indicates which value should be set for the “MS-MPPE-Encryption-Policy” attribute. |
|
Value |
no |
|---|---|
|
Description |
Indicates which value should be set for the “MS-MPPE-Encryption-Types” attribute. |
|
Value |
no |
|---|---|
|
Description |
Generates challenges without a space in RADIUS challenge/response authentication. |


