Creating the VM using Microsoft Azure
The ActivID Appliance delivery package for Microsoft Azure deployment is delivered as a single zip file containing two VHD files:
-
ActivID_Appliance_8.7.0.503-disk1.vhd
-
ActivID_Appliance_8.7.0.503-disk2.vhd
Import the Virtual Disks into Microsoft Azure
The ActivID Appliance delivery package is available
You have a Microsoft Azure account with the rights to create resources for a new virtual machine
You need a minimum of 200 GB free disk space on your host
You can import the virtual disk files using the Microsoft Azure Storage Explorer.
-
On your Microsoft Windows host, extract the two VHD files from the ActivID Appliance delivery package.
Important: You need a minimum of 200 GB free disk space on your host. -
In the Microsoft Azure portal:
-
Create a Resource group - see Use the Azure portal and Azure Resource Manager to Manage Resource Groups - Azure Resource Manager | Microsoft Learn
-
Create a storage account - see Create an Azure storage account - Azure Storage | Microsoft Learn
At minimum, set the following values for the storage account:
-
Resource group - select the resource group you just created
-
Primary service - select Azure Blob Storage or Azure Data Lake Storage Gen 2
Important: Make sure the Enable hierarchical namespace option is NOT enabled. -
-
Once the storage account is created, expand Data storage in the left menu and select Containers.
-
Create a new container for the ActivID Appliance VHD disks you will upload in the next step.
-
-
On your Microsoft Windows host:
-
Install the Microsoft Azure Storage Explorer - see Get started with Storage Explorer | Microsoft Learn
-
Using the Azure Storage Explorer, upload the two ActivID Appliance disks to the new container in the Storage account you created above - see Manage Azure Blob Storage resources with Storage Explorer | Microsoft Learn
-
Create a Managed Disk in Microsoft Azure
You have a Microsoft Azure account with the rights required to create an image and publish a new virtual machine
You have imported the VHD disk files and they are ready to be used
-
In the Microsoft Azure portal, select All Services in the left menu and, under Storage, select the Disks service (or use the filter field).
Alternatively, go to the Microsoft Azure Marketplace and search for Managed Disks.
-
Click Create.
-
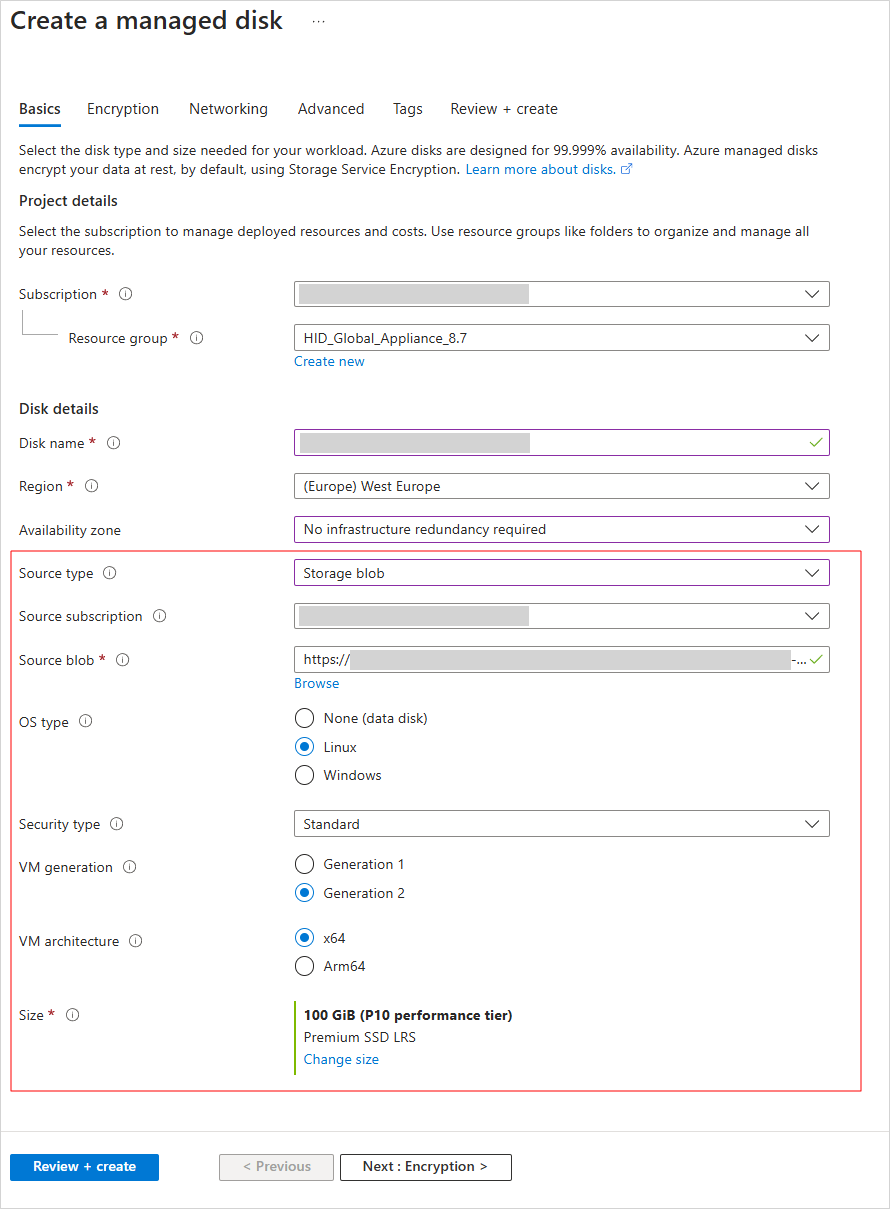
Create a managed disk with the following values:
Parameters Values Resource group Select the resource group you created above Source type Storage Blob Source Blob
-
Click Browse and navigate to the storage account container where you uploaded the ActivID Appliance disks.
-
Select your first VHD file (ActivID_Appliance_8.7.0.503-disk1.vhd).
OS type Linux VM generation Generation 2 VM architecture x64 -
- In the Size section, click Change size.
-
Set the Custom disk size to 100 GiB and click OK.
-
Set the values of the other parameters according to your requirements.
Create a New Virtual Machine in Microsoft Azure
-
In the Microsoft Azure portal, refresh your resources and select the managed disk you just created.
-
Click Create VM.
-
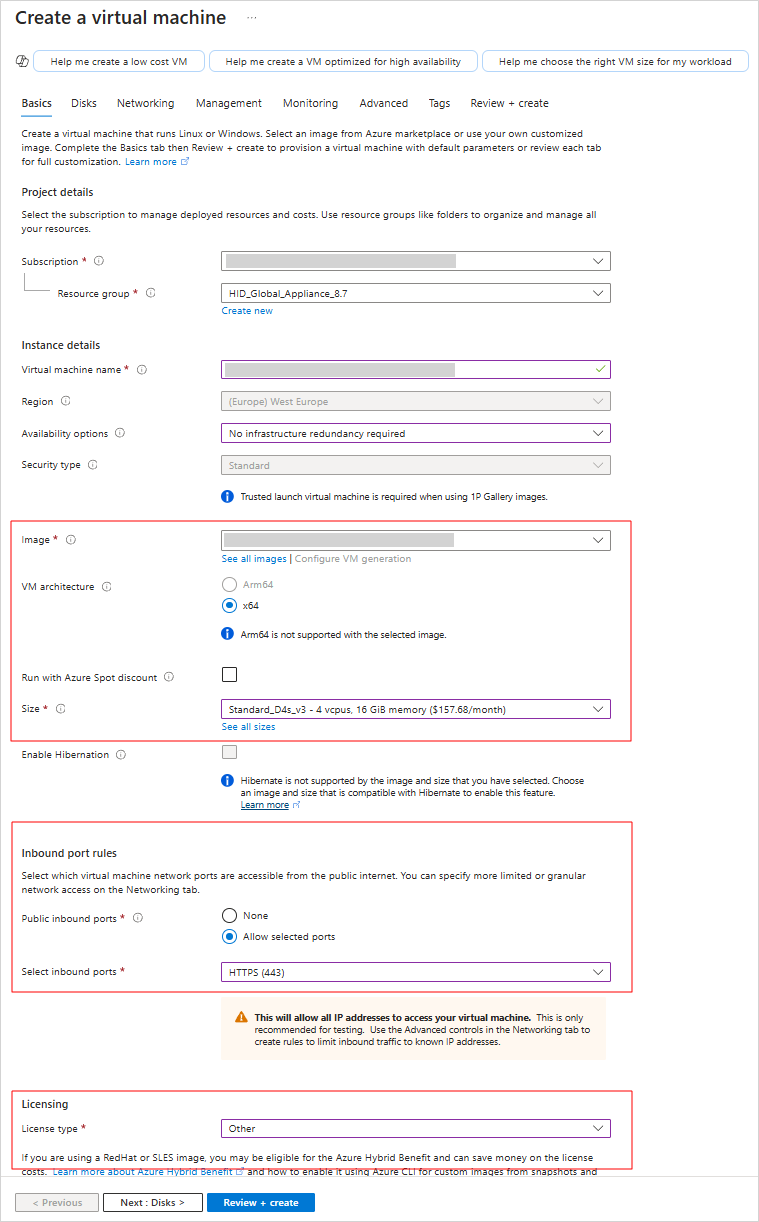
Configure the VM Basics parameters:
Section Parameters Values Instance details Image Select the Managed disk name you created above VM architecture x64 Size Click See all sizes and select at least D4s_v3 (in the D-Series v3) category Inbound port rules Public inbound ports Allow selected ports Select inbound ports HTTPS (443) Licensing License type Other - Click Next : Disks.
-
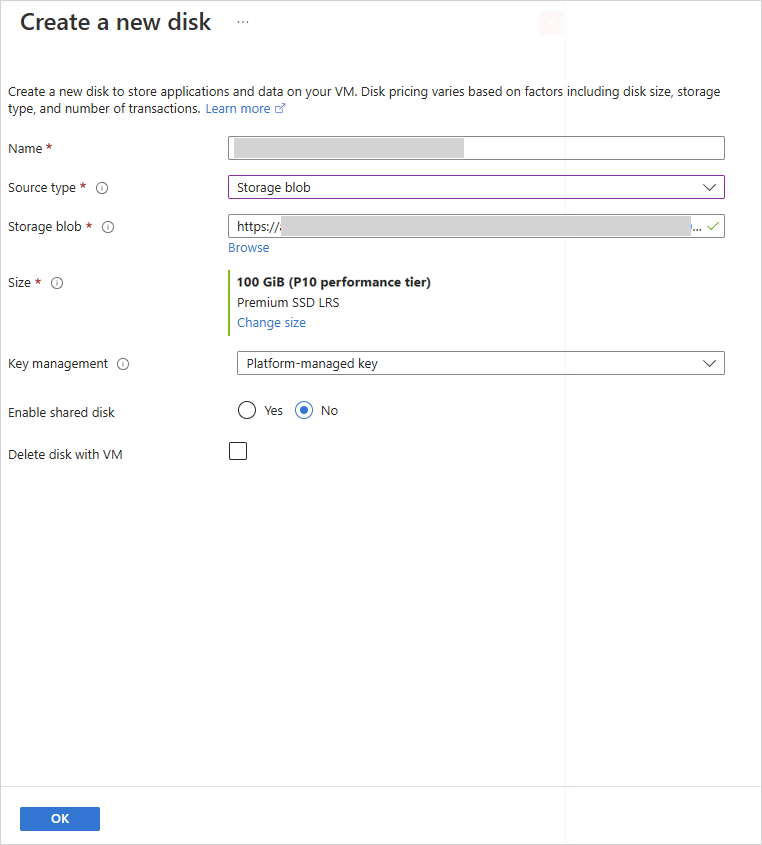
Configure the VM Disks parameters:
-
Go the Data disks for <your virtual machine name> section and click Create and attach a new disk.
-
Set parameter values as follows:
Parameters Values Source type Storage blob Storage blob
-
Click Browse and navigate to the storage account container where you uploaded the ActivID Appliance disks.
-
Select your second VHD file (ActivID_Appliance_8.7.0.503-disk2.vhd.
-
- In the Size section, click Change size.
-
Set the Custom disk size to 100 GiB and click OK.
-
Click Next : Networking.
-
-
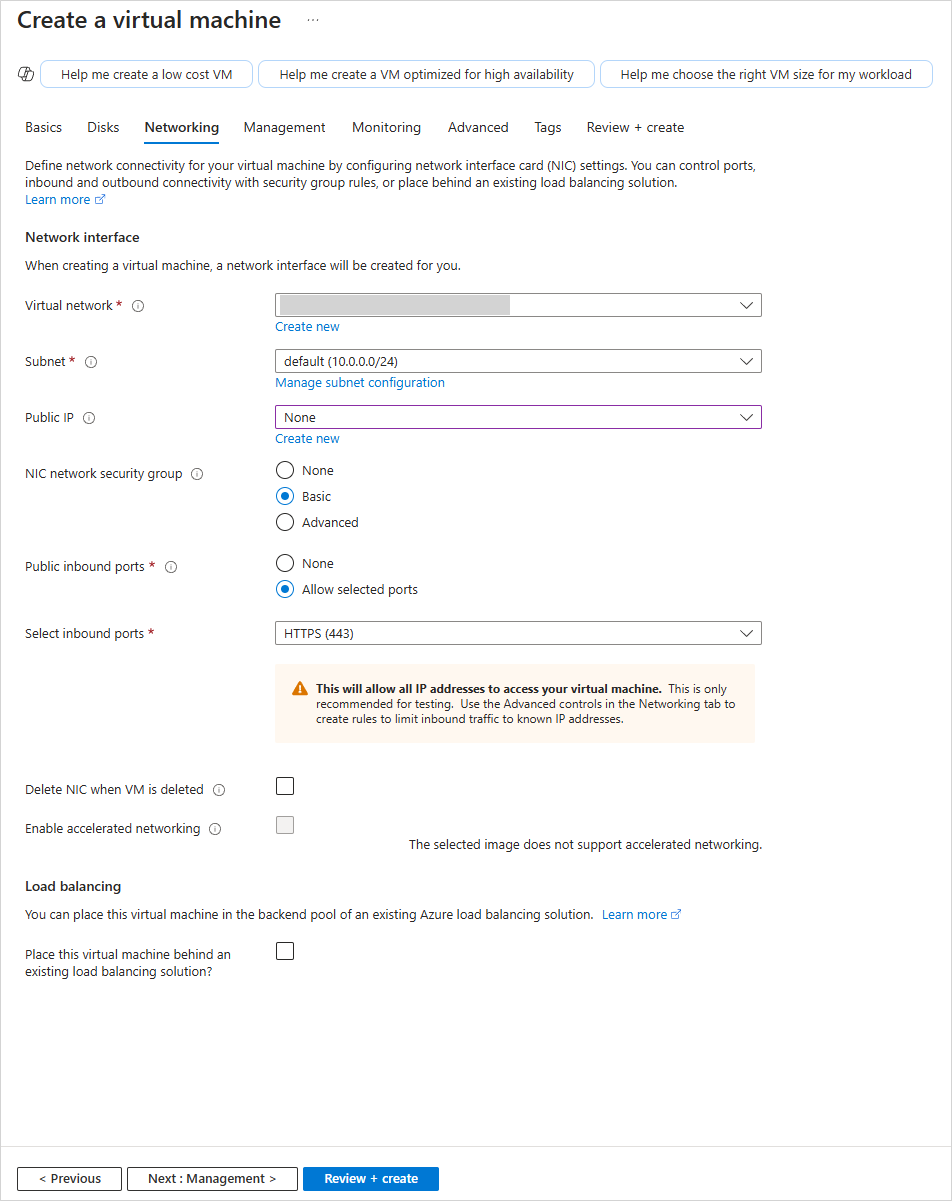
Configure the VM Networking settings:
-
Set parameter values as follows:
Parameters Values Virtual network
Click Create new to create a new virtual network for your first ActivID Appliance VM
Note: You will be able to re-use this new virtual network for the second node of your high availability (HA) deployment.Public IP None NIC network security group Basic Public inbound ports Allow selected ports Select inbound ports HTTPS (443) -
Click Next : Management and then Next: Monitoring.
-
-
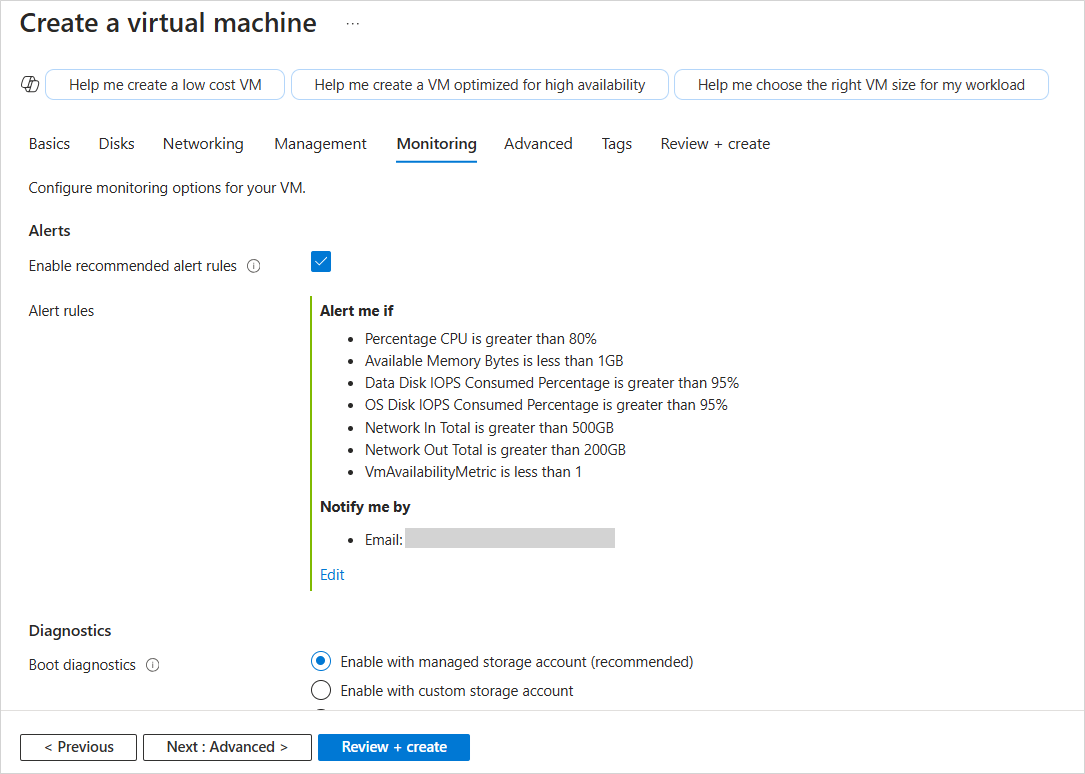
Optionally, configure the VM Monitoring settings:
-
Under Alerts, select the Enable recommended alert rules option.
-
Click Configure, select the required alert rules and then click Save.
-
-
Click Review + create.
-
Verify the configuration is correct and then click Create.
Configure the Inbound Security Rules
-
Expand Networking in the left menu for your ActivID Appliance VM and select Network settings.
-
In the Rules section, click on the link for the Network security group of your ActivID Appliance VM.
-
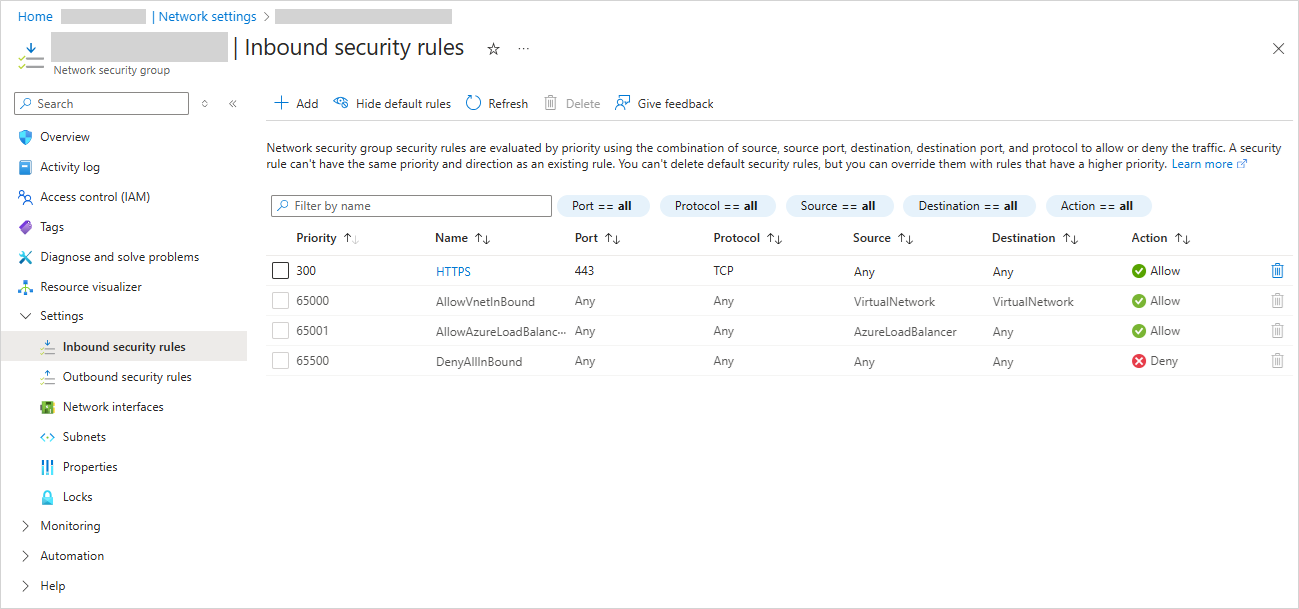
Expand Settings in the left menu and select Inbound security rules.
-
Click Add and apply the following port configuration on the network firewall(s) in front of your ActivID Appliance VM:
Source/Source port ranges/Destination/Service Port Protocol For Reference Any/*/Any/Custom
40
TCP
Application - sshd service
Used for Emergency SSH access for administrators
Note: Adapt the configuration to meet the requirements of your security policy.Any/*/Any/Custom
161
UDP
Application - SNMP Monitoring
Used for SNMP-based notification messaging (opened only if SNMP has been enabled)
Any/*/Any/Custom
1004
TCP
Application - OpenWire (AMQ)
Used for ActiveMQ Broker (JMS messaging)
Any/*/Any/Custom
1005
TCP
Application - HTTPS
Used for the ActivID Console
Any/*/Any/Custom
1812
UDP
Application - RADIUS authentication
User for VPN, Routers, Network and Remote Access Device
Any/*/Any/Custom
8443
TCP
Application - HTTPS (mutual authentication)
Used for the ActivID Management Console, Authentication Portal, Self Service Portal, Web Services
Important: In High Availability mode, ActivID Appliance requires reliable inter-node communication to replicate the data between the two nodes.- Make sure that the bandwidth and latency on the route between the two appliances are sufficient for replication.
- If you have a VLAN between the two nodes, you have to be particularly careful with the resources dedicated to this VLAN.
- ActivID Appliance uses IPSec to encrypt the communications over the channel.
- If the appliances are not on the same subnet, then you have to open the IP Protocol ID 50 (required for Encapsulating Security Protocol (ESP) traffic to be forwarded) and the following ports for IPSec communication:
Port Type Application Description 500 UDP IKE IPSec Channel 4500 UDP NAT-Transversal NAT
For further information, see Managing the Network Configuration.
At this stage, the ActivID Appliance is up and running.
Configure Network Access to the ActivID Appliance
In its current state, the ActivID Appliance is not accessible from outside its Virtual Network even though the SSH and HTTP ports are open.
There are several ways to configure the access to the ActivID Appliance from outside its Virtual Network and obtain the hostname required to access the ActivID Appliance portals.
For example, you can use one of the following methods depending on your requirements:
-
From behind a Microsoft Azure Load Balancer - see Microsoft Azure Load Balancer | Microsoft Learn
-
Balancing the web traffic load with URL-based routing using Azure Application Gateways - see Tutorial: Configure an Application Gateway with TLS termination using the Azure portal | Microsoft Learn
-
Deploy a Microsoft Azure Virtual Desktop in the virtual private network and access the ActivID Appliance through a Bastion - see Microsoft Azure Bastion | Microsoft Learn
Before you configure and initialize the appliance, it is recommended that you create a snapshot of its Initial State.
Back Up the Initial State of the Virtual Machine
Before you configure and initialize the appliance, it is recommended that you create a snapshot of its Initial State.
To revert to a clean state of the ActivID Appliance (state from which you can install latest hotfixes, perform reconfiguration and restore your latest backup), you must use the Initialized State of the virtual appliance (see Back Up the Initialized State).
Alternatively, you can revert to this Initial State of the virtual machine (appliance not configured) and restart the installation from scratch.
Your VM is now ready for initial configuration.
Next step:


