Configure the ActivID CMS User Portal
-
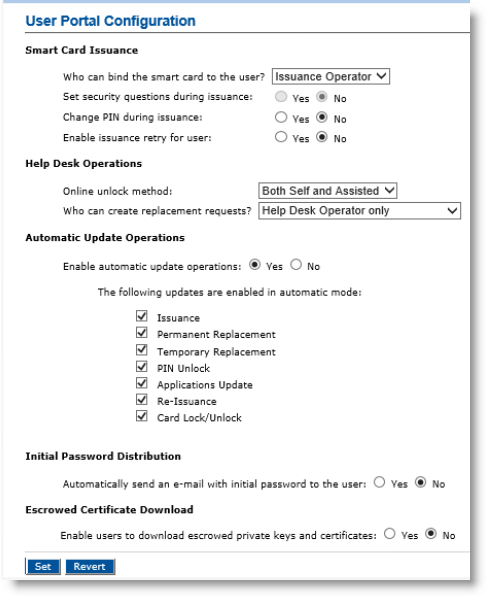
Select the Configuration tab, and then click the User Portal sub-tab.
-
From the Who can bind the smart card to the user? drop-down list, select one of the following options:
-
Issuance Operator—An Issuance operator binds a device to a user before it is given to the user.
- User—The user can bind the device during self-enrollment.
Giving the user the rights to bind devices reduces the operator’s workload, but it also reduces the control over the devices distributed. For more information, see Binding a Device.
Important: When working with virtual smart cards, you must select User from the Who can bind the smart card to the user? drop-down list as the binding operation is done automatically during self-issuance. Operators cannot bind a virtual smart card in advance. For more information, see Prerequisites for Using Virtual Smart Cards. -
-
For the Set security questions during issuance option, select Yes if you want the user to initialize the security questions at the end of the self-enrollment process.
-
For the Change PIN during issuance option, select Yes if you want the operator to request the user to enter their final PIN at the end of the local issuance.
-
For the Enable issuance retry for user option, select Yes if you want to users to be able to retry issuance or update operations from the User Portal. For details, refer to the ActivID CMS User online documentation.
-
From the Online unlock method drop-down list, select one of the following options:
-
Self Online Only—The user can unlock the device without the help of a Help Desk operator.
-
Assisted Online Only—A Help Desk operator must create an unlock request before the device can be unlocked using the ActivID CMS User Portal. In this case, the end user will have to contact the Help Desk to unlock the device. Select this method if you want ActivID CMS operators to have increased control over device unlock processes.
- Both Self and Assisted—Enable both of the above methods.
-
This setting also applies to reset PIN feature.
-
When working with virtual smart cards, select Both Self and Assisted.
Note: -
-
From the Who can create replacement requests? drop-down list, select the person who can create replacement device requests:
-
Help Desk Operator only—A user must declare a device incident through the ActivID CMS User Portal, and a Help Desk operator must create a device replacement request. The issuance then takes place locally or using self-enrollment.
-
User only—A user can create the replacement device request. Once this request is approved by an ActivID CMS operator, the issuance can take place locally or using self-enrollment. A device replacement request is automatically created.
- Both Help Desk Operator and User—Both the Help Desk operator and a user can create a replacement request.
Note: When working with virtual smart cards, select Both Help Desk Operator and User.For details on the replacement processes, see Issuing a Replacement Device.
-
-
For the Enable automatic update operations option, select Yes if you want to enable device automatic update operations. Then, select the updates you want to enable. For detailed information about automatic updates, refer to ActivID ActivClient Smart Card Auto Update.
-
For the Automatically send an email with initial password to the user option, select Yes or No for the automatic sending of the Initial password by email.
If you select Yes, then the following mandatory fields appear:
Enter the SMTP Host hostname or IP address.
Enter the name of the Sender who will appear in the email.
Enter the Subject of the email containing the initial password.
- Enter the Body of the email and use the keyword INITIAL_PASSWORD. The system will automatically replace this password with the user’s real initial password just before sending the email.

-
For the Escrowed Certificate Download option, select Yes to enable end users to download escrowed private keys and certificates using the ActivID CMS User Portal.
-
Optionally, click Revert to go back to the previously saved settings.
-
Click Set.
Configure the Start Page
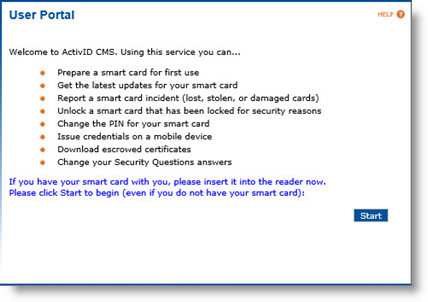
The Welcome page appears automatically in a separate window.
You can configure the default start page by changing the configuration parameters.
If the configuration parameter (ForceStartPage) is set to true, any user trying to access the /user URL is redirected to a custom ActivID CMS User Portal start page at the URL /myDigitalIDCard. This URL requires SSL server authentication and is directed to a dedicated HTML page named: System_Use_Notification.html.
Location of Sample Start Page
The sample start page is located here:
cms_install_dir\cms_portal\html\MDIDC\System_Use_Notification.html
For more information, refer to the ActivID CMS User online documentation.


